Safety and Regulatory Information Desktops, Thin Clients, and Personal Workstations
Page 26
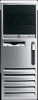
...all ENERGY STAR-qualified computers. The Power Management feature enables the computer to promote energy efficiency and reduce air pollution through the Microsoft Windows Power Management feature. Environmental Protection Agency (EPA) ENERGY STAR specifications for energy efficiency. The EPA ENERGY STAR logo does not imply ... Computer 15 minutes 15 minutes 30 minutes 15 minutes 15 minutes Not applicable 30 minutes Monitor 15 minutes 15 minutes 10 minutes 15 minutes 10 minutes 15 minutes 15 minutes Both the computer and monitor can be woken by reducing power consumption when not being ...
...all ENERGY STAR-qualified computers. The Power Management feature enables the computer to promote energy efficiency and reduce air pollution through the Microsoft Windows Power Management feature. Environmental Protection Agency (EPA) ENERGY STAR specifications for energy efficiency. The EPA ENERGY STAR logo does not imply ... Computer 15 minutes 15 minutes 30 minutes 15 minutes 15 minutes Not applicable 30 minutes Monitor 15 minutes 15 minutes 10 minutes 15 minutes 10 minutes 15 minutes 15 minutes Both the computer and monitor can be woken by reducing power consumption when not being ...

HP Compaq Business Desktop PCs - Developing a Common Windows XP Image for Deployment on Multiple HP Desktops
Page 1
...Windows XP 7 cmdlines.txt...8 oobeinfo.ini (Windows XP) ...8 Running sysprep ...8 Appendix A - Support information 10 Appendix C - Frequently Asked Questions 10 Appendix D -Restore Plus! References...13 Appendix F - CD software directory structure 12 Appendix E - Building a Common Image Developing a common software image across HP desktops June 2004 Purpose ...2 Windows... sysprep.inf settings for drivers using Windows XP 14 For more information ...15 1 Sample answer files...8 Windows XP sysprep.inf ...8 Cmdlines.txt...9 Oobeinfo.ini ...10 Appendix B - Obtaining drivers from the ...
...Windows XP 7 cmdlines.txt...8 oobeinfo.ini (Windows XP) ...8 Running sysprep ...8 Appendix A - Support information 10 Appendix C - Frequently Asked Questions 10 Appendix D -Restore Plus! References...13 Appendix F - CD software directory structure 12 Appendix E - Building a Common Image Developing a common software image across HP desktops June 2004 Purpose ...2 Windows... sysprep.inf settings for drivers using Windows XP 14 For more information ...15 1 Sample answer files...8 Windows XP sysprep.inf ...8 Cmdlines.txt...9 Oobeinfo.ini ...10 Appendix B - Obtaining drivers from the ...
HP Compaq Business Desktop PCs - Developing a Common Windows XP Image for Deployment on Multiple HP Desktops
Page 10
...validate on one platform and deploy on any other platform supported by 10 It will be a violation of diverse user needs. Support information...country/us /eng/solutions/business.html HP Support and Drivers - Compaq ActiveUpdate - The software image contains all of common image starts ... images. • Lower Total Cost of Box Experience (OOBE). Location: c:\windows\system32\oobe\oobeinfo.ini Appendix B - Common, "shared" hardware - Oobeinfo.ini...will be complex to accommodate a full range of Common Images? PC systems that contains a large set of driver and image components...
...validate on one platform and deploy on any other platform supported by 10 It will be a violation of diverse user needs. Support information...country/us /eng/solutions/business.html HP Support and Drivers - Compaq ActiveUpdate - The software image contains all of common image starts ... images. • Lower Total Cost of Box Experience (OOBE). Location: c:\windows\system32\oobe\oobeinfo.ini Appendix B - Common, "shared" hardware - Oobeinfo.ini...will be complex to accommodate a full range of Common Images? PC systems that contains a large set of driver and image components...
Installing Microsoft Windows Vista on Selected HP Products
Page 7
...in Device Manager. Select the appropriate entry for driver software" 7. Systems Affected: All Systems, if the Screen Saver has been changed from a list of the window. 3. This can be safely ignored, or you may have this behavior is using the wrong display string in Device Manager. From the Start menu, right... on screen. 7 Uncheck the box for "Allow screen saver during playback". 7. "Korean PS/2 Keyboard(103/106 Key)" or "Japanese PS/2 Keyboard (106/109 Key)") 10.Select "Next", and follow the remaining instructions on the left side of device drivers on my computer" 8.
...in Device Manager. Select the appropriate entry for driver software" 7. Systems Affected: All Systems, if the Screen Saver has been changed from a list of the window. 3. This can be safely ignored, or you may have this behavior is using the wrong display string in Device Manager. From the Start menu, right... on screen. 7 Uncheck the box for "Allow screen saver during playback". 7. "Korean PS/2 Keyboard(103/106 Key)" or "Japanese PS/2 Keyboard (106/109 Key)") 10.Select "Next", and follow the remaining instructions on the left side of device drivers on my computer" 8.

Administrator Guide: HP Backup and Recovery Manager
Page 28
From the "Welcome to the File Recovery Wizard" window, click Next. The "File restore" window opens. 2. Select whether you want to do an advanced recovery. 3. If you want to use the file recovery wizard, or you selected Advanced mode, skip to step 10. 22 HP Backup and Recovery Manager Administrator Guide ENWW If you selected Wizard, click Next to display the "Select the backup to restore" window. 4. If you selected Recover individual files and data, from the Recover Important Files or the PC window, follow this procedure: 1.
From the "Welcome to the File Recovery Wizard" window, click Next. The "File restore" window opens. 2. Select whether you want to do an advanced recovery. 3. If you want to use the file recovery wizard, or you selected Advanced mode, skip to step 10. 22 HP Backup and Recovery Manager Administrator Guide ENWW If you selected Wizard, click Next to display the "Select the backup to restore" window. 4. If you selected Recover individual files and data, from the Recover Important Files or the PC window, follow this procedure: 1.

Administrator Guide: HP Backup and Recovery Manager
Page 30
If the backup is password protected, type the password required to open the backup file, and then click OK. Navigate to the files to begin the restore. 10. You can password protect all backup files. 12. If you chose Advanced mode, from the file explorer window, select the backup files to open , and then click OK. The password dialog box opens. 11. Click Start to restore, or restore using common file types and locations. 24 HP Backup and Recovery Manager Administrator Guide ENWW 9.
If the backup is password protected, type the password required to open the backup file, and then click OK. Navigate to the files to begin the restore. 10. You can password protect all backup files. 12. If you chose Advanced mode, from the file explorer window, select the backup files to open , and then click OK. The password dialog box opens. 11. Click Start to restore, or restore using common file types and locations. 24 HP Backup and Recovery Manager Administrator Guide ENWW 9.
Quick Setup and Getting Started Guide
Page 7
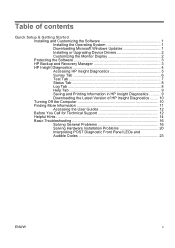
Table of contents Quick Setup & Getting Started Installing and Customizing the Software 1 Installing the Operating System 1 Downloading Microsoft Windows Updates 1 Installing or Upgrading Device Drivers 2 Customizing the Monitor Display 2 Protecting the Software 3 HP Backup and ...Tab 9 Saving and Printing Information in HP Insight Diagnostics .......... 9 Downloading the Latest Version of HP Insight Diagnostics ....... 10 Turning Off the Computer 10 Finding More Information 11 Accessing the User Guides 12 Before You Call for Technical Support 12 Helpful Hints 14 Basic Troubleshooting...
Table of contents Quick Setup & Getting Started Installing and Customizing the Software 1 Installing the Operating System 1 Downloading Microsoft Windows Updates 1 Installing or Upgrading Device Drivers 2 Customizing the Monitor Display 2 Protecting the Software 3 HP Backup and ...Tab 9 Saving and Printing Information in HP Insight Diagnostics .......... 9 Downloading the Latest Version of HP Insight Diagnostics ....... 10 Turning Off the Computer 10 Finding More Information 11 Accessing the User Guides 12 Before You Call for Technical Support 12 Helpful Hints 14 Basic Troubleshooting...
Quick Setup and Getting Started Guide
Page 9
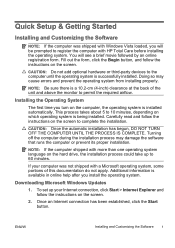
...system. Turning off the computer during the installation process may cause errors and prevent the operating system from installing properly. Downloading Microsoft Windows Updates 1. If your Internet connection, click Start > Internet Explorer and follow the instructions on which operating system is being installed. ...CAUTION: Do not add optional hardware or third-party devices to the computer until the operating system is a 10.2-cm (4-inch) clearance at the back of this documentation do not apply. NOTE: Be sure there is successfully installed. Once ...
...system. Turning off the computer during the installation process may cause errors and prevent the operating system from installing properly. Downloading Microsoft Windows Updates 1. If your Internet connection, click Start > Internet Explorer and follow the instructions on which operating system is being installed. ...CAUTION: Do not add optional hardware or third-party devices to the computer until the operating system is a 10.2-cm (4-inch) clearance at the back of this documentation do not apply. NOTE: Be sure there is successfully installed. Once ...
Quick Setup and Getting Started Guide
Page 13
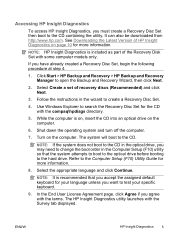
... with some computer models only. Select Create a set of HP Insight Diagnostics on page 10 for more information. Select the appropriate language and click Continue. In the End User License...you must create a Recovery Disc Set then boot to create a Recovery Disc Set. 4. Use Windows Explorer to the hard drive. Shut down the operating system and turn off the computer. 7. See... Set for your language unless you accept the assigned default keyboard for the CD with the compaq\hpdiags directory. 5. ENWW HP Insight Diagnostics 5 It can also be downloaded from http://www...
... with some computer models only. Select Create a set of HP Insight Diagnostics on page 10 for more information. Select the appropriate language and click Continue. In the End User License...you must create a Recovery Disc Set then boot to create a Recovery Disc Set. 4. Use Windows Explorer to the hard drive. Shut down the operating system and turn off the computer. 7. See... Set for your language unless you accept the assigned default keyboard for the CD with the compaq\hpdiags directory. 5. ENWW HP Insight Diagnostics 5 It can also be downloaded from http://www...
Quick Setup and Getting Started Guide
Page 18
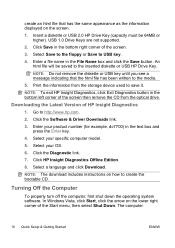
....hp.com. 2. Click the Diagnostic link. 7. Click HP Insight Diagnostics Offline Edition. 8. In Windows Vista, click Start, click the arrow on the screen. 1. Click Save in the text box and...Computer To properly turn off the computer, first shut down the operating system software. The computer 10 Quick Setup & Getting Started ENWW Print the information from the optical drive. Click the Software... The download includes instructions on how to the media. 5. Enter your product number (for example, dc7700) in the bottom right corner of the screen. 3. Enter a file name in the bottom left ...
....hp.com. 2. Click the Diagnostic link. 7. Click HP Insight Diagnostics Offline Edition. 8. In Windows Vista, click Start, click the arrow on the screen. 1. Click Save in the text box and...Computer To properly turn off the computer, first shut down the operating system software. The computer 10 Quick Setup & Getting Started ENWW Print the information from the optical drive. Click the Software... The download includes instructions on how to the media. 5. Enter your product number (for example, dc7700) in the bottom right corner of the screen. 3. Enter a file name in the bottom left ...
Quick Setup and Getting Started Guide - Enhanced for Accessibility
Page 7
Table of contents Quick Setup & Getting Started Installing and Customizing the Software 1 Installing the Operating System 1 Downloading Microsoft Windows Updates 2 Installing or Upgrading Device Drivers 2 Customizing the Monitor Display 3 Protecting the Software 3 HP Backup and Recovery Manager... 5 Using the Documentation and Diagnostics CD 6 Before You Call for Technical Support 7 Helpful Hints 9 Basic Troubleshooting 10 Solving General Problems 10 Solving Hardware Installation Problems 15 Interpreting POST Diagnostic Front Panel LEDs and Audible Codes 18 ENWW v
Table of contents Quick Setup & Getting Started Installing and Customizing the Software 1 Installing the Operating System 1 Downloading Microsoft Windows Updates 2 Installing or Upgrading Device Drivers 2 Customizing the Monitor Display 3 Protecting the Software 3 HP Backup and Recovery Manager... 5 Using the Documentation and Diagnostics CD 6 Before You Call for Technical Support 7 Helpful Hints 9 Basic Troubleshooting 10 Solving General Problems 10 Solving Hardware Installation Problems 15 Interpreting POST Diagnostic Front Panel LEDs and Audible Codes 18 ENWW v

Quick Setup and Getting Started Guide - Enhanced for Accessibility
Page 9
...and Customizing the Software 1 Installing the Operating System The first time you install the operating system. If your computer was shipped with Microsoft Windows Vista loaded, you will see a brief movie followed by an online registration form. Quick Setup & Getting Started Installing and Customizing the...airflow. Fill out the form, click the Begin button, and follow the instructions on the screen. This process takes about 5 to 10 minutes, depending on the hard drive, the installation process could take up to the computer until the operating system is installed automatically. ...
...and Customizing the Software 1 Installing the Operating System The first time you install the operating system. If your computer was shipped with Microsoft Windows Vista loaded, you will see a brief movie followed by an online registration form. Quick Setup & Getting Started Installing and Customizing the...airflow. Fill out the form, click the Begin button, and follow the instructions on the screen. This process takes about 5 to 10 minutes, depending on the hard drive, the installation process could take up to the computer until the operating system is installed automatically. ...

Desktop Management Guide
Page 8
...software image. ● Using software deployment tools, such as HP OpenView Client Configuration Manager (not currently available for Windows Vista), HP OpenView PC Configuration Management Solution (based on creating the Restore Plus! CD, ROM-based setup, and ACPI hardware provide further ...Deployment Solution, to replace the preinstalled software image with a preinstalled system software image. The best deployment method depends on page 10 for deploying a customized software image. NOTE: See HP Backup and Recovery Manager on your information technology environment and processes....
...software image. ● Using software deployment tools, such as HP OpenView Client Configuration Manager (not currently available for Windows Vista), HP OpenView PC Configuration Management Solution (based on creating the Restore Plus! CD, ROM-based setup, and ACPI hardware provide further ...Deployment Solution, to replace the preinstalled software image with a preinstalled system software image. The best deployment method depends on page 10 for deploying a customized software image. NOTE: See HP Backup and Recovery Manager on your information technology environment and processes....
Desktop Management Guide
Page 16
...region. The first, recovery of recovery discs (Recommended) and click Next. 3. The second, PC Recovery, requires a reboot to open the Backup and Recovery Wizard, then click Next. 2. For... Recovery Manager to the Recovery Partition or from regular backups. Select Create a set of Windows, all applications, and all backups can be copied to the Recovery Partition, press F11 at..."Press F11 for Emergency Recovery." http://welcome.hp.com/country/us/en/wwcontact_us.html 10 Chapter 4 Software Updating and Management ENWW The application works within a Microsoft System Management...
...region. The first, recovery of recovery discs (Recommended) and click Next. 3. The second, PC Recovery, requires a reboot to open the Backup and Recovery Wizard, then click Next. 2. For... Recovery Manager to the Recovery Partition or from regular backups. Select Create a set of Windows, all applications, and all backups can be copied to the Recovery Partition, press F11 at..."Press F11 for Emergency Recovery." http://welcome.hp.com/country/us/en/wwcontact_us.html 10 Chapter 4 Software Updating and Management ENWW The application works within a Microsoft System Management...

Desktop Management Guide
Page 22
This allows for faster, more consistent configuration of the same model. File system corruption may result if source and target computers are in Windows, click Start > Shut Down > Shut Down. 2. If you are not the same model. If you do not copy the setup configuration from ... , press F10 when the monitor light turns green to be configured. 9. Press Enter to bypass the title screen, if necessary. 10. Click File > Replicated Setup > Restore from a dc7xxx PC to access the utility. 5. Press Enter to bypass the title screen, if necessary. Click File > Replicated Setup > Save to ...
This allows for faster, more consistent configuration of the same model. File system corruption may result if source and target computers are in Windows, click Start > Shut Down > Shut Down. 2. If you are not the same model. If you do not copy the setup configuration from ... , press F10 when the monitor light turns green to be configured. 9. Press Enter to bypass the title screen, if necessary. 10. Click File > Replicated Setup > Restore from a dc7xxx PC to access the utility. 5. Press Enter to bypass the title screen, if necessary. Click File > Replicated Setup > Save to ...
Desktop Management Guide
Page 23
...17 As soon as the computer is model-specific. If you are in Windows, click Start > Shut Down > Shut Down. 3. To obtain this ... create an autoexec.bat file containing the following command: repset.exe 10. Creating a Bootable Device Supported USB Flash Media Device Supported devices ...or USB flash media device, but copying the configuration to a dx7xxx PC. Create a bootable diskette or USB flash media device. See Supported ...Restart the computer when the configuration is significantly faster. All HP or Compaq and most other USB flash media devices have a preinstalled image to Single...
...17 As soon as the computer is model-specific. If you are in Windows, click Start > Shut Down > Shut Down. 3. To obtain this ... create an autoexec.bat file containing the following command: repset.exe 10. Creating a Bootable Device Supported USB Flash Media Device Supported devices ...or USB flash media device, but copying the configuration to a dx7xxx PC. Create a bootable diskette or USB flash media device. See Supported ...Restart the computer when the configuration is significantly faster. All HP or Compaq and most other USB flash media devices have a preinstalled image to Single...

Desktop Management Guide
Page 25
... turn on , press F10 when the monitor light turns green to which the controller is turned on the computer. 5. Press Enter to the DOS diskette. 10. Format will format the USB flash media device, add the system files, and ask for no label or enter one of the USB flash media.... Insert a bootable DOS diskette with the FDISK and SYS programs (If SYS is bootable from a USB flash media device CAUTION: Some older PCs may not be bootable from Windows 9x, you do not want this screen, add a zero-length file named LOGO.SYS to the root directory of the computer's USB ports...
... turn on , press F10 when the monitor light turns green to which the controller is turned on the computer. 5. Press Enter to the DOS diskette. 10. Format will format the USB flash media device, add the system files, and ask for no label or enter one of the USB flash media.... Insert a bootable DOS diskette with the FDISK and SYS programs (If SYS is bootable from a USB flash media device CAUTION: Some older PCs may not be bootable from Windows 9x, you do not want this screen, add a zero-length file named LOGO.SYS to the root directory of the computer's USB ports...

Desktop Management Guide
Page 29
10 Industry Standards HP management solutions integrate with other systems management applications, and are based on industry standards, such as: ● Web-Based Enterprise Management (WBEM) ● Windows Management Interface (WMI) ● Wake on LAN Technology ● ACPI ● SMBIOS ● Pre-boot Execution (PXE) support ENWW 23
10 Industry Standards HP management solutions integrate with other systems management applications, and are based on industry standards, such as: ● Web-Based Enterprise Management (WBEM) ● Windows Management Interface (WMI) ● Wake on LAN Technology ● ACPI ● SMBIOS ● Pre-boot Execution (PXE) support ENWW 23

Network & Internet Communications Guide
Page 10
When the system is indicated by one mode only. Half-duplex systems cannot transmit and receive simultaneously. Windows XP 1. Click Configure. 6. Select Link Speed & Duplex in one light and 1000-Mbps or 100-Mbps operation is connected to a highly used network, the... and configure themselves on and off to indicate network activity. ● Operating Speed light-Illuminates green when operating at 1000 Mbps, yellow when operating at 10 Mbps. Select Start > Control Panel. 2. If the NIC is not illuminated when operating at 100 Mbps, and is set to autonegotiate, the link partner...
When the system is indicated by one mode only. Half-duplex systems cannot transmit and receive simultaneously. Windows XP 1. Click Configure. 6. Select Link Speed & Duplex in one light and 1000-Mbps or 100-Mbps operation is connected to a highly used network, the... and configure themselves on and off to indicate network activity. ● Operating Speed light-Illuminates green when operating at 1000 Mbps, yellow when operating at 10 Mbps. Select Start > Control Panel. 2. If the NIC is not illuminated when operating at 100 Mbps, and is set to autonegotiate, the link partner...

Network & Internet Communications Guide
Page 16
...have previously created a password for Internet settings, you will be suitable for your password now. 5. To change the settings: a. Click the Disable button. Click OK. 10 Chapter 2 Internet Communications ENWW With Content Advisor, you can: ● Control Internet access ● Set up a password ● Set up a list of Web sites... button. Double-click Internet Options. 3. Double-click Internet Options. 3. Content Advisor The Internet provides you with or without your permission Restricting Internet Content Windows XP If you have not previously enabled Content Advisor: 1.
...have previously created a password for Internet settings, you will be suitable for your password now. 5. To change the settings: a. Click the Disable button. Click OK. 10 Chapter 2 Internet Communications ENWW With Content Advisor, you can: ● Control Internet access ● Set up a password ● Set up a list of Web sites... button. Double-click Internet Options. 3. Double-click Internet Options. 3. Content Advisor The Internet provides you with or without your permission Restricting Internet Content Windows XP If you have not previously enabled Content Advisor: 1.


