Service Guide
Page 34
...ventilation grill located on the left and right sides of the notebook. Exhaust air is designed to identify replacement parts, and Chapter 5, "Removal and Replacement Procedures," for ventilation. Refer to Chapter 3, "Illustrated Parts Catalog," to be caused by high external ...28 Maintenance and Service Guide The system board provides the following device connections: ■ Memory module ■ Mini PCI communications devices ■ Hard drive ■ Display ■ Keyboard and TouchPad ■ Audio ■ Mobile Intel Pentium 4, AMD Athlon 64, or AMD Athlon XP-M...
...ventilation grill located on the left and right sides of the notebook. Exhaust air is designed to identify replacement parts, and Chapter 5, "Removal and Replacement Procedures," for ventilation. Refer to Chapter 3, "Illustrated Parts Catalog," to be caused by high external ...28 Maintenance and Service Guide The system board provides the following device connections: ■ Memory module ■ Mini PCI communications devices ■ Hard drive ■ Display ■ Keyboard and TouchPad ■ Audio ■ Mobile Intel Pentium 4, AMD Athlon 64, or AMD Athlon XP-M...

Service Guide
Page 56
... OS Loading, Hard Drive, Part 2 Continued from hard drive? Remove diskette and reboot. Done N Hard drive partitioned? Done Y Boot from "Flowchart 2.10-No OS Loading, Hard Drive, Part 1." N Done N Boot from diskette drive? Y Go to "Flowchart 2.12-No OS Loading, Hard Drive, Part 3." Load OS using System Restore disc (if applicable). 2-22 Maintenance and Service Guide Y Hard drive accessible? Hard drive formatted? Replace system board. N Hard drive accessible...
... OS Loading, Hard Drive, Part 2 Continued from hard drive? Remove diskette and reboot. Done N Hard drive partitioned? Done Y Boot from "Flowchart 2.10-No OS Loading, Hard Drive, Part 1." N Done N Boot from diskette drive? Y Go to "Flowchart 2.12-No OS Loading, Hard Drive, Part 3." Load OS using System Restore disc (if applicable). 2-22 Maintenance and Service Guide Y Hard drive accessible? Hard drive formatted? Replace system board. N Hard drive accessible...

Service Guide
Page 57
N Run SCANDISK and check for bad sectors. Boot from hard drive? Y Virus on diskette? Y Clean virus. Replace hard drive. N Fix bad sectors. Y Done Replace hard drive. Y Install OS and reboot. Y OS loading from hard drive? N Y Diagnostics on hard drive? N System files on hard drive? N Run diagnostics and follow recommendations. Done Maintenance and Service Guide 2-23 Troubleshooting Flowchart 2.12-No OS Loading, Hard Drive, Part 3 Continued from "Flowchart 2.11-No OS Loading, Hard Drive, Part 2." N Can bad sectors be fixed? Replace hard drive.
N Run SCANDISK and check for bad sectors. Boot from hard drive? Y Virus on diskette? Y Clean virus. Replace hard drive. N Fix bad sectors. Y Done Replace hard drive. Y Install OS and reboot. Y OS loading from hard drive? N Y Diagnostics on hard drive? N System files on hard drive? N Run diagnostics and follow recommendations. Done Maintenance and Service Guide 2-23 Troubleshooting Flowchart 2.12-No OS Loading, Hard Drive, Part 3 Continued from "Flowchart 2.11-No OS Loading, Hard Drive, Part 2." N Can bad sectors be fixed? Replace hard drive.

Service Guide
Page 62
...." N Device boots properly? Done 2-28 Maintenance and Service Guide Clear CMOS. Y Y Any physical device detected? N Replace hard drive. If integrated NIC, replace system board. Replace NIC. Close notebook, plug in power, and reboot. Fix or replace broken item. Y Done Replace diskette drive. Reseat device. N Device boots properly? Troubleshooting Flowchart 2.17-Nonfunctioning Device Nonfunctioning device. Unplug the nonfunctioning device...
...." N Device boots properly? Done 2-28 Maintenance and Service Guide Clear CMOS. Y Y Any physical device detected? N Replace hard drive. If integrated NIC, replace system board. Replace NIC. Close notebook, plug in power, and reboot. Fix or replace broken item. Y Done Replace diskette drive. Reseat device. N Device boots properly? Troubleshooting Flowchart 2.17-Nonfunctioning Device Nonfunctioning device. Unplug the nonfunctioning device...

Service Guide
Page 101
...of shock-proof foam. ■ Avoid dropping drives from any height onto any surface. ■ After removing a hard drive, CD-ROM drive, or diskette drive, place it down the notebook. While handling a drive, avoid touching the connector. ■ Handle drives on , and then shut it in a ...temperature extremes or liquids. ■ If a drive must be mailed, place the drive in a bubble pack mailer or other suitable form of static electricity. Removal and Replacement Preliminaries 4.3 Preventing Damage to Removable Drives Removable drives are fragile components that you are unsure whether ...
...of shock-proof foam. ■ Avoid dropping drives from any height onto any surface. ■ After removing a hard drive, CD-ROM drive, or diskette drive, place it down the notebook. While handling a drive, avoid touching the connector. ■ Handle drives on , and then shut it in a ...temperature extremes or liquids. ■ If a drive must be mailed, place the drive in a bubble pack mailer or other suitable form of static electricity. Removal and Replacement Preliminaries 4.3 Preventing Damage to Removable Drives Removable drives are fragile components that you are unsure whether ...
Service Guide
Page 110
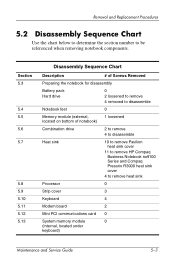
...Hard drive 0 2 loosened to remove 4 removed to disassemble Notebook feet 0 Memory module (external, 1 loosened located on bottom of notebook) Combination drive 2 to remove 4 to disassemble Heat sink 10 to remove Pavilion heat sink cover 11 to remove HP Compaq Business Notebook nx9100 Series and Compaq Presario R3000... heat sink cover 4 to be referenced when removing notebook components. Removal and Replacement ...
...Hard drive 0 2 loosened to remove 4 removed to disassemble Notebook feet 0 Memory module (external, 1 loosened located on bottom of notebook) Combination drive 2 to remove 4 to disassemble Heat sink 10 to remove Pavilion heat sink cover 11 to remove HP Compaq Business Notebook nx9100 Series and Compaq Presario R3000... heat sink cover 4 to be referenced when removing notebook components. Removal and Replacement ...
Service Guide
Page 114
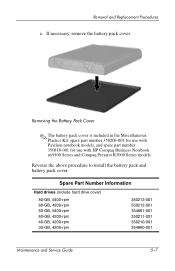
Removal and Replacement Procedures e. Spare Part Number Information Hard drives (include hard drive cover) 80-GB, 5400-rpm 80-GB, 4200-rpm 60-GB, 5400-rpm 60-GB, 4200-rpm 40-GB, 4200-rpm 30-GB, 4200-rpm ... the Miscellaneous Plastics Kit: spare part number 350206-001 for use with Pavilion notebook models, and spare part number 350818-001 for use with HP Compaq Business Notebook nx9100 Series and Compaq Presario R3000 Series models.
Removal and Replacement Procedures e. Spare Part Number Information Hard drives (include hard drive cover) 80-GB, 5400-rpm 80-GB, 4200-rpm 60-GB, 5400-rpm 60-GB, 4200-rpm 40-GB, 4200-rpm 30-GB, 4200-rpm ... the Miscellaneous Plastics Kit: spare part number 350206-001 for use with Pavilion notebook models, and spare part number 350818-001 for use with HP Compaq Business Notebook nx9100 Series and Compaq Presario R3000 Series models.

Service Guide
Page 115
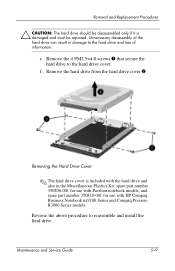
b. Remove the hard drive by following these steps: a. Loosen the 2 PM2.5×6.0 captive screws 1 that secure the hard drive cover to disconnect the hard drive from the notebook. Turn the notebook upside down with the rear panel toward you. Lift the right side of the hard drive cover up and swing it to the left 2 to the notebook. d. Removal and Replacement Procedures 5. Remove the hard drive. c. Removing the Hard Drive 5-8 Maintenance and Service Guide
b. Remove the hard drive by following these steps: a. Loosen the 2 PM2.5×6.0 captive screws 1 that secure the hard drive cover to disconnect the hard drive from the notebook. Turn the notebook upside down with the rear panel toward you. Lift the right side of the hard drive cover up and swing it to the left 2 to the notebook. d. Removal and Replacement Procedures 5. Remove the hard drive. c. Removing the Hard Drive 5-8 Maintenance and Service Guide
Service Guide
Page 116
...-001 for use with HP Compaq Business Notebook nx9100 Series and Compaq Presario R3000 Series models. Removal and Replacement Procedures Ä CAUTION: The hard drive should be repaired. Remove the 4 PM2.5×4.0 screws 1 that secure the hard drive to reassemble and install the hard drive. Reverse the above procedure to the hard drive cover. Remove the hard drive from the hard drive cover 2. Unnecessary disassembly of...
...-001 for use with HP Compaq Business Notebook nx9100 Series and Compaq Presario R3000 Series models. Removal and Replacement Procedures Ä CAUTION: The hard drive should be repaired. Remove the 4 PM2.5×4.0 screws 1 that secure the hard drive to reassemble and install the hard drive. Reverse the above procedure to the hard drive cover. Remove the hard drive from the hard drive cover 2. Unnecessary disassembly of...
Service Guide
Page 269
R rear components 1-14 regulatory notices, power cord set B-1 removal preliminaries 4-1 procedures 5-1 replacement preliminaries 4-1 procedures 5-1 right-side components 1-6, 1-10, 1-16 RJ-11 (modem) jack location 1-15 pin assignments A-2 RJ-45 (network) jack ...3-30 display assembly 3-4, 3-16, 5-39 display inverter 3-4, 3-16 DVD+R/RW and CD-RW Combo Drive 3-6, 3-8, 3-26 DVD/CD-RW Combo Drive 3-6, 3-8, 3-26 DVD-ROM drive 3-6, 3-8, 3-26 entertainment cable 3-33 fan assembly 3-6, 3-22, 5-76 front bezel 3-6, 3-20 hard drive 3-10, 3-26, 3-30, 5-7 heat sink 3-10, 3-26, 5-21 heat sink cover 3-8 ...
R rear components 1-14 regulatory notices, power cord set B-1 removal preliminaries 4-1 procedures 5-1 replacement preliminaries 4-1 procedures 5-1 right-side components 1-6, 1-10, 1-16 RJ-11 (modem) jack location 1-15 pin assignments A-2 RJ-45 (network) jack ...3-30 display assembly 3-4, 3-16, 5-39 display inverter 3-4, 3-16 DVD+R/RW and CD-RW Combo Drive 3-6, 3-8, 3-26 DVD/CD-RW Combo Drive 3-6, 3-8, 3-26 DVD-ROM drive 3-6, 3-8, 3-26 entertainment cable 3-33 fan assembly 3-6, 3-22, 5-76 front bezel 3-6, 3-20 hard drive 3-10, 3-26, 3-30, 5-7 heat sink 3-10, 3-26, 5-21 heat sink cover 3-8 ...