
Service Guide
Page 5
... 5-21 5.8 Processor 5-27 5.9 Strip Cover 5-30 5.10 Keyboard 5-32 5.11 Modem Board 5-34 5.12 Mini PCI Communications Card 5-35 5.13 Primary Memory Module 5-37 5.14 Display Assembly 5-39 5.15 Base Enclosure 5-47 5.16 Speaker Assembly 5-50 5.17 LED Board 5-53 5.18 TouchPad 5-57 5.19 System Board 5-64 5.20 Fan Assembly 5-76...
... 5-21 5.8 Processor 5-27 5.9 Strip Cover 5-30 5.10 Keyboard 5-32 5.11 Modem Board 5-34 5.12 Mini PCI Communications Card 5-35 5.13 Primary Memory Module 5-37 5.14 Display Assembly 5-39 5.15 Base Enclosure 5-47 5.16 Speaker Assembly 5-50 5.17 LED Board 5-53 5.18 TouchPad 5-57 5.19 System Board 5-64 5.20 Fan Assembly 5-76...

Service Guide
Page 9
... L2 cache ■ 15.4-inch wide UXGA (1600 × 1200), 15.4-inch wide XGA (1024 × 768), or 15.0-inch XGA (1024 × 768) TFT displays with over 16.7 million colors, varying by notebook model ■ ATI MOBILITY RADEON 9600 Pro graphics controller with 64 or 32 MB of video memory...
... L2 cache ■ 15.4-inch wide UXGA (1600 × 1200), 15.4-inch wide XGA (1024 × 768), or 15.0-inch XGA (1024 × 768) TFT displays with over 16.7 million colors, varying by notebook model ■ ATI MOBILITY RADEON 9600 Pro graphics controller with 64 or 32 MB of video memory...

Service Guide
Page 13
... condition. Blinking: Notebook is in , and the sound is muted. An LED comes on . also referred to as the hard drive/optical drive activity LED Display release latch Function On: Notebook is charging. Off: Notebook is pushed in Standby. Mute button Volume decrease button Mutes system volume. Product Description Table 1-1 Item...
... condition. Blinking: Notebook is in , and the sound is muted. An LED comes on . also referred to as the hard drive/optical drive activity LED Display release latch Function On: Notebook is charging. Off: Notebook is pushed in Standby. Mute button Volume decrease button Mutes system volume. Product Description Table 1-1 Item...
Service Guide
Page 17
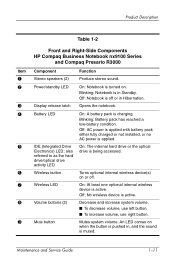
Power/standby LED Display release latch On: Notebook is being accessed. Off: Notebook is off . Opens the notebook. On: The internal hard drive or the optical drive is ...one optional internal wireless device is applied. Maintenance and Service Guide 1-11 Product Description Table 1-2 Item 1 2 3 4 5 6 7 8 9 Front and Right-Side Components HP Compaq Business Notebook nx9100 Series and Compaq Presario R3000 Component Stereo speakers (2) Function Produce stereo sound. Battery LED IDE (Integrated Drive Electronics) LED; Blinking: Battery pack has reached a low-battery condition...
Power/standby LED Display release latch On: Notebook is being accessed. Off: Notebook is off . Opens the notebook. On: The internal hard drive or the optical drive is ...one optional internal wireless device is applied. Maintenance and Service Guide 1-11 Product Description Table 1-2 Item 1 2 3 4 5 6 7 8 9 Front and Right-Side Components HP Compaq Business Notebook nx9100 Series and Compaq Presario R3000 Component Stereo speakers (2) Function Produce stereo sound. Battery LED IDE (Integrated Drive Electronics) LED; Blinking: Battery pack has reached a low-battery condition...

Service Guide
Page 25
... f1 and f3 through f12 perform additional tasks as hotkeys. Move the cursor around the screen. Windows applications key Windows logo key Displays a shortcut menu for items beneath the pointer. Displays the Windows Start menu. When combined with the function keys to perform additional system and application tasks. Enables caps lock and...
... f1 and f3 through f12 perform additional tasks as hotkeys. Move the cursor around the screen. Windows applications key Windows logo key Displays a shortcut menu for items beneath the pointer. Displays the Windows Start menu. When combined with the function keys to perform additional system and application tasks. Enables caps lock and...

Service Guide
Page 29
Product Description Table 1-5 Top Components HP Pavilion zv5000 and zx5000 Notebooks (Continued) Item 8 Component Display lid switch 9 Exhaust vents (2) Function ■ If the notebook is closed while on, turns off . To avoid potential discomfort or burns, do ... of increased power consumption, it is normal for extended periods. e Left and right TouchPad Function like the left and right buttons on or off the display. ■ If the notebook is LED (select models) accessing a digital memory card. Turns the TouchPad on an buttons external mouse. r TouchPad Moves ...
Product Description Table 1-5 Top Components HP Pavilion zv5000 and zx5000 Notebooks (Continued) Item 8 Component Display lid switch 9 Exhaust vents (2) Function ■ If the notebook is closed while on, turns off . To avoid potential discomfort or burns, do ... of increased power consumption, it is normal for extended periods. e Left and right TouchPad Function like the left and right buttons on or off the display. ■ If the notebook is LED (select models) accessing a digital memory card. Turns the TouchPad on an buttons external mouse. r TouchPad Moves ...

Service Guide
Page 31
...Display lid switch TouchPad button On: Num lock is on and the embedded numeric keypad is enabled. ■ If the notebook is closed while on the notebook (resumes from Standby). Maintenance and Service Guide 1-25 Product Description Table 1-6 Item 1 2 3 4 5 6 7 8 9 Top Components HP Compaq Business Notebook nx9100 Series and Compaq Presario R3000...activates items on buttons an external mouse. TouchPad scroll area Scrolls upward or downward. Turns the TouchPad on or off the display. ■ If the notebook is opened while in Standby, turns on , turns off . On: Caps lock is...
...Display lid switch TouchPad button On: Num lock is on and the embedded numeric keypad is enabled. ■ If the notebook is closed while on the notebook (resumes from Standby). Maintenance and Service Guide 1-25 Product Description Table 1-6 Item 1 2 3 4 5 6 7 8 9 Top Components HP Compaq Business Notebook nx9100 Series and Compaq Presario R3000...activates items on buttons an external mouse. TouchPad scroll area Scrolls upward or downward. Turns the TouchPad on or off the display. ■ If the notebook is opened while in Standby, turns on , turns off . On: Caps lock is...
Service Guide
Page 34
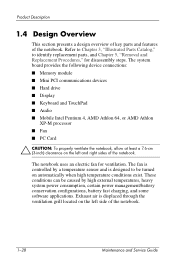
... left side of the notebook. The system board provides the following device connections: ■ Memory module ■ Mini PCI communications devices ■ Hard drive ■ Display ■ Keyboard and TouchPad ■ Audio ■ Mobile Intel Pentium 4, AMD Athlon 64, or AMD Athlon XP-M processor ■ Fan ■ PC Card Ä CAUTION...
... left side of the notebook. The system board provides the following device connections: ■ Memory module ■ Mini PCI communications devices ■ Hard drive ■ Display ■ Keyboard and TouchPad ■ Audio ■ Mobile Intel Pentium 4, AMD Athlon 64, or AMD Athlon XP-M processor ■ Fan ■ PC Card Ä CAUTION...

Service Guide
Page 36
... utility that is used even when your operating system is not necessary to configure a device connected to a USB port on the notebook or to ❏ Display system information. ❏ Test system components. ❏ Troubleshoot a device configuration problem in Microsoft Windows. ■ Diagnostics for Windows-A system information and diagnostic utility that can...
... utility that is used even when your operating system is not necessary to configure a device connected to a USB port on the notebook or to ❏ Display system information. ❏ Test system components. ❏ Troubleshoot a device configuration problem in Microsoft Windows. ■ Diagnostics for Windows-A system information and diagnostic utility that can...

Service Guide
Page 37
... File > Ignore Changes and Exit and press enter. 4. Select the File, Security, or Advanced menu. 3. Press f10 while the "f10 = ROM-Based Setup" message is displayed in Computer Setup are prompted to the Computer Setup menu, press esc. 2. Maintenance and Service Guide 2-3 When you are accessed from the File, Security, or...
... File > Ignore Changes and Exit and press enter. 4. Select the File, Security, or Advanced menu. 3. Press f10 while the "f10 = ROM-Based Setup" message is displayed in Computer Setup are prompted to the Computer Setup menu, press esc. 2. Maintenance and Service Guide 2-3 When you are accessed from the File, Security, or...

Service Guide
Page 40
... not loaded.) ■ Set an optional external monitor or overhead projector connected to a video card in a Port Replicator as the primary device. (When the notebook display is set as secondary, the notebook must be shut down before it is undocked from the Advanced Menu Select Language Boot Options Device Options Table...
... not loaded.) ■ Set an optional external monitor or overhead projector connected to a video card in a Port Replicator as the primary device. (When the notebook display is set as secondary, the notebook must be shut down before it is undocked from the Advanced Menu Select Language Boot Options Device Options Table...

Service Guide
Page 42
Troubleshooting 2.2 Using Diagnostics for Windows When you access Diagnostics for Windows, a scan of all system components is designed to test HP components. You can display more or less information from the drop-down list. ❏ To save the information, select File > Save As. ❏ To print the information, select File > ... third-party components are tested, the results might be inconclusive. To close Diagnostics for Windows by selecting Start > Settings > Control Panel > Diagnostics for Windows is displayed on the menu bar.
Troubleshooting 2.2 Using Diagnostics for Windows When you access Diagnostics for Windows, a scan of all system components is designed to test HP components. You can display more or less information from the drop-down list. ❏ To save the information, select File > Save As. ❏ To print the information, select File > ... third-party components are tested, the results might be inconclusive. To close Diagnostics for Windows by selecting Start > Settings > Control Panel > Diagnostics for Windows is displayed on the menu bar.

Service Guide
Page 43
... the testing process. You might be prompted to insert or remove devices. ❏ Unattended Mode-Does not display prompts. You determine whether the test was passed or failed. If errors are found, they are displayed when testing is complete. Maintenance and Service Guide 2-9 Access Diagnostics for Windows by selecting Start > Settings > Control...
... the testing process. You might be prompted to insert or remove devices. ❏ Unattended Mode-Does not display prompts. You determine whether the test was passed or failed. If errors are found, they are displayed when testing is complete. Maintenance and Service Guide 2-9 Access Diagnostics for Windows by selecting Start > Settings > Control...

Service Guide
Page 51
... Y Y Done Done Maintenance and Service Guide 2-17 Port replicator Stand-alone or Port replicator? Done Y Video OK? Display 4. Stand-alone Internal or external display*? Done N N Check for bent pins on cable. System board N N Video OK? Troubleshooting Flowchart 2.6-No Video, ...video. Adjust brightness. A Y Video OK? Try another display. Done Y Video OK? Go to "Flowchart 2.7-No Video, Part 2." *NOTE: To change from internal to ensure operation. Cable between notebook and notebook display (if applicable) 2. Inverter board (if applicable) 3. Internal...
... Y Y Done Done Maintenance and Service Guide 2-17 Port replicator Stand-alone or Port replicator? Done Y Video OK? Display 4. Stand-alone Internal or external display*? Done N N Check for bent pins on cable. System board N N Video OK? Troubleshooting Flowchart 2.6-No Video, ...video. Adjust brightness. A Y Video OK? Try another display. Done Y Video OK? Go to "Flowchart 2.7-No Video, Part 2." *NOTE: To change from internal to ensure operation. Cable between notebook and notebook display (if applicable) 2. Inverter board (if applicable) 3. Internal...

Service Guide
Page 52
Check brightness of external monitor. Go to "A" in port replicator, for bent pins on cable, and for monitor connection. Y Video OK? N Adjust external monitor display. Adjust display brightness. Done Done 2-18 Maintenance and Service Guide Try another external monitor. Y Go to "Flowchart 2.8-Nonfunctioning Port Replicator (if applicable)." Troubleshooting Flowchart 2.7-No Video, Part 2 ...
Check brightness of external monitor. Go to "A" in port replicator, for bent pins on cable, and for monitor connection. Y Video OK? N Adjust external monitor display. Adjust display brightness. Done Done 2-18 Maintenance and Service Guide Try another external monitor. Y Go to "Flowchart 2.8-Nonfunctioning Port Replicator (if applicable)." Troubleshooting Flowchart 2.7-No Video, Part 2 ...

Service Guide
Page 69
Illustrated Parts Catalog Table 3-2 Item 1 2 3 HP Pavilion zv5000 and zx5000 Notebooks Spare Parts: Notebook Major Components Description Display assemblies For use with HP Pavilion zx5000 notebook models 15.4-inch, WUXGA, with wireless antennae 15.4-inch, WUXGA, without ... XGA, without wireless antennae For use with HP Pavilion zv5000 notebook models 14.1-inch, XGA, with antennae 14.1-inch, XGA, without antennae Display inverter (not illustrated) Wireless antennae cables (not illustrated) Right antennae cable Left antennae cable Diskette drive Upper Logic Audio Board (not illustrated) ...
Illustrated Parts Catalog Table 3-2 Item 1 2 3 HP Pavilion zv5000 and zx5000 Notebooks Spare Parts: Notebook Major Components Description Display assemblies For use with HP Pavilion zx5000 notebook models 15.4-inch, WUXGA, with wireless antennae 15.4-inch, WUXGA, without ... XGA, without wireless antennae For use with HP Pavilion zv5000 notebook models 14.1-inch, XGA, with antennae 14.1-inch, XGA, without antennae Display inverter (not illustrated) Wireless antennae cables (not illustrated) Right antennae cable Left antennae cable Diskette drive Upper Logic Audio Board (not illustrated) ...

Service Guide
Page 81
Illustrated Parts Catalog Table 3-3 Item 1 HP Compaq Business Notebook nx9100 Series and Compaq Presario R3000 Series Spare Parts: Notebook Major Components Description Display assemblies For use with Compaq Presario R3000 Series models 15.4-inch, WUXGA, with wireless antennae 15.4-inch, WUXGA, without wireless antennae 15..., XGA, with antennae 15.0-inch, XGA, without antennae 14.1-inch, XGA, with antennae 14.1-inch, XGA, without antennae Display inverter (not illustrated) Wireless antenna cables (not illustrated) Right antenna cable Left antenna cable Spare Part Number 350846-001 350848-...
Illustrated Parts Catalog Table 3-3 Item 1 HP Compaq Business Notebook nx9100 Series and Compaq Presario R3000 Series Spare Parts: Notebook Major Components Description Display assemblies For use with Compaq Presario R3000 Series models 15.4-inch, WUXGA, with wireless antennae 15.4-inch, WUXGA, without wireless antennae 15..., XGA, with antennae 15.0-inch, XGA, without antennae 14.1-inch, XGA, with antennae 14.1-inch, XGA, without antennae Display inverter (not illustrated) Wireless antenna cables (not illustrated) Right antenna cable Left antenna cable Spare Part Number 350846-001 350848-...

Service Guide
Page 111
Removal and Replacement Procedures Section 5.14 5.15 5.16 5.17 5.18 Disassembly Sequence Chart (Continued) Description Display assembly Base enclosure Speaker assembly System board Fan assembly # of Screws Removed 8 on Pavilion 6 on HP Compaq Business Notebook nx9100 Series and Compaq Presario R3000 13 1 8 on Pavilion 4 on HP Compaq Business Notebook nx9100 Series and Compaq Presario R3000 5 screws and 4 standoffs on Pavilion 5 screws on HP Compaq Business Notebook nx9100 Series and Compaq Presario R3000 5-4 Maintenance and Service Guide
Removal and Replacement Procedures Section 5.14 5.15 5.16 5.17 5.18 Disassembly Sequence Chart (Continued) Description Display assembly Base enclosure Speaker assembly System board Fan assembly # of Screws Removed 8 on Pavilion 6 on HP Compaq Business Notebook nx9100 Series and Compaq Presario R3000 13 1 8 on Pavilion 4 on HP Compaq Business Notebook nx9100 Series and Compaq Presario R3000 5 screws and 4 standoffs on Pavilion 5 screws on HP Compaq Business Notebook nx9100 Series and Compaq Presario R3000 5-4 Maintenance and Service Guide

Service Guide
Page 138
Open the notebook display as far as possible. 6. Maintenance and Service Guide 5-31 Using a flat-bladed screwdriver, lift the right side 1 of the strip cover 3 and swing it toward you to remove it from the notebook. 7. Lift the middle of the strip cover to install the strip cover. Turn the notebook right-side up with the front toward you . 5. Removing the Strip Cover Reverse the above procedure to disengage the cover 2 from the notebook. Removal and Replacement Procedures 4.
Open the notebook display as far as possible. 6. Maintenance and Service Guide 5-31 Using a flat-bladed screwdriver, lift the right side 1 of the strip cover 3 and swing it toward you to remove it from the notebook. 7. Lift the middle of the strip cover to install the strip cover. Turn the notebook right-side up with the front toward you . 5. Removing the Strip Cover Reverse the above procedure to disengage the cover 2 from the notebook. Removal and Replacement Procedures 4.

Service Guide
Page 146
Removal and Replacement Procedures 5.14 Display Assembly Spare Part Number Information Display assemblies For use with HP Pavilion zv5000 notebook models 15.4-inch, WUXGA, with wireless antennae 15.4-inch, WUXGA, without wireless antennae 15.4-inch, WSXGA, ...XGA, without wireless antennae For use with HP Pavilion zx5000 notebook models 14.1-inch, XGA, with antennae 14.1-inch, XGA, without antennae For use with Compaq Presario R3000 Series models 15.4-inch, WUXGA, with wireless antennae 15.4-inch, WUXGA, without wireless antennae 15.4-inch, WSXGA, with wireless antennae 15.4-inch, WSXGA, without...
Removal and Replacement Procedures 5.14 Display Assembly Spare Part Number Information Display assemblies For use with HP Pavilion zv5000 notebook models 15.4-inch, WUXGA, with wireless antennae 15.4-inch, WUXGA, without wireless antennae 15.4-inch, WSXGA, ...XGA, without wireless antennae For use with HP Pavilion zx5000 notebook models 14.1-inch, XGA, with antennae 14.1-inch, XGA, without antennae For use with Compaq Presario R3000 Series models 15.4-inch, WUXGA, with wireless antennae 15.4-inch, WUXGA, without wireless antennae 15.4-inch, WSXGA, with wireless antennae 15.4-inch, WSXGA, without...