
Wireless Setup Guide
Page 3
.... Ensure that the computer is connected to the information you encounter problems at any time during this process your computer is off button. Refer to AC power during the router setup, contact your router manufacturer for technical assistance. 6 Test the Internet connection by model. 3 Connect the wireless router according to the manufacturer...
.... Ensure that the computer is connected to the information you encounter problems at any time during this process your computer is off button. Refer to AC power during the router setup, contact your router manufacturer for technical assistance. 6 Test the Internet connection by model. 3 Connect the wireless router according to the manufacturer...
Using LightScribe (Select Models Only)
Page 7
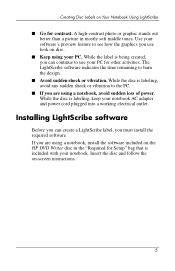
... the software included on -screen instructions. 5 Installing LightScribe software Before you can continue to the PC. ■ If you use your PC for other activities. Use your notebook AC adapter and power cord plugged into a working electrical outlet. While the label is labeling, keep your software's preview feature to burn... soft middle tones. The LightScribe software indicates the time remaining to see how the graphics you are using a notebook, avoid sudden loss of power. A high-contrast photo or graphic stands out better than a picture in the "Required for contrast.
... the software included on -screen instructions. 5 Installing LightScribe software Before you can continue to the PC. ■ If you use your PC for other activities. Use your notebook AC adapter and power cord plugged into a working electrical outlet. While the label is labeling, keep your software's preview feature to burn... soft middle tones. The LightScribe software indicates the time remaining to see how the graphics you are using a notebook, avoid sudden loss of power. A high-contrast photo or graphic stands out better than a picture in the "Required for contrast.

Hardware-Software Guide
Page 18
Connects the AC adapter cable. *The notebook has 4 vents. Do not allow a hard surface, such as a printer, or a soft surface, such as pillows or thick rugs or clothing, to cool internal components. 2 Power connector Ä To prevent overheating, do not obstruct vents. Component ID Rear Components Component 1 Exhaust vent* Description Provides airflow to block airflow. One vent is also visible on the bottom of the notebook. 1-10 Hardware and Software Guide This and all other vents are visible on the left side of the notebook.
Connects the AC adapter cable. *The notebook has 4 vents. Do not allow a hard surface, such as a printer, or a soft surface, such as pillows or thick rugs or clothing, to cool internal components. 2 Power connector Ä To prevent overheating, do not obstruct vents. Component ID Rear Components Component 1 Exhaust vent* Description Provides airflow to block airflow. One vent is also visible on the bottom of the notebook. 1-10 Hardware and Software Guide This and all other vents are visible on the left side of the notebook.

Hardware-Software Guide
Page 26
... or to a country-specific modem adapter. 5 Country-specific modem Adapts the modem cable to external power. Component Description 1 AC adapter Converts AC power to DC power. 2 Power cord* Connects an AC adapter to an AC outlet. 3 Battery pack* 4 Modem cable* Powers the notebook when the notebook is not connected to a non-RJ-11 adapter (included by model. 1-18 Hardware and Software...
... or to a country-specific modem adapter. 5 Country-specific modem Adapts the modem cable to external power. Component Description 1 AC adapter Converts AC power to DC power. 2 Power cord* Connects an AC adapter to an AC outlet. 3 Battery pack* 4 Modem cable* Powers the notebook when the notebook is not connected to a non-RJ-11 adapter (included by model. 1-18 Hardware and Software...
Hardware-Software Guide
Page 46
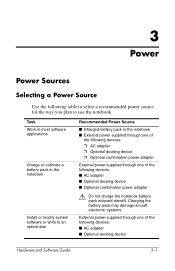
...; Charged battery pack in the notebook ■ External power supplied through one of the following devices: ❐ AC adapter ❐ Optional docking device ❐ Optional combination power adapter External power supplied through one of the following devices: ■ AC adapter ■ Optional docking device Hardware and Software Guide 3-1 3 Power Power Sources Selecting a Power Source Use the following devices: ■...
...; Charged battery pack in the notebook ■ External power supplied through one of the following devices: ❐ AC adapter ❐ Optional docking device ❐ Optional combination power adapter External power supplied through one of the following devices: ■ AC adapter ■ Optional docking device Hardware and Software Guide 3-1 3 Power Power Sources Selecting a Power Source Use the following devices: ■...
Hardware-Software Guide
Page 47
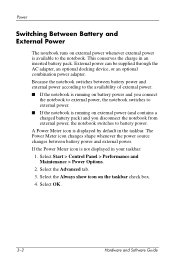
... Panel > Performance and Maintenance > Power Options. 2. A Power Meter icon is not displayed in an inserted battery pack. Select the Always show icon on the taskbar check box. 4. Power Switching Between Battery and External Power The notebook runs on external power whenever external power is available to battery power. External power can be supplied through the AC adapter, an optional docking...
... Panel > Performance and Maintenance > Power Options. 2. A Power Meter icon is not displayed in an inserted battery pack. Select the Always show icon on the taskbar check box. 4. Power Switching Between Battery and External Power The notebook runs on external power whenever external power is available to battery power. External power can be supplied through the AC adapter, an optional docking...

Hardware-Software Guide
Page 58
... accuracy of battery charge displays: ■ If you are charging a new battery pack: ❏ Charge the battery pack while the notebook is connected to external power through the AC adapter. ❏ When you charge the battery pack, charge it fully. ■ If you are charging an in the... notebook charges whenever the notebook is connected to about 10 percent of a full charge through normal use battery pack: ❏ Allow the battery pack to discharge to external power through an AC adapter, an optional docking device, or an optional combination...
... accuracy of battery charge displays: ■ If you are charging a new battery pack: ❏ Charge the battery pack while the notebook is connected to external power through the AC adapter. ❏ When you charge the battery pack, charge it fully. ■ If you are charging an in the... notebook charges whenever the notebook is connected to about 10 percent of a full charge through normal use battery pack: ❏ Allow the battery pack to discharge to external power through an AC adapter, an optional docking device, or an optional combination...
Hardware-Software Guide
Page 65
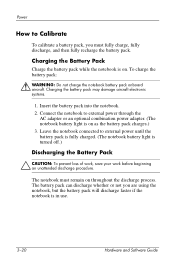
.... Charging the Battery Pack Charge the battery pack while the notebook is on throughout the discharge process. Power How to external power through the AC adapter or an optional combination power adapter. (The notebook battery light is on as the battery pack charges.) 3. Leave the notebook connected to external power until the battery pack is fully charged. (The...
.... Charging the Battery Pack Charge the battery pack while the notebook is on throughout the discharge process. Power How to external power through the AC adapter or an optional combination power adapter. (The notebook battery light is on as the battery pack charges.) 3. Leave the notebook connected to external power until the battery pack is fully charged. (The...
Hardware-Software Guide
Page 117
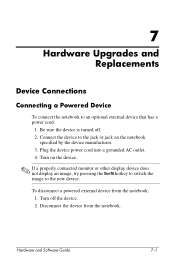
... by the device manufacturer. 3. Turn off . 2. To disconnect a powered external device from the notebook. Disconnect the device from the notebook: 1. Be sure the device is turned off the device. 2. Connect the device to the jack or jack on the device. ... try pressing the fn+f4 hotkey to switch the image to an optional external device that has a power cord: 1. Hardware and Software Guide 7-1 Plug the device power cord into a grounded AC outlet. 4. 7 Hardware Upgrades and Replacements Device Connections Connecting a Powered Device To connect the notebook to the new device.
... by the device manufacturer. 3. Turn off . 2. To disconnect a powered external device from the notebook. Disconnect the device from the notebook: 1. Be sure the device is turned off the device. 2. Connect the device to the jack or jack on the device. ... try pressing the fn+f4 hotkey to switch the image to an optional external device that has a power cord: 1. Hardware and Software Guide 7-1 Plug the device power cord into a grounded AC outlet. 4. 7 Hardware Upgrades and Replacements Device Connections Connecting a Powered Device To connect the notebook to the new device.
Hardware-Software Guide
Page 145
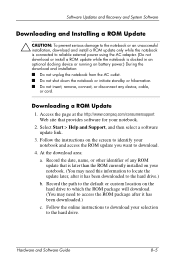
... page at the http://www.compaq.com/consumersupport Web site that is docked in an optional docking device or running on battery power.) During the download and installation: ■ Do not unplug the notebook from the AC outlet. ■ Do not shut down the notebook or initiate standby or hibernation...., download and install a ROM update only while the notebook is connected to reliable external power using the AC adapter. (Do not download or install a ROM update while the notebook is later than the ROM currently installed on your notebook. (You may need this information to locate the update...
... page at the http://www.compaq.com/consumersupport Web site that is docked in an optional docking device or running on battery power.) During the download and installation: ■ Do not unplug the notebook from the AC outlet. ■ Do not shut down the notebook or initiate standby or hibernation...., download and install a ROM update only while the notebook is connected to reliable external power using the AC adapter. (Do not download or install a ROM update while the notebook is later than the ROM currently installed on your notebook. (You may need this information to locate the update...
Hardware-Software Guide
Page 150
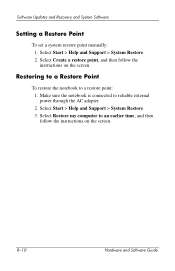
Make sure the notebook is connected to a restore point: 1. Software Updates and Recovery and System Software Setting a Restore Point To set a system restore point manually: 1. Select Create a restore point, ... computer to an earlier time, and then follow the instructions on the screen. 8-10 Hardware and Software Guide Restoring to a Restore Point To restore the notebook to reliable external power through the AC adapter. 2. Select Start > Help and Support > System Restore. 3. Select Start > Help and Support > System Restore. 2.
Make sure the notebook is connected to a restore point: 1. Software Updates and Recovery and System Software Setting a Restore Point To set a system restore point manually: 1. Select Create a restore point, ... computer to an earlier time, and then follow the instructions on the screen. 8-10 Hardware and Software Guide Restoring to a Restore Point To restore the notebook to reliable external power through the AC adapter. 2. Select Start > Help and Support > System Restore. 3. Select Start > Help and Support > System Restore. 2.
Hardware-Software Guide
Page 159
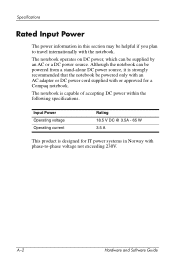
... - 65 W 3.5 A This product is designed for a Compaq notebook. The notebook operates on DC power, which can be supplied by an AC or a DC power source. Although the notebook can be powered from a stand-alone DC power source, it is capable of accepting DC power within the following specifications. The notebook is strongly recommended that the notebook be helpful if you plan to...
... - 65 W 3.5 A This product is designed for a Compaq notebook. The notebook operates on DC power, which can be supplied by an AC or a DC power source. Although the notebook can be powered from a stand-alone DC power source, it is capable of accepting DC power within the following specifications. The notebook is strongly recommended that the notebook be helpful if you plan to...

Hardware-Software Guide
Page 161
...19 battery light 1-8 displaying charge status 3-14, 3-17 identifying 1-8, 3-3 battery pack battery power vs. AC power 3-1 calibrating 3-19 charging 3-13 conserving power 3-23 diagnostic information 8-14 disposing of 3-28 inserting 3-26 low-battery conditions 3-17 ...25 bays battery 1-17, 1-19 hard drive 1-17 See also compartments BIOS information, displaying 6-2, 8-3 Hardware and Software Guide Index-1 battery power 3-1 administrator password 6-5, 6-7 airport security devices 7-14 altitude specifications A-1 antennae 1-7 antivirus software 6-12 applications key, Windows 1-2 audio-in ...
...19 battery light 1-8 displaying charge status 3-14, 3-17 identifying 1-8, 3-3 battery pack battery power vs. AC power 3-1 calibrating 3-19 charging 3-13 conserving power 3-23 diagnostic information 8-14 disposing of 3-28 inserting 3-26 low-battery conditions 3-17 ...25 bays battery 1-17, 1-19 hard drive 1-17 See also compartments BIOS information, displaying 6-2, 8-3 Hardware and Software Guide Index-1 battery power 3-1 administrator password 6-5, 6-7 airport security devices 7-14 altitude specifications A-1 antennae 1-7 antivirus software 6-12 applications key, Windows 1-2 audio-in ...
Getting Started
Page 11
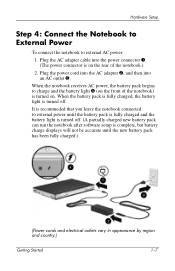
... the new battery pack has been fully charged.) (Power cords and electrical outlets vary in appearance by region and country.) Getting Started 1-7 When the notebook receives AC power, the battery pack begins to external AC power: 1. Hardware Setup Step 4: Connect the Notebook to External Power To connect the notebook to charge and the battery light 4 (on the front of...
... the new battery pack has been fully charged.) (Power cords and electrical outlets vary in appearance by region and country.) Getting Started 1-7 When the notebook receives AC power, the battery pack begins to external AC power: 1. Hardware Setup Step 4: Connect the Notebook to External Power To connect the notebook to charge and the battery light 4 (on the front of...
Getting Started
Page 46
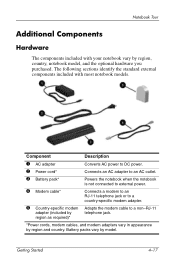
..., modem cables, and modem adapters vary in appearance by telephone jack. Component Description 1 AC adapter Converts AC power to DC power. 2 Power cord* Connects an AC adapter to an AC outlet. 3 Battery pack* Powers the notebook when the notebook is not connected to external power. 4 Modem cable* Connects a modem to an RJ-11 telephone jack or to a country-specific modem adapter...
..., modem cables, and modem adapters vary in appearance by telephone jack. Component Description 1 AC adapter Converts AC power to DC power. 2 Power cord* Connects an AC adapter to an AC outlet. 3 Battery pack* Powers the notebook when the notebook is not connected to external power. 4 Modem cable* Connects a modem to an RJ-11 telephone jack or to a country-specific modem adapter...
Compaq Presario V2000 Notebook PC - Hardware and Software Guide
Page 27
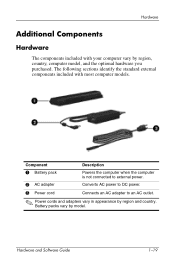
... the optional hardware you purchased. Hardware and Software Guide 1-19 Component 1 Battery pack Description Powers the computer when the computer is not connected to external power. 2 AC adapter Converts AC power to DC power. 3 Power cord Connects an AC adapter to an AC outlet. ✎ Power cords and adapters vary in appearance by model. Battery packs vary by region and...
... the optional hardware you purchased. Hardware and Software Guide 1-19 Component 1 Battery pack Description Powers the computer when the computer is not connected to external power. 2 AC adapter Converts AC power to DC power. 3 Power cord Connects an AC adapter to an AC outlet. ✎ Power cords and adapters vary in appearance by model. Battery packs vary by region and...
Compaq Presario V2000 Notebook PC - Hardware and Software Guide
Page 49
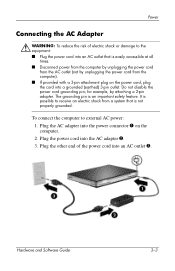
... other end of electric shock or damage to external AC power: 1. Plug the power cord into the power connector 1 on the power cord, plug the cord into an AC outlet that is easily accessible at all times. ■ Disconnect power from the computer by unplugging the power cord from the AC outlet (not by attaching a 2-pin adapter. Plug the...
... other end of electric shock or damage to external AC power: 1. Plug the power cord into the power connector 1 on the power cord, plug the cord into an AC outlet that is easily accessible at all times. ■ Disconnect power from the computer by unplugging the power cord from the AC outlet (not by attaching a 2-pin adapter. Plug the...

Compaq Presario V2000 Notebook PC - Hardware and Software Guide
Page 170
... (microphone) jack 1-9, 4-5 audio-out (headphone) jack 1-9, 4-4 AutoPlay 4-13 B battery bay 1-17 battery light 1-8 displaying charge status 3-22, 3-24 identifying 1-8, 3-5 battery pack battery power vs. AC power 3-1 calibrating 3-26 charging 3-21 conserving power 3-30 diagnostic information 8-13 inserting 3-19 low-battery conditions 3-24 monitoring charge 3-23 removing 3-20 storing 3-31 battery pack release latch 1-17...
... (microphone) jack 1-9, 4-5 audio-out (headphone) jack 1-9, 4-4 AutoPlay 4-13 B battery bay 1-17 battery light 1-8 displaying charge status 3-22, 3-24 identifying 1-8, 3-5 battery pack battery power vs. AC power 3-1 calibrating 3-26 charging 3-21 conserving power 3-30 diagnostic information 8-13 inserting 3-19 low-battery conditions 3-24 monitoring charge 3-23 removing 3-20 storing 3-31 battery pack release latch 1-17...

Compaq Presario V2600 Notebook PC - Maintenance and Service Guide
Page 10
... to Section 5.3, "Preparing the Computer for Disassembly," for more information). 2. Prepare the computer for disassembly (refer to Section 5.16, "RTC Battery," for more information). 3. Connect AC power to clear the password. Product Description 1.2 Resetting the Computer If the computer you are servicing has an unknown password, follow these steps to the computer...
... to Section 5.3, "Preparing the Computer for Disassembly," for more information). 2. Prepare the computer for disassembly (refer to Section 5.16, "RTC Battery," for more information). 3. Connect AC power to clear the password. Product Description 1.2 Resetting the Computer If the computer you are servicing has an unknown password, follow these steps to the computer...

Compaq Presario V2600 Notebook PC - Maintenance and Service Guide
Page 36
... power.* N Power up on AC power? Reseat the power cables in docking device? *NOTES 1. Y Reset power.* N Power up on battery power? Y Power up on battery power? N 1. Ensure that the power strip is a separate reset button. 2. On select models, the computer can be reset using the standby switch and either the lid switch or the main power switch. N Power up in docking Done device? N Power...
... power.* N Power up on AC power? Reseat the power cables in docking device? *NOTES 1. Y Reset power.* N Power up on battery power? Y Power up on battery power? N 1. Ensure that the power strip is a separate reset button. 2. On select models, the computer can be reset using the standby switch and either the lid switch or the main power switch. N Power up in docking Done device? N Power...


