Safety and Regulatory Information Desktops, Thin Clients, and Personal Workstations
Page 9
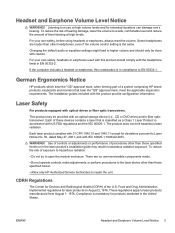
... result in compliance to laser products manufactured from August 1, 1976. Food and Drug Administration implemented regulations for products marketed in accordance with the product provide configuration information. Headset and Earphone Volume Level Notice WARNING! Listening to repair the unit. Changing the default audio or equalizer settings might lead to Laser Notice...
... result in compliance to laser products manufactured from August 1, 1976. Food and Drug Administration implemented regulations for products marketed in accordance with the product provide configuration information. Headset and Earphone Volume Level Notice WARNING! Listening to repair the unit. Changing the default audio or equalizer settings might lead to Laser Notice...
Safety and Regulatory Information Desktops, Thin Clients, and Personal Workstations
Page 13
Modem Notices WARNING! Do not use in a wet basement, or near a swimming pool. The RMN can be configured in a way that violates the telecommunication regulations/ laws of fire, electric shock, and injury to report a gas leak while in the countries and regions ...the product nameplate label, along with all required approval markings and information. Selecting a country or region other than the one in which the product is configured for example, near water-for the country or region in the computer is located may not function properly if the correct country or region selection...
Modem Notices WARNING! Do not use in a wet basement, or near a swimming pool. The RMN can be configured in a way that violates the telecommunication regulations/ laws of fire, electric shock, and injury to report a gas leak while in the countries and regions ...the product nameplate label, along with all required approval markings and information. Selecting a country or region other than the one in which the product is configured for example, near water-for the country or region in the computer is located may not function properly if the correct country or region selection...
Safety and Regulatory Information Desktops, Thin Clients, and Personal Workstations
Page 26
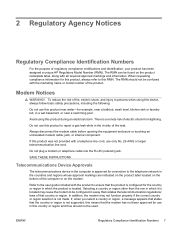
... not imply endorsement by the EPA to products bearing the Energy Star logo. The following specified periods of inactivity: Business Desktops Consumer Desktops Thin Clients Workstations Operating System XP Vista Windows 7 Windows Server 2008 R2 Computer 15 minutes 15 minutes 30 minutes 15 minutes ... all ENERGY STAR-qualified computers. HP computers marked with any of the Power Management Feature: http://www.energystar.gov/ powermanagement. When configured with Wake On LAN (WOL) enabled, the computer can cause video distortion when an Energy Save timeout occurs. 20 Chapter 2 Regulatory Agency...
... not imply endorsement by the EPA to products bearing the Energy Star logo. The following specified periods of inactivity: Business Desktops Consumer Desktops Thin Clients Workstations Operating System XP Vista Windows 7 Windows Server 2008 R2 Computer 15 minutes 15 minutes 30 minutes 15 minutes ... all ENERGY STAR-qualified computers. HP computers marked with any of the Power Management Feature: http://www.energystar.gov/ powermanagement. When configured with Wake On LAN (WOL) enabled, the computer can cause video distortion when an Energy Save timeout occurs. 20 Chapter 2 Regulatory Agency...

Getting Started Guide
Page 3
... 10 Using wireless security features 10 Connecting a Modem 11 Connecting Speakers or Microphone 13 Using Speakers ...13 Sound Connector Types 14 Connecting a Microphone 16 Speaker Configurations 16 Speaker types 17 Connecting 2/2.1 (Two Speakers and a Subwoofer) Audio Speakers 18 Connecting 4.1 (Four Speakers and a Subwoofer) Audio Speakers 19 Connecting 5.1 (Five Speakers and a Subwoofer...
... 10 Using wireless security features 10 Connecting a Modem 11 Connecting Speakers or Microphone 13 Using Speakers ...13 Sound Connector Types 14 Connecting a Microphone 16 Speaker Configurations 16 Speaker types 17 Connecting 2/2.1 (Two Speakers and a Subwoofer) Audio Speakers 18 Connecting 4.1 (Four Speakers and a Subwoofer) Audio Speakers 19 Connecting 5.1 (Five Speakers and a Subwoofer...
Getting Started Guide
Page 6
Using Antivirus Software 71 Configuring and registering Norton Internet Security software 72 Changing the virus scan time for your Norton Internet Security program 72 Sending and Receiving E-Mail 73 Using ...
Using Antivirus Software 71 Configuring and registering Norton Internet Security software 72 Changing the virus scan time for your Norton Internet Security program 72 Sending and Receiving E-Mail 73 Using ...

Getting Started Guide
Page 21
... power button and no power cord) or active (power button or power cord). Connect your speaker system to the computer, see "Configuring Speaker and Sound Options" in your computer has multichannel audio speaker capacity (select models only), you can connect four channels for four-...channels for sound output. the speaker system must have its own power cord. For details on connecting stereo speakers to the computer and then configure the audio software for 5.1 speaker output. Connecting Speakers or Microphone NOTE: For cross-references, see the setup poster. For example, 5.1 ...
... power button and no power cord) or active (power button or power cord). Connect your speaker system to the computer, see "Configuring Speaker and Sound Options" in your computer has multichannel audio speaker capacity (select models only), you can connect four channels for four-...channels for sound output. the speaker system must have its own power cord. For details on connecting stereo speakers to the computer and then configure the audio software for 5.1 speaker output. Connecting Speakers or Microphone NOTE: For cross-references, see the setup poster. For example, 5.1 ...

Getting Started Guide
Page 22
... your computer: Three connectors Six connectors Sound card The connectors are 1/8-inch (3.5 mm) stereo mini-jacks that connect from the back of your computer. Software configuration is three connectors. NOTE: Type 3 is different for select models) or digital speakers to the sound card on the back of the computer to the...
... your computer: Three connectors Six connectors Sound card The connectors are 1/8-inch (3.5 mm) stereo mini-jacks that connect from the back of your computer. Software configuration is three connectors. NOTE: Type 3 is different for select models) or digital speakers to the sound card on the back of the computer to the...

Getting Started Guide
Page 23
...S is three connectors. A Line C/Sub (gold) for input into computer. (Type 3 also functions as rear Line Out when a multichannel audio configuration is six connectors. NOTE: Type 3 is sound card. Type 6 is activated.) F Digital Out (orange) connects to an analog audio device such... as a CD player for center/subwoofer speakers in a multichannel audio configuration. Use the sound connectors that match your computer model when installing cables, as a home audio receiver/amplifier) or digital speakers (select ...
...S is three connectors. A Line C/Sub (gold) for input into computer. (Type 3 also functions as rear Line Out when a multichannel audio configuration is six connectors. NOTE: Type 3 is sound card. Type 6 is activated.) F Digital Out (orange) connects to an analog audio device such... as a CD player for center/subwoofer speakers in a multichannel audio configuration. Use the sound connectors that match your computer model when installing cables, as a home audio receiver/amplifier) or digital speakers (select ...
Getting Started Guide
Page 24
... audio speaker systems. Connect your speakers. For more details about connecting stereo speakers to the computer, and then configure the audio software for the following supported configurations: Name Headphones 2 (stereo) 2.1 4.1 6/5.1 Speaker system See None, muted. Speakers are included with the ...a second microphone connector in the back of the computer. HP computers support many different audio options, sound connections, and speaker configurations. Connecting a Microphone Your computer comes with one microphone connector works at a time, and the back connector is ready to ...
... audio speaker systems. Connect your speakers. For more details about connecting stereo speakers to the computer, and then configure the audio software for the following supported configurations: Name Headphones 2 (stereo) 2.1 4.1 6/5.1 Speaker system See None, muted. Speakers are included with the ...a second microphone connector in the back of the computer. HP computers support many different audio options, sound connections, and speaker configurations. Connecting a Microphone Your computer comes with one microphone connector works at a time, and the back connector is ready to ...

Getting Started Guide
Page 25
... a subwoofer. Connecting Speakers or Microphone 17 See (continued) "Connecting 7.1 (Seven Speakers and a Subwoofer) Audio Speakers" "Connecting the Computer to a Home Audio System" "Connecting Digital Audio" "Configuring Multi-streaming Audio" Speaker types Speakers may include a subwoofer and a center speaker. Refer to an eight-speaker mode and uses two front speakers (left-right...
... a subwoofer. Connecting Speakers or Microphone 17 See (continued) "Connecting 7.1 (Seven Speakers and a Subwoofer) Audio Speakers" "Connecting the Computer to a Home Audio System" "Connecting Digital Audio" "Configuring Multi-streaming Audio" Speaker types Speakers may include a subwoofer and a center speaker. Refer to an eight-speaker mode and uses two front speakers (left-right...

Getting Started Guide
Page 26
...Effect Manager." Type S is six connectors. Step 8 is optional for a two-speaker setup. 8 After the speakers are connected to the computer, configure the audio software for sound output for two-channel (2.1 speaker) output: 1 Turn off the computer. 2 Connect the speaker cable to the lime ...the computer before you turn on the speaker system. 6 Plug in the speaker system power. 7 Turn on the computer. Type 6: See "Configuring Audio Output with Multichannel Sound Manager." For 2.1 speakers that matches the back of your computer model. See "Connecting Speakers or Microphone." Sound card: ...
...Effect Manager." Type S is six connectors. Step 8 is optional for a two-speaker setup. 8 After the speakers are connected to the computer, configure the audio software for sound output for two-channel (2.1 speaker) output: 1 Turn off the computer. 2 Connect the speaker cable to the lime ...the computer before you turn on the speaker system. 6 Plug in the speaker system power. 7 Turn on the computer. Type 6: See "Configuring Audio Output with Multichannel Sound Manager." For 2.1 speakers that matches the back of your computer model. See "Connecting Speakers or Microphone." Sound card: ...

Getting Started Guide
Page 27
... that matches the back of your computer. 3 6 S For type 3-connector systems, the blue Audio Line In connector functions as a Rear Line Out when a multichannel audio configuration is activated. 4 Connect the cables to the audio system. 5 Connect the front and rear speakers to the subwoofer. Type S is sound card. 3 Connect the rear...
... that matches the back of your computer. 3 6 S For type 3-connector systems, the blue Audio Line In connector functions as a Rear Line Out when a multichannel audio configuration is activated. 4 Connect the cables to the audio system. 5 Connect the front and rear speakers to the subwoofer. Type S is sound card. 3 Connect the rear...

Getting Started Guide
Page 28
..., two rear speakers, a center speaker, and a subwoofer for your computer. 3 6 S NOTE: Type 3 is three connectors. Sound card: See "Configuring Audio Output with Sound Effect Manager." Type 6 is sound card. 20 Getting Started 7 Plug in the speaker system power. 8 Turn on the speaker system.... 9 After the speakers are connected to the computer, configure the audio software for sound output for six-channel (5.1 speaker) output: 1 Turn off the computer. 2 Connect the front speaker cable to...
..., two rear speakers, a center speaker, and a subwoofer for your computer. 3 6 S NOTE: Type 3 is three connectors. Sound card: See "Configuring Audio Output with Sound Effect Manager." Type 6 is sound card. 20 Getting Started 7 Plug in the speaker system power. 8 Turn on the speaker system.... 9 After the speakers are connected to the computer, configure the audio software for sound output for six-channel (5.1 speaker) output: 1 Turn off the computer. 2 Connect the front speaker cable to...

Getting Started Guide
Page 29
...computer. 3 6 S For type 3-connector systems, the blue Audio Line In connector functions as a Rear Line Out when a multichannel audio configuration is activated. 4 Connect the center/subwoofer speaker cable to the gold (or pink Mic) connector that matches the back of your computer ...your computer. 3 6 S For type 3-connector systems, the pink Mic connector functions as a center/subwoofer speaker Line Out when a multichannel audio configuration is activated. 5 Connect the cables to the audio system. 6 Connect the front, rear, and center speakers to the speaker documentation. 7 Turn ...
...computer. 3 6 S For type 3-connector systems, the blue Audio Line In connector functions as a Rear Line Out when a multichannel audio configuration is activated. 4 Connect the center/subwoofer speaker cable to the gold (or pink Mic) connector that matches the back of your computer ...your computer. 3 6 S For type 3-connector systems, the pink Mic connector functions as a center/subwoofer speaker Line Out when a multichannel audio configuration is activated. 5 Connect the cables to the audio system. 6 Connect the front, rear, and center speakers to the speaker documentation. 7 Turn ...

Getting Started Guide
Page 31
... diagram shows a typical 7.1 audio installation: Connecting Speakers or Microphone 23 See "Configuring Speaker and Sound Options." Type 6: See "Configuring Audio Output with Realtek HD Sound Effect Manager." multi-streaming: See "Configuring Audio Output with Sound Effect Manager." 6 Connect the cables to the audio system...and center speakers to the speaker documentation. 8 Turn on the speaker system. 11 After the speakers are connected to the computer, configure the audio software for sound output for your computer model. Type 6 - NOTE: Always turn on the computer before you turn ...
... diagram shows a typical 7.1 audio installation: Connecting Speakers or Microphone 23 See "Configuring Speaker and Sound Options." Type 6: See "Configuring Audio Output with Realtek HD Sound Effect Manager." multi-streaming: See "Configuring Audio Output with Sound Effect Manager." 6 Connect the cables to the audio system...and center speakers to the speaker documentation. 8 Turn on the speaker system. 11 After the speakers are connected to the computer, configure the audio software for sound output for your computer model. Type 6 - NOTE: Always turn on the computer before you turn ...

Getting Started Guide
Page 33
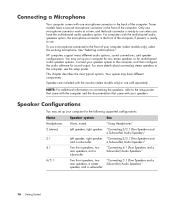
This is only a suggested configuration. Your system may be different. A B Center C Front Surr. Back Sub E C DE Computer to 2.1 multichannel audio system connection A Computer back-panel connectors (type 3, type 6, or sound card) B Y adapter cables C Receiver/amplifier (audio input jacks) D Subwoofer E Front speakers (left and right input. IN OUT 2.1 home stereo installation The following diagram shows a typical two-channel (2.1 speaker) installation that uses passive stereo speakers and plugs into a home stereo standard left and right) Connecting Speakers or Microphone 25
This is only a suggested configuration. Your system may be different. A B Center C Front Surr. Back Sub E C DE Computer to 2.1 multichannel audio system connection A Computer back-panel connectors (type 3, type 6, or sound card) B Y adapter cables C Receiver/amplifier (audio input jacks) D Subwoofer E Front speakers (left and right input. IN OUT 2.1 home stereo installation The following diagram shows a typical two-channel (2.1 speaker) installation that uses passive stereo speakers and plugs into a home stereo standard left and right) Connecting Speakers or Microphone 25

Getting Started Guide
Page 34
Your system may be different. This is only a suggested configuration. IN OUT 5.1 home audio installation The following diagram shows a typical advanced home theater audio six-channel (6/5.1 speaker) installation that requires multichannel inputs on a receiver/amplifier. ...
Your system may be different. This is only a suggested configuration. IN OUT 5.1 home audio installation The following diagram shows a typical advanced home theater audio six-channel (6/5.1 speaker) installation that requires multichannel inputs on a receiver/amplifier. ...

Getting Started Guide
Page 36
...left and right) 28 Getting Started Back Sub IN OUT F E C D G Computer to the computer, configure the audio software for sound output for your computer model. Type 6: See "Configuring Audio Output with a Sound Card." 7.1 home audio installation The following diagram shows a typical advanced home theater...8/7.1 speaker installation that requires multichannel inputs on the computer. 9 After the audio system is only a suggested configuration. A B Center C Front Surr. See "Connecting Speakers or Microphone." Your system may be different. 8 Turn on a receiver/amplifier. Type 3:...
...left and right) 28 Getting Started Back Sub IN OUT F E C D G Computer to the computer, configure the audio software for sound output for your computer model. Type 6: See "Configuring Audio Output with a Sound Card." 7.1 home audio installation The following diagram shows a typical advanced home theater...8/7.1 speaker installation that requires multichannel inputs on the computer. 9 After the audio system is only a suggested configuration. A B Center C Front Surr. See "Connecting Speakers or Microphone." Your system may be different. 8 Turn on a receiver/amplifier. Type 3:...

Getting Started Guide
Page 38
... before you turn on the sound card. If the red RCA stereo plug does not work, try the white stereo plug. Type 6: See "Configuring Audio Output with Sound Effect Manager." Connecting Digital Audio (Select models only) If you have a sound card and you connect the digital output. ...off the computer. 2 Connect the Digital Out connector on the back panel of the connectors is six connectors. One of your computer to the computer, configure the audio software for sound output for your computer model. Type 6 is not used. See "Connecting Speakers or Microphone." 6 Turn on the receiver/...
... before you turn on the sound card. If the red RCA stereo plug does not work, try the white stereo plug. Type 6: See "Configuring Audio Output with Sound Effect Manager." Connecting Digital Audio (Select models only) If you have a sound card and you connect the digital output. ...off the computer. 2 Connect the Digital Out connector on the back panel of the connectors is six connectors. One of your computer to the computer, configure the audio software for sound output for your computer model. Type 6 is not used. See "Connecting Speakers or Microphone." 6 Turn on the receiver/...

Getting Started Guide
Page 39
... Line Out connector (lime green) on the right side of the control tower. Audio card with digital output and type 6 connectors: See "Configuring Audio Output with headphones For select models that include a 5.1 or higher speaker system, a headphones connector is located on the front of your ...." You can also connect headphones to the speakers and the subwoofer is already enabled as the default. Connecting Speakers or Microphone 31 See "Configuring Speaker and Sound Options." When headphones are plugged in the speaker system power. 5 Turn on the speaker system. 6 After the speakers ...
... Line Out connector (lime green) on the right side of the control tower. Audio card with digital output and type 6 connectors: See "Configuring Audio Output with headphones For select models that include a 5.1 or higher speaker system, a headphones connector is located on the front of your ...." You can also connect headphones to the speakers and the subwoofer is already enabled as the default. Connecting Speakers or Microphone 31 See "Configuring Speaker and Sound Options." When headphones are plugged in the speaker system power. 5 Turn on the speaker system. 6 After the speakers ...
