Safety and Regulatory Information Desktops, Thin Clients, and Personal Workstations
Page 16
... Support All persons using this device. This requires that at least one party to the conversation is aware that calls are dependent on the equipment (PC) associated with this device for recording telephone conversations shall comply with New Zealand law. c. b. d. The equipment shall go on -hook for a period of not... less than 5 seconds between the end of one attempt and the beginning of the next attempt. There shall be set to any single manual call attempts to go on -hook for a period of not less than 30 seconds between the end of one attempt and the beginning of ...
... Support All persons using this device. This requires that at least one party to the conversation is aware that calls are dependent on the equipment (PC) associated with this device for recording telephone conversations shall comply with New Zealand law. c. b. d. The equipment shall go on -hook for a period of not... less than 5 seconds between the end of one attempt and the beginning of the next attempt. There shall be set to any single manual call attempts to go on -hook for a period of not less than 30 seconds between the end of one attempt and the beginning of ...
PC Basics Guide
Page 10
.... 2 Click Start on the taskbar. 3 Click Turn Off Computer, at the bottom of using Windows without having to wait for more information on putting your PC in standby mode manually: 1 Press the Standby button on the keyboard, or press the Standby button. Another way to do so. Turning Off the...
.... 2 Click Start on the taskbar. 3 Click Turn Off Computer, at the bottom of using Windows without having to wait for more information on putting your PC in standby mode manually: 1 Press the Standby button on the keyboard, or press the Standby button. Another way to do so. Turning Off the...
PC Basics Guide
Page 11
...Instead, click Start, click Turn Off Computer, and then click Restart. 2 Turn on the PC again, your PC for approximately 5 seconds until the PC turns off . Introducing the PC 5 To put the PC into hibernation manually: 1 Click Start on the taskbar. 2 Click Turn Off Computer. 3 Press and hold ...the On button on the front of the PC. refer to steps 1 through 6 of "Automatic Standby or Hibernation" on ...
...Instead, click Start, click Turn Off Computer, and then click Restart. 2 Turn on the PC again, your PC for approximately 5 seconds until the PC turns off . Introducing the PC 5 To put the PC into hibernation manually: 1 Click Start on the taskbar. 2 Click Turn Off Computer. 3 Press and hold ...the On button on the front of the PC. refer to steps 1 through 6 of "Automatic Standby or Hibernation" on ...
PC Basics Guide
Page 25
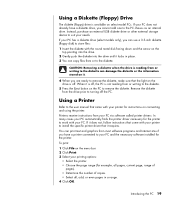
...the drive until it locks in a range. 4 Click OK. Using a Printer Refer to the user manual that came with your PC does not already have a diskette drive, you have a printer connected to your PC and the necessary software installed for the printer. Using a Diskette (Floppy) Drive The diskette (floppy) ... all, odd, or even pages in place. 3 You can use a 3.5-inch diskette (floppy disk) to turning off . If it requires. Introducing the PC 19 Printers receive instructions from or to remove the diskette, make sure that come with the round metal disk facing down and the arrow on...
...the drive until it locks in a range. 4 Click OK. Using a Printer Refer to the user manual that came with your PC does not already have a diskette drive, you have a printer connected to your PC and the necessary software installed for the printer. Using a Diskette (Floppy) Drive The diskette (floppy) ... all, odd, or even pages in place. 3 You can use a 3.5-inch diskette (floppy disk) to turning off . If it requires. Introducing the PC 19 Printers receive instructions from or to remove the diskette, make sure that come with the round metal disk facing down and the arrow on...
PC Basics Guide
Page 27
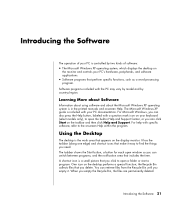
... vary by model and by two kinds of your PC is the work area that perform specific functions, such as a word processing program. For Microsoft Windows, you click to open the built-in the printed manuals and onscreen Help. Using the Desktop The desktop is controlled by country/region. When you empty it easy...
... vary by model and by two kinds of your PC is the work area that perform specific functions, such as a word processing program. For Microsoft Windows, you click to open the built-in the printed manuals and onscreen Help. Using the Desktop The desktop is controlled by country/region. When you empty it easy...
PC Basics Guide
Page 48
... microphone adjusting volume, 16 using, 15 modem connecting, 31 setting up, 31 42 PC Basics Guide monitor changing resolution, 13 changing where desktop displays, 13 selecting, 13 mouse autoscroll feature, 8 buttons, 7 double-click, 7... left-handed, 8 optical, 6 panning feature, 8 pointer speed, adjusting, 8 scrolling, 7 using , 19 programs, uninstalling, 38 floppy disk. See Internet, about network interface about , 4 standby mode, automatic, 5 standby mode, manual, 4 turning off, 4 performance improving PC...
... microphone adjusting volume, 16 using, 15 modem connecting, 31 setting up, 31 42 PC Basics Guide monitor changing resolution, 13 changing where desktop displays, 13 selecting, 13 mouse autoscroll feature, 8 buttons, 7 double-click, 7... left-handed, 8 optical, 6 panning feature, 8 pointer speed, adjusting, 8 scrolling, 7 using , 19 programs, uninstalling, 38 floppy disk. See Internet, about network interface about , 4 standby mode, automatic, 5 standby mode, manual, 4 turning off, 4 performance improving PC...
PC Basics Guide
Page 49
R receiving e-mails, 35 recording volume, adjusting microphone, 16 recycle bin emptying, 38 getting files out of the recycle bin, 30 removing desktop icons, 22 removing unneeded software, 38 resizing a window, 25 resolution, monitor, 13 restricting Internet content, 34 S saving electricity, 4, 5 ScanDisk...14 speaker volume, adjusting, 14 speakers, 14 multi-channel, 14 standby mode automatic, 5 manual, 4 Start button, 23 Start menu contents, 23 surface, using mouse on, 6 T television, viewing PC image on a TV, 13 turning off PC, 4 TV connecting, 13 TV-out, 13 cables, 13 disabling TV option, 13 U...
R receiving e-mails, 35 recording volume, adjusting microphone, 16 recycle bin emptying, 38 getting files out of the recycle bin, 30 removing desktop icons, 22 removing unneeded software, 38 resizing a window, 25 resolution, monitor, 13 restricting Internet content, 34 S saving electricity, 4, 5 ScanDisk...14 speaker volume, adjusting, 14 speakers, 14 multi-channel, 14 standby mode automatic, 5 manual, 4 Start button, 23 Start menu contents, 23 surface, using mouse on, 6 T television, viewing PC image on a TV, 13 turning off PC, 4 TV connecting, 13 TV-out, 13 cables, 13 disabling TV option, 13 U...

Warranty and Support Guide - 1 year
Page 14
...lightning. • Do not use this product to the incorrect position can be easily accessible at any 30-minute period for a single manual call initiation. Always use in the vicinity of the leak. • Always disconnect the modem cable before opening the equipment enclosure or touching... IEC 60950). For correct operation of the ringers in personal injury or equipment damage. Hazardous voltage levels are dependent on the equipment (PC) associated with this modem. Dispose of used batteries according to avoid the risk of electrical shock. The AC power cord is your ...
...lightning. • Do not use this product to the incorrect position can be easily accessible at any 30-minute period for a single manual call initiation. Always use in the vicinity of the leak. • Always disconnect the modem cable before opening the equipment enclosure or touching... IEC 60950). For correct operation of the ringers in personal injury or equipment damage. Hazardous voltage levels are dependent on the equipment (PC) associated with this modem. Dispose of used batteries according to avoid the risk of electrical shock. The AC power cord is your ...

Warranty and Support Guide - 1 Year Parts and Labor
Page 12
...electrical storm. Hazardous voltage levels are correctly entered. WARNING: When using this product near an AC outlet. Lithium Battery Caution WARNING: The PC uses a lithium battery, type CR2032. There is danger of used batteries according to the manufacturer's instructions. 12 Replace only with a ...) to an "IT" power system (an AC distribution system with the cover removed. For your PC's main AC disconnecting device and must be easily accessible at all manually programmed telephone numbers are inside the power supply and modem of this modem to operate with your computer...
...electrical storm. Hazardous voltage levels are correctly entered. WARNING: When using this product near an AC outlet. Lithium Battery Caution WARNING: The PC uses a lithium battery, type CR2032. There is danger of used batteries according to the manufacturer's instructions. 12 Replace only with a ...) to an "IT" power system (an AC distribution system with the cover removed. For your PC's main AC disconnecting device and must be easily accessible at all manually programmed telephone numbers are inside the power supply and modem of this modem to operate with your computer...

Warranty and Support Guide - 90 days
Page 13
... and the beginning of the next attempt. • For automatically answered incoming calls: Incoming calls shall be found printed on the equipment (PC) associated with this modem. AC Power Safety Warning WARNING: Install the computer near a swimming pool. • Avoid using this device, ...ringers in the vicinity of the leak. • Always disconnect the modem cable before installing or removing your PC and void any 30-minute period for a single manual call attempts to the same number within the following limits for compliance with Telecom's specification: • For ...
... and the beginning of the next attempt. • For automatically answered incoming calls: Incoming calls shall be found printed on the equipment (PC) associated with this modem. AC Power Safety Warning WARNING: Install the computer near a swimming pool. • Avoid using this device, ...ringers in the vicinity of the leak. • Always disconnect the modem cable before installing or removing your PC and void any 30-minute period for a single manual call attempts to the same number within the following limits for compliance with Telecom's specification: • For ...
Getting Started Guide
Page 11
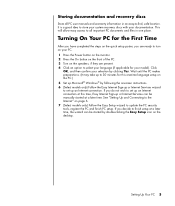
...discs with your documentation. See "Setting Up and Connecting to the Internet" on the desktop. If you decide to update the PC security tools, register the PC and finish PC setup. It is a good idea to all PC user manuals and warranty information in one -time language setup on the speakers, if they are... Easy Setup wizard to finish setup at a later time, the wizard can be manually started at a later time. Storing documentation and recovery discs Store all important PC documents and files in an easy-to turn on your PC. 1 Press the Power button on the monitor. 2 Press the On button on...
...discs with your documentation. See "Setting Up and Connecting to the Internet" on the desktop. If you decide to update the PC security tools, register the PC and finish PC setup. It is a good idea to all PC user manuals and warranty information in one -time language setup on the speakers, if they are... Easy Setup wizard to finish setup at a later time, the wizard can be manually started at a later time. Storing documentation and recovery discs Store all important PC documents and files in an easy-to turn on your PC. 1 Press the Power button on the monitor. 2 Press the On button on...

Getting Started Guide
Page 41
...without enabling the wizard, click OK. Click OK to enable the wizard. A connector with no descriptive text in the center of the PC. selects the digital audio output and digital audio frequency for the selected speaker configuration. • Digital Audio - Configuring Speaker and Sound Options... 35 You can select an environment such as Pop or Live, or manually adjust the settings and then save them for WinDVD Player" on the PC. • Audio Wizard - To use the Equalizer, click the Power button in the Connector Guide ...
...without enabling the wizard, click OK. Click OK to enable the wizard. A connector with no descriptive text in the center of the PC. selects the digital audio output and digital audio frequency for the selected speaker configuration. • Digital Audio - Configuring Speaker and Sound Options... 35 You can select an environment such as Pop or Live, or manually adjust the settings and then save them for WinDVD Player" on the PC. • Audio Wizard - To use the Equalizer, click the Power button in the Connector Guide ...

Getting Started Guide
Page 43
...on the taskbar. 2 Click Control Panel. 3 Click Sounds, then Speech and Audio Devices (or Sounds and Audio Devices). To configure multichannel audio output for your PC model has type 6 connectors and is fixed in the center of the circular equalizer control to set up multi-streaming. • Audio I/O - To use the... your speakers, if your configuration, change the speaker selection in to the speakers, feedback can select an environment, such as Pop or Live, or manually adjust the settings and then save them for noise suppression and acoustic echo cancellation. You can occur.
...on the taskbar. 2 Click Control Panel. 3 Click Sounds, then Speech and Audio Devices (or Sounds and Audio Devices). To configure multichannel audio output for your PC model has type 6 connectors and is fixed in the center of the circular equalizer control to set up multi-streaming. • Audio I/O - To use the... your speakers, if your configuration, change the speaker selection in to the speakers, feedback can select an environment, such as Pop or Live, or manually adjust the settings and then save them for noise suppression and acoustic echo cancellation. You can occur.

Getting Started Guide
Page 71
... a music CD in CD audio (CDA) format, not as a data CD. • As you add music files in your collection. • If your recording fails, manually select a slower recording speed, if available, each time you make a recording. This data verification feature is important to record more than those permitted by default...
... a music CD in CD audio (CDA) format, not as a data CD. • As you add music files in your collection. • If your recording fails, manually select a slower recording speed, if available, each time you make a recording. This data verification feature is important to record more than those permitted by default...

Getting Started Guide
Page 74
... of the following: • Click Add Data and navigate to files stored on your PC. • In the Quick Scan panel, select a type of recording space used on your disc. • If your recording fails, manually select a slower recording speed, if available, each time you make a recording. Sonic... to your disc, Sonic DigitalMedia Plus calculates and displays the amount of file to search for, and then click Scan to automatically search your PC for more information about selecting a slower recording speed. NOTE: An appendable disc can have added all the files to your data project. 7...
... of the following: • Click Add Data and navigate to files stored on your PC. • In the Quick Scan panel, select a type of recording space used on your disc. • If your recording fails, manually select a slower recording speed, if available, each time you make a recording. Sonic... to your disc, Sonic DigitalMedia Plus calculates and displays the amount of file to search for, and then click Scan to automatically search your PC for more information about selecting a slower recording speed. NOTE: An appendable disc can have added all the files to your data project. 7...

Getting Started Guide
Page 86
... stored as described in a file on your hard disk drive. The video capture is stored on your hard disk drive and added to save it. Manually stops the capture if you created as a picture file (.jpg, .bmp, .gif, .tif, or .png format). • Start Capturing - To add a video capture to display... Length, Chapter Points, or Scene Detection. The file is added to your video project and stored in "Creating a Video Project" on page 79. 2 Connect your PC's USB connector.
... stored as described in a file on your hard disk drive. The video capture is stored on your hard disk drive and added to save it. Manually stops the capture if you created as a picture file (.jpg, .bmp, .gif, .tif, or .png format). • Start Capturing - To add a video capture to display... Length, Chapter Points, or Scene Detection. The file is added to your video project and stored in "Creating a Video Project" on page 79. 2 Connect your PC's USB connector.

Getting Started Guide
Page 87
... clicking the Help icon. 4 Click OK to add the slide show to the previous menu by a Next button. Adding slideshows to a video project You can manually add submenus to a project and use them to your project or by capturing them with a connected digital video source. You can create a slideshow (a series of...
... clicking the Help icon. 4 Click OK to add the slide show to the previous menu by a Next button. Adding slideshows to a video project You can manually add submenus to a project and use them to your project or by capturing them with a connected digital video source. You can create a slideshow (a series of...

Getting Started Guide
Page 90
... the type of the following : • Record to DVD (or Record to VCD if you do not want to be able to select from your PC. 2 Click Start, choose All Programs, Sonic, and then DigitalMedia Home. 3 Click the Video button and then Direct-to-Disc. 4 Click DVD or VCD depending on.... The Direct-to-VCD or Direct-to-DVD Wizard displays. 5 Click Edit Style, and edit any of copies, and write speed. • Record to create. Manually stops the capture if you want to hard disk -
... the type of the following : • Record to DVD (or Record to VCD if you do not want to be able to select from your PC. 2 Click Start, choose All Programs, Sonic, and then DigitalMedia Home. 3 Click the Video button and then Direct-to-Disc. 4 Click DVD or VCD depending on.... The Direct-to-VCD or Direct-to-DVD Wizard displays. 5 Click Edit Style, and edit any of copies, and write speed. • Record to create. Manually stops the capture if you want to hard disk -

Getting Started Guide
Page 99
.... 6 Use magicSpot to control the motion that is applied to your picture: • Select the magicSpot button to open the magicSpot window. • Click the manual button to display two overlapping frames over your picture. • Move the frames around to set the length of your video production and preferences. Selecting...
.... 6 Use magicSpot to control the motion that is applied to your picture: • Select the magicSpot button to open the magicSpot window. • Click the manual button to display two overlapping frames over your picture. • Move the frames around to set the length of your video production and preferences. Selecting...

Getting Started Guide
Page 103
... no onscreen guides. Getting Help 97 Finding Guides on your PC has no guide titles listed in the folder, your PC where you want and do one of your PC, and then click Search . 4 Click Manuals. 5 Locate the manual you can download it from the Manuals page if it . NOTE: If there are available in Adobe... Start on the taskbar. 2 Choose All Programs. 3 Choose User's Guides. 4 Click an item to view it or use it is not currently installed on your PC). • Right-click the title, select Save Target As, specify a location on the Web You can find guides and information for your...
... no onscreen guides. Getting Help 97 Finding Guides on your PC has no guide titles listed in the folder, your PC where you want and do one of your PC, and then click Search . 4 Click Manuals. 5 Locate the manual you can download it from the Manuals page if it . NOTE: If there are available in Adobe... Start on the taskbar. 2 Choose All Programs. 3 Choose User's Guides. 4 Click an item to view it or use it is not currently installed on your PC). • Right-click the title, select Save Target As, specify a location on the Web You can find guides and information for your...


