

Drives - Windows Vista
Page 5
Table of contents 1 Identifying installed drives 2 Handling drives 3 Using an optical drive Inserting an optical disc (CD or DVD 4 Removing an optical disc (CD or DVD 5 When the disc tray opens ...5 When the disc tray does not open 5 4 Improving hard drive performance Using Disk Defragmenter ...7 Using Disk Cleanup ...7 5 Replacing the hard drive Index ...11 v
Table of contents 1 Identifying installed drives 2 Handling drives 3 Using an optical drive Inserting an optical disc (CD or DVD 4 Removing an optical disc (CD or DVD 5 When the disc tray opens ...5 When the disc tray does not open 5 4 Improving hard drive performance Using Disk Defragmenter ...7 Using Disk Cleanup ...7 5 Replacing the hard drive Index ...11 v
Drives - Windows Vista
Page 14
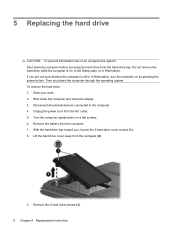
... whether the computer is on by pressing the power button. If you , loosen the 2 hard drive cover screws (1). 8. Disconnect all external devices connected to the computer. 4. Remove the 2 hard drive screws (1). 8 Chapter 5 Replacing the hard drive Then shut down the computer before removing the hard drive from the computer (2). 9. Shut down on a flat surface. 6. Remove the battery from the...
... whether the computer is on by pressing the power button. If you , loosen the 2 hard drive cover screws (1). 8. Disconnect all external devices connected to the computer. 4. Remove the 2 hard drive screws (1). 8 Chapter 5 Replacing the hard drive Then shut down the computer before removing the hard drive from the computer (2). 9. Shut down on a flat surface. 6. Remove the battery from the...
Drives - Windows Vista
Page 15
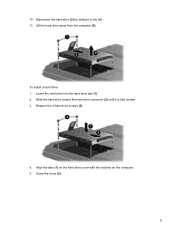
Disconnect the hard drive (2) by sliding it is fully seated. 3. Align the tabs (1) on the hard drive cover with the notches on the computer. 5. Lower the hard drive into the hard drive bay (1). 2. Slide the hard drive toward the hard drive connector (2) until it to the left. 11. 10. Close the cover (2). 9 To install a hard drive: 1. Replace the 2 hard drive screws (3). 4. Lift the hard drive away from the computer (3).
Disconnect the hard drive (2) by sliding it is fully seated. 3. Align the tabs (1) on the hard drive cover with the notches on the computer. 5. Lower the hard drive into the hard drive bay (1). 2. Slide the hard drive toward the hard drive connector (2) until it to the left. 11. 10. Close the cover (2). 9 To install a hard drive: 1. Replace the 2 hard drive screws (3). 4. Lift the hard drive away from the computer (3).
Drives - Windows Vista
Page 16
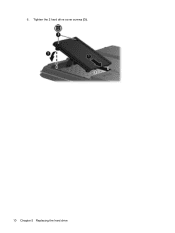
Tighten the 2 hard drive cover screws (3). 10 Chapter 5 Replacing the hard drive 6.
Tighten the 2 hard drive cover screws (3). 10 Chapter 5 Replacing the hard drive 6.

Drives - Windows Vista
Page 17
optical drive O optical disc inserting 4 removing 5 optical drive 3 S software Disk Cleanup 7 Disk Defragmenter 7 DVD inserting 4 removing 5 DVD drive 3 H hard disk drive installing 9 removing 8 replacing 8 hard drive installing 9 removing 8 replacing 8 M maintenance Disk Cleanup 7 Disk Defragmenter 7 Index 11 Index A airport security devices 2 C CD inserting 4 removing 5 CD drive 3 D Disk Cleanup software 7 Disk Defragmenter software 7 disk performance 7 drives caring for 2 hard 8, 9 optical 3 See also hard drive;
optical drive O optical disc inserting 4 removing 5 optical drive 3 S software Disk Cleanup 7 Disk Defragmenter 7 DVD inserting 4 removing 5 DVD drive 3 H hard disk drive installing 9 removing 8 replacing 8 hard drive installing 9 removing 8 replacing 8 M maintenance Disk Cleanup 7 Disk Defragmenter 7 Index 11 Index A airport security devices 2 C CD inserting 4 removing 5 CD drive 3 D Disk Cleanup software 7 Disk Defragmenter software 7 disk performance 7 drives caring for 2 hard 8, 9 optical 3 See also hard drive;


