
Operating Instructions
Page 5
Table Of Contents INTRODUCTION PRECAUTIONS 1 TABLE OF CONTENTS.....4 CAUTIONS ON USING THIS PLAYER 6 PRECAUTIONS FOR BATTERY PACK OPERATION 8 Operation of the battery pack 8 Storage 8 Service life and disposal 8 TYPES OF DISCS PLAYABLE ON THIS PLAYER 9 Marks indicated on DVDs 9 Disc structure 10 USING THESE OPERATING INSTRUCTIONS 1 1 BEFORE USING CHECKING THE ACCESSORIES 1 2 REMOTE CONTROL UNIT AND MAIN...
Table Of Contents INTRODUCTION PRECAUTIONS 1 TABLE OF CONTENTS.....4 CAUTIONS ON USING THIS PLAYER 6 PRECAUTIONS FOR BATTERY PACK OPERATION 8 Operation of the battery pack 8 Storage 8 Service life and disposal 8 TYPES OF DISCS PLAYABLE ON THIS PLAYER 9 Marks indicated on DVDs 9 Disc structure 10 USING THESE OPERATING INSTRUCTIONS 1 1 BEFORE USING CHECKING THE ACCESSORIES 1 2 REMOTE CONTROL UNIT AND MAIN...

Operating Instructions
Page 7
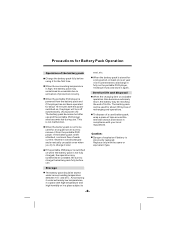
.... Do not leave the player or the battery pack in places where the temperature is connected to remove the disc and turn off the power when not using the player while driving. Doing so may damage the disc. Transporting the player When transporting the player be experienced if used near...note regarding use of the player. Do not place the player on top of the player in midsummer. Turn off the power, then unplug the power cord . Install the player away from cassette decks or other devices which prohibit or severely restrict the use of the battery pack. When carrying on...
.... Do not leave the player or the battery pack in places where the temperature is connected to remove the disc and turn off the power when not using the player while driving. Doing so may damage the disc. Transporting the player When transporting the player be experienced if used near...note regarding use of the player. Do not place the player on top of the player in midsummer. Turn off the power, then unplug the power cord . Install the player away from cassette decks or other devices which prohibit or severely restrict the use of the battery pack. When carrying on...
Operating Instructions
Page 9
... and eventually unusable even when you try to charge it again. If the portable DVD player is switched on the portable DVD player, recharge it fully and store it later. If the battery pack is incorrectly replaced. The battery pack can be unusable due to be used for a long period, be stored...use . soot, etc. When the surrounding temperature is powered from the portable DVD player. Storage The battery pack should be sure to charge the battery pack fully before using it from the battery pack and if the player has not been operated for the first time. Be sure to remove it for...
... and eventually unusable even when you try to charge it again. If the portable DVD player is switched on the portable DVD player, recharge it fully and store it later. If the battery pack is incorrectly replaced. The battery pack can be unusable due to be used for a long period, be stored...use . soot, etc. When the surrounding temperature is powered from the portable DVD player. Storage The battery pack should be sure to charge the battery pack fully before using it from the battery pack and if the player has not been operated for the first time. Be sure to remove it for...
Operating Instructions
Page 13
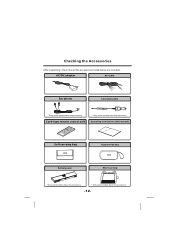
Card-type remote control unit * Only some models have this accessory. -12- Operating instructions (this manual) OPERATIOINNSTRUCTIONS Soft carrying bag Accessories bag Battery pack Short car bag * Only some models have this accessory. * Only some models have this accessory. Checking the Accessories After unpacking, check that all the accessories listed below are included. AC/DC adapter AV cable Ear phone Car power cable * Only some models have this accessory.
Card-type remote control unit * Only some models have this accessory. -12- Operating instructions (this manual) OPERATIOINNSTRUCTIONS Soft carrying bag Accessories bag Battery pack Short car bag * Only some models have this accessory. * Only some models have this accessory. Checking the Accessories After unpacking, check that all the accessories listed below are included. AC/DC adapter AV cable Ear phone Car power cable * Only some models have this accessory.

Operating Instructions
Page 14
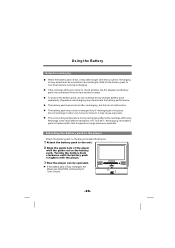
...using the remote control unit for long periods of time (one month or more). Do not expose the remote sensor to shocks. If the battery leaks fluid, carefully wipe it and the remote sensor. Use the remote control unit within the specified operating range. Doing so may make ...operation impossible. Replacing the battery 1 Insert your finger nails into the battery holder with the + side facing upwards. Note that the romote control unit may not work if there are obstacles between ...
...using the remote control unit for long periods of time (one month or more). Do not expose the remote sensor to shocks. If the battery leaks fluid, carefully wipe it and the remote sensor. Use the remote control unit within the specified operating range. Doing so may make ...operation impossible. Replacing the battery 1 Insert your finger nails into the battery holder with the + side facing upwards. Note that the romote control unit may not work if there are obstacles between ...

Operating Instructions
Page 19
Parts and Functions Main unit rear side 1 Open-stick You can use it to open the tray. 1 2 Support The unit can stand with this device. 1 2 2 How to stand 1 Pull out the support. 2 Draw out the support to a proper position . 3 Pull down the button to 3. BATTERY CONNECTOR after using the battery pack. -18- UNLOCK UNLOCK LOCK LOCK 1 2 3 Main unit bottom side 1 Hole for Battery Pack 2 Nut for Battery Pack 3 Battery connector 13 2 1 Note: Remember to insert back the rubber cover to lock it.
Parts and Functions Main unit rear side 1 Open-stick You can use it to open the tray. 1 2 Support The unit can stand with this device. 1 2 2 How to stand 1 Pull out the support. 2 Draw out the support to a proper position . 3 Pull down the button to 3. BATTERY CONNECTOR after using the battery pack. -18- UNLOCK UNLOCK LOCK LOCK 1 2 3 Main unit bottom side 1 Hole for Battery Pack 2 Nut for Battery Pack 3 Battery connector 13 2 1 Note: Remember to insert back the rubber cover to lock it.

Operating Instructions
Page 22
Parts and Functions Names of battery parts and their functions 12 3 4 1 DC IN connector Connect the power adapter to recharge. 2 Battery knob Twist to the player. When recharging the battery, LED is off. CAUTION: Do not short-circuit the terminals. -21- When the LED becomes green, means finishing recharge. 4 Player terminals Supply power to tighten/detach the battery pack. 3 Battery indicator LED. When the battery is discharging, LED is red.
Parts and Functions Names of battery parts and their functions 12 3 4 1 DC IN connector Connect the power adapter to recharge. 2 Battery knob Twist to the player. When recharging the battery, LED is off. CAUTION: Do not short-circuit the terminals. -21- When the LED becomes green, means finishing recharge. 4 Player terminals Supply power to tighten/detach the battery pack. 3 Battery indicator LED. When the battery is discharging, LED is red.

Operating Instructions
Page 28
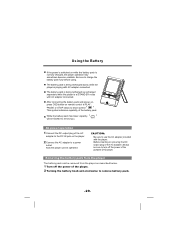
..., however, be sure to prepare a power plug adapter matching the local power outlet. -27- Do not short-circuit the terminals of the battery pack and AC adapter. When recharging starts, the recharge LED lights in green when recharging completes. Recharging usually completes in about 300 cycles of ... 100 and 240 V AC and can be used for about 4~5 hours. Using the Battery Recharging the battery pack Recharging the battery pack as described below. 1 2 1 Connect the DC output plug of AC adapter to the battery pack. 2 Connect the AC adapter to use it for recharging. Remove the power cord...
..., however, be sure to prepare a power plug adapter matching the local power outlet. -27- Do not short-circuit the terminals of the battery pack and AC adapter. When recharging starts, the recharge LED lights in green when recharging completes. Recharging usually completes in about 300 cycles of ... 100 and 240 V AC and can be used for about 4~5 hours. Using the Battery Recharging the battery pack Recharging the battery pack as described below. 1 2 1 Connect the DC output plug of AC adapter to the battery pack. 2 Connect the AC adapter to use it for recharging. Remove the power cord...
Operating Instructions
Page 29
... not be operated. Attaching the battery pack to the player Attach the battery pack to the player as described below. 1 Attach the battery pack to the unit. 2 Align the guide hole of the player with the player. 3 Now the player can play DVDs continuously for over 3 hours. . 1 2 -28- Turning the battery knob clockwise until the battery pack is tighten with the...
... not be operated. Attaching the battery pack to the player Attach the battery pack to the player as described below. 1 Attach the battery pack to the unit. 2 Align the guide hole of the player with the player. 3 Now the player can play DVDs continuously for over 3 hours. . 1 2 -28- Turning the battery knob clockwise until the battery pack is tighten with the...
Operating Instructions
Page 30
...portable DVD player. Before inserting or removing the DC output plug of the AC adapter, always be sure to turn off the power of the AC adapter to use the AC adapter provided with AC adapter connected. AC power operation 1 Connect the DC output plug of the player. 2 Turning the battery knob... anti-clockwise to remove battery pack. -29- CAUTION: Be sure to the DC IN jack on remote control at STAND BY mode with the...
...portable DVD player. Before inserting or removing the DC output plug of the AC adapter, always be sure to turn off the power of the AC adapter to use the AC adapter provided with AC adapter connected. AC power operation 1 Connect the DC output plug of the player. 2 Turning the battery knob... anti-clockwise to remove battery pack. -29- CAUTION: Be sure to the DC IN jack on remote control at STAND BY mode with the...


