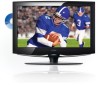

User Manual
Page 2
... connected. •• Consult the dealer or an experienced radio/TV technician for help Use of the equipment. Dangerous high voltage is no response or powers off and on, the user is encouraged to try to the equipment unless otherwise specified in a residential installation. However, there is present inside the enclosure...
... connected. •• Consult the dealer or an experienced radio/TV technician for help Use of the equipment. Dangerous high voltage is no response or powers off and on, the user is encouraged to try to the equipment unless otherwise specified in a residential installation. However, there is present inside the enclosure...

User Manual
Page 3
...not insert anything into the ventilation holes of the serial/model plate. 1111 Never overload wall outlets and extensions. 1111 Use and handle the power cord with care. Refer service to qualified personnel. 2222 Do not place or drop any way, such as the disconnected device, the ...particularly at plugs ,convenience receptacles, and the point where they exit 2222 Refer all servicing to fire or electric shock. 2222 Protect the power cord from the outlet before the product is damaged, liquid has been spilled or objects have fallen into the electrical outlet, contact an electrician...
...not insert anything into the ventilation holes of the serial/model plate. 1111 Never overload wall outlets and extensions. 1111 Use and handle the power cord with care. Refer service to qualified personnel. 2222 Do not place or drop any way, such as the disconnected device, the ...particularly at plugs ,convenience receptacles, and the point where they exit 2222 Refer all servicing to fire or electric shock. 2222 Protect the power cord from the outlet before the product is damaged, liquid has been spilled or objects have fallen into the electrical outlet, contact an electrician...
User Manual
Page 4
... and supporting structure, grounding of the lead-in wire to an antenna discharge unit, size of grounding conductors, location of Coby Electronics Corporation. Manufactured under license from earphones and headphones can cause hearing loss. •• To avoid damaging your ears... indicated otherwise. HDMI, the HDMI logo and High-Definition Multimedia Interface are trademarks or registered trademarks of properly. Direct contact with power lines may suddenly begin at a high Volume. All rights reserved. Confidential unpublished works. © 1992 -1997 Dolby Laboratories, Inc...
... and supporting structure, grounding of the lead-in wire to an antenna discharge unit, size of grounding conductors, location of Coby Electronics Corporation. Manufactured under license from earphones and headphones can cause hearing loss. •• To avoid damaging your ears... indicated otherwise. HDMI, the HDMI logo and High-Definition Multimedia Interface are trademarks or registered trademarks of properly. Direct contact with power lines may suddenly begin at a high Volume. All rights reserved. Confidential unpublished works. © 1992 -1997 Dolby Laboratories, Inc...
User Manual
Page 6
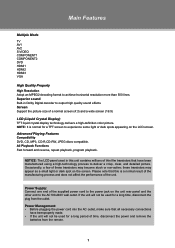
...a normal screen (4:3) and a wide screen (16:9) LCD (Liquid Crystal Display) TFT liquid crystal display technology delivers a high-definition color picture. Power Supply: Connect one end of these transistors may become stuck or non-active; Superior sound Built-in this is normal for a long period of the... on the screen. NOTE: It is a normal result of the manufacturing process and does not affect the performance of time, disconnect the power and remove the batteries from the outlet. Advanced Playing Features Compatibility DVD, CD, MP3, CD-R,CD-RW, JPEG discs compatible. If the...
...a normal screen (4:3) and a wide screen (16:9) LCD (Liquid Crystal Display) TFT liquid crystal display technology delivers a high-definition color picture. Power Supply: Connect one end of these transistors may become stuck or non-active; Superior sound Built-in this is normal for a long period of the... on the screen. NOTE: It is a normal result of the manufacturing process and does not affect the performance of time, disconnect the power and remove the batteries from the outlet. Advanced Playing Features Compatibility DVD, CD, MP3, CD-R,CD-RW, JPEG discs compatible. If the...

User Manual
Page 7
c. b. a, Main Unit b, Power Cord & RCA Cable c, Remote Control Unit 2 a. Package Contents Please make sure the following items are included with your dealer. If any item is missing, contact your product.
c. b. a, Main Unit b, Power Cord & RCA Cable c, Remote Control Unit 2 a. Package Contents Please make sure the following items are included with your dealer. If any item is missing, contact your product.

User Manual
Page 8
... damage or serious injury should it fall from its mountings. PLAY/PAUSE - A variety of mounts are available in the standby/power-on /off the player. 17 9. Wall Mounting Thread X 4 16. Wall Mounting - MENU 15 Display the system setup menu. 6. Disc Slot 10.... POWER Press to turn on mode, 3. Unit View 1 9 10 11 12 13 14 2 4 5 6 7 8 3 1. Open/close the disc room. 15. Adjust sound output level. 8. TFT SCREEN Present high resolution pictures 2. POWER INDICATOR Lights blue in your local retailer, see instructions ...
... damage or serious injury should it fall from its mountings. PLAY/PAUSE - A variety of mounts are available in the standby/power-on /off the player. 17 9. Wall Mounting Thread X 4 16. Wall Mounting - MENU 15 Display the system setup menu. 6. Disc Slot 10.... POWER Press to turn on mode, 3. Unit View 1 9 10 11 12 13 14 2 4 5 6 7 8 3 1. Open/close the disc room. 15. Adjust sound output level. 8. TFT SCREEN Present high resolution pictures 2. POWER INDICATOR Lights blue in your local retailer, see instructions ...

User Manual
Page 9
... A to a channel substation (e.g., 4-1, 4-2). 5 24 e.g. SUBTITLE Display available DVD subtitles. 15. LIGHT Turn the front panel light on or off . 20. Numeric Keypad 2 Input numberic data. POWER 1 21 Turn the unit on /off (standby). 2. Fast Reverse 12 Search fast backward through the sleep timer options. 14. INFO 20 36 37 38 Display...
... A to a channel substation (e.g., 4-1, 4-2). 5 24 e.g. SUBTITLE Display available DVD subtitles. 15. LIGHT Turn the front panel light on or off . 20. Numeric Keypad 2 Input numberic data. POWER 1 21 Turn the unit on /off (standby). 2. Fast Reverse 12 Search fast backward through the sleep timer options. 14. INFO 20 36 37 38 Display...

User Manual
Page 12
Cable Connections Figure. PC Connection IMPORTANT NOTICE 111 Be sure to have all necessary connections properly done before connect the power supply. 222 If you have difficulty inserting the plug, turn off both units and then connect the VGA jack and the PC Audio In jack ...~240V VGA Input - A C100V-240V 50Hz/60Hz 7 The VGA port of the TV is capable of time, disconnect the power. To completely disconnect the main voltage, please disconnect the power plug from the main voltage. You can use 75 Ohm coaxial cable to connect outdoor antenna. 222 Insert one end of...
Cable Connections Figure. PC Connection IMPORTANT NOTICE 111 Be sure to have all necessary connections properly done before connect the power supply. 222 If you have difficulty inserting the plug, turn off both units and then connect the VGA jack and the PC Audio In jack ...~240V VGA Input - A C100V-240V 50Hz/60Hz 7 The VGA port of the TV is capable of time, disconnect the power. To completely disconnect the main voltage, please disconnect the power plug from the main voltage. You can use 75 Ohm coaxial cable to connect outdoor antenna. 222 Insert one end of...

User Manual
Page 13
... 50Hz/60Hz Coaxial cable (not supplied) External Audio and Video Signal Input - When work with electronic store. IMPORTANT NOTICE - The rest of power cord with this product. Four input modes are not included with this product, please check with external device, •• Be sure to have... all necessary connections properly done before connect the power supply. •• Set the unit into the relative input/output mode to enable the signal pass. •• Refer to the ...
... 50Hz/60Hz Coaxial cable (not supplied) External Audio and Video Signal Input - When work with electronic store. IMPORTANT NOTICE - The rest of power cord with this product. Four input modes are not included with this product, please check with external device, •• Be sure to have... all necessary connections properly done before connect the power supply. •• Set the unit into the relative input/output mode to enable the signal pass. •• Refer to the ...

User Manual
Page 16
a. Press the UP or DOWN buttons to skip channels. buttons to browse the mode options. See the "Channel Menu" section for details). 222 Press POWER to turn on the player. 333 Press SOURCE to input channels directly. System Setup Menu Most of advanced functions and features are performed with the ...
a. Press the UP or DOWN buttons to skip channels. buttons to browse the mode options. See the "Channel Menu" section for details). 222 Press POWER to turn on the player. 333 Press SOURCE to input channels directly. System Setup Menu Most of advanced functions and features are performed with the ...
User Manual
Page 22
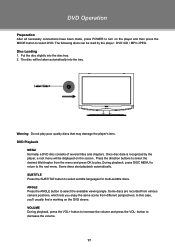
... a marking on the screen . VOLUME During playback, press the VOL+ button to select DVD. DVD Operation Preparation After all necessary connections have been made, press POWER to turn on the player and then press the MODE button to increase the volume and press the VOL- Warning: Do not play . The following...
... a marking on the screen . VOLUME During playback, press the VOL+ button to select DVD. DVD Operation Preparation After all necessary connections have been made, press POWER to turn on the player and then press the MODE button to increase the volume and press the VOL- Warning: Do not play . The following...
User Manual
Page 26
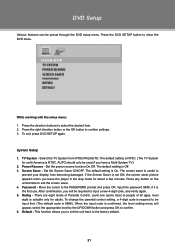
... discs to show the DVD menu. System Setup 111 TV System - DVD Setup Various features can be used if you have a Multi-System TV). 222 Power Resume - Press the DVD SETUP button to people of Parental Control. AUTO should only be preset through the DVD setup menu. The default setting is... Screen Saver is the first use. To change the parental control setting, a 4-digit code is On. Select the TV System from becoming damaged. Set the power resume function On.Off. The default setting is required to the PASSWORD prompt and press OK.
... discs to show the DVD menu. System Setup 111 TV System - DVD Setup Various features can be used if you have a Multi-System TV). 222 Power Resume - Press the DVD SETUP button to people of Parental Control. AUTO should only be preset through the DVD setup menu. The default setting is... Screen Saver is the first use. To change the parental control setting, a 4-digit code is On. Select the TV System from becoming damaged. Set the power resume function On.Off. The default setting is required to the PASSWORD prompt and press OK.

User Manual
Page 28
...been properly connected to change without prior notice. 23 If these resources do not resolve the problem, please contact Technical Support. After that, power on the player. •• Check if the batteries of the remote control have a problem with correct polarities. •• Replace...;• Check if the system has been properly connected. •• If using antenna, adjust the antenna. •• Make sure the POWER button on the unit has been turned on manually. •• Remove the obstacles between the remote control and the player. •• ...
...been properly connected to change without prior notice. 23 If these resources do not resolve the problem, please contact Technical Support. After that, power on the player. •• Check if the batteries of the remote control have a problem with correct polarities. •• Replace...;• Check if the system has been properly connected. •• If using antenna, adjust the antenna. •• Make sure the POWER button on the unit has been turned on manually. •• Remove the obstacles between the remote control and the player. •• ...

