
User Manual
Page 2
English Table of Contents Package Contents 4 Safety Precautions 5 General Operation 5 Battery ...6 Power Connection 6 Unit Components...7 Netbook at a Glance 8 Top View...8 System Status Indicators 9 Left View...10 Bottom View...11 Basic Operation 12 Power...12 AC Power 12 Battery Power 12 Getting Started...14 Turning On Your Computer 14 Sleep Mode 14 Shut Down 14 Keyboard Functions 15 Numeric Keypad 15 Function Key Combinations 15 Using the Touchpad 16 Page 2 Coby Electronics Corporation
English Table of Contents Package Contents 4 Safety Precautions 5 General Operation 5 Battery ...6 Power Connection 6 Unit Components...7 Netbook at a Glance 8 Top View...8 System Status Indicators 9 Left View...10 Bottom View...11 Basic Operation 12 Power...12 AC Power 12 Battery Power 12 Getting Started...14 Turning On Your Computer 14 Sleep Mode 14 Shut Down 14 Keyboard Functions 15 Numeric Keypad 15 Function Key Combinations 15 Using the Touchpad 16 Page 2 Coby Electronics Corporation

User Manual
Page 3
English Table of Contents Features 17 Using Memory Cards 17 Using the Web Camera 17 Using the Internet 17 LAN Port...17 Wireless ...18 Installing Device Drivers 18 External Devices 19 Connecting a Universal Serial Bus (USB) Device 19 Connecting an External Display 19 Connecting an Audio Device 20 Connecting an External Microphone 20 Troubleshooting 21 Specifications 26 www.cobyusa.com Page 3
English Table of Contents Features 17 Using Memory Cards 17 Using the Web Camera 17 Using the Internet 17 LAN Port...17 Wireless ...18 Installing Device Drivers 18 External Devices 19 Connecting a Universal Serial Bus (USB) Device 19 Connecting an External Display 19 Connecting an Audio Device 20 Connecting an External Microphone 20 Troubleshooting 21 Specifications 26 www.cobyusa.com Page 3

User Manual
Page 4
...; Coby NBPC1028 computer unit 100-240V AC adapter 3-cell lithium-ion battery This package may be the trademarks of all packing materials after opening. Microsoft, Windows XP, Windows MCE, Windows Vista, and Windows Sound System are registered trademark of Microsoft Corporation. All other materials that pose a hazard to safely dispose of their respective companies. This instruction manual guides you...
...; Coby NBPC1028 computer unit 100-240V AC adapter 3-cell lithium-ion battery This package may be the trademarks of all packing materials after opening. Microsoft, Windows XP, Windows MCE, Windows Vista, and Windows Sound System are registered trademark of Microsoft Corporation. All other materials that pose a hazard to safely dispose of their respective companies. This instruction manual guides you...

User Manual
Page 6
...143; Do not connect the power cord to the battery, make sure that the battery catch locks firmly in place upon installation. English Safety Precautions Battery Use only the recommended battery pack. Keep metallic objects, such as keys and clips, ...power cord, hold the body of fire, keep electrical appliances away from the bat- tery pack. To avoid risk of the plug and pull gently. Do not yank or stress the cord. Disconnect the cord before cleaning the computer. Disconnect the cord during electrical storms. Page 6 Coby...
...143; Do not connect the power cord to the battery, make sure that the battery catch locks firmly in place upon installation. English Safety Precautions Battery Use only the recommended battery pack. Keep metallic objects, such as keys and clips, ...power cord, hold the body of fire, keep electrical appliances away from the bat- tery pack. To avoid risk of the plug and pull gently. Do not yank or stress the cord. Disconnect the cord before cleaning the computer. Disconnect the cord during electrical storms. Page 6 Coby...

User Manual
Page 8
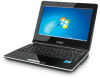
Microphone jack 9. Web camera 2. Display panel 3. Headphone jack 8. Integrated mouse (left/right click) 12. Power button 4. VGA connection (monitor or projector ouput) 7. Touchpad 11. Top View English 1. LAN connection (broadband or cable internet) 6. USB ports (x2) 10. System status indicators 13. Keyboard Page 8 Coby Electronics Corporation Netbook at a Glance Illustrations in this manual may differ from the actual product. AC adapter jack 5.
Microphone jack 9. Web camera 2. Display panel 3. Headphone jack 8. Integrated mouse (left/right click) 12. Power button 4. VGA connection (monitor or projector ouput) 7. Touchpad 11. Top View English 1. LAN connection (broadband or cable internet) 6. USB ports (x2) 10. System status indicators 13. Keyboard Page 8 Coby Electronics Corporation Netbook at a Glance Illustrations in this manual may differ from the actual product. AC adapter jack 5.

User Manual
Page 9
Wireless LAN Off No power to wireless card/ RF deactivated Flashing blue, slow Wireless client is being written to the table below for more information. English Netbook at a Glance System Status Indicators These indicators display your computer's current status. Please refer to /read from the hard disk. Indicator Indicator Symbol Type Power Battery HDD Appearance Status Solid blue Flashing blue Off System on System in standby mode System off/hibernating Off Solid...
Wireless LAN Off No power to wireless card/ RF deactivated Flashing blue, slow Wireless client is being written to the table below for more information. English Netbook at a Glance System Status Indicators These indicators display your computer's current status. Please refer to /read from the hard disk. Indicator Indicator Symbol Type Power Battery HDD Appearance Status Solid blue Flashing blue Off System on System in standby mode System off/hibernating Off Solid...

User Manual
Page 10
SD card reader (SDHC compatible) 5. English Netbook at a Glance Left View 1. Page 10 Coby Electronics Corporation Vent 3. USB port 4. SIM card slot (for 3G-enabled netbooks only) To avoid overheating, do not block vents when the computer is in use. Security key port (security cable not included) 2.
SD card reader (SDHC compatible) 5. English Netbook at a Glance Left View 1. Page 10 Coby Electronics Corporation Vent 3. USB port 4. SIM card slot (for 3G-enabled netbooks only) To avoid overheating, do not block vents when the computer is in use. Security key port (security cable not included) 2.

User Manual
Page 11
Hard drive compartment 6 5 4. Memory compartment Do not attempt to disassemble or replace your hard drive. For assistance with hard drive replacement and repair, contact a qualified service professional. Stereo speakers 5. Battery latch 3. www.cobyusa.com Page 11 English Netbook at a Glance Bottom View 1 2 2 3 4 1. To avoid overheating, do not block vents when the computer is in use. Battery pack 2. Vent 6.
Hard drive compartment 6 5 4. Memory compartment Do not attempt to disassemble or replace your hard drive. For assistance with hard drive replacement and repair, contact a qualified service professional. Stereo speakers 5. Battery latch 3. www.cobyusa.com Page 11 English Netbook at a Glance Bottom View 1 2 2 3 4 1. To avoid overheating, do not block vents when the computer is in use. Battery pack 2. Vent 6.

User Manual
Page 12
...; Turn the computer over to charge the battery. Connect the AC adapter as instructed above to access the battery release. Page 12 Coby Electronics Corporation To connect the AC adapter: Connect the power cord to the AC power adapter jack of the com- puter. Slide the battery release latch to the unlock position and hold. Slide the battery out. Slide the replacement battery...
...; Turn the computer over to charge the battery. Connect the AC adapter as instructed above to access the battery release. Page 12 Coby Electronics Corporation To connect the AC adapter: Connect the power cord to the AC power adapter jack of the com- puter. Slide the battery release latch to the unlock position and hold. Slide the battery out. Slide the replacement battery...

User Manual
Page 14
English Basic Operation Getting Started Open the display panel and adjust it down when not in use for 24 hours or more. Use sleep mode if you move your computer while the hard disk is in sleep) before you will be shut down . Wait until the power indicator light starts blinking (indicating that the computer is spinning may cause damage or loss of data. Moving your...
English Basic Operation Getting Started Open the display panel and adjust it down when not in use for 24 hours or more. Use sleep mode if you move your computer while the hard disk is in sleep) before you will be shut down . Wait until the power indicator light starts blinking (indicating that the computer is spinning may cause damage or loss of data. Moving your...

User Manual
Page 15
..., press Fn+Ins/ NumLk. See below can be used as a 10-key numeric keypad. Enable/disable the built-in sleep mode. Turn on using function key combinations. Shift to change your computer in wireless internet. Mute. Decrease display brightness. Increase display brightness. Decrease computer volume. another monitor. www.cobyusa.com Page 15 English Basic Operation Keyboard Functions Your computer's standard keyboard incorporates a numeric keypad and function keys. Key Fn + Esc Fn + F1 Fn + F3 Fn...
..., press Fn+Ins/ NumLk. See below can be used as a 10-key numeric keypad. Enable/disable the built-in sleep mode. Turn on using function key combinations. Shift to change your computer in wireless internet. Mute. Decrease display brightness. Increase display brightness. Decrease computer volume. another monitor. www.cobyusa.com Page 15 English Basic Operation Keyboard Functions Your computer's standard keyboard incorporates a numeric keypad and function keys. Key Fn + Esc Fn + F1 Fn + F3 Fn...

User Manual
Page 16
... buttons on the integrated mouse just as you would the left/right click on the screen, slide your computer's operating system. Moisture or dirt may damage the touchpad's surface. Page 16 Coby Electronics Corporation Sharp objects or excessive pressure may cause the touchpad to function incorrectly. Use one finger only to remove the cover of the touchpad. English Basic Operation Using the Touchpad Use the touchpad...
... buttons on the integrated mouse just as you would the left/right click on the screen, slide your computer's operating system. Moisture or dirt may damage the touchpad's surface. Page 16 Coby Electronics Corporation Sharp objects or excessive pressure may cause the touchpad to function incorrectly. Use one finger only to remove the cover of the touchpad. English Basic Operation Using the Touchpad Use the touchpad...

User Manual
Page 17
To remove a memory card, grasp it by the end and pull gently. Gently slide the card into the slot. Using the Internet Your computer comes with the label upward. Doing so may need to install a third-party dedicated application in order to take pictures and video using the webcam. Using the Web Camera The built-in wireless connection. To insert a memory card, orient the memory card with LAN port for capturing photos, recording video, or...
To remove a memory card, grasp it by the end and pull gently. Gently slide the card into the slot. Using the Internet Your computer comes with the label upward. Doing so may need to install a third-party dedicated application in order to take pictures and video using the webcam. Using the Web Camera The built-in wireless connection. To insert a memory card, orient the memory card with LAN port for capturing photos, recording video, or...

User Manual
Page 18
... Features Wireless An isotropic antenna system is required to ensure correct operation and performance of the operating system. Page 18 Coby Electronics Corporation Installing Device Drivers A compatible device driver is built into the display for optimal reception, enabling wireless communication wherever you are. Be sure to update the driver. The computer will automatically search and connect to the internet wirelessly, press Fn + F1. To connect to an available network.
... Features Wireless An isotropic antenna system is required to ensure correct operation and performance of the operating system. Page 18 Coby Electronics Corporation Installing Device Drivers A compatible device driver is built into the display for optimal reception, enabling wireless communication wherever you are. Be sure to update the driver. The computer will automatically search and connect to the internet wirelessly, press Fn + F1. To connect to an available network.

User Manual
Page 19
... specific classes of hardware to be used without requiring individual device drivers to attached devices, wait at least five seconds after the computer is on your computer. Connecting an External Display You can connect a VGA monitor via the computer's built-in VGA port. When using the Control Panel Display menu. English External Devices Your computer includes multiple connection ports for maximum performance and productivity. USB devices may also select a device using a high power consumption USB device such as a keyboard, mouse, camera, hard disk drive...
... specific classes of hardware to be used without requiring individual device drivers to attached devices, wait at least five seconds after the computer is on your computer. Connecting an External Display You can connect a VGA monitor via the computer's built-in VGA port. When using the Control Panel Display menu. English External Devices Your computer includes multiple connection ports for maximum performance and productivity. USB devices may also select a device using a high power consumption USB device such as a keyboard, mouse, camera, hard disk drive...

User Manual
Page 22
... using battery power, check that the battery is no screen image. exit screen saver mode. If power management is enabled. English Troubleshooting Problem Solution Display Computer does not turn on . Insert. Screen goes blank while Screen saver may have entered sleep mode. To disable it, press Fn + you enter a letter. Press the power button to the computer and the power cord is on . touch the touchpad or any key to the computer is plugged into a working electrical outlet. Keyboard A number appears...
... using battery power, check that the battery is no screen image. exit screen saver mode. If power management is enabled. English Troubleshooting Problem Solution Display Computer does not turn on . Insert. Screen goes blank while Screen saver may have entered sleep mode. To disable it, press Fn + you enter a letter. Press the power button to the computer and the power cord is on . touch the touchpad or any key to the computer is plugged into a working electrical outlet. Keyboard A number appears...

User Manual
Page 23
... enters sleep mode (the sleep indicator turns on and the computer does not work. If the battery is in sleep mode. If the computer fails to exit hibernation mode. Connect the AC adapter to automatically enter hibernation mode. Solution Sleep/Hibernation Mode Check that the battery is charged. Check the sleep mode settings. Unsaved data may be lost. www.cobyusa.com Page 23 English Troubleshooting Problem The computer enters...
... enters sleep mode (the sleep indicator turns on and the computer does not work. If the battery is in sleep mode. If the computer fails to exit hibernation mode. Connect the AC adapter to automatically enter hibernation mode. Solution Sleep/Hibernation Mode Check that the battery is charged. Check the sleep mode settings. Unsaved data may be lost. www.cobyusa.com Page 23 English Troubleshooting Problem The computer enters...

User Manual
Page 24
... Troubleshoot button. Missing, discolored, or bright dots appear on the screen every time you before the battery status in- Check that the device is plugged into the audio output (headphone) jack. Check that has been installed on your computer. If the problem persists, you turn on your computer. may need to operate after the battery status indicator lights. dicator turns on, or continues to replace the battery. Page 24 Coby...
... Troubleshoot button. Missing, discolored, or bright dots appear on the screen every time you before the battery status in- Check that the device is plugged into the audio output (headphone) jack. Check that has been installed on your computer. If the problem persists, you turn on your computer. may need to operate after the battery status indicator lights. dicator turns on, or continues to replace the battery. Page 24 Coby...

User Manual
Page 25
... one minute to replace the battery. The battery does not charge. The hard disk drive does not work. Internal components of the device carry a risk of electric shock. English Troubleshooting Problem The operating time for a fully charged battery is included in the Boot Sequence. Turn off the computer by pressing and holding the power button for 4 seconds or more. Hard Drive In the Boot menu in the battery might be active. www.cobyusa...
... one minute to replace the battery. The battery does not charge. The hard disk drive does not work. Internal components of the device carry a risk of electric shock. English Troubleshooting Problem The operating time for a fully charged battery is included in the Boot Sequence. Turn off the computer by pressing and holding the power button for 4 seconds or more. Hard Drive In the Boot menu in the battery might be active. www.cobyusa...

User Manual
Page 26
... Specifications Display Type Display Resolution CPU Hard Drive Memory Networking Connectivity A/V Connections Additional Features Keyboard Battery Unit Dimensions 10" TFT LCD (Matte) 1024x600 (WSVGA) Intel Atom™ 1.6 GHz 2.5" SATA 160 GB (5400 RPM) 1 GB DDR II RAM RAM Type: PC2-5300 DDR II SO-DIMM (667 MHz) Installed: 1024 MB (single SO-DIMM) Maximum: 2048 MB (single SO-DIMM) Wi-Fi 802.11 b/g Ethernet 10/100 Mb Wireless 3G WAN (optional) USB...
... Specifications Display Type Display Resolution CPU Hard Drive Memory Networking Connectivity A/V Connections Additional Features Keyboard Battery Unit Dimensions 10" TFT LCD (Matte) 1024x600 (WSVGA) Intel Atom™ 1.6 GHz 2.5" SATA 160 GB (5400 RPM) 1 GB DDR II RAM RAM Type: PC2-5300 DDR II SO-DIMM (667 MHz) Installed: 1024 MB (single SO-DIMM) Maximum: 2048 MB (single SO-DIMM) Wi-Fi 802.11 b/g Ethernet 10/100 Mb Wireless 3G WAN (optional) USB...


