User Manual
Page 3
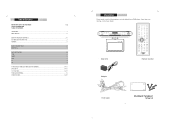
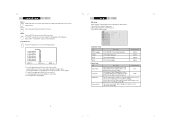
......2 IDENTIFICATION OF CONTROLS...3-5 BUTTONS ON THE MAIN UNIT...3 REMOTE...5 CABLE CONNECTIONS...6 MOUNTING...7 BASIC OPERATION...8-9 TIME...8 RADIO...8 DVD...8 TV...9 AV...9 FUNCTION BUTTONS (BUTTONS ON THE REMOTE 10-13 DVD SETUP...14-15 TV FUNCTION...16-17 TROUBLE SHOOTING...18 SPECIFICATION...19-20 Unpacking Please make sure the following items are missing, contact your DVD player. Main Unit Adapter Remote Control RCA Cable...
......2 IDENTIFICATION OF CONTROLS...3-5 BUTTONS ON THE MAIN UNIT...3 REMOTE...5 CABLE CONNECTIONS...6 MOUNTING...7 BASIC OPERATION...8-9 TIME...8 RADIO...8 DVD...8 TV...9 AV...9 FUNCTION BUTTONS (BUTTONS ON THE REMOTE 10-13 DVD SETUP...14-15 TV FUNCTION...16-17 TROUBLE SHOOTING...18 SPECIFICATION...19-20 Unpacking Please make sure the following items are missing, contact your DVD player. Main Unit Adapter Remote Control RCA Cable...
User Manual
Page 5
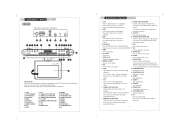
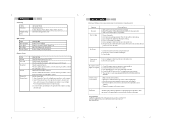
... FORWARD 4.PLAY/PAUSE 5. REMOTE SENSER 9. TUNING-/LEFT DIRECTION 13. TV/SETUP 16. VOL19. POWER 21. AUDIO R 26. TUNING+/RIGHT DIRECTION Under the DVD mode, press to search... VIDEO IN 27. OK Identification of Controls 1. PREV It also works as the right direction button while Press the button briefly to set the clock/week/date/alarm. working with the .... AM antenna connector. POWER 7. Press to shift modes. 19. Display the working with the LCD side facing inward. 1. Video signal input. 12. AM ANTENNA JACK 24. MODE Press to ...
... FORWARD 4.PLAY/PAUSE 5. REMOTE SENSER 9. TUNING-/LEFT DIRECTION 13. TV/SETUP 16. VOL19. POWER 21. AUDIO R 26. TUNING+/RIGHT DIRECTION Under the DVD mode, press to search... VIDEO IN 27. OK Identification of Controls 1. PREV It also works as the right direction button while Press the button briefly to set the clock/week/date/alarm. working with the .... AM antenna connector. POWER 7. Press to shift modes. 19. Display the working with the LCD side facing inward. 1. Video signal input. 12. AM ANTENNA JACK 24. MODE Press to ...
User Manual
Page 6
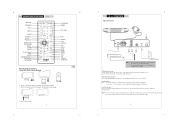
... outlet with the positive side facing up. + 3. Be sure to have all necessary connections properly done before connect the power supply. .6. TV RF signals include: receiving antenna/CATV net. Tuner Antenna Connection Connect the supplied AM/FM antenna to the arrow direction and take out the ...~50/60Hz NOTE: 1. Power Connection Insert one end of Controls DISPLAY STANDBY TITLE GOTO AUDIO SUBTITLE SETUP TV SETUP DIRECTION /OK/TUN/CH MENU F.FWD F.BWD PLAY/PAUSE STOP CLEAR ZOOM/MEMORY EPG/FM/AM AUTO/FAV Remote Control Drawing Using The Coin Lithium Battery PROGRAM MODE KEY PAD PBC...
... outlet with the positive side facing up. + 3. Be sure to have all necessary connections properly done before connect the power supply. .6. TV RF signals include: receiving antenna/CATV net. Tuner Antenna Connection Connect the supplied AM/FM antenna to the arrow direction and take out the ...~50/60Hz NOTE: 1. Power Connection Insert one end of Controls DISPLAY STANDBY TITLE GOTO AUDIO SUBTITLE SETUP TV SETUP DIRECTION /OK/TUN/CH MENU F.FWD F.BWD PLAY/PAUSE STOP CLEAR ZOOM/MEMORY EPG/FM/AM AUTO/FAV Remote Control Drawing Using The Coin Lithium Battery PROGRAM MODE KEY PAD PBC...
User Manual
Page 11
...Function ro ra Press the "Program" button to display the channel list under the TV mode. Title1-Chapter7 PROG Exit OK Select PLAY Play 1. Set this function by pressing the ANGLE button on the remote control. SETUP Setup Press the SETUP button to access Chapters. 2. Title1-Chapter4 5. ..., press the Clear button on the screen if the disc has multiple angle shots available for further directions. et p DVD Setup Various features of the DVD player can access this to adjust the setting details of the display. 4:3 is used with standard television displays; 16...
...Function ro ra Press the "Program" button to display the channel list under the TV mode. Title1-Chapter7 PROG Exit OK Select PLAY Play 1. Set this function by pressing the ANGLE button on the remote control. SETUP Setup Press the SETUP button to access Chapters. 2. Title1-Chapter4 5. ..., press the Clear button on the screen if the disc has multiple angle shots available for further directions. et p DVD Setup Various features of the DVD player can access this to adjust the setting details of the display. 4:3 is used with standard television displays; 16...
User Manual
Page 13
...TV or amplifier has been activated. 5. Press OK again to the factory default. ro e ootin Should your DVD player develop a problem, please check below before requesting service: Symptom No power Does not play No Picture Check and Action 1. Picture noisy/ distorted 1. Check if the MUTE function of the remote control... the right direction button to release. Remove the obstacles between the remote control and the player. 3. No disc, load a disc. 2. Point the remote control towards the remote sensor on the player and the restore function should reset the player...
...TV or amplifier has been activated. 5. Press OK again to the factory default. ro e ootin Should your DVD player develop a problem, please check below before requesting service: Symptom No power Does not play No Picture Check and Action 1. Picture noisy/ distorted 1. Check if the MUTE function of the remote control... the right direction button to release. Remove the obstacles between the remote control and the player. 3. No disc, load a disc. 2. Point the remote control towards the remote sensor on the player and the restore function should reset the player...


