
Quick Setup Guide
Page 2
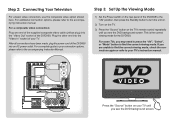
...correct viewing mode. After all connections have been made, plug the power cord of the DVD938 into the "Video Out" socket of the DVD938 to the "ON" position, then press the Standby button to turn the unit on. 2) Turn on the TV. 3) Press the "Source" button on your connection options, please ...refer to the accompanying instruction manual. If you see the DVD background screen. Step 3: Set Up the Viewing Mode 1) Set the Power switch on the rear panel of the DVD938. This ...
...correct viewing mode. After all connections have been made, plug the power cord of the DVD938 into the "Video Out" socket of the DVD938 to the "ON" position, then press the Standby button to turn the unit on. 2) Turn on the TV. 3) Press the "Source" button on your connection options, please ...refer to the accompanying instruction manual. If you see the DVD background screen. Step 3: Set Up the Viewing Mode 1) Set the Power switch on the rear panel of the DVD938. This ...
Quick Setup Guide
Page 3
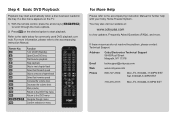
...3592: Mon-Fri, 8:00AM-11:00PM EST Sat, 9:00AM-5:30PM EST 718-416-3197: Mon-Fri, 8:00AM-5:30PM EST Remote Key Function Turn On/Off (Standby) Open/Close DVD tray Start/resume playback Stop playback Skip to next chapter/track Select fast forward speed Skip to previous chapter... More Help Please refer to the accompanying Instruction Manual for commonly used DVD playback controls. Refer to the table below for further help with your Coby Home Theater System. You may start playback. For more . If these resources do not resolve the problem, please contact Technical Support. Step 4:...
...3592: Mon-Fri, 8:00AM-11:00PM EST Sat, 9:00AM-5:30PM EST 718-416-3197: Mon-Fri, 8:00AM-5:30PM EST Remote Key Function Turn On/Off (Standby) Open/Close DVD tray Start/resume playback Stop playback Skip to next chapter/track Select fast forward speed Skip to previous chapter... More Help Please refer to the accompanying Instruction Manual for commonly used DVD playback controls. Refer to the table below for further help with your Coby Home Theater System. You may start playback. For more . If these resources do not resolve the problem, please contact Technical Support. Step 4:...
User Manual
Page 3
Table of Contents English Getting Started 24 Turning the Unit On 24 Select the Video Line 24 Select the Source Mode 24 Load a Disc (or other media 25 Basic Playback Instructions 26 Play/...
Table of Contents English Getting Started 24 Turning the Unit On 24 Select the Video Line 24 Select the Source Mode 24 Load a Disc (or other media 25 Basic Playback Instructions 26 Play/...
User Manual
Page 10
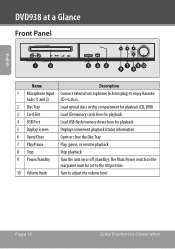
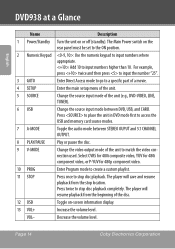
The Main Power switch on the rear panel must be set to the ON position. 10 Volume Knob Turn to enjoy Karaoke Jacks (1 and 2) CD+G discs. 2 Disc Tray Load optical discs in this compartment for playback (CD, DVD) 3 Card Slot Load SD memory .../status information 6 Open/Close Open or close the Disc Tray 7 Play/Pause Play, pause, or resume playback 8 Stop Stop playback 9 Power/Standby Turn the unit on or off (standby). English DVD938 at a Glance Front Panel 1 Name Description 1 Microphone Input Connect external microphones (6.3mm plug) to adjust the volume level Page 10...
The Main Power switch on the rear panel must be set to the ON position. 10 Volume Knob Turn to enjoy Karaoke Jacks (1 and 2) CD+G discs. 2 Disc Tray Load optical discs in this compartment for playback (CD, DVD) 3 Card Slot Load SD memory .../status information 6 Open/Close Open or close the Disc Tray 7 Play/Pause Play, pause, or resume playback 8 Stop Stop playback 9 Power/Standby Turn the unit on or off (standby). English DVD938 at a Glance Front Panel 1 Name Description 1 Microphone Input Connect external microphones (6.3mm plug) to adjust the volume level Page 10...

User Manual
Page 11
... a TV. Output An optional component video cable is required. 6 Composite Video Standard connection to output composite video (480i) to a TV. DVD938 at a Glance Rear Panel English Name Description 1 Main Power Switch Turn the main power on or off. 2 Speaker Output Terminals Connection terminals for this connection. 5 Coaxial Digital Audio Output Optional connection...
... a TV. Output An optional component video cable is required. 6 Composite Video Standard connection to output composite video (480i) to a TV. DVD938 at a Glance Rear Panel English Name Description 1 Main Power Switch Turn the main power on or off. 2 Speaker Output Terminals Connection terminals for this connection. 5 Coaxial Digital Audio Output Optional connection...
User Manual
Page 14
...to input the number "25". 3 GOTO Enter Direct Access mode to go to match the video connection used. English DVD938 at a Glance Name Description 1 Power/Standby Turn the unit on -screen information display. 13 VOL+ Increase the volume level. Press twice to access the USB and ...memory card source modes. 7 A-MODE Toggle the audio mode between DVD, USB, and CARD. Page 14 Coby Electronics Corporation Select CVBS for 480i...
...to input the number "25". 3 GOTO Enter Direct Access mode to go to match the video connection used. English DVD938 at a Glance Name Description 1 Power/Standby Turn the unit on -screen information display. 13 VOL+ Increase the volume level. Press twice to access the USB and ...memory card source modes. 7 A-MODE Toggle the audio mode between DVD, USB, and CARD. Page 14 Coby Electronics Corporation Select CVBS for 480i...
User Manual
Page 23
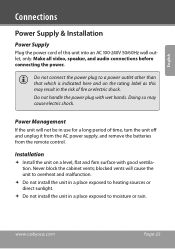
English Connections Power Supply & Installation Power Supply Plug the power cord of time, turn the unit off and unplug it from the AC power supply, and remove the batteries from the remote control. www.cobyusa.com Page 23 Power ...
English Connections Power Supply & Installation Power Supply Plug the power cord of time, turn the unit off and unplug it from the AC power supply, and remove the batteries from the remote control. www.cobyusa.com Page 23 Power ...
User Manual
Page 24
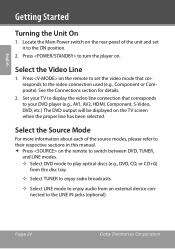
See the Connections section for details. 2. Press on the remote to set it to the ON position. 2. Page 24 Coby Electronics Corporation Set your TV to display the video line connection that corresponds to your DVD player (e.g., AV1, AV2, HDMI, Component, S-Video, DVD, etc.) The ... the disc tray. —— Select TUNER to enjoy radio broadcasts. —— Select LINE mode to enjoy audio from an external device connected to turn the player on the TV screen when the proper line has been selected. English Getting Started...
See the Connections section for details. 2. Press on the remote to set it to the ON position. 2. Page 24 Coby Electronics Corporation Set your TV to display the video line connection that corresponds to your DVD player (e.g., AV1, AV2, HDMI, Component, S-Video, DVD, etc.) The ... the disc tray. —— Select TUNER to enjoy radio broadcasts. —— Select LINE mode to enjoy audio from an external device connected to turn the player on the TV screen when the proper line has been selected. English Getting Started...

User Manual
Page 27
... Page 27 Adjusting the Sound Press to increase the volume level. Press to decrease the volume level. Press to turn the volume off when playing a Dolby 5.1-channel disc to avoid interference with Dolby Digital decoding. Set the sound effects mode to change the repeat playback...
... Page 27 Adjusting the Sound Press to increase the volume level. Press to decrease the volume level. Press to turn the volume off when playing a Dolby 5.1-channel disc to avoid interference with Dolby Digital decoding. Set the sound effects mode to change the repeat playback...

User Manual
Page 32
... decrease the magnification level, respectively. USB Drives & Memory Cards 1. If the unit should freeze when reading a USB drive or memory card, turn the unit back on screen). 2. Page 32 Coby Electronics Corporation Press again to exit and return to DVD mode. Press to normal status. Load a USB flash drive or memory card...
... decrease the magnification level, respectively. USB Drives & Memory Cards 1. If the unit should freeze when reading a USB drive or memory card, turn the unit back on screen). 2. Page 32 Coby Electronics Corporation Press again to exit and return to DVD mode. Press to normal status. Load a USB flash drive or memory card...
User Manual
Page 37
... switch it up. The next time that you open the disc tray, the unit will play from stereo or multichannel audio contents. 5.1CH: Turn off the DOWNMIX mode. You can press any key or button except to a 5.1-channel amplifier, this item should be selected. Audio Setup Page Analog Audio...
... switch it up. The next time that you open the disc tray, the unit will play from stereo or multichannel audio contents. 5.1CH: Turn off the DOWNMIX mode. You can press any key or button except to a 5.1-channel amplifier, this item should be selected. Audio Setup Page Analog Audio...
User Manual
Page 41
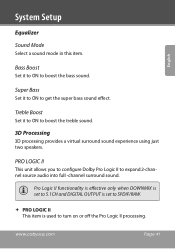
... 3D processing provides a virtual surround sound experience using just two speakers. PRO LOGIC II This unit allows you to configure Dolby Pro Logic II to turn on or off the Pro Logic II processing. Treble Boost Set it to ON to boost the bass sound. www.cobyusa.com Page 41 English...
... 3D processing provides a virtual surround sound experience using just two speakers. PRO LOGIC II This unit allows you to configure Dolby Pro Logic II to turn on or off the Pro Logic II processing. Treble Boost Set it to ON to boost the bass sound. www.cobyusa.com Page 41 English...
User Manual
Page 42
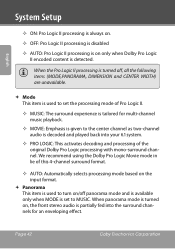
...PRO LOGIC: This activates decoding and processing of Pro Logic II. —— MUSIC: The surround experience is tailored for an enveloping effect. Page 42 Coby Electronics Corporation English System Setup —— ON: Pro Logic II processing is always on. —— OFF: Pro Logic II processing is disabled...processing is on only when Dolby Pro Logic II encoded content is used to set to MUSIC. When the Pro Logic II processing is turned off panorama mode and is available only when MODE is set the processing mode of the original Dolby Pro Logic processing with mono-surround...
...PRO LOGIC: This activates decoding and processing of Pro Logic II. —— MUSIC: The surround experience is tailored for an enveloping effect. Page 42 Coby Electronics Corporation English System Setup —— ON: Pro Logic II processing is always on. —— OFF: Pro Logic II processing is disabled...processing is on only when Dolby Pro Logic II encoded content is used to set to MUSIC. When the Pro Logic II processing is turned off panorama mode and is available only when MODE is set the processing mode of the original Dolby Pro Logic processing with mono-surround...
User Manual
Page 50
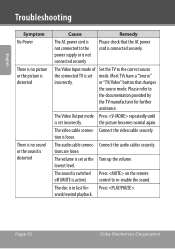
... refer to re-enable the sound. lowest level. Press . The volume is set mode. The disc is in fast for further assistance. Page 50 Coby Electronics Corporation The video cable connec- the picture becomes normal again. Connect the video cable securely. The Video Input mode of Set the TV to... the correct source the connected TV is set at the Turn up the volume. tion is active). The sound is switched Press on the remote off (MUTE is loose. The Video Output mode Press repeatedly...
... refer to re-enable the sound. lowest level. Press . The volume is set mode. The disc is in fast for further assistance. Page 50 Coby Electronics Corporation The video cable connec- the picture becomes normal again. Connect the video cable securely. The Video Input mode of Set the TV to... the correct source the connected TV is set at the Turn up the volume. tion is active). The sound is switched Press on the remote off (MUTE is loose. The Video Output mode Press repeatedly...
User Manual
Page 58
... user is no guarantee that interference will not occur in the manual. However, there is encouraged to try to correct the interference by turning the equipment off and on a circuit different from that may cause harmful interference to radio communications. Use of shielded cable is connected.... accept any changes or modifications to comply with Class B limits in Subpart B of Part 15 of the FCC Rules. Page 58 Coby Electronics Corporation If this equipment does cause harmful interference to radio or television reception, which the receiver is required to the equipment unless ...
... user is no guarantee that interference will not occur in the manual. However, there is encouraged to try to correct the interference by turning the equipment off and on a circuit different from that may cause harmful interference to radio communications. Use of shielded cable is connected.... accept any changes or modifications to comply with Class B limits in Subpart B of Part 15 of the FCC Rules. Page 58 Coby Electronics Corporation If this equipment does cause harmful interference to radio or television reception, which the receiver is required to the equipment unless ...


