
Quick Setup Guide
Page 1
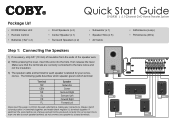
... release the lever. do not connect one wire to several terminals. and match black negative (-) terminals together. Package List • DVD938 Main Unit • Remote Control • Batteries ("AA" x 2) Quick Start Guide DVD938 | 5.1-Channel DVD Home Theater System • Front Speakers (x 2) • Center Speaker (x 1) • Surround Speakers (x 2) • Subwoofer (x 1) • Speaker Wire...
... release the lever. do not connect one wire to several terminals. and match black negative (-) terminals together. Package List • DVD938 Main Unit • Remote Control • Batteries ("AA" x 2) Quick Start Guide DVD938 | 5.1-Channel DVD Home Theater System • Front Speakers (x 2) • Center Speaker (x 1) • Surround Speakers (x 2) • Subwoofer (x 1) • Speaker Wire...
Quick Setup Guide
Page 2
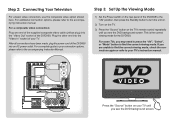
..." socket of your connection options, please refer to your TV until you see the DVD background screen. This is the correct viewing mode for the DVD938. AV 1 IN AV 1 Press the "Source" button on your TV's instruction manual. Step 2: Connecting Your Television For a basic video connection, ... For additional connection options, please refer to find the correct viewing mode. For a composite video connection: Plug one end of the DVD938 to the "ON" position, then press the Standby button to your TV. For some TVs, you are unable to the accompanying instruction manual.
..." socket of your connection options, please refer to your TV until you see the DVD background screen. This is the correct viewing mode for the DVD938. AV 1 IN AV 1 Press the "Source" button on your TV's instruction manual. Step 2: Connecting Your Television For a basic video connection, ... For additional connection options, please refer to find the correct viewing mode. For a composite video connection: Plug one end of the DVD938 to the "ON" position, then press the Standby button to your TV. For some TVs, you are unable to the accompanying instruction manual.
Quick Setup Guide
Page 3
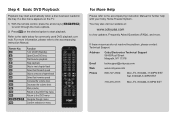
... arrow keys [ ] to scroll through menu Confirm selection in the tray. Refer to the table below for further help with your Coby Home Theater System. You may start playback. Address Coby Electronics Technical Support 56-65 Rust Street Maspeth, NY 11378 Email [email protected] Web www.cobyusa.com Phone 800-727...
... arrow keys [ ] to scroll through menu Confirm selection in the tray. Refer to the table below for further help with your Coby Home Theater System. You may start playback. Address Coby Electronics Technical Support 56-65 Rust Street Maspeth, NY 11378 Email [email protected] Web www.cobyusa.com Phone 800-727...
User Manual
Page 2
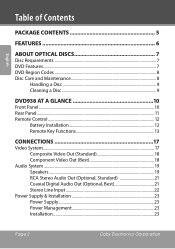
English Table of Contents Package Contents 5 Features 6 About Optical Discs 7 Disc Requirements 7 DVD Features...7 DVD Region Codes 8 Disc Care and Maintenance 8 Handling a Disc 9 Cleaning a Disc 9 DVD938 at a Glance 10 Front Panel...10 Rear Panel...11 Remote Control...12 Battery Installation 12 Remote Key Functions 13 Connections 17 Video System...17 Composite ... 21 Coaxial Digital Audio Out (Optional, Best 21 Stereo Line Input 22 Power Supply & Installation 23 Power Supply 23 Power Management 23 Installation 23 Page 2 Coby Electronics Corporation
English Table of Contents Package Contents 5 Features 6 About Optical Discs 7 Disc Requirements 7 DVD Features...7 DVD Region Codes 8 Disc Care and Maintenance 8 Handling a Disc 9 Cleaning a Disc 9 DVD938 at a Glance 10 Front Panel...10 Rear Panel...11 Remote Control...12 Battery Installation 12 Remote Key Functions 13 Connections 17 Video System...17 Composite ... 21 Coaxial Digital Audio Out (Optional, Best 21 Stereo Line Input 22 Power Supply & Installation 23 Power Supply 23 Power Management 23 Installation 23 Page 2 Coby Electronics Corporation
User Manual
Page 3
Table of Contents English Getting Started 24 Turning the Unit On 24 Select the Video Line 24 Select the Source Mode 24 Load a Disc (or other media 25 Basic Playback Instructions 26 Play/Pause/Stop 26 Previous/Next (Skip 26 Forward/Reverse (Search 26 Step...27 Repeat Playback 27 Adjusting the Sound 27 Operation Modes 28 DVD/CD Discs...28 Additional DVD Controls 28 Digital Media Discs 29 Menu Operation 29 Karaoke Discs (CD+G 30 JPEG Picture Discs 31 Thumbnail Mode Operation 31 USB Drives & Memory Cards 32 Menu Operation 33 Tuner (AM/FM Radio 33 System Setup 35 General ...
Table of Contents English Getting Started 24 Turning the Unit On 24 Select the Video Line 24 Select the Source Mode 24 Load a Disc (or other media 25 Basic Playback Instructions 26 Play/Pause/Stop 26 Previous/Next (Skip 26 Forward/Reverse (Search 26 Step...27 Repeat Playback 27 Adjusting the Sound 27 Operation Modes 28 DVD/CD Discs...28 Additional DVD Controls 28 Digital Media Discs 29 Menu Operation 29 Karaoke Discs (CD+G 30 JPEG Picture Discs 31 Thumbnail Mode Operation 31 USB Drives & Memory Cards 32 Menu Operation 33 Tuner (AM/FM Radio 33 System Setup 35 General ...
User Manual
Page 5
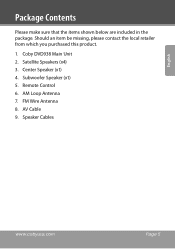
Center Speaker (x1) 4. AV Cable 9. Should an item be missing, please contact the local retailer from which you purchased this product. 1. Subwoofer Speaker (x1) 5. AM Loop Antenna 7. FM Wire Antenna 8. Coby DVD938 Main Unit 2. Remote Control 6. Satellite Speakers (x4) 3. English Package Contents Please make sure that the items shown below are included in the package. Speaker Cables www.cobyusa.com Page 5
Center Speaker (x1) 4. AV Cable 9. Should an item be missing, please contact the local retailer from which you purchased this product. 1. Subwoofer Speaker (x1) 5. AM Loop Antenna 7. FM Wire Antenna 8. Coby DVD938 Main Unit 2. Remote Control 6. Satellite Speakers (x4) 3. English Package Contents Please make sure that the items shown below are included in the package. Speaker Cables www.cobyusa.com Page 5
User Manual
Page 6
..., CD, CD+G, and JPEG discs Full function remote control AM/FM stereo tuning system High-quality integrated amplifier Page 6 Coby Electronics Corporation English Features Thank you for purchasing...
..., CD, CD+G, and JPEG discs Full function remote control AM/FM stereo tuning system High-quality integrated amplifier Page 6 Coby Electronics Corporation English Features Thank you for purchasing...
User Manual
Page 7
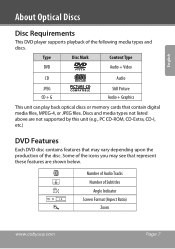
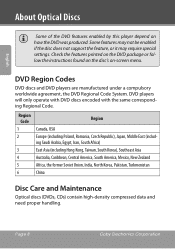
Discs and media types not listed above are shown below. Type Disc Mark Content Type DVD Audio + Video CD Audio JPEG Still Picture CD + G Audio + Graphics This unit can play back optical discs or memory cards that may vary depending upon the production of the disc. Number of Audio Tracks Number of the following media types and discs. English About Optical Discs Disc Requirements This DVD player supports playback of Subtitles Angle Indicator Screen Format (Aspect Ratio) Zoom www.cobyusa.com Page 7 Some of the icons you may see that represent these features are not ...
Discs and media types not listed above are shown below. Type Disc Mark Content Type DVD Audio + Video CD Audio JPEG Still Picture CD + G Audio + Graphics This unit can play back optical discs or memory cards that may vary depending upon the production of the disc. Number of Audio Tracks Number of the following media types and discs. English About Optical Discs Disc Requirements This DVD player supports playback of Subtitles Angle Indicator Screen Format (Aspect Ratio) Zoom www.cobyusa.com Page 7 Some of the icons you may see that represent these features are not ...
User Manual
Page 8
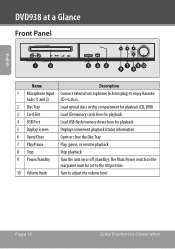
English About Optical Discs Some of the DVD features enabled by this player depend on -screen menu. Page 8 Coby Electronics Corporation Some features may not be enabled if the disc does not support the feature, or it may require special settings. Region Code 1 2 3 4 5 6 Region ...
English About Optical Discs Some of the DVD features enabled by this player depend on -screen menu. Page 8 Coby Electronics Corporation Some features may not be enabled if the disc does not support the feature, or it may require special settings. Region Code 1 2 3 4 5 6 Region ...

User Manual
Page 9
Cleaning a Disc Use a dry, soft cloth to wipe off any fingerprints and dusts from the center to the outside edge of the disc. English About Optical Discs Handling a Disc Hold a DVD/CD by its storage case, press down on either side of the disc. Never use . www.cobyusa.com Page 9 Wipe in a straight line radially from the playing surface of the disc. Doing so will not affect playback quality. To remove a DVD/CD from its edges. Avoid touching the recorded side of a disc. Store discs vertically in their case after use chemicals such as record sprays, anti...
Cleaning a Disc Use a dry, soft cloth to wipe off any fingerprints and dusts from the center to the outside edge of the disc. English About Optical Discs Handling a Disc Hold a DVD/CD by its storage case, press down on either side of the disc. Never use . www.cobyusa.com Page 9 Wipe in a straight line radially from the playing surface of the disc. Doing so will not affect playback quality. To remove a DVD/CD from its edges. Avoid touching the recorded side of a disc. Store discs vertically in their case after use chemicals such as record sprays, anti...
User Manual
Page 10
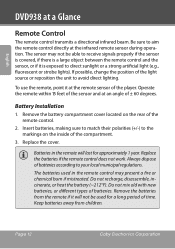
English DVD938 at a Glance Front Panel 1 Name Description 1 Microphone Input Connect external microphones (6.3mm plug) to enjoy Karaoke Jacks (1 and 2) CD+G discs. 2 Disc Tray Load optical discs ... Turn the unit on the rear panel must be set to the ON position. 10 Volume Knob Turn to adjust the volume level Page 10 Coby Electronics Corporation The Main Power switch on or off (standby).
English DVD938 at a Glance Front Panel 1 Name Description 1 Microphone Input Connect external microphones (6.3mm plug) to enjoy Karaoke Jacks (1 and 2) CD+G discs. 2 Disc Tray Load optical discs ... Turn the unit on the rear panel must be set to the ON position. 10 Volume Knob Turn to adjust the volume level Page 10 Coby Electronics Corporation The Main Power switch on or off (standby).

User Manual
Page 11
... digital audio to a TV. Output The AV cable may be used for this connection. 7 Component Video Optional connection to output component video (480p) to a TV. DVD938 at a Glance Rear Panel English Name Description 1 Main Power Switch Turn the main power on or off. 2 Speaker Output Terminals Connection terminals for the five...
... digital audio to a TV. Output The AV cable may be used for this connection. 7 Component Video Optional connection to output component video (480p) to a TV. DVD938 at a Glance Rear Panel English Name Description 1 Main Power Switch Turn the main power on or off. 2 Speaker Output Terminals Connection terminals for the five...
User Manual
Page 12
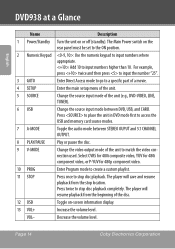
...for a long period of the compartment. 3. Do not recharge, disassemble, incinerate, or heat the battery (~212°F). Page 12 Coby Electronics Corporation Be sure to aim the remote control directly at a Glance Remote Control The remote control transmits a directional infrared beam. Keep...remote control. 2. The sensor may not be used in the remote control may present a fire or chemical burn if mistreated. English DVD938 at the infrared remote sensor during operation. Insert batteries, making sure to match their polarities (+/-) to direct sunlight or a strong ...
...for a long period of the compartment. 3. Do not recharge, disassemble, incinerate, or heat the battery (~212°F). Page 12 Coby Electronics Corporation Be sure to aim the remote control directly at a Glance Remote Control The remote control transmits a directional infrared beam. Keep...remote control. 2. The sensor may not be used in the remote control may present a fire or chemical burn if mistreated. English DVD938 at the infrared remote sensor during operation. Insert batteries, making sure to match their polarities (+/-) to direct sunlight or a strong ...
User Manual
Page 14
... component video. 10 PROG Enter Program mode to create a custom playlist. 11 STOP Press once to stop disc playback completely. Page 14 Coby Electronics Corporation Decrease the volume level. Press twice to stop location. Press to place the unit in DVD mode first to access the USB... and memory card source modes. 7 A-MODE Toggle the audio mode between DVD, USB, and CARD. English DVD938 at a Glance Name Description 1 Power/Standby Turn the unit on -screen information display. 13 VOL+ Increase the volume level. The Main Power switch...
... component video. 10 PROG Enter Program mode to create a custom playlist. 11 STOP Press once to stop disc playback completely. Page 14 Coby Electronics Corporation Decrease the volume level. Press twice to stop location. Press to place the unit in DVD mode first to access the USB... and memory card source modes. 7 A-MODE Toggle the audio mode between DVD, USB, and CARD. English DVD938 at a Glance Name Description 1 Power/Standby Turn the unit on -screen information display. 13 VOL+ Increase the volume level. The Main Power switch...
User Manual
Page 15
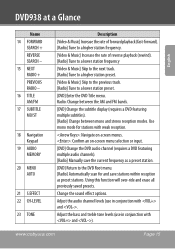
... station preset. [DVD] Enter the DVD Title menu. Using this function will over-ride and erase all previously saved presets. Change the sound effect options. DVD938 at a Glance English Name 14 FORWARD SEARCH + REVERSE SEARCH - 15 NEXT RADIO + PREVIOUS RADIO - 16 TITLE AM/FM 17 SUBTITLE MO/ST 18 Navigation Keypad...
... station preset. [DVD] Enter the DVD Title menu. Using this function will over-ride and erase all previously saved presets. Change the sound effect options. DVD938 at a Glance English Name 14 FORWARD SEARCH + REVERSE SEARCH - 15 NEXT RADIO + PREVIOUS RADIO - 16 TITLE AM/FM 17 SUBTITLE MO/ST 18 Navigation Keypad...

User Manual
Page 16
Confirm a selection. Use the Repeat A-B function. Change the repeat playback options. Open/Close the disc tray. English DVD938 at a Glance Name 24 ANGLE 25 STEP 26 ZOOM 27 REPEAT 28 A-B 29 MUTE 30 OPEN/CLOSE 31 ENTER Description [DVD] Change the angle view (requires a DVD featuring multiple camera angles). [DVD} Play DVD video frame by frame. [DVD] Use the picture zoom feature. Temporarily disable or restore the sound. Page 16 Coby Electronics Corporation
Confirm a selection. Use the Repeat A-B function. Change the repeat playback options. Open/Close the disc tray. English DVD938 at a Glance Name 24 ANGLE 25 STEP 26 ZOOM 27 REPEAT 28 A-B 29 MUTE 30 OPEN/CLOSE 31 ENTER Description [DVD] Change the angle view (requires a DVD featuring multiple camera angles). [DVD} Play DVD video frame by frame. [DVD] Use the picture zoom feature. Temporarily disable or restore the sound. Page 16 Coby Electronics Corporation
User Manual
Page 17
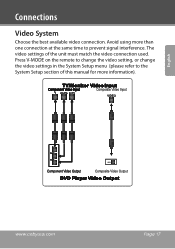
The video settings of this manual for more than one connection at the same time to the System Setup section of the unit must match the video connection used. Connections Video System Choose the best available video connection. English www.cobyusa.com Page 17 Avoid using more information). Press V-MODE on the remote to change the video setting, or change the video settings in the System Setup menu (please refer to prevent signal interference.
The video settings of this manual for more than one connection at the same time to the System Setup section of the unit must match the video connection used. Connections Video System Choose the best available video connection. English www.cobyusa.com Page 17 Avoid using more information). Press V-MODE on the remote to change the video setting, or change the video settings in the System Setup menu (please refer to prevent signal interference.

User Manual
Page 18
... remote until you see "CVBS" on the TV screen to set the unit to the component video mode. Use YUV for 480p output. Page 18 Coby Electronics Corporation Connect the other end of the yellow cable to the composite video mode.
... remote until you see "CVBS" on the TV screen to set the unit to the component video mode. Use YUV for 480p output. Page 18 Coby Electronics Corporation Connect the other end of the yellow cable to the composite video mode.

User Manual
Page 19
While pressing the terminal levers of each end of the speaker wire. 2. Change the audio settings in the System Setup menu (please refer to secure the connection. If necessary, strip 3/8" (10 mm) of insulation from each speaker, insert the bare wire into the hole, then release the lever to the System Setup section of the unit must match the audio connection used. www.cobyusa.com Page 19 The audio settings of this manual for more than one connection at the same time to enjoy your movies with 5.1-channel surround sound! 1. Connect the supplied speakers to prevent signal ...
While pressing the terminal levers of each end of the speaker wire. 2. Change the audio settings in the System Setup menu (please refer to secure the connection. If necessary, strip 3/8" (10 mm) of insulation from each speaker, insert the bare wire into the hole, then release the lever to the System Setup section of the unit must match the audio connection used. www.cobyusa.com Page 19 The audio settings of this manual for more than one connection at the same time to enjoy your movies with 5.1-channel surround sound! 1. Connect the supplied speakers to prevent signal ...

User Manual
Page 20
... Color Green Red Blue Yellow Blue White Make sure that the terminals are connected to each speaker is color-coded for your convenience. Page 20 Coby Electronics Corporation
... Color Green Red Blue Yellow Blue White Make sure that the terminals are connected to each speaker is color-coded for your convenience. Page 20 Coby Electronics Corporation
