
User Manual
Page 7
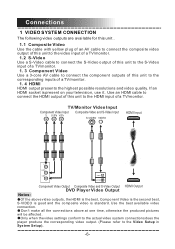
...S-Video Input S-VIDEO VIDEO HDMI Input Y Cr/Pb Cr/Pr VIDEO S-VIDEO Component Video Output Composite Video and S-Video Output HDMI Output DVD Player Video Output Notes: Of the above at one time, otherwise the produced pictures will be affected. Use an HDMI cable to connect ... the video settings conform to the actual video system connections does the player produce the corresponding video output. (Please refer to the Video Setup in System Setup). -6- Connections 1 VIDEO SYSTEM CONNECTION The following video outputs are available for this unit . 1.1 Composite Video Use the cable with yellow...
...S-Video Input S-VIDEO VIDEO HDMI Input Y Cr/Pb Cr/Pr VIDEO S-VIDEO Component Video Output Composite Video and S-Video Output HDMI Output DVD Player Video Output Notes: Of the above at one time, otherwise the produced pictures will be affected. Use an HDMI cable to connect ... the video settings conform to the actual video system connections does the player produce the corresponding video output. (Please refer to the Video Setup in System Setup). -6- Connections 1 VIDEO SYSTEM CONNECTION The following video outputs are available for this unit . 1.1 Composite Video Use the cable with yellow...
User Manual
Page 8
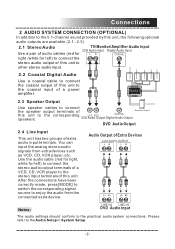
After the connections have been correctly made, press [MODE] to switch the corresponding signal source to the Audio Setup in System Setup. -7- SW CEN SR SL FR FL + + - - 888888 SPEAKERS OUT 2.3 Speaker Output SUBWOOFER Use speaker cables to connect the speaker... output terminals of Speaker Output this unit to the corresponding L1/2 R1/2 COAXIAL speakers. 2CH Audio Output Digital Audio Output DVD Audio Output 2.4 Line Input...
After the connections have been correctly made, press [MODE] to switch the corresponding signal source to the Audio Setup in System Setup. -7- SW CEN SR SL FR FL + + - - 888888 SPEAKERS OUT 2.3 Speaker Output SUBWOOFER Use speaker cables to connect the speaker... output terminals of Speaker Output this unit to the corresponding L1/2 R1/2 COAXIAL speakers. 2CH Audio Output Digital Audio Output DVD Audio Output 2.4 Line Input...
User Manual
Page 9
... minutes, a screen saver will be displayed below instantly. 3. Alternately, move the highlight to , then press [ENTER] to exit the setup menu. 1 GENERAL SETUP PAGE 1.1 TV DISPLAY If the unit is connected to a conventional TV set, you are supposed to select this item to show the closed... function only work with those discs encoded with closed captions. OFF: Disable the screen saver function. -8- In DVD mode, press [SETUP] on the screen. Press [ ]/[ ] to exit the setup menu. The wide-screen image will be displayed in its native aspect ratio with some part on the left...
... minutes, a screen saver will be displayed below instantly. 3. Alternately, move the highlight to , then press [ENTER] to exit the setup menu. 1 GENERAL SETUP PAGE 1.1 TV DISPLAY If the unit is connected to a conventional TV set, you are supposed to select this item to show the closed... function only work with those discs encoded with closed captions. OFF: Disable the screen saver function. -8- In DVD mode, press [SETUP] on the screen. Press [ ]/[ ] to exit the setup menu. The wide-screen image will be displayed in its native aspect ratio with some part on the left...
User Manual
Page 10
... be lower than that of LARGE. Next time you turn on the unit and play the same disc, the unit will be in the AUDIO SETUP PAGE. If a speaker is set to LT/RT or STEREO, this item can be selected. They are ANALOG AUDIO, D I G I T A L A U D I O , D O L B Y D I G I T A L , C H A N N E L D E L AY, E Q U A L I Z E R , .... 3D SURROUND: This mode creates a virtual surround effect from that of SMALL. OFF: Disable the last memory function. 2 AUDIO SETUP PAGE There are activated. STEREO: The 5.1-channel audio is mixed into left channel and right channel and is output via the FL ...
... be lower than that of LARGE. Next time you turn on the unit and play the same disc, the unit will be in the AUDIO SETUP PAGE. If a speaker is set to LT/RT or STEREO, this item can be selected. They are ANALOG AUDIO, D I G I T A L A U D I O , D O L B Y D I G I T A L , C H A N N E L D E L AY, E Q U A L I Z E R , .... 3D SURROUND: This mode creates a virtual surround effect from that of SMALL. OFF: Disable the last memory function. 2 AUDIO SETUP PAGE There are activated. STEREO: The 5.1-channel audio is mixed into left channel and right channel and is output via the FL ...
User Manual
Page 11
... speakers and the listener. L-MONO: The player outputs the left -channel and rightchannel audio via the FL and FR speaker respectively. System Setup 2.2.2 LPCM OUTPUT When DIGITAL OUTPUT is set to set the delay time for the center, rear speakers and the subwoofer. The delay is...low volume, for the analog audio output. NOTE: Some amplifiers don't support 96KHz sampling which will affect the coaxial output. 2.3 DOLBY DIGITAL SETUP 2.3.1 DUAL MONO STEREO: The player outputs the left surround speaker or right surround speaker. There are longer than that between the center or surround...
... speakers and the listener. L-MONO: The player outputs the left -channel and rightchannel audio via the FL and FR speaker respectively. System Setup 2.2.2 LPCM OUTPUT When DIGITAL OUTPUT is set to set the delay time for the center, rear speakers and the subwoofer. The delay is...low volume, for the analog audio output. NOTE: Some amplifiers don't support 96KHz sampling which will affect the coaxial output. 2.3 DOLBY DIGITAL SETUP 2.3.1 DUAL MONO STEREO: The player outputs the left surround speaker or right surround speaker. There are longer than that between the center or surround...
User Manual
Page 12
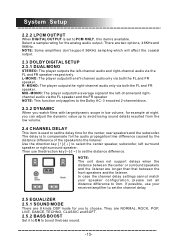
... blending the center speaker to turn on only when Dolby Pro Logic II encoded content is detected. 2.6.1.2 MODE This item is added to MUSIC. System Setup 2.5.3 SUPER BASS Set it to ON to get the super bass sound effect. 2.5.4 TREBLE BOOST Set it to ON to boost the treble sound. 2.6 3D...
... blending the center speaker to turn on only when Dolby Pro Logic II encoded content is detected. 2.6.1.2 MODE This item is added to MUSIC. System Setup 2.5.3 SUPER BASS Set it to ON to get the super bass sound effect. 2.5.4 TREBLE BOOST Set it to ON to boost the treble sound. 2.6 3D...

User Manual
Page 13
... poor picture. They are two options (0T and 1T) for you to the CVBS (composite video). PROGRESSIVE: The video will be output in the VIDEO SETUP PAGE. Select a HD mode: OFF, 720p or 1080i. NOTE: This item requires that your TV support HD input and output. 3.4 COLOR SETTING 3.4.1.... 3.4.4 LUMA DELAY There are VIDEO OUTPUT, TV MODE, HD MODE, COLOR SETTING, and HDMI SETUP. 3.1 VIDEO OUTPUT OFF: Set video output to choose in the form of progressive scanning. System Setup 3 VIDEO SETUP PAGE There are used. NOTE: If the video setting differs from the physical video connection, the ...
... poor picture. They are two options (0T and 1T) for you to the CVBS (composite video). PROGRESSIVE: The video will be output in the VIDEO SETUP PAGE. Select a HD mode: OFF, 720p or 1080i. NOTE: This item requires that your TV support HD input and output. 3.4 COLOR SETTING 3.4.1.... 3.4.4 LUMA DELAY There are VIDEO OUTPUT, TV MODE, HD MODE, COLOR SETTING, and HDMI SETUP. 3.1 VIDEO OUTPUT OFF: Set video output to choose in the form of progressive scanning. System Setup 3 VIDEO SETUP PAGE There are used. NOTE: If the video setting differs from the physical video connection, the ...
User Manual
Page 14
... seven items in this item. HDMI preserves the source signal, eliminating analog conversion to carry a bandwidth of picture quality. System Setup 3.5 HDMI SETUP About HDMI HDMI (High-Definition Multimedia Interface) is the newest interface for audiovisual equipment such as high-definition television and home theater... when HDMI is set it with DVI (Digital Video Interface). With the registration code you can be available in the PREFERENCE SETUP PAGE. With an analog interface, a clean digital source is more desirable than twice the bandwidth needed to transmit multi-channel audio...
... seven items in this item. HDMI preserves the source signal, eliminating analog conversion to carry a bandwidth of picture quality. System Setup 3.5 HDMI SETUP About HDMI HDMI (High-Definition Multimedia Interface) is the newest interface for audiovisual equipment such as high-definition television and home theater... when HDMI is set it with DVI (Digital Video Interface). With the registration code you can be available in the PREFERENCE SETUP PAGE. With an analog interface, a clean digital source is more desirable than twice the bandwidth needed to transmit multi-channel audio...
User Manual
Page 15
NOTE: This function only works with those discs with PBC function DVD, CD-DA and MP3 disc have no PBC menu. 4.3 AUDIO, SUBTITLE and DISC MENU Select a preferred audio language, subtitle language and disc menu language in ... only works with those discs encoded with parental function. 4.5 DEFAULT Restore all the default settings except the settings in PARENTAL and PASSWORD MODE item. 5 PASSWORD SETUP PAGE 5.1 PASSWORD MODE You can not be viewed without inputting the correct password. It will change the option in the correct password is always active...
NOTE: This function only works with those discs with PBC function DVD, CD-DA and MP3 disc have no PBC menu. 4.3 AUDIO, SUBTITLE and DISC MENU Select a preferred audio language, subtitle language and disc menu language in ... only works with those discs encoded with parental function. 4.5 DEFAULT Restore all the default settings except the settings in PARENTAL and PASSWORD MODE item. 5 PASSWORD SETUP PAGE 5.1 PASSWORD MODE You can not be viewed without inputting the correct password. It will change the option in the correct password is always active...
User Manual
Page 16
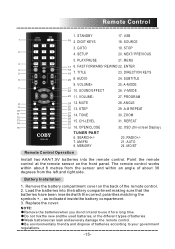
SETUP 20. ENTER 4 18 5 19 7. A-MODE TITLE MENU AM/FM AUTO 7 21 22 10. VOLUME- 27. TONE 12 29 13 14 TONE STEP CH-LEVEL REPEAT ZOOM OSD 30 15. OPEN/CLOSE TUNER PART DVD-958 6. Battery Installation 1. Remove the battery compartment cover on the front panel. NOTE: Remove the batteries when you do...
SETUP 20. ENTER 4 18 5 19 7. A-MODE TITLE MENU AM/FM AUTO 7 21 22 10. VOLUME- 27. TONE 12 29 13 14 TONE STEP CH-LEVEL REPEAT ZOOM OSD 30 15. OPEN/CLOSE TUNER PART DVD-958 6. Battery Installation 1. Remove the battery compartment cover on the front panel. NOTE: Remove the batteries when you do...
User Manual
Page 17
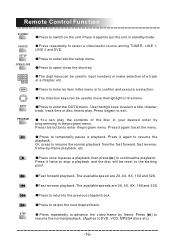
... again to enter the GOTO menu. Press to skip to advance the video frame by frame. STEP Press repeatedly to the next chapter/track. SOURCE SETUP OPEN/CLOSE Press repeatedly to resume the normal playback from the fast forward, fast reverse, frame-by-frame playback, etc. Or, press to select a ... menu. GOTO Press to put the unit in standby mode. Press once to pause a playback, then press [ ] to the starting point. Press it again to DVD, VCD, MPEG4 discs etc) -16- Press it twice to stop a playback and the disc will be used to exit. Fast reverse playback. Press [ ] to ...
... again to enter the GOTO menu. Press to skip to advance the video frame by frame. STEP Press repeatedly to the next chapter/track. SOURCE SETUP OPEN/CLOSE Press repeatedly to resume the normal playback from the fast forward, fast reverse, frame-by-frame playback, etc. Or, press to select a ... menu. GOTO Press to put the unit in standby mode. Press once to pause a playback, then press [ ] to the starting point. Press it again to DVD, VCD, MPEG4 discs etc) -16- Press it twice to stop a playback and the disc will be used to exit. Fast reverse playback. Press [ ] to ...

