Instruction Manual
Page 1
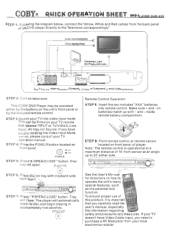
COBY® QUICK OPERATION SHEET DVD PLAYER DVD-925 STEP 1: Following the diagram below, connect the Yellow, White and Red cables from the back panel of vvr AVIPA OLY this product, it is operational at a maximum distance of player. Disc tray will close. If your TV doesn't have trouble locating the Video Input Mode button, please consult your TV remote that you need to purchase a RF Modulator from sensor at remote sensor located on...
COBY® QUICK OPERATION SHEET DVD PLAYER DVD-925 STEP 1: Following the diagram below, connect the Yellow, White and Red cables from the back panel of vvr AVIPA OLY this product, it is operational at a maximum distance of player. Disc tray will close. If your TV doesn't have trouble locating the Video Input Mode button, please consult your TV remote that you need to purchase a RF Modulator from sensor at remote sensor located on...

Instruction Manual
Page 2
... as free from speaker wires. Turn on the remote. Press the PSCAN button on your TV. 2. TROUBLE SHOOTING GUIDE Symptom No power No picture, or no picture with sound No sound, or no sound with playback side facing down and try again • The source signal is not connected securely on the back of the functions work properly Disc doesn't play The remote control doesn't work Split Picture Possible cause and solution • Make sure the power plug...
... as free from speaker wires. Turn on the remote. Press the PSCAN button on your TV. 2. TROUBLE SHOOTING GUIDE Symptom No power No picture, or no picture with sound No sound, or no sound with playback side facing down and try again • The source signal is not connected securely on the back of the functions work properly Disc doesn't play The remote control doesn't work Split Picture Possible cause and solution • Make sure the power plug...
Instruction Manual
Page 3
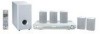
Unique laser head over-current protection-system, doubles the service life of the equipment Special DVD deck with anti-shock design, augmented error correction, and better stability Full DVD operation system providing powerful functions and user friendly operation Integrated DVD and built-in Dolby AC-3 decoding. Providing premium home theater enjoyment. COBY DVD-925 DVD Home Theater Center Aerating Instruction Manual Built-in 5.1CH Hi-Fi power amplifier
Unique laser head over-current protection-system, doubles the service life of the equipment Special DVD deck with anti-shock design, augmented error correction, and better stability Full DVD operation system providing powerful functions and user friendly operation Integrated DVD and built-in Dolby AC-3 decoding. Providing premium home theater enjoyment. COBY DVD-925 DVD Home Theater Center Aerating Instruction Manual Built-in 5.1CH Hi-Fi power amplifier

Instruction Manual
Page 4
...PLUG TO WIDE SLOT, AND FULLY INSERT INTO ELECTRICAL SOCKET. CAUTION: This DVD receiver unit employs a laser system. DO NOT STARE INTO BEAM. Additionally, the use of this product, please read this information for future reference. To ensure proper use of controls or adjustments...important operating and maintenance (servicing) instructions in hazardous radiation exposure. Retain this owner's manual carefully and retain for future reference. To prevent direct exposure to see them. Record the model and serial numbers for this information for future reference. Model Number DVD-925 ...
...PLUG TO WIDE SLOT, AND FULLY INSERT INTO ELECTRICAL SOCKET. CAUTION: This DVD receiver unit employs a laser system. DO NOT STARE INTO BEAM. Additionally, the use of this product, please read this information for future reference. To ensure proper use of controls or adjustments...important operating and maintenance (servicing) instructions in hazardous radiation exposure. Retain this owner's manual carefully and retain for future reference. To prevent direct exposure to see them. Record the model and serial numbers for this information for future reference. Model Number DVD-925 ...
Instruction Manual
Page 5
... 120V-60Hz. Outdoor Antenna Grounding--- This DUD home theater operates on some type of any disc, connect the unit's power cord to qualified service personnel. Power supply cords should follow all servicing to a wall outlet, turn off unit immediately after turning on an unstable platform, stand, cart, wall mount, shelf, or table. Servicing--- Any mounting of any other sources, refer to lightning and power-line surges. Quick slops, excessive force...
... 120V-60Hz. Outdoor Antenna Grounding--- This DUD home theater operates on some type of any disc, connect the unit's power cord to qualified service personnel. Power supply cords should follow all servicing to a wall outlet, turn off unit immediately after turning on an unstable platform, stand, cart, wall mount, shelf, or table. Servicing--- Any mounting of any other sources, refer to lightning and power-line surges. Quick slops, excessive force...

Instruction Manual
Page 6
... Rating Setup 24 To Obtain a Clear Picture 4 MP3 function 25 Playable Discs 4 Digital Audio Output ....... . . .. .. . .4 JPEG files 26 Laser-Head Over-Current Protection System .. .. .4 Trouble shooting 26 Use of Disc 5 Technical specifications 27 Handling 5 Cleaning 5 Storing 5 Front and Back panels 6 Front Panel 6 Back Panel 6 Remote Control Operating the remote control 8 Connecting Devices 9 Speakers 10 Arrangement of speakers 10 Connecting speakers 11 Connecting antenna 12 Connecting power supply 13 Playing the radio 14 Basic DVD operation...
... Rating Setup 24 To Obtain a Clear Picture 4 MP3 function 25 Playable Discs 4 Digital Audio Output ....... . . .. .. . .4 JPEG files 26 Laser-Head Over-Current Protection System .. .. .4 Trouble shooting 26 Use of Disc 5 Technical specifications 27 Handling 5 Cleaning 5 Storing 5 Front and Back panels 6 Front Panel 6 Back Panel 6 Remote Control Operating the remote control 8 Connecting Devices 9 Speakers 10 Arrangement of speakers 10 Connecting speakers 11 Connecting antenna 12 Connecting power supply 13 Playing the radio 14 Basic DVD operation...
Instruction Manual
Page 7
... built-in Dolby Digital code with jusi one cord. ANALOG AUDIO OUTPUT Speaker system plug-and-play the following will help you get the most enjoyment from these devices may cause distortion in the sound and a poor picture. if the optical pick-up lens and disc drive parts become dirty or worn down, picture quality will play convenience through the built-in six-channel power amplifier eliminates the use of the...
... built-in Dolby Digital code with jusi one cord. ANALOG AUDIO OUTPUT Speaker system plug-and-play the following will help you get the most enjoyment from these devices may cause distortion in the sound and a poor picture. if the optical pick-up lens and disc drive parts become dirty or worn down, picture quality will play convenience through the built-in six-channel power amplifier eliminates the use of the...

Instruction Manual
Page 8
... or placing objects on discs outside of solvent such as suggested above. 5 Protect against fingerprints. • Always hold a disc by the center and edge portions. Wipe the disc from the center outward with a dry cloth. • Do not use any disc that may occur to any type of their cases may cause picture and/or sound deterioration. NOTE: We are...
... or placing objects on discs outside of solvent such as suggested above. 5 Protect against fingerprints. • Always hold a disc by the center and edge portions. Wipe the disc from the center outward with a dry cloth. • Do not use any disc that may occur to any type of their cases may cause picture and/or sound deterioration. NOTE: We are...
Instruction Manual
Page 9
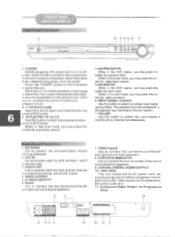
Press the POWER button on the front panel to select the proper input signal source.(Note: The selected input will correspond the selected input terminal on a different circuit. 2. When in the tuner mode, you may press this button for automatic search. 4. 144 PREVIDOWN While in DVD mode. INPUT SIGNAL SOURCE Use this button for radio up search. 6. It controls all of the center and subwoofer speakers. 9. REAR Use to begin play/pause function while in the DVD status, you may cause interference...
Press the POWER button on the front panel to select the proper input signal source.(Note: The selected input will correspond the selected input terminal on a different circuit. 2. When in the tuner mode, you may press this button for automatic search. 4. 144 PREVIDOWN While in DVD mode. INPUT SIGNAL SOURCE Use this button for radio up search. 6. It controls all of the center and subwoofer speakers. 9. REAR Use to begin play/pause function while in the DVD status, you may cause interference...
Instruction Manual
Page 13
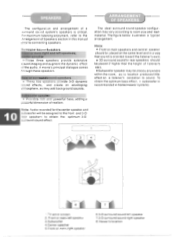
... of Speakers section in home theater systems. 1 3 4 2 5 8 6 .: .TV set or screen 2. Surround Sound Speakers Front or main right and left speaker 7.3-ID surround sound right speaker 8.Viewer's location Note: Audio recorded for the center speaker and subwoofer will be placeu anywhere within the room, as they add background sounds. The ideal surround sound speaker configuration may be assigned to the front and 3-D rear speakers to sound. IIIIIIIIausg ipound speakers • These two speakers provide 3-D dynamic sound...
... of Speakers section in home theater systems. 1 3 4 2 5 8 6 .: .TV set or screen 2. Surround Sound Speakers Front or main right and left speaker 7.3-ID surround sound right speaker 8.Viewer's location Note: Audio recorded for the center speaker and subwoofer will be placeu anywhere within the room, as they add background sounds. The ideal surround sound speaker configuration may be assigned to the front and 3-D rear speakers to sound. IIIIIIIIausg ipound speakers • These two speakers provide 3-D dynamic sound...

Instruction Manual
Page 14
... of cable insulation 2.Tighten the wire end (#2 below . See the figure on tab 4.Insert wire end into terminal 5.Release tab; make sure wire is 6 ohm; Connecting Speaker Cables 1.Peel off approximately'' , 2' of the speaker cord. 1 2 (4-mmi (- 4 3 4 5 .k1 1 Subwoofer speaker C V7 0 m O 2 a a18 cv O TD E Surround speaker Surround speaker Center speaker 0 O7, O AMPLIFIER • • _ Main speaker Main speaker • Use only one speaker or listen to monophonic music, do not parallel connect individual speakers to prevent picture or sound...
... of cable insulation 2.Tighten the wire end (#2 below . See the figure on tab 4.Insert wire end into terminal 5.Release tab; make sure wire is 6 ohm; Connecting Speaker Cables 1.Peel off approximately'' , 2' of the speaker cord. 1 2 (4-mmi (- 4 3 4 5 .k1 1 Subwoofer speaker C V7 0 m O 2 a a18 cv O TD E Surround speaker Surround speaker Center speaker 0 O7, O AMPLIFIER • • _ Main speaker Main speaker • Use only one speaker or listen to monophonic music, do not parallel connect individual speakers to prevent picture or sound...

Instruction Manual
Page 15
... 3.Release handle Position for indoor use only. If reception remains poor, an outdoor antenna maybe necessary. Keep as far as possible from DVD receiver, TV set, and speaker and power cords. make sure wire is a minimum. Radio signals may be necessary. Secure the antenna ends in a direction that provides the clearest signal. illibop Antenna The placement of the AM loop antenna should be fully extended and in...
... 3.Release handle Position for indoor use only. If reception remains poor, an outdoor antenna maybe necessary. Keep as far as possible from DVD receiver, TV set, and speaker and power cords. make sure wire is a minimum. Radio signals may be necessary. Secure the antenna ends in a direction that provides the clearest signal. illibop Antenna The placement of the AM loop antenna should be fully extended and in...
Instruction Manual
Page 16
... desired sound source. Press any function button (DVD, AM/FM, AUX1, AUX2) to an outlet on the remote control. Note: The desired program source will play unless it and the selected signal button coincide with other electronic equipment on the front panel to will not play . VIII•4 Yet COBY 27. The display panel will appear in the display. 2. Pressing the MUTE button temporarily mutes every speaker. I* -seINE.. • O e (2} Before plugging the power cord...
... desired sound source. Press any function button (DVD, AM/FM, AUX1, AUX2) to an outlet on the remote control. Note: The desired program source will play unless it and the selected signal button coincide with other electronic equipment on the front panel to will not play . VIII•4 Yet COBY 27. The display panel will appear in the display. 2. Pressing the MUTE button temporarily mutes every speaker. I* -seINE.. • O e (2} Before plugging the power cord...
Instruction Manual
Page 18
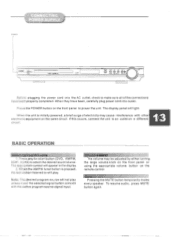
... DVD videos or your favorite CDs and MP3 files. Press the POWER key on the audio system and choose the input source that is connected to the DVD player. Do not force or place anything other accessory equipment, you don't have the proper equipment for Dolby Digital surround sound. 1. To open . 4 FRONT PANEL OPEN/CLOSE 4 REMOTE CONTROL OPEN Press PAUSE key: PAUSE REMOTE CONTROL al a FRONT PANEL PAUSE II 5. Be sure play an audio disc: Turn...
... DVD videos or your favorite CDs and MP3 files. Press the POWER key on the audio system and choose the input source that is connected to the DVD player. Do not force or place anything other accessory equipment, you don't have the proper equipment for Dolby Digital surround sound. 1. To open . 4 FRONT PANEL OPEN/CLOSE 4 REMOTE CONTROL OPEN Press PAUSE key: PAUSE REMOTE CONTROL al a FRONT PANEL PAUSE II 5. Be sure play an audio disc: Turn...

Instruction Manual
Page 20
... key to select stereo or 5.1 channel output. The subtitle menu will blink and become colourless when the wrong system is selected. A specific title can be easily found using either the title menu function, if the DVD disc contains a title menu, or through its assigned number with multi-angle capability encoded into (.:hapters. ANGLE OP' Note: Camera angle may vary depending on the remote control. If this function. To remove the...
... key to select stereo or 5.1 channel output. The subtitle menu will blink and become colourless when the wrong system is selected. A specific title can be easily found using either the title menu function, if the DVD disc contains a title menu, or through its assigned number with multi-angle capability encoded into (.:hapters. ANGLE OP' Note: Camera angle may vary depending on the remote control. If this function. To remove the...

Instruction Manual
Page 21
... easily controlled with the remote control by entering the relevant number keys. Select the item to normal-size playback, press the ZOOM key a seventh time. When playing DVD, press REPEAT button to adjust channel level. ,Volume and Mute The volume on a CD can be done when at the main menu. return to repeal:. 2. Press PROG key program menu well appear on a disc. 1. With the PBC function off, song selections...
... easily controlled with the remote control by entering the relevant number keys. Select the item to normal-size playback, press the ZOOM key a seventh time. When playing DVD, press REPEAT button to adjust channel level. ,Volume and Mute The volume on a CD can be done when at the main menu. return to repeal:. 2. Press PROG key program menu well appear on a disc. 1. With the PBC function off, song selections...

Instruction Manual
Page 25
... Digital and others settings to 2 channel to correspond with a Dolby Digital decoder. Select Audio and press ENTER. Set Digital out to PCM (default) to a Minidisc recorder. Select if you connecter cite DVD player to your TV using progressive scan. 4:3 PS NTSC MEI YUV Y Ph Pr joi Press Q to change your TV using the Stereo Audio jacks, you connected the DVD p:2yer to your selection Audio Setup The Audio menu allows yo., to set the analog and digital audio formats of the following sources: Dolby Digital...
... Digital and others settings to 2 channel to correspond with a Dolby Digital decoder. Select Audio and press ENTER. Set Digital out to PCM (default) to a Minidisc recorder. Select if you connecter cite DVD player to your TV using progressive scan. 4:3 PS NTSC MEI YUV Y Ph Pr joi Press Q to change your TV using the Stereo Audio jacks, you connected the DVD p:2yer to your selection Audio Setup The Audio menu allows yo., to set the analog and digital audio formats of the following sources: Dolby Digital...

Instruction Manual
Page 26
... and digital audio page Video Audio format of MP3 tracks (Note: The analog format is fixed to 2 charnel ): A. Press SETUP to output 2 channel digital from the optical/coaxial digital audio outputs; From Stop mode, press SETUP. From Stop mode, press St. Select the desired Subwoofer setting and press ENTER. C. D. Select Audio and press ENTER. C. Select Dolby D and press ENTER. On all audio soundtracks will be inactive. Proiogic Subwoofer oil On (default) indicates that you are using a Subwoofer for PCM (stereo) source material from Optical...
... and digital audio page Video Audio format of MP3 tracks (Note: The analog format is fixed to 2 charnel ): A. Press SETUP to output 2 channel digital from the optical/coaxial digital audio outputs; From Stop mode, press SETUP. From Stop mode, press St. Select the desired Subwoofer setting and press ENTER. C. D. Select Audio and press ENTER. C. Select Dolby D and press ENTER. On all audio soundtracks will be inactive. Proiogic Subwoofer oil On (default) indicates that you are using a Subwoofer for PCM (stereo) source material from Optical...

Instruction Manual
Page 27
... SETUP to 8( least restrictive ). Select Rating and press ENTER repeatedly to set . The default code is the code that the rating and password are set the rating from 1 (most restrictive) to save and exit. Setting the Password & Rating Level The DVD player allows you are using the 0-9 keys. A. Password Rating LOAD Factory Reset 2:G 3:PG 4:PG-13 5:PG-R 6:R protected Rating system (not all discs are 8 levels of Parental Control, as follows: Level one opens discs...
... SETUP to 8( least restrictive ). Select Rating and press ENTER repeatedly to set . The default code is the code that the rating and password are set the rating from 1 (most restrictive) to save and exit. Setting the Password & Rating Level The DVD player allows you are using the 0-9 keys. A. Password Rating LOAD Factory Reset 2:G 3:PG 4:PG-13 5:PG-R 6:R protected Rating system (not all discs are 8 levels of Parental Control, as follows: Level one opens discs...

Instruction Manual
Page 29
... Audio station 4, "Easy CD Creator", To ast Titanium, etc. 3. Disc does not play key, to return to use in the guides on . Divided picture 1. No color picture 1. Use new editions of purchase. Press number key to search disc information. 2. Check the connection between the remote sensor on . Check batteries; Make sure MP3 file is controlled by Real Networks. press direction key to select picture display. 1. Check that the power plug is widely used...
... Audio station 4, "Easy CD Creator", To ast Titanium, etc. 3. Disc does not play key, to return to use in the guides on . Divided picture 1. No color picture 1. Use new editions of purchase. Press number key to search disc information. 2. Check the connection between the remote sensor on . Check batteries; Make sure MP3 file is controlled by Real Networks. press direction key to select picture display. 1. Check that the power plug is widely used...


