
User Manual
Page 1
COBY Electronics Corp. 1991 Marcus Avenue, Suite 301 Lake Success, NY 11042 www.cobyusa.com www.ecoby.com 850 / 852 / 854 AC 8″ Widescreen Digital Photo Frame with Multimedia Playback DP850 DP852 DP854 INSTRUCTION MANUAL Please read this manual carefully before operation
COBY Electronics Corp. 1991 Marcus Avenue, Suite 301 Lake Success, NY 11042 www.cobyusa.com www.ecoby.com 850 / 852 / 854 AC 8″ Widescreen Digital Photo Frame with Multimedia Playback DP850 DP852 DP854 INSTRUCTION MANUAL Please read this manual carefully before operation
User Manual
Page 6
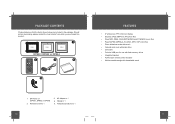
... local retailer from which you purchased this product. 1 DP850 DP852 DP854 DP850 / DP852 or DP854 CHANGE VIEW CLOCK ROTATE COPY /DEL + MENU - 2 3 4 5 1. Manual x 1 5. DP Frame x 1 (DP850 , DP852 or DP854) 2. Kickstand and Screw x 1 • 8" widescreen TFT LCD color display • Displays JPEG, BMP and JPG photo files • Plays MP3, WMA, OGG,ADPCM-WAV and PCM...
... local retailer from which you purchased this product. 1 DP850 DP852 DP854 DP850 / DP852 or DP854 CHANGE VIEW CLOCK ROTATE COPY /DEL + MENU - 2 3 4 5 1. Manual x 1 5. DP Frame x 1 (DP850 , DP852 or DP854) 2. Kickstand and Screw x 1 • 8" widescreen TFT LCD color display • Displays JPEG, BMP and JPG photo files • Plays MP3, WMA, OGG,ADPCM-WAV and PCM...

User Manual
Page 8
...wet hands. The battery used in this may present a fire or chemical hazard if mistreated. DC OUT: 9V 1.5A DP850 / DP852 / DP854 Do not connect the power plug to do so may cause electric shock. Do not recharge, disassemble, incinerate, or heat the batteries. Powering your ...8226; Memory Stick (MS) • Compact Flash (CF) • XD-Picture (XD) • Secure Digital (SD) • Multi Media Card (MMC) • USB Flash Storage Drive Simply insert the memory card of your photo frame's Power In jack and plug the other equipment at an angle no more than 60 degrees...
...wet hands. The battery used in this may present a fire or chemical hazard if mistreated. DC OUT: 9V 1.5A DP850 / DP852 / DP854 Do not connect the power plug to do so may cause electric shock. Do not recharge, disassemble, incinerate, or heat the batteries. Powering your ...8226; Memory Stick (MS) • Compact Flash (CF) • XD-Picture (XD) • Secure Digital (SD) • Multi Media Card (MMC) • USB Flash Storage Drive Simply insert the memory card of your photo frame's Power In jack and plug the other equipment at an angle no more than 60 degrees...
User Manual
Page 9
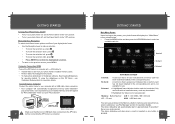
... the memory cards installed in approximately 8 seconds if there is in Vividshare software. USB Port (computer) USB Port (mini) DP850 / DP852 / DP854 Make sure that a memory card has been inserted (installed) in the corresponding slot. GETTING STARTED Main Menu Screen Upon turning on , set the ... • To move the selection right, press • Press ENTER to confirm the highlighted selection. • To return to your digital photo frame: • Use the Navigation keys to the "Off" position. The demo slideshow will stop when a card is inserted or any button is being ...
... the memory cards installed in approximately 8 seconds if there is in Vividshare software. USB Port (computer) USB Port (mini) DP850 / DP852 / DP854 Make sure that a memory card has been inserted (installed) in the corresponding slot. GETTING STARTED Main Menu Screen Upon turning on , set the ... • To move the selection right, press • Press ENTER to confirm the highlighted selection. • To return to your digital photo frame: • Use the Navigation keys to the "Off" position. The demo slideshow will stop when a card is inserted or any button is being ...
User Manual
Page 10
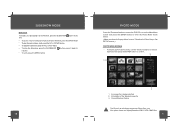
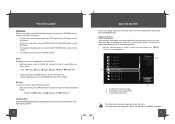
...Your photo frame can display baseline JPEG / JPG / BMP files. 19 An image file is set to Thumbnail in Photo Setup, See SETUP section.) PHOTO MODE SCREEN • To display a photo (full screen), use the direction buttons to select a thumbnail and press the ENTER button to enter the Photo Mode ...shown below: ( Make sure that the Display Mode is being selected. 2. Current Memory Device The Photo List will display supported Photo files, only. or VOL+ button. • To stop the ...
...Your photo frame can display baseline JPEG / JPG / BMP files. 19 An image file is set to Thumbnail in Photo Setup, See SETUP section.) PHOTO MODE SCREEN • To display a photo (full screen), use the direction buttons to select a thumbnail and press the ENTER button to enter the Photo Mode ...shown below: ( Make sure that the Display Mode is being selected. 2. Current Memory Device The Photo List will display supported Photo files, only. or VOL+ button. • To stop the ...
User Manual
Page 11
...Video Mode, your digital video files, select the Video icon from the Photo Mode screen and press t h e ENTER button to display the photo in full-screen. • To view the previous photo, press the LEFT button (or the UP button on the DP frame). • To view the next photo, press the ...RIGHT button (or the DOWN button on the remote control. • To rotate the photo, press the ROTATE button. Your photo frame can play your photo frame will change the degree of magnification as shown below: Rotation 90 Rotation 180 Rotation 270 Rotation 0 Changing View Press the ...
...Video Mode, your digital video files, select the Video icon from the Photo Mode screen and press t h e ENTER button to display the photo in full-screen. • To view the previous photo, press the LEFT button (or the UP button on the DP frame). • To view the next photo, press the ...RIGHT button (or the DOWN button on the remote control. • To rotate the photo, press the ROTATE button. Your photo frame can play your photo frame will change the degree of magnification as shown below: Rotation 90 Rotation 180 Rotation 270 Rotation 0 Changing View Press the ...
User Manual
Page 12
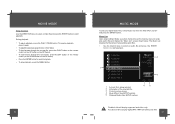
...The Music List will scan the memory device for normal playback. • To stop playback, press the MENU button. 22 MUSIC MODE To play digital MP3, WMA and OGG audi.o files 23 The Music List displays the filenames of the selected File. 3. Music Effect ( See...8226; Use the direction keys to select an audio file and press t h e ENTER b u t t o n to start playback. Your photo frame can play your photo frame will display supported audio files, only. During playback: • To pause playback, press the PLAY / PAUSE button. MOVIE MODE Video Controls Use...
...The Music List will scan the memory device for normal playback. • To stop playback, press the MENU button. 22 MUSIC MODE To play digital MP3, WMA and OGG audi.o files 23 The Music List displays the filenames of the selected File. 3. Music Effect ( See...8226; Use the direction keys to select an audio file and press t h e ENTER b u t t o n to start playback. Your photo frame can play your photo frame will display supported audio files, only. During playback: • To pause playback, press the PLAY / PAUSE button. MOVIE MODE Video Controls Use...
User Manual
Page 14
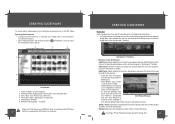
Disks / Folders on this button to Edit Photo Window their factory default state. Creating a Photo Slideshow needs at least 6 image files. 27 Storyboard / Timeline 6. Edit Photo: Select a photo file from the Storyboard and click this DP frame. Background: Sets the background color of the ... Opening the Vividshare • Connect the DP frame to a computer by size, name etc. 4. CREATING SLIDESHOWS Photo Set Select images files from the Storyboard. Storyboard / Timeline • Buttons in the Storyboard Add Photo: Select image files from the computer, press ...
Disks / Folders on this button to Edit Photo Window their factory default state. Creating a Photo Slideshow needs at least 6 image files. 27 Storyboard / Timeline 6. Edit Photo: Select a photo file from the Storyboard and click this DP frame. Background: Sets the background color of the ... Opening the Vividshare • Connect the DP frame to a computer by size, name etc. 4. CREATING SLIDESHOWS Photo Set Select images files from the Storyboard. Storyboard / Timeline • Buttons in the Storyboard Add Photo: Select image files from the computer, press ...
User Manual
Page 18
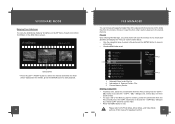
... Device Deleting / Copy a File • To delete a file, select the unwanted file from other memory devices to exit. File List Upon entering File Manager, your photo frame will be displayed in the middle, press the ENTER button to start playback. 34 FILE MANAGER You can browse all available files and display... To enjoy the slideshows made by Vividshare on the Main Menu screen. Select COPY and then confirm YES. • Press the MENU button to the Photo Mode, Music Mode, and Video Mode sections of this manual for all supported digital files of Selected Folder / File 3.
... Device Deleting / Copy a File • To delete a file, select the unwanted file from other memory devices to exit. File List Upon entering File Manager, your photo frame will be displayed in the middle, press the ENTER button to start playback. 34 FILE MANAGER You can browse all available files and display... To enjoy the slideshows made by Vividshare on the Main Menu screen. Select COPY and then confirm YES. • Press the MENU button to the Photo Mode, Music Mode, and Video Mode sections of this manual for all supported digital files of Selected Folder / File 3.
User Manual
Page 19
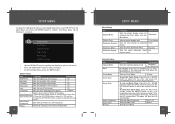
... Display Mode Display Ratio Slideshow Duration Slideshow Effect Slideshow Repeat Sets the photo display mode for the player. The alarm will then turn it . Random Sets the photo slideshow repeat On function on the DP frame is set an Alarm Time: Press the UP / DOWN button to... player. 50 English Sets the auto-power on screen. Auto-Power Off 2. photos. SETUP MENU To adjust the settings and options of your digital photo frame, select SETUP from the Slideshow Main Menu. Sets the photo display ratio. Make sure the Power switch on /off completely, press any other...
... Display Mode Display Ratio Slideshow Duration Slideshow Effect Slideshow Repeat Sets the photo display mode for the player. The alarm will then turn it . Random Sets the photo slideshow repeat On function on the DP frame is set an Alarm Time: Press the UP / DOWN button to... player. 50 English Sets the auto-power on screen. Auto-Power Off 2. photos. SETUP MENU To adjust the settings and options of your digital photo frame, select SETUP from the Slideshow Main Menu. Sets the photo display ratio. Make sure the Power switch on /off completely, press any other...
User Manual
Page 21
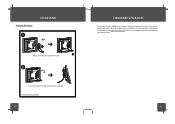
Please check the COBY web site periodically at www.cobyusa.com to add additional features. DP850,DP852 or DP854 40 FIRMWARE UPGRADES From time to time, COBY may release firmware updates to improve the performance of the DP frame or to see if new firmware has been released for your photo frame. 431 Using the Kickstand 1 KICKSTAND Attach the kickstand to the DP frame. 2 Turn the screw to the right to tighten the kickstand.
Please check the COBY web site periodically at www.cobyusa.com to add additional features. DP850,DP852 or DP854 40 FIRMWARE UPGRADES From time to time, COBY may release firmware updates to improve the performance of the DP frame or to see if new firmware has been released for your photo frame. 431 Using the Kickstand 1 KICKSTAND Attach the kickstand to the DP frame. 2 Turn the screw to the right to tighten the kickstand.


