Instruction Manual
Page 2
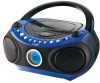
ÂÂ Table of Contents English Thank You...4 Package Contents...4 Features...4 Getting Started...5 CXCD240 at a Glance...5 Connections...8 AC Power...8 DC Power (Battery Operation 8 Headphone Out...8 CD Function...9 Basic Operation...9 CD Function Controls...9 Radio Function...11 Basic Operation...11 Clock Setup...12 Basic Operation...12 Page 2 Table Of Contents
ÂÂ Table of Contents English Thank You...4 Package Contents...4 Features...4 Getting Started...5 CXCD240 at a Glance...5 Connections...8 AC Power...8 DC Power (Battery Operation 8 Headphone Out...8 CD Function...9 Basic Operation...9 CD Function Controls...9 Radio Function...11 Basic Operation...11 Clock Setup...12 Basic Operation...12 Page 2 Table Of Contents
Instruction Manual
Page 3
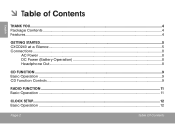
English Care & Maintenance...13 Handling CDs...13 Cleaning CDs...13 Cleaning the CD Player Lens...13 Specifications...14 Troubleshooting & Support 15 Safety Notices...18 Page 3 Table Of Contents
English Care & Maintenance...13 Handling CDs...13 Cleaning CDs...13 Cleaning the CD Player Lens...13 Specifications...14 Troubleshooting & Support 15 Safety Notices...18 Page 3 Table Of Contents
Instruction Manual
Page 4
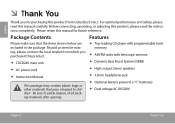
Package Contents Features Please make sure that pose a hazard to safely dispose of all packing materials after opening. Top-loading CD player with programmable track memory AM/FM radio with telescopic antenna Dynamic Bass Boost System (DBBS) High-output stereo speakers 3.5mm headphone jack Optional battery power (6 x "C" batteries) Dual voltage AC 110/220V Page 4 Thank You...
Package Contents Features Please make sure that pose a hazard to safely dispose of all packing materials after opening. Top-loading CD player with programmable track memory AM/FM radio with telescopic antenna Dynamic Bass Boost System (DBBS) High-output stereo speakers 3.5mm headphone jack Optional battery power (6 x "C" batteries) Dual voltage AC 110/220V Page 4 Thank You...
Instruction Manual
Page 5
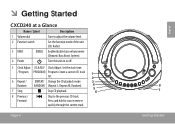
...; Getting Started CXCD240 at a Glance Name / Label Description 1 Volume dial Turn to adjust the volume level. 2 Function switch Set the function mode of the unit (CD, Radio). 3 DBBS [DBBS] Enable/disable bass enhancement (Dynamic Bass Boost System). 4 Power Turn the unit on or off. 5 Clock Adjust [CLK ADJ/ Clock Adjust: Set the clock time. / Program PROGRAM] Program: Create a custom CD track list. 6 Repeat / Random [REPEAT/ Change the CD playback mode RANDOM] (Repeat 1, Repeat All, Random). 7 Stop Stop CD playback. 8 Previous / Forward Skip to scan in reverse quickly through...
...; Getting Started CXCD240 at a Glance Name / Label Description 1 Volume dial Turn to adjust the volume level. 2 Function switch Set the function mode of the unit (CD, Radio). 3 DBBS [DBBS] Enable/disable bass enhancement (Dynamic Bass Boost System). 4 Power Turn the unit on or off. 5 Clock Adjust [CLK ADJ/ Clock Adjust: Set the clock time. / Program PROGRAM] Program: Create a custom CD track list. 6 Repeat / Random [REPEAT/ Change the CD playback mode RANDOM] (Repeat 1, Repeat All, Random). 7 Stop Stop CD playback. 8 Previous / Forward Skip to scan in reverse quickly through...
Instruction Manual
Page 6
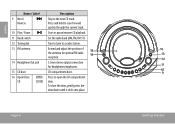
Turn to tune to open the CD compartment door. Extend and adjust the position of the antenna for optimal FM radio reception. 3.5mm stereo output connection for headphones/earphones. Press to a radio station. Start or pause/resume CD playback. English Name / Label 9 Next / Reverse 10 Play / Pause 11 Band switch 12 Tuning dial 13 FM antenna 14 Headphone Out jack 15 CD door 16 Open/Close CD [OPEN/ CLOSE] Description Skip to scan forward quickly...
Turn to tune to open the CD compartment door. Extend and adjust the position of the antenna for optimal FM radio reception. 3.5mm stereo output connection for headphones/earphones. Press to a radio station. Start or pause/resume CD playback. English Name / Label 9 Next / Reverse 10 Play / Pause 11 Band switch 12 Tuning dial 13 FM antenna 14 Headphone Out jack 15 CD door 16 Open/Close CD [OPEN/ CLOSE] Description Skip to scan forward quickly...

Instruction Manual
Page 8
... be disconnected during headphone use. 1. When you have confirmed that the operating voltage of the unit has been properly set , use the supplied AC power cord to connect the unit to lower the volume on the unit. Replace the battery compartment cover. Insert six "C" size batteries. Headphone Out For private listening, connect a pair of the unit. 2. The speakers on AC 110V or 220V power. Make sure that...
... be disconnected during headphone use. 1. When you have confirmed that the operating voltage of the unit has been properly set , use the supplied AC power cord to connect the unit to lower the volume on the unit. Replace the battery compartment cover. Insert six "C" size batteries. Headphone Out For private listening, connect a pair of the unit. 2. The speakers on AC 110V or 220V power. Make sure that...
Instruction Manual
Page 9
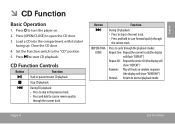
... display will show "RANDOM") Normal: Return to open the CD door. 3. Press to turn the player on. 2. Stop CD playback. CD Function Controls Button Function Start or pause/resume CD playback. Load a CD into the compartment with its label facing up. During CD playback: • Press to skip to the previous track. • Press and hold to scan forward quickly through the current track. Page 9 Cd Function English ÂÂ CD Function Basic Operation...
... display will show "RANDOM") Normal: Return to open the CD door. 3. Press to turn the player on. 2. Stop CD playback. CD Function Controls Button Function Start or pause/resume CD playback. Load a CD into the compartment with its label facing up. During CD playback: • Press to skip to the previous track. • Press and hold to scan forward quickly through the current track. Page 9 Cd Function English ÂÂ CD Function Basic Operation...

Instruction Manual
Page 10
... complete. 6. The playlist will flash "P02" and then "00". 5. English Button [CLK ADJ/ PROGRAM] Function Program a playlist of up to stop playback. 2. Press [CLK ADJ/PROGRAM] to save the selected track to enter Program mode. Press [CLK ADJ/PROGRAM] to memory. Press or to start playing your playlist is opened. Press to select a track. 4. The display will flash "P01" and then "00". 3. To cancel the playlist...
... complete. 6. The playlist will flash "P02" and then "00". 5. English Button [CLK ADJ/ PROGRAM] Function Program a playlist of up to stop playback. 2. Press [CLK ADJ/PROGRAM] to save the selected track to enter Program mode. Press [CLK ADJ/PROGRAM] to memory. Press or to start playing your playlist is opened. Press to select a track. 4. The display will flash "P01" and then "00". 3. To cancel the playlist...
Instruction Manual
Page 11
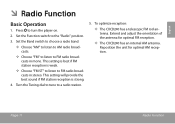
This setting is best if FM station reception is strong. 4. This setting will provide the best sound if FM station reception is weak. —— Choose "FM ST" to listen to turn the player on. 2. To optimize reception: —— The CXCD240 has a telescopic FM rod antenna. Page 11 Radio Function English ÂÂ Radio Function Basic Operation 1. Extend and adjust the orientation of the antenna for optimal...
This setting is best if FM station reception is strong. 4. This setting will provide the best sound if FM station reception is weak. —— Choose "FM ST" to listen to turn the player on. 2. To optimize reception: —— The CXCD240 has a telescopic FM rod antenna. Page 11 Radio Function English ÂÂ Radio Function Basic Operation 1. Extend and adjust the orientation of the antenna for optimal...
Instruction Manual
Page 12
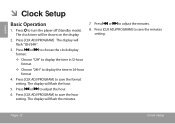
... Clock Setup Press [CLK ADJ/PROGRAM]. The display will flash the hour. 5. The display will flash "12H/24H". 3. Press or to save the hour setting. Press [CLK ADJ/PROGRAM] to save the format setting. Press [CLK ADJ/PROGRAM] to save the minutes setting. The display will be shown on the display. 2. English ÂÂ Clock Setup Basic Operation 1. Press or to turn the player off (Standby mode). Press to adjust the hour. 6. The clock time...
... Clock Setup Press [CLK ADJ/PROGRAM]. The display will flash the hour. 5. The display will flash "12H/24H". 3. Press or to save the hour setting. Press [CLK ADJ/PROGRAM] to save the format setting. Press [CLK ADJ/PROGRAM] to save the minutes setting. The display will be shown on the display. 2. English ÂÂ Clock Setup Basic Operation 1. Press or to turn the player off (Standby mode). Press to adjust the hour. 6. The clock time...
Instruction Manual
Page 13
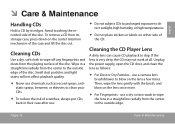
... or labels on the lens a few times. use a dry cotton swab to the outside edge of the case and lift the disc out. To remove a CD from the center to wipe the lens in a straight line radially from its edges. Unplug the power supply, open the CD door, and clean the lens as record sprays, antistatic sprays, benzene, or thinners...
... or labels on the lens a few times. use a dry cotton swab to the outside edge of the case and lift the disc out. To remove a CD from the center to wipe the lens in a straight line radially from its edges. Unplug the power supply, open the CD door, and clean the lens as record sprays, antistatic sprays, benzene, or thinners...
Instruction Manual
Page 14
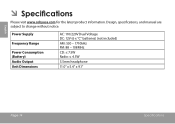
Design, specifications, and manual are subject to change without notice. English ÂÂ Specifications Please visit www.cobyusa.com for the latest product information. Power Supply Frequency Range Power Consumption (Battery) Audio Output Unit Dimensions AC: 110/220V Dual Voltage DC: 12V (6 x "C" batteries) (not included) AM: 530 - 1710kHz FM: 88 - 108MHz CD: ≤ 7.5W Radio: ≤ 4.5W 3.5mm headphone 11.0" x 5.4" x 9.1" Page 14 Specifications
Design, specifications, and manual are subject to change without notice. English ÂÂ Specifications Please visit www.cobyusa.com for the latest product information. Power Supply Frequency Range Power Consumption (Battery) Audio Output Unit Dimensions AC: 110/220V Dual Voltage DC: 12V (6 x "C" batteries) (not included) AM: 530 - 1710kHz FM: 88 - 108MHz CD: ≤ 7.5W Radio: ≤ 4.5W 3.5mm headphone 11.0" x 5.4" x 9.1" Page 14 Specifications
Instruction Manual
Page 15
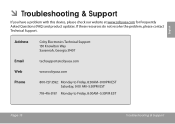
If these resources do not resolve the problem, please contact Technical Support. Address Coby Electronics Technical Support 150 Knowlton Way Savannah, Georgia 31407 Email Web Phone [email protected] www.cobyusa.com 800-727-3592: Monday to Friday, 8:30AM-9:00PM EST Saturday, 9:00 AM-5:30PM EST 718-416-3197: Monday to Friday, 8:00AM-5:30PM EST Page 15 Troubleshooting & Support English ÂÂ Troubleshooting & Support If you have a problem with this device, please check our website at www.cobyusa.com for Frequently Asked Questions (FAQ) and product updates.
If these resources do not resolve the problem, please contact Technical Support. Address Coby Electronics Technical Support 150 Knowlton Way Savannah, Georgia 31407 Email Web Phone [email protected] www.cobyusa.com 800-727-3592: Monday to Friday, 8:30AM-9:00PM EST Saturday, 9:00 AM-5:30PM EST 718-416-3197: Monday to Friday, 8:00AM-5:30PM EST Page 15 Troubleshooting & Support English ÂÂ Troubleshooting & Support If you have a problem with this device, please check our website at www.cobyusa.com for Frequently Asked Questions (FAQ) and product updates.
Instruction Manual
Page 16
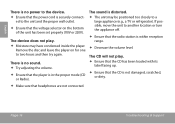
... that the power cord is securely connect- If possible, move the unit to the device. Ensure that the radio station is within reception range. Decrease the volume level. Page 16 Troubleshooting & Support English There is no sound. Try adjusting the volume. Ensure that headphones are not connected. Remove the disc and leave the player on...
... that the power cord is securely connect- If possible, move the unit to the device. Ensure that the radio station is within reception range. Decrease the volume level. Page 16 Troubleshooting & Support English There is no sound. Try adjusting the volume. Ensure that headphones are not connected. Remove the disc and leave the player on...
Instruction Manual
Page 17
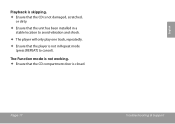
The Function mode is not working. Ensure that the player is closed. Page 17 Troubleshooting & Support English Playback is skipping. Ensure that the CD is not damaged, scratched, or dirty. Ensure that the unit has been installed in Repeat mode (press [REPEAT] to avoid vibration and shock. The player will only play one track, repeatedly. Ensure that the CD compartment door is not in a stable location to cancel).
The Function mode is not working. Ensure that the player is closed. Page 17 Troubleshooting & Support English Playback is skipping. Ensure that the CD is not damaged, scratched, or dirty. Ensure that the unit has been installed in Repeat mode (press [REPEAT] to avoid vibration and shock. The player will only play one track, repeatedly. Ensure that the CD compartment door is not in a stable location to cancel).
Instruction Manual
Page 18
... this device to the presence of important operation and servicing instructions in the literature accompanying the appliance. Retain this product, please contact your local authorities or the Electronics Industries Alliance: www.eiae.org. Serial No. Page 18 Safety Notices English ÂÂ Safety Notices For Customer Use: Enter below the serial number that may be of sufficient magnitude...
... this device to the presence of important operation and servicing instructions in the literature accompanying the appliance. Retain this product, please contact your local authorities or the Electronics Industries Alliance: www.eiae.org. Serial No. Page 18 Safety Notices English ÂÂ Safety Notices For Customer Use: Enter below the serial number that may be of sufficient magnitude...

Instruction Manual
Page 19
...laser. The use of controls or adjustment or performance of time, make sure that all batteries from the battery compartment, and unplug the AC-DC adapter from the unit. Remove all power sources are disconnected from the wall outlet. Page 19 Safety Notices If you do not attempt to disassemble the casing. • Stop operation...English On Protection Against Laser Energy Exposure • As the laser beam used in this product is not to be ON when the disc compartment door is still open. • If the unit is harmful to the eyes, do , the laser diode will be used for a long period ...
...laser. The use of controls or adjustment or performance of time, make sure that all batteries from the battery compartment, and unplug the AC-DC adapter from the unit. Remove all power sources are disconnected from the wall outlet. Page 19 Safety Notices If you do not attempt to disassemble the casing. • Stop operation...English On Protection Against Laser Energy Exposure • As the laser beam used in this product is not to be ON when the disc compartment door is still open. • If the unit is harmful to the eyes, do , the laser diode will be used for a long period ...

Instruction Manual
Page 20
... is open or attempt to repair this device. Do not open , the laser beam stops automatically. Keep these instructions carefully. Do not force the power plug into your safety.) 8. When the disc holder is wider than the other; Read these instructions for replacement of time. 12. Do not stand the unit on , pinched by the manufacturer. the wide blade is used, use caution...
... is open or attempt to repair this device. Do not open , the laser beam stops automatically. Keep these instructions carefully. Do not force the power plug into your safety.) 8. When the disc holder is wider than the other; Read these instructions for replacement of time. 12. Do not stand the unit on , pinched by the manufacturer. the wide blade is used, use caution...
Instruction Manual
Page 21
... use. • Place the unit on a flat, even surface. • Do not place the unit where it is subject to a warm room. Page 21 Safety Notices English All other trademarks and logos are property of Coby Electronics Corporation. • Condensation may form inside the CD player... if the unit is left anywhere warm and damp, or if you move the unit from a cold location to vibration. Legal and Trademark Notices Coby is a registered trademark of their respective owners unless indicated ...
... use. • Place the unit on a flat, even surface. • Do not place the unit where it is subject to a warm room. Page 21 Safety Notices English All other trademarks and logos are property of Coby Electronics Corporation. • Condensation may form inside the CD player... if the unit is left anywhere warm and damp, or if you move the unit from a cold location to vibration. Legal and Trademark Notices Coby is a registered trademark of their respective owners unless indicated ...


