User Manual
Page 2
English Table of Contents Package Contents 4 Features 5 Getting Started 6 Controls at a Glance 6 Front View 6 Top View 7 Rear View 8 Remote Control 9 Connecting Power 10 Using the DC Power Supply 10 Using the AC Power Supply 11 Installing/Replacing the Remote Control Batteries ..11 Stereo Headphone Jack 12 Radio Mode 14 iPod Mode 15 CD Mode 16 To use the CD Player 16 Selecting a different track 17 Searching for a passage on a track 17 Repeat function 17 Programming of track numbers 17 Page 2 Coby Electronics Corporation
English Table of Contents Package Contents 4 Features 5 Getting Started 6 Controls at a Glance 6 Front View 6 Top View 7 Rear View 8 Remote Control 9 Connecting Power 10 Using the DC Power Supply 10 Using the AC Power Supply 11 Installing/Replacing the Remote Control Batteries ..11 Stereo Headphone Jack 12 Radio Mode 14 iPod Mode 15 CD Mode 16 To use the CD Player 16 Selecting a different track 17 Searching for a passage on a track 17 Repeat function 17 Programming of track numbers 17 Page 2 Coby Electronics Corporation
User Manual
Page 4
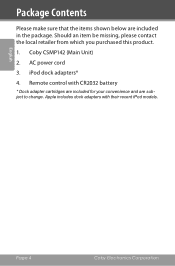
Coby CSMP142 (Main Unit) 2. AC power cord 3. Apple includes dock adapters with CR2032 battery * Dock adapter cartridges are included for your convenience and are included in the package. iPod dock adapters* 4. Remote control with their recent iPod models. Page 4 Coby Electronics Corporation Should an item be missing, please contact the local retailer from which you purchased this product. 1. English Package Contents Please make sure that the items shown below are subject to change.
Coby CSMP142 (Main Unit) 2. AC power cord 3. Apple includes dock adapters with CR2032 battery * Dock adapter cartridges are included for your convenience and are included in the package. iPod dock adapters* 4. Remote control with their recent iPod models. Page 4 Coby Electronics Corporation Should an item be missing, please contact the local retailer from which you purchased this product. 1. English Package Contents Please make sure that the items shown below are subject to change.
User Manual
Page 5
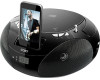
English Features Universal dock for iPod charges and plays your favorite iPod music Top-loading CD player with programmable track memory AM/FM radio with telescopic FM antenna 3.5mm headphone jack Full-range speaker system Full function remote control www.cobyusa.com Page 5
English Features Universal dock for iPod charges and plays your favorite iPod music Top-loading CD player with programmable track memory AM/FM radio with telescopic FM antenna 3.5mm headphone jack Full-range speaker system Full function remote control www.cobyusa.com Page 5
User Manual
Page 6
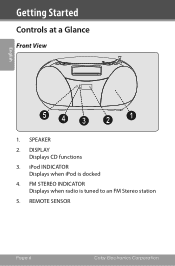
SPEAKER 2. DISPLAY Displays CD functions 3. REMOTE SENSOR Page 6 Coby Electronics Corporation FM STEREO INDICATOR Displays when radio is docked 4. iPod INDICATOR Displays when iPod is tuned to an FM Stereo station 5. Getting Started Controls at a Glance Front View English 54 3 2 1 1.
SPEAKER 2. DISPLAY Displays CD functions 3. REMOTE SENSOR Page 6 Coby Electronics Corporation FM STEREO INDICATOR Displays when radio is docked 4. iPod INDICATOR Displays when iPod is tuned to an FM Stereo station 5. Getting Started Controls at a Glance Front View English 54 3 2 1 1.

User Manual
Page 7
... 10 6. CD DOOR Lift at open/close mark to select Repeat or Random playback 15. iPod UNIVERSAL DOCK CONNECTOR Connect your iPod 12. HANDLE www.cobyusa.com Page 7 STOP (for CD only) Skip to stop CD playback or delete a program 10. NEXT (for CD only) Press to next available CD track 13. MODE (for RADIO only) 7. TELESCOPIC ANTENNA (for CD only) Press to open 11. PROGRAM (for CD only) Programming and control of track playback 8.
... 10 6. CD DOOR Lift at open/close mark to select Repeat or Random playback 15. iPod UNIVERSAL DOCK CONNECTOR Connect your iPod 12. HANDLE www.cobyusa.com Page 7 STOP (for CD only) Skip to stop CD playback or delete a program 10. NEXT (for CD only) Press to next available CD track 13. MODE (for RADIO only) 7. TELESCOPIC ANTENNA (for CD only) Press to open 11. PROGRAM (for CD only) Programming and control of track playback 8.

User Manual
Page 8
STEREO HEADPHONE JACK Connect a pair of 3.5mm stereo headphones here 20. TUNING KNOB Adjust the radio frequency to tune to stations Page 8 Coby Electronics Corporation AC POWER SUPPLY Connect the power cord here 19. BATTERY COMPARTMENT 21. English Getting Started Rear View 22 21 VOLUME 16 ~~AC IN 17 20 19 18 16. VOLUME CONTROL Adjust the sound level 17. FUNCTION SELECTOR Select the playback source (Radio, iPod, CD) or turn the unit off 18. BAND SELECTOR Select the radio band (AM, FM, FM ST) 22.
STEREO HEADPHONE JACK Connect a pair of 3.5mm stereo headphones here 20. TUNING KNOB Adjust the radio frequency to tune to stations Page 8 Coby Electronics Corporation AC POWER SUPPLY Connect the power cord here 19. BATTERY COMPARTMENT 21. English Getting Started Rear View 22 21 VOLUME 16 ~~AC IN 17 20 19 18 16. VOLUME CONTROL Adjust the sound level 17. FUNCTION SELECTOR Select the playback source (Radio, iPod, CD) or turn the unit off 18. BAND SELECTOR Select the radio band (AM, FM, FM ST) 22.
User Manual
Page 11
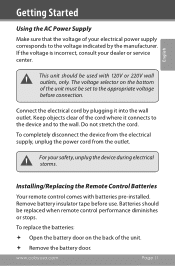
... storms. Installing/Replacing the Remote Control Batteries Your remote control comes with 120V or 220V wall outlets, only. Keep objects clear of your electrical power supply corresponds to the voltage indicated by plugging it connects to the device and to the appropriate voltage before use. For your dealer or service center. Batteries should be replaced when remote control performance diminishes or stops. To replace the batteries: Open the battery door on...
... storms. Installing/Replacing the Remote Control Batteries Your remote control comes with 120V or 220V wall outlets, only. Keep objects clear of your electrical power supply corresponds to the voltage indicated by plugging it connects to the device and to the appropriate voltage before use. For your dealer or service center. Batteries should be replaced when remote control performance diminishes or stops. To replace the batteries: Open the battery door on...
User Manual
Page 13
Set the desired volume level using the VOLUME KNOB. 3. English www.cobyusa.com Page 13 General Operation 1. Select the source by setting the FUNCTION SELECTOR to OFF. To turn off the unit, set the FUNCTION SELECTOR to iPod, CD or RADIO. 2.
Set the desired volume level using the VOLUME KNOB. 3. English www.cobyusa.com Page 13 General Operation 1. Select the source by setting the FUNCTION SELECTOR to OFF. To turn off the unit, set the FUNCTION SELECTOR to iPod, CD or RADIO. 2.
User Manual
Page 14
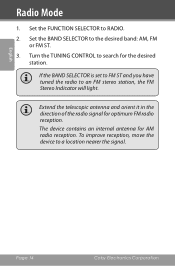
... signal. Extend the telescopic antenna and orient it in the direction of the radio signal for the desired station. To improve reception, move the device to an FM stereo station, the FM Stereo Indicator will light. English Radio Mode 1. Page 14 Coby Electronics Corporation The device contains an internal antenna for AM radio reception. Set the BAND SELECTOR to RADIO. 2. Set the FUNCTION SELECTOR to the desired...
... signal. Extend the telescopic antenna and orient it in the direction of the radio signal for the desired station. To improve reception, move the device to an FM stereo station, the FM Stereo Indicator will light. English Radio Mode 1. Page 14 Coby Electronics Corporation The device contains an internal antenna for AM radio reception. Set the BAND SELECTOR to RADIO. 2. Set the FUNCTION SELECTOR to the desired...
User Manual
Page 15
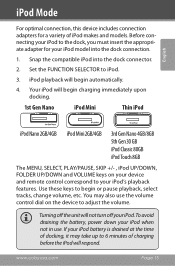
... compatible iPod into the dock connection. 1. Set the FUNCTION SELECTOR to begin or pause playback, select tracks, change volume, etc. Use these keys to iPod. 3. Turning off the unit will begin automatically. 4. www.cobyusa.com Page 15 Your iPod will not turn off your iPod when not in use the volume control dial on your device and remote control correspond to adjust the volume. You may take up to the dock, you...
... compatible iPod into the dock connection. 1. Set the FUNCTION SELECTOR to begin or pause playback, select tracks, change volume, etc. Use these keys to iPod. 3. Turning off the unit will begin automatically. 4. www.cobyusa.com Page 15 Your iPod will not turn off your iPod when not in use the volume control dial on your device and remote control correspond to adjust the volume. You may take up to the dock, you...
User Manual
Page 16
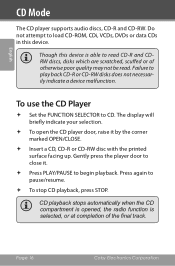
..., or at completion of otherwise poor quality may not be read. Page 16 Coby Electronics Corporation CD playback stops automatically when the CD compartment is opened, the radio function is able to CD. Though this device. To use the CD Player Set the FUNCTION SELECTOR to read CD-R and CDRW discs, disks which are scratched, scuffed or of the final track. English CD Mode The CD player supports audio discs, CD-R and CD-RW.
..., or at completion of otherwise poor quality may not be read. Page 16 Coby Electronics Corporation CD playback stops automatically when the CD compartment is opened, the radio function is able to CD. Though this device. To use the CD Player Set the FUNCTION SELECTOR to read CD-R and CDRW discs, disks which are scratched, scuffed or of the final track. English CD Mode The CD player supports audio discs, CD-R and CD-RW.

User Manual
Page 17
.... When you have found the desired passage, release the BACK or NEXT button. Programming of track numbers Up to select a track. Repeat function Select REPEAT for a passage on the unit or remote control unit to resume playback. To program tracks: In STOP mode, press BACK or NEXT to 20 tracks can be programmed in Stop or Pause mode, press PLAY/PAUSE to select the next/previous...
.... When you have found the desired passage, release the BACK or NEXT button. Programming of track numbers Up to select a track. Repeat function Select REPEAT for a passage on the unit or remote control unit to resume playback. To program tracks: In STOP mode, press BACK or NEXT to 20 tracks can be programmed in Stop or Pause mode, press PLAY/PAUSE to select the next/previous...

User Manual
Page 18
... playback of your programmed tracks, press PLAY/PAUSE. Page 18 Coby Electronics Corporation Deleting a Program To reset the memory and delete the program: Open the CD door. Set the function selector to record the track. English CD Mode When the desired track number appears, press the PROG button once to RADIO . Press STOP once. The display will display the track numbers in the order programmed. Program Check In STOP mode...
... playback of your programmed tracks, press PLAY/PAUSE. Page 18 Coby Electronics Corporation Deleting a Program To reset the memory and delete the program: Open the CD door. Set the function selector to record the track. English CD Mode When the desired track number appears, press the PROG button once to RADIO . Press STOP once. The display will display the track numbers in the order programmed. Program Check In STOP mode...
User Manual
Page 20
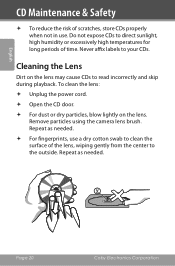
... the outside. To clean the lens: Unplug the power cord. Open the CD door. For dust or dry particles, blow lightly on the lens may cause CDs to read incorrectly and skip during playback. Remove particles using the camera lens brush. Repeat as needed . English CD Maintenance & Safety To reduce the risk of...
... the outside. To clean the lens: Unplug the power cord. Open the CD door. For dust or dry particles, blow lightly on the lens may cause CDs to read incorrectly and skip during playback. Remove particles using the camera lens brush. Repeat as needed . English CD Maintenance & Safety To reduce the risk of...
User Manual
Page 21
... are charged and properly installed. No sound/electric power Confirm that volume is adjusted. Confirm that batteries are secure. Confirm that power cord connections to repair the device yourself. English Troubleshooting If you have a problem with this device, please read the troubleshooting guide below and check our website at www.cobyusa.com for Frequently Asked Questions (FAQs) and firmware updates...
... are charged and properly installed. No sound/electric power Confirm that volume is adjusted. Confirm that batteries are secure. Confirm that power cord connections to repair the device yourself. English Troubleshooting If you have a problem with this device, please read the troubleshooting guide below and check our website at www.cobyusa.com for Frequently Asked Questions (FAQs) and firmware updates...

User Manual
Page 22
... position the FM aerial for obstruction on device dock and iPod dock connector. You may need to clear potential electrostatic discharge. Wait a few minutes, then plug in the docking station. Check for optimal reception. No display unit or button function Turn off and disconnect the device from power source to reset your iPod. Page 22 Coby Electronics Corporation iPod does not dock properly ...
... position the FM aerial for obstruction on device dock and iPod dock connector. You may need to clear potential electrostatic discharge. Wait a few minutes, then plug in the docking station. Check for optimal reception. No display unit or button function Turn off and disconnect the device from power source to reset your iPod. Page 22 Coby Electronics Corporation iPod does not dock properly ...
User Manual
Page 26
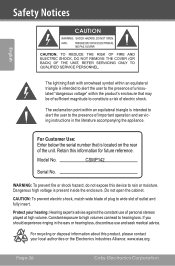
... Serial No. Safety Notices English The lightning flash with arrowhead symbol within an equilateral triangle is intended to alert the user to the presence of uninsulated "dangerous voltage" within an equilateral triangle is intended to alert the user to the presence of important operation and servicing instructions in the ears or hearing loss, discontinue use of personal stereos played at high volume...
... Serial No. Safety Notices English The lightning flash with arrowhead symbol within an equilateral triangle is intended to alert the user to the presence of uninsulated "dangerous voltage" within an equilateral triangle is intended to alert the user to the presence of important operation and servicing instructions in the ears or hearing loss, discontinue use of personal stereos played at high volume...

User Manual
Page 27
... specified in a residential installation. These limits are designed to radio communications. Note: This equipment has been tested and found to comply with the limits for help Use of shielded cable is no guarantee that to which can radiate radio frequency energy and, if not installed and used in accordance with the instructions, may cause undesired operation. www.cobyusa.com Page...
... specified in a residential installation. These limits are designed to radio communications. Note: This equipment has been tested and found to comply with the limits for help Use of shielded cable is no guarantee that to which can radiate radio frequency energy and, if not installed and used in accordance with the instructions, may cause undesired operation. www.cobyusa.com Page...

User Manual
Page 28
... they are not sure of the type of time. Heed Warnings: All warnings on the rating label. Power-Cord Protection: Power supply cords should be followed. 5. Use a damp cloth for ventilation to ensure reliable operation of other similar surface. Use of the product and to operate from the product. 11. Ventilation: Slots and openings in the operating instructions should be walked on a bed, sofa...
... they are not sure of the type of time. Heed Warnings: All warnings on the rating label. Power-Cord Protection: Power supply cords should be followed. 5. Use a damp cloth for ventilation to ensure reliable operation of other similar surface. Use of the product and to operate from the product. 11. Ventilation: Slots and openings in the operating instructions should be walked on a bed, sofa...

User Manual
Page 29
... that your service technician has used replacement parts specified by following conditions: a) when the power-supply or plug is in a fire or electric shock. Refer all servicing to rain or water; b) if liquid has been spilled or if objects have the same characteristics as they may expose you to this product through openings as the original part. Adjust only those controls that...
... that your service technician has used replacement parts specified by following conditions: a) when the power-supply or plug is in a fire or electric shock. Refer all servicing to rain or water; b) if liquid has been spilled or if objects have the same characteristics as they may expose you to this product through openings as the original part. Adjust only those controls that...


