User Manual
Page 3
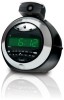
English Controls 1. TUNING CONTROL DIAL 11. VOLUME/BUZZ DIAL 13. ROTARY SET DIAL 9. SLEEP BUTTON 10. PROJECTION SWITCH (ON/OFF) 15. PROJECTION TIME SET BUTTON www.cobyusa.com Page 3 PROJECTION MINUTE SETTING 16. PROJECTION HOUR SETTING 17. BATTERY COMPARTMENT 5. SETTING SWITCH (RUN/ALM/TIME) 6. LED DISPLAY 8. PROJECTOR 14. AM/FM BAND SELECTION SWITCH 12. FOCUS 18. SNOOZE BUTTON 4. POWER SWITCH (ON/AUTO/OFF) 7. AC POWER CORD 2. FM ANTENNA WIRE 3.
English Controls 1. TUNING CONTROL DIAL 11. VOLUME/BUZZ DIAL 13. ROTARY SET DIAL 9. SLEEP BUTTON 10. PROJECTION SWITCH (ON/OFF) 15. PROJECTION TIME SET BUTTON www.cobyusa.com Page 3 PROJECTION MINUTE SETTING 16. PROJECTION HOUR SETTING 17. BATTERY COMPARTMENT 5. SETTING SWITCH (RUN/ALM/TIME) 6. LED DISPLAY 8. PROJECTOR 14. AM/FM BAND SELECTION SWITCH 12. FOCUS 18. SNOOZE BUTTON 4. POWER SWITCH (ON/AUTO/OFF) 7. AC POWER CORD 2. FM ANTENNA WIRE 3.

User Manual
Page 4
For your clock to any power source not indicated by the Specifications list. This backup battery will allow your safety, do not connect the clock to maintain the correct time during a power outage or other interruption of the AC connection. If the AC connection is interrupted, the clock will not be displayed until AC power is reconnected. English Power Plug the AC POWER CORD (1) into your wall outlet. Page 4 Coby Electronics...
For your clock to any power source not indicated by the Specifications list. This backup battery will allow your safety, do not connect the clock to maintain the correct time during a power outage or other interruption of the AC connection. If the AC connection is interrupted, the clock will not be displayed until AC power is reconnected. English Power Plug the AC POWER CORD (1) into your wall outlet. Page 4 Coby Electronics...

User Manual
Page 5
To obtain the best possible FM reception, be sure to select the desired station. 4. Use the TUNING CONTROL (10) to fully extend the FM ANTENNA WIRE (2). 6. Adjust the volume level using the VOLUME CONTROL DIAL (12). 5. www.cobyusa.com Page 5 Set the POWER SWITCH (6) to the desired bandwicth. 3. Set the AM/FM BAND SELECTION SWITCH (11) to the ON position. 2. Do not connect the FM antenna to the OFF position. To switch off the radio, set the POWER SWITCH to another external antenna. English Radio Operation 1.
To obtain the best possible FM reception, be sure to select the desired station. 4. Use the TUNING CONTROL (10) to fully extend the FM ANTENNA WIRE (2). 6. Adjust the volume level using the VOLUME CONTROL DIAL (12). 5. www.cobyusa.com Page 5 Set the POWER SWITCH (6) to the desired bandwicth. 3. Set the AM/FM BAND SELECTION SWITCH (11) to the ON position. 2. Do not connect the FM antenna to the OFF position. To switch off the radio, set the POWER SWITCH to another external antenna. English Radio Operation 1.
User Manual
Page 6
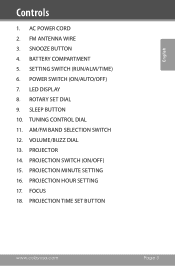
... displayed correctly, move the SETTING switch to the RUN position to dim the lights in focus. Extend the projector unit and aim the front lens at a wall or other surface. You may need to confirm. To set the projector display time manually. 1. The projector clock operates independently of the rest of the unit; English Clock Operation Setting the Clock 1. Adjust the FOCUS knob until the desired hour...
... displayed correctly, move the SETTING switch to the RUN position to dim the lights in focus. Extend the projector unit and aim the front lens at a wall or other surface. You may need to confirm. To set the projector display time manually. 1. The projector clock operates independently of the rest of the unit; English Clock Operation Setting the Clock 1. Adjust the FOCUS knob until the desired hour...

User Manual
Page 7
Clock Operation Adjusting the focus will cause the lens to use the projector feature, you do not wish to extend from the projector unit. If you must fully retract the lens before folding the projector back into its port. Maximum projection distance is 3 - 9 feet. English www.cobyusa.com Page 7
Clock Operation Adjusting the focus will cause the lens to use the projector feature, you do not wish to extend from the projector unit. If you must fully retract the lens before folding the projector back into its port. Maximum projection distance is 3 - 9 feet. English www.cobyusa.com Page 7

User Manual
Page 8
... position. Set the POWER switch to the AUTO position to the correct station and desired volume level. To set the alarm hour, rotate the set the alarm. The display will stop flashing. Page 8 Coby Electronics Corporation Once the desired alarm time is set the alarm. English Alarm Functions Setting the Alarm Time 1. To set the alarm minute, rotate the set dial too quickly. Set the POWER switch to the AUTO position to confirm. Wake to buzzer Once the alarm time is displayed correctly, move the SETTING switch...
... position. Set the POWER switch to the AUTO position to the correct station and desired volume level. To set the alarm hour, rotate the set the alarm. The display will stop flashing. Page 8 Coby Electronics Corporation Once the desired alarm time is set the alarm. English Alarm Functions Setting the Alarm Time 1. To set the alarm minute, rotate the set dial too quickly. Set the POWER switch to the AUTO position to confirm. Wake to buzzer Once the alarm time is displayed correctly, move the SETTING switch...

User Manual
Page 9
... hold the SLEEP button on the bottom of the clock face. The radio will automatically switch the radio off after 9 minutes. Sleep Function This function will switch on automatically when the countdown begins, and switch off the alarm, set the sleep interval and begin countdown. Set the POWER switch to AUTO. 2. To set dial until the display shows the desired time. (Rotate clockwise for interval beginning at 1 hour 59 minutes...
... hold the SLEEP button on the bottom of the clock face. The radio will automatically switch the radio off after 9 minutes. Sleep Function This function will switch on automatically when the countdown begins, and switch off the alarm, set the sleep interval and begin countdown. Set the POWER switch to AUTO. 2. To set dial until the display shows the desired time. (Rotate clockwise for interval beginning at 1 hour 59 minutes...
User Manual
Page 10
Alarm Functions You may both fall asleep and wake to the radio by setting the Alarm and Sleep functions as indicated above. English Page 10 Coby Electronics Corporation
Alarm Functions You may both fall asleep and wake to the radio by setting the Alarm and Sleep functions as indicated above. English Page 10 Coby Electronics Corporation

User Manual
Page 11
www.cobyusa.com Page 11 English Specifcations Frequency range: AM 530 - 1710 kHz FM 88 - 108 MHz Speaker impedance: 8 ohm Battery backup: 9V battery (not included) Power source: 120V ~ 60 Hz WARNING: To reduce the risk of fire or electric shock, do not expose this appliance to moisture.
www.cobyusa.com Page 11 English Specifcations Frequency range: AM 530 - 1710 kHz FM 88 - 108 MHz Speaker impedance: 8 ohm Battery backup: 9V battery (not included) Power source: 120V ~ 60 Hz WARNING: To reduce the risk of fire or electric shock, do not expose this appliance to moisture.
User Manual
Page 12
If these resources do not resolve the problem, please contact Technical Support. English Troubleshooting If you have a problem with this device, please check our website at www.cobyusa.com for Frequently Asked Questions (FAQs) and firmware updates. Address Coby Electronics Technical Support 56-65 Rust Street Maspeth, NY 11378 Email [email protected] Web www.cobyusa.com Phone 800-727-3592: Mon-Fri, 8:00AM-11:00PM EST Saturdays, 9:00AM-5:30PM EST 718-416-3197: Mon-Fri, 8:00AM-5:30PM EST Page 12 Coby Electronics Corporation
If these resources do not resolve the problem, please contact Technical Support. English Troubleshooting If you have a problem with this device, please check our website at www.cobyusa.com for Frequently Asked Questions (FAQs) and firmware updates. Address Coby Electronics Technical Support 56-65 Rust Street Maspeth, NY 11378 Email [email protected] Web www.cobyusa.com Phone 800-727-3592: Mon-Fri, 8:00AM-11:00PM EST Saturdays, 9:00AM-5:30PM EST 718-416-3197: Mon-Fri, 8:00AM-5:30PM EST Page 12 Coby Electronics Corporation
User Manual
Page 13
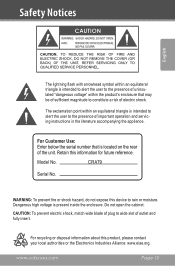
... the presence of important operation and servicing instructions in the literature accompanying the appliance. Safety Notices English The lightning flash with arrowhead symbol within the product's enclosure that is present inside the enclosure. The exclamation point within an equilateral triangle is intended to alert the user to the presence of electric shock. Model No. CRA79 Serial No. CAUTION: To...
... the presence of important operation and servicing instructions in the literature accompanying the appliance. Safety Notices English The lightning flash with arrowhead symbol within the product's enclosure that is present inside the enclosure. The exclamation point within an equilateral triangle is intended to alert the user to the presence of electric shock. Model No. CRA79 Serial No. CAUTION: To...
User Manual
Page 14
... is connected. • Consult the dealer or an experienced radio/TV technician for Class B digital devices, pursuant to the equipment unless otherwise specified in the manual. Operation is subject to stop operation of shielded cable is no guarantee that to comply with the instructions, may cause undesired operation. English Safety Notices FCC Statement: This device complies with the limits for help Use...
... is connected. • Consult the dealer or an experienced radio/TV technician for Class B digital devices, pursuant to the equipment unless otherwise specified in the manual. Operation is subject to stop operation of shielded cable is no guarantee that to comply with the instructions, may cause undesired operation. English Safety Notices FCC Statement: This device complies with the limits for help Use...
User Manual
Page 15
... to the operating instructions. 10. This product should be retained for cleaning. 6. www.cobyusa.com Page 15 Use of time. For products intended to cords at plugs, convenience receptacles, and at the point which they exit from the wall outlet before the product is left unattended and unused for this product near water (e.g., near a swimming pool and the like). 8. Power-Cord Protection: Power supply cords should...
... to the operating instructions. 10. This product should be retained for cleaning. 6. www.cobyusa.com Page 15 Use of time. For products intended to cords at plugs, convenience receptacles, and at the point which they exit from the wall outlet before the product is left unattended and unused for this product near water (e.g., near a swimming pool and the like). 8. Power-Cord Protection: Power supply cords should...
User Manual
Page 16
...; Adjust only those controls that produce heat. Replacement Parts: When replacement parts are required, be situated away from the wall outlet and refer servicing to its normal operation; d) if the product does not operate normally by a qualified technician to restore the product to qualified service personnel under the following conditions: a) when the power-supply or plug is in damage and will often require extensive work by...
...; Adjust only those controls that produce heat. Replacement Parts: When replacement parts are required, be situated away from the wall outlet and refer servicing to its normal operation; d) if the product does not operate normally by a qualified technician to restore the product to qualified service personnel under the following conditions: a) when the power-supply or plug is in damage and will often require extensive work by...


