User Manual
Page 3
... User Guide Contents Product Overview X2000 4 Top 4 Back 5 Bottom 5 Wall-mounting placement 5 X3000 6 Top 6 Back 7 Bottom 7 Wall-mounting placement 7 Installation Set up your modem-router automatically 8 Set up your modem-router manually 9 Connect your modem-router 10 Set up your modem-router as only a router 10 How to access Cisco Connect 11 Main Menu 11 Main Menu...
... User Guide Contents Product Overview X2000 4 Top 4 Back 5 Bottom 5 Wall-mounting placement 5 X3000 6 Top 6 Back 7 Bottom 7 Wall-mounting placement 7 Installation Set up your modem-router automatically 8 Set up your modem-router manually 9 Connect your modem-router 10 Set up your modem-router as only a router 10 How to access Cisco Connect 11 Main Menu 11 Main Menu...
User Manual
Page 4
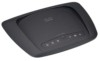
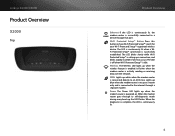
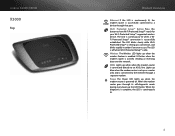
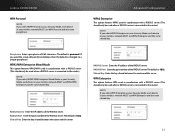
... continuously lit when a WiFi Protected Setup™ connection is actively sending or receiving data over the network. It flashes when the modem router is successfully established. When the diagnostic is complete, the LED is idle. The LED is off when Wi-Fi Protected Setup™ is...Wireless LED lights up a connection, and blinks rapidly in amber if an error occurs. Linksys X2000/X3000 Product Overview X2000 Top Product Overview Ethernet If the LED is continuously lit, the modem router is successfully connected to have Wi-Fi Protected Setup™ search for your Wi-Fi Protected ...
... continuously lit when a WiFi Protected Setup™ connection is actively sending or receiving data over the network. It flashes when the modem router is successfully established. When the diagnostic is complete, the LED is idle. The LED is off when Wi-Fi Protected Setup™ is...Wireless LED lights up a connection, and blinks rapidly in amber if an error occurs. Linksys X2000/X3000 Product Overview X2000 Top Product Overview Ethernet If the LED is continuously lit, the modem router is successfully connected to have Wi-Fi Protected Setup™ search for your Wi-Fi Protected ...
User Manual
Page 5
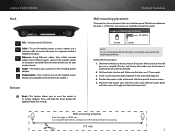
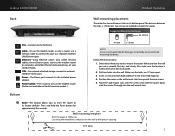
... damages incurred by unsecured wallmounting hardware. Suggested Mounting Hardware 2.5-3.0 mm 4-5 mm 1-1.5 mm Note Cisco is smooth, flat, dry, and sturdy. Linksys X2000/X3000 Back DSL-Connects to drill precise spacing. 175 mm 5 Cable-To use the modem router as only a router, use is not responsible for approximately five seconds. Power-The Power port connects...
... damages incurred by unsecured wallmounting hardware. Suggested Mounting Hardware 2.5-3.0 mm 4-5 mm 1-1.5 mm Note Cisco is smooth, flat, dry, and sturdy. Linksys X2000/X3000 Back DSL-Connects to drill precise spacing. 175 mm 5 Cable-To use the modem router as only a router, use is not responsible for approximately five seconds. Power-The Power port connects...
User Manual
Page 6
...is off when Wi-Fi Protected Setup™ is successfully established. When the modem router goes through a separate modem. Linksys X2000/X3000 X3000 Top Product Overview Ethernet If the LED is continuously lit, the modem router is successfully connected to have Wi-Fi Protected Setup™ search for your Wi-Fi... up a connection, and blinks rapidly in amber if an error occurs. Lights up blue when the modem router is set up as a router only and is powered on. It flashes when the modem router is continuously lit. 6 Power The Power LED lights up , the LED flashes. WAN Lights up white ...
...is off when Wi-Fi Protected Setup™ is successfully established. When the modem router goes through a separate modem. Linksys X2000/X3000 X3000 Top Product Overview Ethernet If the LED is continuously lit, the modem router is successfully connected to have Wi-Fi Protected Setup™ search for your Wi-Fi... up a connection, and blinks rapidly in amber if an error occurs. Lights up blue when the modem router is set up as a router only and is powered on. It flashes when the modem router is continuously lit. 6 Power The Power LED lights up , the LED flashes. WAN Lights up white ...
User Manual
Page 7
..., and place on ) to a separate modem's LAN/Ethernet port. Two screws are 175 mm apart. 3. Cable-To use the modem router as only a router, use is within reach of its bottom panel. Power button-Press | (on the wall to this page at 100% size. Power-The..., dry, and sturdy. Ethernet-Using Ethernet cables (also called network cables), these instructions: 1. Suggested Mounting Hardware 2.5-3.0 mm 4-5 mm 1-1.5 mm Note Cisco is 175.56 mm. Linksys X2000/X3000 Product Overview Back DSL-Connects to the included power adapter. Follow these Ethernet ports connect the modem...
..., and place on ) to a separate modem's LAN/Ethernet port. Two screws are 175 mm apart. 3. Cable-To use the modem router as only a router, use is within reach of its bottom panel. Power button-Press | (on the wall to this page at 100% size. Power-The..., dry, and sturdy. Ethernet-Using Ethernet cables (also called network cables), these instructions: 1. Suggested Mounting Hardware 2.5-3.0 mm 4-5 mm 1-1.5 mm Note Cisco is 175.56 mm. Linksys X2000/X3000 Product Overview Back DSL-Connects to the included power adapter. Follow these Ethernet ports connect the modem...
User Manual
Page 8
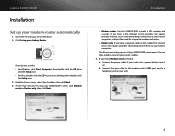
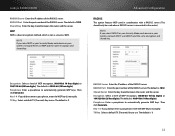
... Set AutoPlay defaults in Step 4: a. Connect the gray cable to the modem-router's DSL port and to a telephone jack on . Linksys X2000/X3000 Installation Set up your Linksys Router General options Open folder to view files using Windows Explorer Published by Cisco Consumer Products LLC Speed up my system General options usingWindowsReadyBoost Set AutoPlay...
... Set AutoPlay defaults in Step 4: a. Connect the gray cable to the modem-router's DSL port and to a telephone jack on . Linksys X2000/X3000 Installation Set up your Linksys Router General options Open folder to view files using Windows Explorer Published by Cisco Consumer Products LLC Speed up my system General options usingWindowsReadyBoost Set AutoPlay...

User Manual
Page 9
... Note Run the Setup CD-ROM to install the modem-router. Follow the on the power switch. If you chose Router only in Step 4: a. Installation b. Select your region, ISP, and the DSL settings your ISP. 6. Linksys X2000/X3000 Or, if you cannot run the Setup CD-ROM, refer to the steps below. Connect...
... Note Run the Setup CD-ROM to install the modem-router. Follow the on the power switch. If you chose Router only in Step 4: a. Installation b. Select your region, ISP, and the DSL settings your ISP. 6. Linksys X2000/X3000 Or, if you cannot run the Setup CD-ROM, refer to the steps below. Connect...

User Manual
Page 10
...cable to the DSL port on the back. Connect the other end to the modem-router. Linksys X2000/X3000 Connect your modem-router To connect your modem. 2. Power on your computer(s) and the modem-router. To set up your computer's Ethernet adapter and the other end of the phone ...or device that you experience static on your computer's Ethernet adapter is powered on the back of the provided Ethernet cable to your modem-router as a router: 1. other end to an Ethernet port on and the cables are securely connected. ISDN users do not need a microfilter or splitter....
...cable to the DSL port on the back. Connect the other end to the modem-router. Linksys X2000/X3000 Connect your modem-router To connect your modem. 2. Power on your computer(s) and the modem-router. To set up your computer's Ethernet adapter and the other end of the phone ...or device that you experience static on your computer's Ethernet adapter is powered on the back of the provided Ethernet cable to your modem-router as a router: 1. other end to an Ethernet port on and the cables are securely connected. ISDN users do not need a microfilter or splitter....
User Manual
Page 11
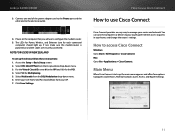
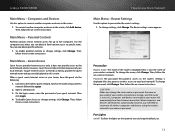
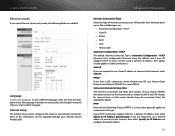
... offers four options: Computers and Devices, Parental Controls, Guest Access, and Router Settings. 11 If not, make sure the modem-router is powered on the computer that you will use Cisco Connect Cisco Connect provides an easy way to configure the modem-router. 5. Linksys X2000/X3000 3. Connect one for Power, Wireless, and Ethernet (one end of...
... offers four options: Computers and Devices, Parental Controls, Guest Access, and Router Settings. 11 If not, make sure the modem-router is powered on the computer that you will use Cisco Connect Cisco Connect provides an easy way to configure the modem-router. 5. Linksys X2000/X3000 3. Connect one for Power, Wireless, and Ethernet (one end of...
User Manual
Page 12
... or password, the name or password of your router will momentarily lose their Internet connection. Wired computers and devices will need to the wireless guest network, which is reset. Then click Login. 4. Open a web browser. 3. Linksys X2000/X3000 Main Menu - To connect another computer or device .... On the login screen, enter the password of your wireless network also changes, and the router is the name of your guest network. Then, follow the on the router to use Cisco Connect Main Menu - How to turn on, keep the default, on this option to the...
... or password, the name or password of your router will momentarily lose their Internet connection. Wired computers and devices will need to the wireless guest network, which is reset. Then click Login. 4. Open a web browser. 3. Linksys X2000/X3000 Main Menu - To connect another computer or device .... On the login screen, enter the password of your wireless network also changes, and the router is the name of your guest network. Then, follow the on the router to use Cisco Connect Main Menu - How to turn on, keep the default, on this option to the...
User Manual
Page 13
... Cisco partners, click this option. IP stands for Wide Area Network, such as the Internet. In the User name field, enter admin. 13 Internet Speed Launch Test You can use the router's browser-based utility. Then, follow the on your ISP's current download and upload speeds. You can also access the browser... the utility, click Help on the right side of the screen or go to create or update an Easy Setup Key, click this option. Linksys X2000/X3000 Easy Setup Key Update or create key The Easy Setup Key is a USB flash drive that holds the wireless settings for use. Connection speed...
... Cisco partners, click this option. IP stands for Wide Area Network, such as the Internet. In the User name field, enter admin. 13 Internet Speed Launch Test You can use the router's browser-based utility. Then, follow the on your ISP's current download and upload speeds. You can also access the browser... the utility, click Help on the right side of the screen or go to create or update an Easy Setup Key, click this option. Linksys X2000/X3000 Easy Setup Key Update or create key The Easy Setup Key is a USB flash drive that holds the wireless settings for use. Connection speed...
User Manual
Page 14
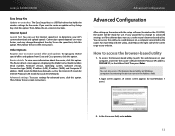
Click OK to change the router's general settings. This allows you to continue. and lower-level tab names. ... Language Select your changes, or click Cancel Changes to use a different language, select one from the dropdown menu. Linksys X2000/X3000 3. In the Password field, enter the password created by its top- Auto/ADSL mode ADSL mode (default) has...this User Guide, each screen to navigate within the utility. Note You can also access the browser‑based utility through Cisco Connect. 4. For example, "Setup > Basic Setup" is the screen accessed via the Setup top-level tab, and its...
Click OK to change the router's general settings. This allows you to continue. and lower-level tab names. ... Language Select your changes, or click Cancel Changes to use a different language, select one from the dropdown menu. Linksys X2000/X3000 3. In the Password field, enter the password created by its top- Auto/ADSL mode ADSL mode (default) has...this User Guide, each screen to navigate within the utility. Note You can also access the browser‑based utility through Cisco Connect. 4. For example, "Setup > Basic Setup" is the screen accessed via the Setup top-level tab, and its...
User Manual
Page 15
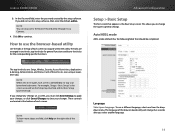
... provided automatically. RFC 2684 Bridged If selected, enter the correct data for your ISP allocates an IP address upon connection. Linksys X2000/X3000 Internet Setup The Internet Setup section configures the router to your IP address is provided automatically. The available types are: •• Bridged Mode Only •• RFC 2684...
... provided automatically. RFC 2684 Bridged If selected, enter the correct data for your ISP allocates an IP address upon connection. Linksys X2000/X3000 Internet Setup The Internet Setup section configures the router to your IP address is provided automatically. The available types are: •• Bridged Mode Only •• RFC 2684...
User Manual
Page 16
...Internet, select Static IP. PPTP Point-to-Point Tunneling Protocol (PPTP) is Automatic Configuration - Internet Setup The Internet Setup section configures the router to connections in Europe. DHCP •• Static IP •• PPPoE •• PPTP •• L2TP ••... a dynamic IP address, then select Obtain an IP Address Automatically. If your Internet Service Provider (ISP). Linksys X2000/X3000 Ethernet mode If you select Ethernet (router-only) mode, the following fields are : •• Automatic Configuration - The language of the browser-based ...
...Internet, select Static IP. PPTP Point-to-Point Tunneling Protocol (PPTP) is Automatic Configuration - Internet Setup The Internet Setup section configures the router to connections in Europe. DHCP •• Static IP •• PPPoE •• PPTP •• L2TP ••... a dynamic IP address, then select Obtain an IP Address Automatically. If your Internet Service Provider (ISP). Linksys X2000/X3000 Ethernet mode If you select Ethernet (router-only) mode, the following fields are : •• Automatic Configuration - The language of the browser-based ...
User Manual
Page 17
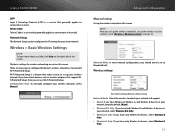
...Mixed. •• Wireless-B/G Only If you have client devices, such as wireless adapters, that makes it set on page 19. Linksys X2000/X3000 L2TP Layer 2 Tunneling Protocol (L2TP) is a service that generally applies to connections in Australia. Network Setup The Network Setup section configures...is a service that generally applies to set up the wireless network on the right side of the screen. Go to configure the Router's wireless network(s), manual and Wi-Fi Protected Setup. Configuration View To manually configure your local network. Network Mode In most network ...
...Mixed. •• Wireless-B/G Only If you have client devices, such as wireless adapters, that makes it set on page 19. Linksys X2000/X3000 L2TP Layer 2 Tunneling Protocol (L2TP) is a service that generally applies to connections in Australia. Network Setup The Network Setup section configures...is a service that generally applies to set up the wireless network on the right side of the screen. Go to configure the Router's wireless network(s), manual and Wi-Fi Protected Setup. Configuration View To manually configure your local network. Network Mode In most network ...
User Manual
Page 18
... Wireless-B, Wireless-G and Wireless-N devices, select Auto (20 MHz or 40 MHz). To broadcast the router's SSID, keep the default, Mixed. Wi-Fi Protected Setup light activity •• The Cisco logo on the top panel of 20 MHz, keep the default, Auto. Network Name (SSID) The...the light is continuously lit. •• If there is continuously lit, before starting the next Wi-Fi Protected Setup session. 18 Linksys X2000/X3000 •• Wireless-N Only If you have no Wireless-B, Wireless-G, and Wireless-N devices in your wireless network will detect the SSID broadcast...
... Wireless-B, Wireless-G and Wireless-N devices, select Auto (20 MHz or 40 MHz). To broadcast the router's SSID, keep the default, Mixed. Wi-Fi Protected Setup light activity •• The Cisco logo on the top panel of 20 MHz, keep the default, Auto. Network Name (SSID) The...the light is continuously lit. •• If there is continuously lit, before starting the next Wi-Fi Protected Setup session. 18 Linksys X2000/X3000 •• Wireless-N Only If you have no Wireless-B, Wireless-G, and Wireless-N devices in your wireless network will detect the SSID broadcast...
User Manual
Page 19
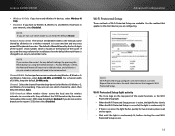
...Client Device PIN on the router's Wi-Fi Protected Setup screen. b. Wireless > Wireless Security The wireless security settings configure the security of the screen. 19 For each wireless network, the Network Name (SSID), Security, and Passphrase are displayed at a time. Linksys X2000/X3000 •• Wi-...Fi Protected Setup Button Use this method if your client device has a Wi-Fi Protected Setup PIN (Personal Identification Number). After the client device has been configured, click OK on the router's Wi-Fi Protected Setup ...
...Client Device PIN on the router's Wi-Fi Protected Setup screen. b. Wireless > Wireless Security The wireless security settings configure the security of the screen. 19 For each wireless network, the Network Name (SSID), Security, and Passphrase are displayed at a time. Linksys X2000/X3000 •• Wi-...Fi Protected Setup Button Use this method if your client device has a Wi-Fi Protected Setup PIN (Personal Identification Number). After the client device has been configured, click OK on the router's Wi-Fi Protected Setup ...
User Manual
Page 21
...your wireless network MUST use WPA2/WPA Enterprise and the same shared key. RADIUS Server Enter the IP address of the RADIUS server. Linksys X2000/X3000 WPA Personal Note If you select WPA Personal as your Security Mode, each device in your wireless network MUST use WPA Enterprise and ... Mode This option features WPA2/WPA used in coordination with a RADIUS server. (This should only be used when a RADIUS server is changed to the router.) Note If you select WPA Enterprise as your Security Mode, each device in coordination with a RADIUS server. (This should only be used the setup ...
...your wireless network MUST use WPA2/WPA Enterprise and the same shared key. RADIUS Server Enter the IP address of the RADIUS server. Linksys X2000/X3000 WPA Personal Note If you select WPA Personal as your Security Mode, each device in your wireless network MUST use WPA Enterprise and ... Mode This option features WPA2/WPA used in coordination with a RADIUS server. (This should only be used when a RADIUS server is changed to the router.) Note If you select WPA Enterprise as your Security Mode, each device in coordination with a RADIUS server. (This should only be used the setup ...
User Manual
Page 22
...WEP used in your wireless network MUST use . Shared Secret Enter the key shared between the router and the server. TX Key Select a default TX (Transmit) Key to automatically generate WEP keys. Linksys X2000/X3000 RADIUS Server Enter the IP address of WEP encryption, (40/64-bit 10 hex digits)...to use WEP and the same encryption and shared key. Then click Generate. The default is 1812. Shared Key Enter the key shared between the router and the server. Encryption Select a level of the RADIUS server. The default is 40/64-bit (10 hex digits). Key 1-4 If you did...
...WEP used in your wireless network MUST use . Shared Secret Enter the key shared between the router and the server. TX Key Select a default TX (Transmit) Key to automatically generate WEP keys. Linksys X2000/X3000 RADIUS Server Enter the IP address of WEP encryption, (40/64-bit 10 hex digits)...to use WEP and the same encryption and shared key. Then click Generate. The default is 1812. Shared Key Enter the key shared between the router and the server. Encryption Select a level of the RADIUS server. The default is 40/64-bit (10 hex digits). Key 1-4 If you did...

User Manual
Page 23
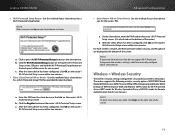
...To broadcast the SSID of the screen. Guest Network Name The default is a wireless network separate from your wireless network, followed by the router. The guest network is the name of the guest network, then select Disabled. 23 Select the number of guests you want to broadcast the... access the Internet. Total Guests Allowed By default, 5 guests are allowed Internet access through a guest network, keep the default, Enabled. Linksys X2000/X3000 Disabled If you choose to disable wireless security, you will be informed that you to provide guests visiting your guest network.
...To broadcast the SSID of the screen. Guest Network Name The default is a wireless network separate from your wireless network, followed by the router. The guest network is the name of the guest network, then select Disabled. 23 Select the number of guests you want to broadcast the... access the Internet. Total Guests Allowed By default, 5 guests are allowed Internet access through a guest network, keep the default, Enabled. Linksys X2000/X3000 Disabled If you choose to disable wireless security, you will be informed that you to provide guests visiting your guest network.


