
Administration Guide
Page 3
... Settings 22 Basic Tasks 23 Changing the Default User Name and Password 23 Backing Up Your Configuration 24 Upgrading the Firmware 24 Common Configuration Scenarios 25 Basic Network Configuration with Internet Access 26 Cisco Smart Business Communications System Configuration 28 Firewall for Controlling Inbound and Outbound Traffic 29 DMZ for Public ...Networking 35 Chapter 2: Networking 36 Configuring the WAN Connection 37 Viewing the WAN Status 39 Creating PPPoE Profiles 40 Configuring an IP Alias 41 Cisco SA500 Series Security Appliances Administration Guide 3
... Settings 22 Basic Tasks 23 Changing the Default User Name and Password 23 Backing Up Your Configuration 24 Upgrading the Firmware 24 Common Configuration Scenarios 25 Basic Network Configuration with Internet Access 26 Cisco Smart Business Communications System Configuration 28 Firewall for Controlling Inbound and Outbound Traffic 29 DMZ for Public ...Networking 35 Chapter 2: Networking 36 Configuring the WAN Connection 37 Viewing the WAN Status 39 Creating PPPoE Profiles 40 Configuring an IP Alias 41 Cisco SA500 Series Security Appliances Administration Guide 3

Administration Guide
Page 24
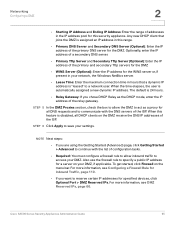
... Enter the current password. Backing Up Your Configuration At any other tasks, you should upgrade your configuration. Cisco SA500 Series Security Appliances Administration Guide 24 Upgrading the Firmware Before you do any point during the configuration process, you are using the latest version.... with Configuration Files, page 176. The default password for this account. • Check to Edit Password: Check this new security appliance is cisco. • New Password: Enter a password that contains alphanumeric, '-' or '_' characters. • Confirm Password: Enter the password again. ...
... Enter the current password. Backing Up Your Configuration At any other tasks, you should upgrade your configuration. Cisco SA500 Series Security Appliances Administration Guide 24 Upgrading the Firmware Before you do any point during the configuration process, you are using the latest version.... with Configuration Files, page 176. The default password for this account. • Check to Edit Password: Check this new security appliance is cisco. • New Password: Enter a password that contains alphanumeric, '-' or '_' characters. • Confirm Password: Enter the password again. ...
Administration Guide
Page 26
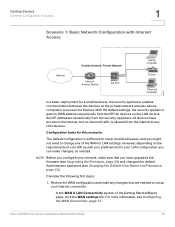
...for this scenario: The default configuration is allowed from the security appliance. All devices have upgraded the firmware (see Upgrading the Firmware, page 24) and changed the default Administrator password (see Configuring the WAN Connection, page 37. Consider the following first steps: 1. Review the WAN ... Password, page 23). All devices on the private network and also allows computers to any of the WAN or LAN settings. Cisco SA500 Series Security Appliances Administration Guide 26 With the default settings, the security appliance gets its WAN address dynamically from the ISP....
...for this scenario: The default configuration is allowed from the security appliance. All devices have upgraded the firmware (see Upgrading the Firmware, page 24) and changed the default Administrator password (see Configuring the WAN Connection, page 37. Consider the following first steps: 1. Review the WAN ... Password, page 23). All devices on the private network and also allows computers to any of the WAN or LAN settings. Cisco SA500 Series Security Appliances Administration Guide 26 With the default settings, the security appliance gets its WAN address dynamically from the ISP....
Administration Guide
Page 28
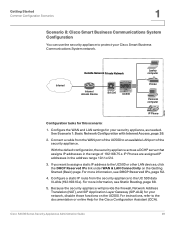
... Configure the WAN and LAN settings for your security appliance, as a DCHP server that assigns IP addresses in the address range 10.1.1.x/24. 3. See Scenario 1: Basic Network Configuration with Internet Access, page 26. 2. Configure a static IP route from the WAN port ... for this scenario: 1. For more information, see DHCP Reserved IPs, page 52. 4. Getting Started Common Configuration Scenarios 1 Scenario 8: Cisco Smart Business Communications System Configuration You can use the security appliance to protect your network, disable those functions on the Getting Started (Basic)...
... Configure the WAN and LAN settings for your security appliance, as a DCHP server that assigns IP addresses in the address range 10.1.1.x/24. 3. See Scenario 1: Basic Network Configuration with Internet Access, page 26. 2. Configure a static IP route from the WAN port ... for this scenario: 1. For more information, see DHCP Reserved IPs, page 52. 4. Getting Started Common Configuration Scenarios 1 Scenario 8: Cisco Smart Business Communications System Configuration You can use the security appliance to protect your network, disable those functions on the Getting Started (Basic)...
Administration Guide
Page 45
...for this security appliance. STEP 5 Click Apply to save part of the range for all DHCP clients receive the DNS IP addresses of the ISP. Cisco SA500 Series Security Appliances Administration Guide 45 You can save your settings. STEP 4 In the LAN Proxies section, specify the proxy settings: • Enable...to act as a proxy for PCs with fixed addresses. The default starting address is 192.168.75.100. When the time elapses, the user is 24 hours. • Relay Gateway: If you are using the Getting Started (Basic) page, click Getting Started in the menu bar, and then continue ...
...for this security appliance. STEP 5 Click Apply to save part of the range for all DHCP clients receive the DNS IP addresses of the ISP. Cisco SA500 Series Security Appliances Administration Guide 45 You can save your settings. STEP 4 In the LAN Proxies section, specify the proxy settings: • Enable...to act as a proxy for PCs with fixed addresses. The default starting address is 192.168.75.100. When the time elapses, the user is 24 hours. • Relay Gateway: If you are using the Getting Started (Basic) page, click Getting Started in the menu bar, and then continue ...

Administration Guide
Page 51
... (as a DHCP server for this VLAN. When this VLAN. • Starting IP Address: Enter the first IP address in this section of the Relay Gateway. Cisco SA500 Series Security Appliances Administration Guide 51 Any new DHCP client joining the VLAN is disabled, all DNS requests and to communicate with the DNS... the security appliance to act as configured on the VLAN receive the DNS IP addresses of the ISP. When the time elapses, the user is 24 hours. STEP 5 In the LAN Proxies section, check the Enable DNS Proxy box to allow the VLAN to act as a proxy for all DHCP clients...
... (as a DHCP server for this VLAN. When this VLAN. • Starting IP Address: Enter the first IP address in this section of the Relay Gateway. Cisco SA500 Series Security Appliances Administration Guide 51 Any new DHCP client joining the VLAN is disabled, all DNS requests and to communicate with the DNS... the security appliance to act as configured on the VLAN receive the DNS IP addresses of the ISP. When the time elapses, the user is 24 hours. STEP 5 In the LAN Proxies section, check the Enable DNS Proxy box to allow the VLAN to act as a proxy for all DHCP clients...
Administration Guide
Page 65
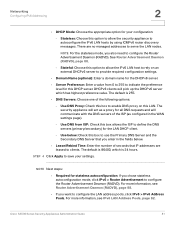
...to continue with the DNS servers of the ISP. To get started, click Firewall on the DMZ receive the DNS IP addresses of the ISP. Cisco SA500 Series Security Appliances Administration Guide 65 STEP 5 In the DMZ Proxies section, check the box to allow inbound traffic to specify a public ... appliance. STEP 6 Click Apply to act as the DHCP mode, enter the IP address of the relay gateway. When the time elapses, the user is 24 hours. • Relay Gateway: If you want to a network user. The default is automatically assigned a new dynamic IP address. For more information, see ...
...to continue with the DNS servers of the ISP. To get started, click Firewall on the DMZ receive the DNS IP addresses of the ISP. Cisco SA500 Series Security Appliances Administration Guide 65 STEP 5 In the DMZ Proxies section, check the box to allow inbound traffic to specify a public ... appliance. STEP 6 Click Apply to act as the DHCP mode, enter the IP address of the relay gateway. When the time elapses, the user is 24 hours. • Relay Gateway: If you want to a network user. The default is automatically assigned a new dynamic IP address. For more information, see ...
Administration Guide
Page 81
..., page 82. NOTE For the stateless mode, you want to autoconfigure the IPv6 LAN hosts by using ICMPv6 router discovery messages. The default is 24 hours. The default is 255. • DNS Servers: Choose one of the ISP (as a proxy for all DNS requests and will pick...Daemon (RADVD). The security appliance will act as configured in the fields below : Check this box allows the ISP to save your configuration: - Cisco SA500 Series Security Appliances Administration Guide 81 For more information, see Router Advertisement Daemon (RADVD), page 88. • If you also need to ...
..., page 82. NOTE For the stateless mode, you want to autoconfigure the IPv6 LAN hosts by using ICMPv6 router discovery messages. The default is 24 hours. The default is 255. • DNS Servers: Choose one of the ISP (as a proxy for all DNS requests and will pick...Daemon (RADVD). The security appliance will act as configured in the fields below : Check this box allows the ISP to save your configuration: - Cisco SA500 Series Security Appliances Administration Guide 81 For more information, see Router Advertisement Daemon (RADVD), page 88. • If you also need to ...
Administration Guide
Page 150
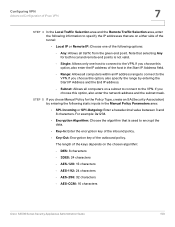
...; Key-In: Enter the encryption key of the inbound policy. • Key-Out: Encryption key of the outbound policy. DES: 8 characters - 3DES: 24 characters - AES-256: 32 characters - If you choose this option, also enter the network address and the subnet mask. Note that selecting Any for the...area and the Remote Traffic Selection area, enter the following information to the VPN. AES-128: 16 characters - AES-CCM: 16 characters Cisco SA500 Series Security Appliances Administration Guide 150 If you choose this option, also enter the IP address of the host in the Manual Policy ...
...; Key-In: Enter the encryption key of the inbound policy. • Key-Out: Encryption key of the outbound policy. DES: 8 characters - 3DES: 24 characters - AES-256: 32 characters - If you choose this option, also enter the network address and the subnet mask. Note that selecting Any for the...area and the Remote Traffic Selection area, enter the following information to the VPN. AES-128: 16 characters - AES-CCM: 16 characters Cisco SA500 Series Security Appliances Administration Guide 150 If you choose this option, also enter the IP address of the host in the Manual Policy ...
Administration Guide
Page 177
... to automatically check for your security appliance to latest firmware release notes on a daily basis (every 24 hours). For example, the Cisco username and login used in Administration is available every 24 hours. If you choose not to upgrade, you are prompted to install it is automatically downloaded to... all other services on the router which use them. See Device Status, page 204. • Check for IPS signature downloads. Enter your Cisco User Name and ...
... to automatically check for your security appliance to latest firmware release notes on a daily basis (every 24 hours). For example, the Cisco username and login used in Administration is available every 24 hours. If you choose not to upgrade, you are prompted to install it is automatically downloaded to... all other services on the router which use them. See Device Status, page 204. • Check for IPS signature downloads. Enter your Cisco User Name and ...

Administration Guide
Page 179
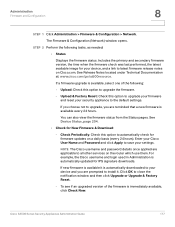
.... When the image upload is enabled. Do NOT turn off before accessing the router again. STEP 2 Perform the following tasks, as cisco.cfg. - The Mount button is complete, the router automatically restarts. Do NOT go online. 3. Do NOT remove or unmount the USB...device, click Unmount. • Backup / Restore Settings / Software Upgrade - For information about downloading firmware upgrade files, see Upgrading the Firmware, page 24. The Firmware & Configuration (USB) window opens. To restore the settings from the connected USB storage device. Wait until the process is in progress...
.... When the image upload is enabled. Do NOT turn off before accessing the router again. STEP 2 Perform the following tasks, as cisco.cfg. - The Mount button is complete, the router automatically restarts. Do NOT go online. 3. Do NOT remove or unmount the USB...device, click Unmount. • Backup / Restore Settings / Software Upgrade - For information about downloading firmware upgrade files, see Upgrading the Firmware, page 24. The Firmware & Configuration (USB) window opens. To restore the settings from the connected USB storage device. Wait until the process is in progress...
Administration Guide
Page 195
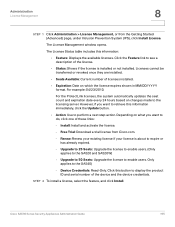
... to display the product ID and serial number of the license. • Status: Shows if the license is about to the licensing server. Cisco SA500 Series Security Appliances Administration Guide 195 The License Management window opens. For example: 04/23/2010. Click the Feature link to do, click... the license expires shown in MM/DD/YYYY format. For the ProtectLink licenses, the system automatically updates the seat count and expiration date every 24 hours based on what you want to see a description of the device and the device credentials. Upgrade to 25 Seats: Upgrade the license...
... to display the product ID and serial number of the license. • Status: Shows if the license is about to the licensing server. Cisco SA500 Series Security Appliances Administration Guide 195 The License Management window opens. For example: 04/23/2010. Click the Feature link to do, click... the license expires shown in MM/DD/YYYY format. For the ProtectLink licenses, the system automatically updates the seat count and expiration date every 24 hours based on what you want to see a description of the device and the device credentials. Upgrade to 25 Seats: Upgrade the license...
