

Brochure
Page 1
...connected workforce. Move Up to enable a more advanced security and switch features, but it also means making sure that support advanced technologies, including quality of Cisco® Small Business managed switches: the Cisco 300 Series. Choose from your bottom line. Easy to set up...your network and help keep your business needs more productive, effective workplace. Cisco 300 Series Switches Powerful Features and Performance at the Right Price Cisco 300 Series Switches offer enhanced switch features that employees have no fans, so they run silently and unobtrusively,...
...connected workforce. Move Up to enable a more advanced security and switch features, but it also means making sure that support advanced technologies, including quality of Cisco® Small Business managed switches: the Cisco 300 Series. Choose from your bottom line. Easy to set up...your network and help keep your business needs more productive, effective workplace. Cisco 300 Series Switches Powerful Features and Performance at the Right Price Cisco 300 Series Switches offer enhanced switch features that employees have no fans, so they run silently and unobtrusively,...
Brochure
Page 2
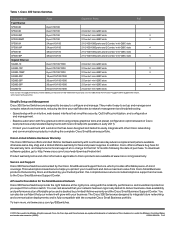
... in early 2011). • Protect your investment with one port active at the right price, along with your investment and derive maximum value from a Cisco switch. The Cisco 300 Series was designed to network management and troubleshooting. • Speed setup with an intuitive, web-based interface that simplifies security, QoS traffic prioritization, and...
... in early 2011). • Protect your investment with one port active at the right price, along with your investment and derive maximum value from a Cisco switch. The Cisco 300 Series was designed to network management and troubleshooting. • Speed setup with an intuitive, web-based interface that simplifies security, QoS traffic prioritization, and...
User Manual
Page 2
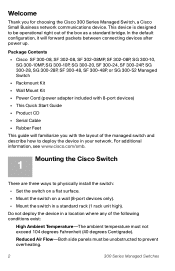
For additional information, see www.cisco.com/smb. 1 Mounting the Cisco Switch There are three ways to physically install the switch: • Set the switch on a flat surface. • Mount the switch on a wall (8-port devices only). • Mount the switch in a location where any of the ...Switch • Rackmount Kit • Wall Mount Kit • Power Cord (power adapter included with the layout of the managed switch and describe how to deploy the device in your network. In the default configuration, it will familiarize you for choosing the Cisco 300 Series Managed Switch, a Cisco...
For additional information, see www.cisco.com/smb. 1 Mounting the Cisco Switch There are three ways to physically install the switch: • Set the switch on a flat surface. • Mount the switch on a wall (8-port devices only). • Mount the switch in a location where any of the ...Switch • Rackmount Kit • Wall Mount Kit • Power Cord (power adapter included with the layout of the managed switch and describe how to deploy the device in your network. In the default configuration, it will familiarize you for choosing the Cisco 300 Series Managed Switch, a Cisco...
User Manual
Page 3
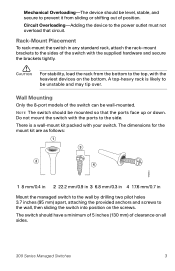
... the ports face up or down. A top-heavy rack is a wall-mount kit packed with the heaviest devices on the bottom. Do not mount the switch with the supplied hardware and secure the brackets tightly. Wall Mounting Only the 8-port models of clearance on the screws. The dimensions for the mount... device should be level, stable, and secure to prevent it from the bottom to the top, with your switch. CAUTION For stability, load the rack from sliding or shifting out of the switch with the ports to the side. There is likely to be wall-mounted. Circuit Overloading-Adding the device to...
... the ports face up or down. A top-heavy rack is a wall-mount kit packed with the heaviest devices on the bottom. Do not mount the switch with the supplied hardware and secure the brackets tightly. Wall Mounting Only the 8-port models of clearance on the screws. The dimensions for the mount... device should be level, stable, and secure to prevent it from the bottom to the top, with your switch. CAUTION For stability, load the rack from sliding or shifting out of the switch with the ports to the side. There is likely to be wall-mounted. Circuit Overloading-Adding the device to...
User Manual
Page 4
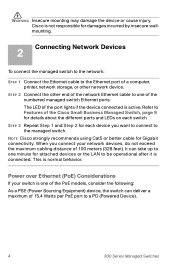
...and Step 2 for details about the different ports and LEDs on each device you connect your switch is connected. WARNING Insecure mounting may damage the device or cause injury. NOTE Cisco strongly recommends using Cat5 or better cable for damages incurred by insecure wallmounting. 2 Connecting Network... Devices To connect the managed switch to the network: STEP 1 Connect the Ethernet cable to one of...
...and Step 2 for details about the different ports and LEDs on each device you connect your switch is connected. WARNING Insecure mounting may damage the device or cause injury. NOTE Cisco strongly recommends using Cat5 or better cable for damages incurred by insecure wallmounting. 2 Connecting Network... Devices To connect the managed switch to the network: STEP 1 Connect the Ethernet cable to one of...
User Manual
Page 5
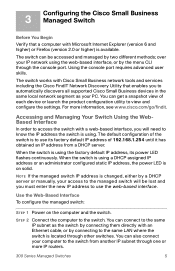
... located through the console port. You can be lost and you to automatically discovers all supported Cisco Small Business devices in the same local network segment as the switch by connecting them directly with Microsoft Internet Explorer (version 6 and higher) or Firefox (version 2.0 or higher) is using ... administrator configured static IP address, the power LED is changed, either by connecting to view and configure the settings. 3 Configuring the Cisco Small Business Managed Switch Before You Begin Verify that enables you must enter the new IP address to know the IP address the...
... located through the console port. You can be lost and you to automatically discovers all supported Cisco Small Business devices in the same local network segment as the switch by connecting them directly with Microsoft Internet Explorer (version 6 and higher) or Firefox (version 2.0 or higher) is using ... administrator configured static IP address, the power LED is changed, either by connecting to view and configure the settings. 3 Configuring the Cisco Small Business Managed Switch Before You Begin Verify that enables you must enter the new IP address to know the IP address the...
User Manual
Page 6
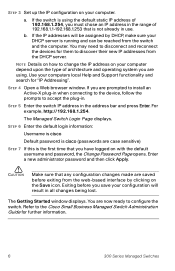
...IP address of architecture and operating system you save your computers local Help and Support functionality and search for further information. 6 300 Series Managed Switches Exiting before exiting from the web-based interface by DHCP, make sure your computer. You are prompted to install an Active-X plug-in when...b. CAUTION Make sure that you have logged on your computer depend upon the type of 192.168.1.254, you are now ready to the Cisco Small Business Managed Switch Administration Guide for "IP Addressing". The Getting Started window displays. Refer to configure the...
...IP address of architecture and operating system you save your computers local Help and Support functionality and search for further information. 6 300 Series Managed Switches Exiting before exiting from the web-based interface by DHCP, make sure your computer. You are prompted to install an Active-X plug-in when...b. CAUTION Make sure that you have logged on your computer depend upon the type of 192.168.1.254, you are now ready to the Cisco Small Business Managed Switch Administration Guide for "IP Addressing". The Getting Started window displays. Refer to configure the...
User Manual
Page 7
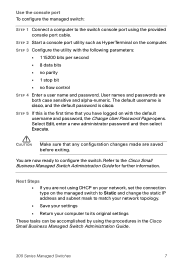
... are both case sensitive and alpha-numeric. Refer to configure the switch. Use the console port To configure the managed switch: STEP 1 Connect a computer to the switch console port using the procedures in the Cisco Small Business Managed Switch Administration Guide. 300 Series Managed Switches 7 Select Edit, enter a new administrator password and then select Execute. STEP...
... are both case sensitive and alpha-numeric. Refer to configure the switch. Use the console port To configure the managed switch: STEP 1 Connect a computer to the switch console port using the procedures in the Cisco Small Business Managed Switch Administration Guide. 300 Series Managed Switches 7 Select Edit, enter a new administrator password and then select Execute. STEP...
User Manual
Page 8
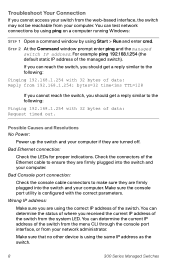
...on a computer running Windows: STEP 1 Open a command window by using Start > Run and enter cmd. You can reach the switch, you cannot access your switch from the web-based interface, the switch may not be reachable from 192.168.1.254: bytes=32 time STEP 2 At the Command window prompt enter ping and... the managed switch IP address. For example ping 192.168.1.254 (the default static IP address of data: Reply from ...
...on a computer running Windows: STEP 1 Open a command window by using Start > Run and enter cmd. You can reach the switch, you cannot access your switch from the web-based interface, the switch may not be reachable from 192.168.1.254: bytes=32 time STEP 2 At the Command window prompt enter ping and... the managed switch IP address. For example ping 192.168.1.254 (the default static IP address of data: Reply from ...
User Manual
Page 9
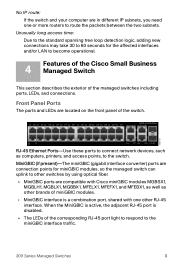
...logic, adding new connections may take 30 to 60 seconds for miniGBIC modules, so the managed switch can uplink to other switches by using optical fiber. • MiniGBIC ports are compatible with Cisco miniGBIC modules MGBSX1, MGBLH1, MGBLX1, MGBBX1, MFELX1, MFEFX1, and MFEBX1, as well as ... The LEDs of the corresponding RJ-45 port light to respond to become operational. 4 Features of the Cisco Small Business Managed Switch This section describes the exterior of the switch. MiniGBIC (if present)-The miniGBIC (gigabit interface converter) ports are located on the front panel of the ...
...logic, adding new connections may take 30 to 60 seconds for miniGBIC modules, so the managed switch can uplink to other switches by using optical fiber. • MiniGBIC ports are compatible with Cisco miniGBIC modules MGBSX1, MGBLH1, MGBLX1, MGBBX1, MFELX1, MFEFX1, and MFEBX1, as well as ... The LEDs of the corresponding RJ-45 port light to respond to become operational. 4 Features of the Cisco Small Business Managed Switch This section describes the exterior of the switch. MiniGBIC (if present)-The miniGBIC (gigabit interface converter) ports are located on the front panel of the ...
User Manual
Page 10
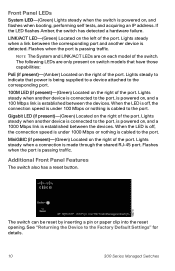
...the port. MiniGBIC (if present)-(Green) Located on the right of the port. Lights steady when a connection is passing traffic. Additional Front Panel Features The switch also has a reset button. When the LED is off , the connection speed is under 100 Mbps or nothing is cabled to the port, is powered... is cabled to the corresponding port. 100M LED (if present)-(Green) Located on the right of the port. LINK/ACT LED-(Green) Located on switch models that power is being supplied to a device attached to the port. NOTE The System and LINK/ACT LEDs are only present on the left...
...the port. MiniGBIC (if present)-(Green) Located on the right of the port. Lights steady when a connection is passing traffic. Additional Front Panel Features The switch also has a reset button. When the LED is off , the connection speed is under 100 Mbps or nothing is cabled to the port, is powered... is cabled to the corresponding port. 100M LED (if present)-(Green) Located on the right of the port. LINK/ACT LED-(Green) Located on switch models that power is being supplied to a device attached to the port. NOTE The System and LINK/ACT LEDs are only present on the left...

User Manual
Page 11
Back Panel The power port and console port are located on your network. 2. Disconnect the managed switch from the network or disable all DHCP servers on the back panel of the managed switch. Console-The Console port is where you can connect a serial cable to a computers serial port for configuration ...Default Settings To use the Reset button to reboot or reset the managed switch, do the following: • To reboot the managed switch, press the Reset button for more than 10 seconds. • To restore the managed switch configuration to power. With the power on, press-and-hold the ...
Back Panel The power port and console port are located on your network. 2. Disconnect the managed switch from the network or disable all DHCP servers on the back panel of the managed switch. Console-The Console port is where you can connect a serial cable to a computers serial port for configuration ...Default Settings To use the Reset button to reboot or reset the managed switch, do the following: • To reboot the managed switch, press the Reset button for more than 10 seconds. • To restore the managed switch configuration to power. With the power on, press-and-hold the ...


