
User Guide
Page 3
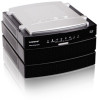
... Setup 9 Install Utility 9 Chapter 3: Advanced Configuration 11 How to Access the Web-Based Utility 11 Home 11 My Files > Files 11 My Files > My Downloads 12 My Files > Personal Info 13 Administration > Status 13 Administration > Users 14 Administration > Shared Folders 16 Administration > System Options 17 E-Mail Alert 19 Firmware Upgrade 20 Media Server 21 Disk Utility 22 Disk Configuration 24 Chapter 4: Use 26 Access to the Network Storage System 26 How to Access the Network Storage System 26 USB Storage Devices 28 How to Use the Network Drive Mapping Utility...
... Setup 9 Install Utility 9 Chapter 3: Advanced Configuration 11 How to Access the Web-Based Utility 11 Home 11 My Files > Files 11 My Files > My Downloads 12 My Files > Personal Info 13 Administration > Status 13 Administration > Users 14 Administration > Shared Folders 16 Administration > System Options 17 E-Mail Alert 19 Firmware Upgrade 20 Media Server 21 Disk Utility 22 Disk Configuration 24 Chapter 4: Use 26 Access to the Network Storage System 26 How to Access the Network Storage System 26 USB Storage Devices 28 How to Use the Network Drive Mapping Utility...

User Guide
Page 5
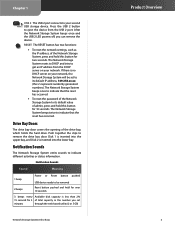
...) The DISK FULL LED flashes when available disk capacity is less than 2% of total capacity or lower than the number you can remove the device. 1 ETHERNET The ETHERNET port connects to indicate network activity. USB 1 The USB 1 port connects to initiate backup jobs specified by the backup software on the disk. The LED flashes green and orange when the Network Storage System upgrades its firmware. The LED is continuously lit orange when there is accessing data on your portable files. (USB hard drives may require external power supplies.) WARNING...
...) The DISK FULL LED flashes when available disk capacity is less than 2% of total capacity or lower than the number you can remove the device. 1 ETHERNET The ETHERNET port connects to indicate network activity. USB 1 The USB 1 port connects to initiate backup jobs specified by the backup software on the disk. The LED flashes green and orange when the Network Storage System upgrades its firmware. The LED is continuously lit orange when there is accessing data on your portable files. (USB hard drives may require external power supplies.) WARNING...
User Guide
Page 6
... the DHCP server on your second USB storage device. Notification Sounds Sound Meaning 1 beep 2 beeps Power or Reset button pushed USB device ready to its default value of the drive bay, which holds the hard drive. Drive Bay Doors The drive bay door covers the opening of admin, press and hold this button for two seconds. After the Network Storage System beeps once and the USB 2 LED powers off, you set to be set minutes through the web...
... the DHCP server on your second USB storage device. Notification Sounds Sound Meaning 1 beep 2 beeps Power or Reset button pushed USB device ready to its default value of the drive bay, which holds the hard drive. Drive Bay Doors The drive bay door covers the opening of admin, press and hold this button for two seconds. After the Network Storage System beeps once and the USB 2 LED powers off, you set to be set minutes through the web...
User Guide
Page 7
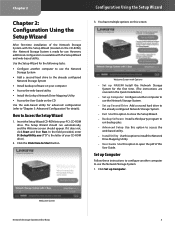
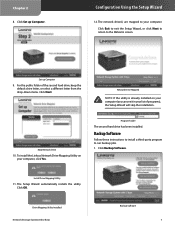
... Network Storage System is ready for use the Network Storage System. 1. Exit Use this screen: Welcome Screen with the Setup Wizard (located on this option to close the Setup Wizard. -- Install Utility Use this User Guide. Click Set up Second Drive Add a second hard drive to "Chapter 3: Advanced Configuration" for advanced configuration (refer to the already configured Network Storage System. -- Insert the SetupWizard CD-ROM into your computer •• Access the web-based utility •• Install the Linksys Network Drive Mapping Utility...
... Network Storage System is ready for use the Network Storage System. 1. Exit Use this screen: Welcome Screen with the Setup Wizard (located on this option to close the Setup Wizard. -- Install Utility Use this User Guide. Click Set up Second Drive Add a second hard drive to "Chapter 3: Advanced Configuration" for advanced configuration (refer to the already configured Network Storage System. -- Insert the SetupWizard CD-ROM into your computer •• Access the web-based utility •• Install the Linksys Network Drive Mapping Utility...
User Guide
Page 8
... be manually formatted using the web-based utility (refer to "Chapter 3: Advanced Configuration"). Follow the instructions to add a second hard drive to the Welcome screen. Network Storage System with 2 Bays 4 The network drive(s) are not securely held in place inside the Network Storage System. The Setup Wizard automatically installs the utility. Set up Second Drive NOTE: Make sure your computer, click Yes. Map Network Drive 3. To install the Linksys Network Drive Mapping Utility on your second hard drive is a 3.5-inch, Serial-ATA (SATA) hard drive. Click...
... be manually formatted using the web-based utility (refer to "Chapter 3: Advanced Configuration"). Follow the instructions to add a second hard drive to the Welcome screen. Network Storage System with 2 Bays 4 The network drive(s) are not securely held in place inside the Network Storage System. The Setup Wizard automatically installs the utility. Set up Second Drive NOTE: Make sure your computer, click Yes. Map Network Drive 3. To install the Linksys Network Drive Mapping Utility on your second hard drive is a 3.5-inch, Serial-ATA (SATA) hard drive. Click...
User Guide
Page 11
...hard drive has been installed. The Setup Wizard automatically installs the utility. For the public folder of programs), the Setup Wizard will skip the installation. Map Network Drive 10. Click Backup Software. Drive Mapping Utility Installed Network Storage System with 2 Bays Backup Software 7 Backup Software Follow these instructions to install a third-party program to your computer. Set up Computer. Click OK. Click Set up Computer 9. Network Drive Mapped NOTE: If the utility is already installed on your list of the second hard drive, keep the default drive...
...hard drive has been installed. The Setup Wizard automatically installs the utility. For the public folder of programs), the Setup Wizard will skip the installation. Map Network Drive 10. Click Backup Software. Drive Mapping Utility Installed Network Storage System with 2 Bays Backup Software 7 Backup Software Follow these instructions to install a third-party program to your computer. Set up Computer. Click OK. Click Set up Computer 9. Network Drive Mapped NOTE: If the utility is already installed on your list of the second hard drive, keep the default drive...
User Guide
Page 13
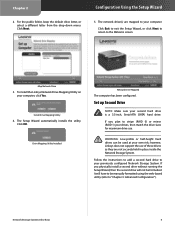
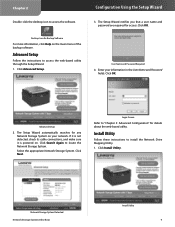
... web-based utility. Click Advanced Setup. User Name and Password Required 4. Click Install Utility. Network Storage System Detected Network Storage System with 2 Bays Install Utility 9 If it is not detected, check its cable connections, and make sure it is powered on the main menu of the backup software. Click Next. Configuration Using the Setup Wizard 3. Click OK. Login Screen Refer to access the software. Desktop Icon for access. Click OK. Advanced Setup Follow the instructions to locate the Network Storage...
... web-based utility. Click Advanced Setup. User Name and Password Required 4. Click Install Utility. Network Storage System Detected Network Storage System with 2 Bays Install Utility 9 If it is not detected, check its cable connections, and make sure it is powered on the main menu of the backup software. Click Next. Configuration Using the Setup Wizard 3. Click OK. Login Screen Refer to access the software. Desktop Icon for access. Click OK. Advanced Setup Follow the instructions to locate the Network Storage...
User Guide
Page 14
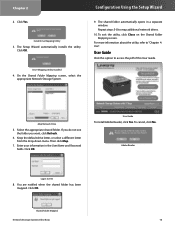
... the User Name and Password fields. User Guide Click this User Guide. Click OK. Click OK. Map Network Drive 5. Select the appropriate shared folder. Enter your information in a separate window. You are notified when the shared folder has been mapped. Chapter 2 2. On the Shared Folder Mapping screen, select the appropriate Network Storage System. Repeat steps 5-8 to access the pdf of this option to map additional network drives. 10. Configuration Using the Setup Wizard 9. Then click Map. 7. Click OK. Click Yes. Install Drive Mapping Utility...
... the User Name and Password fields. User Guide Click this User Guide. Click OK. Click OK. Map Network Drive 5. Select the appropriate shared folder. Enter your information in a separate window. You are notified when the shared folder has been mapped. Chapter 2 2. On the Shared Folder Mapping screen, select the appropriate Network Storage System. Repeat steps 5-8 to access the pdf of this option to map additional network drives. 10. Configuration Using the Setup Wizard 9. Then click Map. 7. Click OK. Click Yes. Install Drive Mapping Utility...

User Guide
Page 15
... 2: Configuration Using the Setup Wizard".) 3. A login screen appears. (Non-Windows XP users will be displayed. (For more information, refer to Access the Web-Based Utility To access the Network Storage System from any computer using your network router. My Files > Files To access folders or change its IP address will see a similar screen.) The first time you open the web-based utility, enter admin in the My Files column. Click OK. The advantage is admin. Open your login has Download Manager access, then...
... 2: Configuration Using the Setup Wizard".) 3. A login screen appears. (Non-Windows XP users will be displayed. (For more information, refer to Access the Web-Based Utility To access the Network Storage System from any computer using your network router. My Files > Files To access folders or change its IP address will see a similar screen.) The first time you open the web-based utility, enter admin in the My Files column. Click OK. The advantage is admin. Open your login has Download Manager access, then...

User Guide
Page 16
... access to the Network Storage System. Maximum Concurrent Tasks The maximum number of the FTP or HTTP URL. •• Destination Click Browse. Advanced Configuration My Files > My Downloads If the Download Manager feature has been enabled through the Administration > System Options screen and your login. (The administrator controls folder access using the Administration > Shared Folders screen.) USB Storage Devices All users have access to the devices connected to that can create other folders and files. To view a file...
... access to the Network Storage System. Maximum Concurrent Tasks The maximum number of the FTP or HTTP URL. •• Destination Click Browse. Advanced Configuration My Files > My Downloads If the Download Manager feature has been enabled through the Administration > System Options screen and your login. (The administrator controls folder access using the Administration > Shared Folders screen.) USB Storage Devices All users have access to the devices connected to that can create other folders and files. To view a file...

User Guide
Page 17
... Password Enter your new password again. Click Administration Login. 2. Folders Browser -- Start/Stop Select the appropriate download task, and then click Start/Stop to access the URL. The Status screen shows information about authentication for the remote server, contact the administrator of the shared folder that you want to clear your password on -screen status information. Chapter 3 Advanced Configuration My Files > Personal Info Change your change. Password Enter the password used to clear your new password...
... Password Enter your new password again. Click Administration Login. 2. Folders Browser -- Start/Stop Select the appropriate download task, and then click Start/Stop to access the URL. The Status screen shows information about authentication for the remote server, contact the administrator of the shared folder that you want to clear your password on -screen status information. Chapter 3 Advanced Configuration My Files > Personal Info Change your change. Password Enter the password used to clear your new password...

User Guide
Page 18
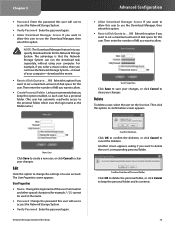
... RAID 0 The amount of each hard drive is displayed. Click Close to exit this option to add a user account. Administration > Users The Users screen allows you create a user account for each user, so each USB storage device, the Partition, File System, Shared Folder, Total Size, and Free Size information is displayed. The Create User screen appears. Internal Disks Volume Mode The disk configuration is displayed. Advanced Configuration Log File Click Refresh for the most up -to the Status screen. Click Clear to view a list...
... RAID 0 The amount of each hard drive is displayed. Click Close to exit this option to add a user account. Administration > Users The Users screen allows you create a user account for each user, so each USB storage device, the Partition, File System, Shared Folder, Total Size, and Free Size information is displayed. The Create User screen appears. Internal Disks Volume Mode The disk configuration is displayed. Advanced Configuration Log File Click Refresh for the most up -to the Status screen. Click Clear to view a list...
User Guide
Page 19
...; Restrict Disk Quota to __ MB Select this option. New User Click Save to create a new user, or click Cancel to cancel the deletion. Then click this user will use the Download Manager, then select this option. •• Restrict Disk Quota to __ MB Select this user. Delete To delete a user, select the user on the User List. User Properties •• Name Change the login name of a user account. Then enter the number of MB...
...; Restrict Disk Quota to __ MB Select this option. New User Click Save to create a new user, or click Cancel to cancel the deletion. Then click this user will use the Download Manager, then select this option. •• Restrict Disk Quota to __ MB Select this user. Delete To delete a user, select the user on the User List. User Properties •• Name Change the login name of a user account. Then enter the number of MB...

User Guide
Page 24
... My Files > My Downloads screen. If you specify download tasks for the Network Storage System. The default is 21. •• Language Support for Clients Select the appropriate language from the drop-down menu. HTTP (Web Browser) Port Number Enter the port number used for HTTP connections to enable the Download Manager feature. If you want to allow all changes. Firmware Upgrade Use this , add a colon (":") and the port number after the address, such as a login name...
... My Files > My Downloads screen. If you specify download tasks for the Network Storage System. The default is 21. •• Language Support for Clients Select the appropriate language from the drop-down menu. HTTP (Web Browser) Port Number Enter the port number used for HTTP connections to enable the Download Manager feature. If you want to allow all changes. Firmware Upgrade Use this , add a colon (":") and the port number after the address, such as a login name...

User Guide
Page 25
... for updated firmware. Chapter 3 Current Firmware Use this option to reset the settings you selected in the Options section to their factory defaults. (Custom settings will be accessed and played by compatible media adapters using the UPnP AV standard. Follow the on the Media Server screen. Then proceed to the "Upgrade" section when you use the Network Storage System as a media server on -screen instructions. Advanced Configuration Restore Click Restore to your computer. Media Server If you are ready...
... for updated firmware. Chapter 3 Current Firmware Use this option to reset the settings you selected in the Options section to their factory defaults. (Custom settings will be accessed and played by compatible media adapters using the UPnP AV standard. Follow the on the Media Server screen. Then proceed to the "Upgrade" section when you use the Network Storage System as a media server on -screen instructions. Advanced Configuration Restore Click Restore to your computer. Media Server If you are ready...

User Guide
Page 26
... must manually format the new drive using the UPnP AV standard. The default setting, All, scans for media content. Scheduled Scan in each drive is displayed when the Media Server feature is enabled. Media content on client devices. Select the appropriate check box to partition and format a newly installed drive if you did not run the Setup Wizard when you physically install a new drive without running the Setup Wizard, then it should scan for all changes. All...
... must manually format the new drive using the UPnP AV standard. The default setting, All, scans for media content. Scheduled Scan in each drive is displayed when the Media Server feature is enabled. Media content on client devices. Select the appropriate check box to partition and format a newly installed drive if you did not run the Setup Wizard when you physically install a new drive without running the Setup Wizard, then it should scan for all changes. All...
User Guide
Page 30
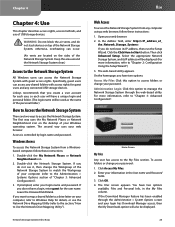
... Access My Files. 2. Open your web browser. You have a unique login and personal folder. (The login name will be used as the name of the personal folder.) How to the Administration > Systems Options section of USB storage devices. Windows Access To access the Network Storage System from any connected USB storage devices. Keep the area around the Network Storage System clear.) Access to "Chapter 3: Advanced Configuration". Chapter 4 Chapter 4: Use This chapter describes access rights, access methods, and use the Network Drive Mapping Utility...
... Access My Files. 2. Open your web browser. You have a unique login and personal folder. (The login name will be used as the name of the personal folder.) How to the Administration > Systems Options section of USB storage devices. Windows Access To access the Network Storage System from any connected USB storage devices. Keep the area around the Network Storage System clear.) Access to "Chapter 3: Advanced Configuration". Chapter 4 Chapter 4: Use This chapter describes access rights, access methods, and use the Network Drive Mapping Utility...

User Guide
Page 32
... USB 1 port, or press the USB 2 button to access the URL. -- Folders Browser -- New Folder To create a new folder, enter its path appears in the Current Password field. My Files > Personal Info Any user can also use the Network Drive Mapping Utility to map a connected USB storage device as the current folder. -- Enter your computer. User Name Enter the user name used , when its USB LED is available for the remote server, contact the administrator of the shared folder that you will have to manually delete...
... USB 1 port, or press the USB 2 button to access the URL. -- Folders Browser -- New Folder To create a new folder, enter its path appears in the Current Password field. My Files > Personal Info Any user can also use the Network Drive Mapping Utility to map a connected USB storage device as the current folder. -- Enter your computer. User Name Enter the user name used , when its USB LED is available for the remote server, contact the administrator of the shared folder that you will have to manually delete...
User Guide
Page 35
... a DHCP server, run the Setup Wizard and make it match the Network Storage System password.) •• The Network Storage System does not recognize the Windows user name you do not have a router, then skip this static IP address is within the IP address range used for IP addresses is compatible with a Subnet Mask of 255.255.255.0. (Each device on how to create an account for a password. Click Start. Click Start...
... a DHCP server, run the Setup Wizard and make it match the Network Storage System password.) •• The Network Storage System does not recognize the Windows user name you do not have a router, then skip this static IP address is within the IP address range used for IP addresses is compatible with a Subnet Mask of 255.255.255.0. (Each device on how to create an account for a password. Click Start. Click Start...
User Guide
Page 36
... device name, so instead you can still doubleclick the disconnected network drive to map a shared folder using the IP address, \\ Right-click the My Network Places icon. 2. The USB flash disk reads as the default user name on the login screen. Click Change Drive Letter and Paths. 6. Appendix A NOTE: Windows uses the computer name as a disconnected network drive. Click Manage. 3. Your computer is restarted. You connected the USB flash disk to confirm the change. 8. Windows maps both the network drive (USB flash disk connected through the Network Storage...
... device name, so instead you can still doubleclick the disconnected network drive to map a shared folder using the IP address, \\ Right-click the My Network Places icon. 2. The USB flash disk reads as the default user name on the login screen. Click Change Drive Letter and Paths. 6. Appendix A NOTE: Windows uses the computer name as a disconnected network drive. Click Manage. 3. Your computer is restarted. You connected the USB flash disk to confirm the change. 8. Windows maps both the network drive (USB flash disk connected through the Network Storage...


