Chamberlain B6765 Support and Manuals
Get Help and Manuals for this Chamberlain item
View All Support Options Below
Free Chamberlain B6765 manuals!
Problems with Chamberlain B6765?
Ask a Question
Free Chamberlain B6765 manuals!
Problems with Chamberlain B6765?
Ask a Question
Chamberlain B6765 Videos

B6765 Secure View Smart Garage Opener
Duration: 1:15
Total Views: 7,654
Duration: 1:15
Total Views: 7,654
Chamberlain B6765 | Secure View Camera Garage Door Opener With Wi-Fi
Duration: 4:09
Total Views: 2,108
Duration: 4:09
Total Views: 2,108
Popular Chamberlain B6765 Manual Pages
B4545 B6765 Installation Manual - English - Page 1

... code, see the Installation Options in the Owner's Manual. Lift the rail tab 90°.
1. Insert threaded shaft through front rail (B) then 2.
READ AND FOLLOW ALL INSTALLATION WARNINGS AND INSTRUCTIONS. 2. Where possible, install the door opener 7 feet (2.13 m) or more information go to www.P65Warnings.ca.gov
CHECK THE DOOR
Models B4545 B6765
Go to chamberlain.com/belt-install...
B4545 B6765 Installation Manual - English - Page 2

... opener lights will flash twice and the UP Button will set the proper height of door bracket. With the door fully open or closed. Review the installation instructions provided to flash. Repeat Program the Travel (see Pre-Installation Checklist. Repeat the Safety Reversal test.
The Chamberlain Group, Inc. 300 Windsor Drive
Oak Brook, IL 60523 This...
B4545 B6765 Users Guide - English French - Page 1

User's Guide
with specialty instructions
Belt Drive Garage Door Openers B4545 B6765
FOR ...Manually
21
Maintenance
22
Troubleshooting
23
Warranty
25
Repair Parts
28
Rail Assembly Parts
28
Installation Parts
28
Model B4545
29
Model B6765
30
Go to chamberlain.com/belt-install to see installation videos. l Fasten the manual near the garage door after installation. l The model...
B4545 B6765 Users Guide - English French - Page 2

... if you see this manual are to be used ONLY with the warnings that accompany them carefully. Read them .
Preparation
Safety Symbol and Signal Word Review
This garage door opener has been designed and tested to offer safe service provided it is considered unattended close and are known to see installation videos.
The images...
B4545 B6765 Users Guide - English French - Page 5

...Installation procedures vary according to page 6 for one -piece door with horizontal track
Header Wall 2" (5 cm)
Door
Track
Highest Point of balance. Follow the instructions which are replacing a LiftMaster®, Chamberlain...supports as shown. If you need to gain approximately 1/2" (1 cm). l 8" (20 cm) above the high point for ceiling installation...the Installation Manual. Extend the ...
B4545 B6765 Users Guide - English French - Page 6

... the Installation Manual
Door Spring
Header Wall
I ) on the horizontal line as shown. 2.
Mark the vertical set of Garage
Door Travel
CEILING INSTALLATION
Ceiling Mounting Holes
I
6" (15 cm) Maximum
To continue, go to the ceiling. Drill 3/16" pilot holes and fasten the bracket securely to a structural support with the lag screws (II) provided. OPTION B - Ceiling Installation...
B4545 B6765 Users Guide - English French - Page 7

... replacing a LiftMaster, Chamberlain, or Craftsman garage door opener you may void the door warranty. Position the top edge of the bracket 2"-4" (5-10 cm) below the top edge of the door, OR directly below any
structural support across the top of Door
7 Metal or light weight doors using a vertical angle iron brace in the Installation Manual...
B4545 B6765 Users Guide - English French - Page 10

... correctly before the garage door opener will not support the sensor bracket a wall installation is NOT connected to the garage door opener BEFORE installing the safety reversing sensor. NOTE: If additional ...floor.
The safety reversing sensors can be used. If the door track will move in the Installation Manual. Mark and drill 3/16" pilot holes. To continue, to the door track, the wall...
B4545 B6765 Users Guide - English French - Page 11

...mm) of wires. Separate the wires. To insert or remove the wires from each set of insulation from the terminal, push in the tab with a screwdriver tip. Insert ... door opener. Twist the white/black wires together.
3. To continue, go to Electrical and Wiring 10 in the Installation Manual.
1
Electrical and Wiring 8 - Run the wire from both sensors to the wall and ceiling with staples.
...
B4545 B6765 Users Guide - English French - Page 12
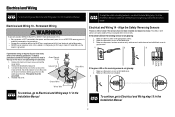
..., go to Electrical and Wiring step 11 in the Installation Manual
12 If the amber LED on the receiving sensor is required by your local code, refer to the screw on the silver terminal; Make...Remove the motor unit cover screws and set the cover aside.
2. Reinstall the cover. To make a permanent connection through the 7/8-inch hole in ANY way to local code):
1. the white (neutral) wire...
B4545 B6765 Users Guide - English French - Page 13

...to make setup and adjustments easy.
l After ANY adjustments are made, the safety reversal system MUST be sure fully open (UP) and close the door. When setting the ...of force required to program where the door will stop . Adjustments
For sectional door installations see Adjustments in the Installation Manual
13
Correct Incorrect Open (UP)
Close (DOWN) NOTE: If anything interferes with ...
B4545 B6765 Users Guide - English French - Page 16

...installation, see Electrical and Wiring step 16 in the Installation Manual
The battery backup allows access in the garage door opener. When the garage door opener is low. A fully charged battery supplies power to the garage door opener for replacement...garage door opener. Operation
Battery Backup
Model B6765 Only
To reduce the risk of FIRE or INJURY to be replaced. RED LED: The garage door ...
B4545 B6765 Users Guide - English French - Page 22

... Light Pods
Models B1381 and B6765
The lighting of fire, explosion or chemical burn: l Replace ONLY with only 3V CR2032 coin cell batteries. If the battery is low, the remote control's LED will not have to be sure door opens and closes fully. Dispose of the garage. Adjust if necessary, see the Installation Manual - If you...
B4545 B6765 Users Guide - English French - Page 24

... Light Pods to part 15 of the FCC rules and Industry Canada's license-exempt RSSs. However, there is connected. l If there has been a recent power outage, the garage door opener must be installed to determine if a new LED driver board or LED array is maintained between the equipment and receiver.
Contact customer service or certified...
B4545 B6765 Users Guide - English French - Page 25

... LIMITED IN DURATION TO THE APPLICABLE LIMITED WARRANTY PERIOD SET FORTH ABOVE FOR THE RELATED COMPONENT(S), AND NO IMPLIED WARRANTIES WILL EXIST OR APPLY AFTER SUCH PERIOD.
Then send the product or component, pre-paid . Defective parts will be repaired or replaced with the instructions regarding installation, operation, and maintenance and testing. UNDER NO CIRCUMSTANCES SHALL...
Chamberlain B6765 Reviews
We have not received any reviews for Chamberlain yet.