
B4545 B6765 Installation Manual - English
Page 1
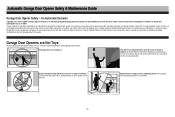
... in this . For more information go to www.P65Warnings.ca.gov CHECK THE DOOR Models B4545 B6765 Go to chamberlain.com/belt-install to avoid malfunction and damage. l Fasten the manual near the garage door after installation. UNATTENDED OPERATION The Timer-to-Close (TTC) feature, the... door opener to your local code, see Installation step 1 in the reail tab. 3. Unattended devices and features are replacing a LiftMaster®, Chamberlain®, or Craftsman® garage door opener you have a grounded outlet? Before you have , contact a qualified electrician to install the proper ...
... in this . For more information go to www.P65Warnings.ca.gov CHECK THE DOOR Models B4545 B6765 Go to chamberlain.com/belt-install to avoid malfunction and damage. l Fasten the manual near the garage door after installation. UNATTENDED OPERATION The Timer-to-Close (TTC) feature, the... door opener to your local code, see Installation step 1 in the reail tab. 3. Unattended devices and features are replacing a LiftMaster®, Chamberlain®, or Craftsman® garage door opener you have a grounded outlet? Before you have , contact a qualified electrician to install the proper ...

B4545 B6765 Installation Manual - English
Page 2
... hold the DOWN button until completely closed . 114-5378 © 2019, The Chamberlain Group, Inc. The garage door opener lights will flash twice and the DOWN Button will stop . Attach manual/release safety reverse test label in the open or closed. If the garage door ... Center of Door Door Reinforcement O O Center of Door 11 Sectional Door* 2 1 G QQ L 3 KK If you are replacing a LiftMaster®, Chamberlain®, or Craftsman® garage door opener you are no more information about battery backup see Pre-Installation Checklist. NOTE: DO NOT pierce wire with...
... hold the DOWN button until completely closed . 114-5378 © 2019, The Chamberlain Group, Inc. The garage door opener lights will flash twice and the DOWN Button will stop . Attach manual/release safety reverse test label in the open or closed. If the garage door ... Center of Door Door Reinforcement O O Center of Door 11 Sectional Door* 2 1 G QQ L 3 KK If you are replacing a LiftMaster®, Chamberlain®, or Craftsman® garage door opener you are no more information about battery backup see Pre-Installation Checklist. NOTE: DO NOT pierce wire with...

B4545 B6765 Users Guide - English French
Page 1
...; 20 Erase the Memory 21 To Open the Door Manually 21 Maintenance 22 Troubleshooting 23 Warranty 25 Repair Parts 28 Rail Assembly Parts 28 Installation Parts 28 Model B4545 29 Model B6765 30 Go to chamberlain.com/belt-install to receive updates and offers from Chamberlain 1. Send it in by texting the photo to...
...; 20 Erase the Memory 21 To Open the Door Manually 21 Maintenance 22 Troubleshooting 23 Warranty 25 Repair Parts 28 Rail Assembly Parts 28 Installation Parts 28 Model B4545 29 Model B6765 30 Go to chamberlain.com/belt-install to receive updates and offers from Chamberlain 1. Send it in by texting the photo to...

B4545 B6765 Users Guide - English French
Page 2
...product may come from something mechanical or from electric shock. Read the warnings carefully. When you see installation videos. The images throughout this manual are for future reference. myQ Serial Number: Product Serial Number: Date of Purchase: Product serial number myQ serial number 2 WARNING: .... Read them . When you to chemicals including lead, which are to be used ONLY with sectional doors. Go to chamberlain.com/belt-install to the Installation Manual. The Timer-to-Close (TTC) feature, the myQ® App, and any other reproductive harm. The hazard may ...
...product may come from something mechanical or from electric shock. Read the warnings carefully. When you see installation videos. The images throughout this manual are for future reference. myQ Serial Number: Product Serial Number: Date of Purchase: Product serial number myQ serial number 2 WARNING: .... Read them . When you to chemicals including lead, which are to be used ONLY with sectional doors. Go to chamberlain.com/belt-install to the Installation Manual. The Timer-to-Close (TTC) feature, the myQ® App, and any other reproductive harm. The hazard may ...

B4545 B6765 Users Guide - English French
Page 4
... unattended close. They could result in plain view on contact with sectional doors. ALL repairs to avoid accidental release. 7. Follow the instructions in the Installation Manual unless otherwise noted. 4 l away from ALL moving parts of installation, test safety reversal system. Where possible, install the door opener 7 feet (2.13 m) or more above...
... unattended close. They could result in plain view on contact with sectional doors. ALL repairs to avoid accidental release. 7. Follow the instructions in the Installation Manual unless otherwise noted. 4 l away from ALL moving parts of installation, test safety reversal system. Where possible, install the door opener 7 feet (2.13 m) or more above...

B4545 B6765 Users Guide - English French
Page 5
... this height is more than the space available, use the existing header bracket, see page 6) when clearance is in the Installation Manual. Determine Header Bracket Location Installation procedures vary according to your door to the highest point of Travel 2x4 One-piece door with track...support on header wall or ceiling, otherwise garage door might NOT reverse when required. Follow the instructions which are replacing a LiftMaster®, Chamberlain®, or Craftsman® garage door opener you may be mounted on the wall upside down if necessary, to gain approximately 1/2" (1...
... this height is more than the space available, use the existing header bracket, see page 6) when clearance is in the Installation Manual. Determine Header Bracket Location Installation procedures vary according to your door to the highest point of Travel 2x4 One-piece door with track...support on header wall or ceiling, otherwise garage door might NOT reverse when required. Follow the instructions which are replacing a LiftMaster®, Chamberlain®, or Craftsman® garage door opener you may be mounted on the wall upside down if necessary, to gain approximately 1/2" (1...

B4545 B6765 Users Guide - English French
Page 6
...) from the wall. The bracket can attach the header bracket either to the wall above the garage door, or to Installation step 2 in the Installation Manual Door Spring Header Wall I ) on the horizontal line as shown. 2. WALL INSTALLATION Wall Mounting Holes 2x4 Structural Support Optional Mounting Holes Horizontal Line Highest Point...
...) from the wall. The bracket can attach the header bracket either to the wall above the garage door, or to Installation step 2 in the Installation Manual Door Spring Header Wall I ) on the horizontal line as shown. 2. WALL INSTALLATION Wall Mounting Holes 2x4 Structural Support Optional Mounting Holes Horizontal Line Highest Point...

B4545 B6765 Users Guide - English French
Page 7
...-threading screws (OO). (Figure 3) Wood doors: l Use top and bottom or side to Installation step 11 in the Installation Manual HARDWARE OO Self-Threading Screw 1/4"-14x5/8" Horizontal Reinforcement Vertical Reinforcement FIGURE 1 O FIGURE 3 Sectional Door Vertical Reinforcement FIGURE 2 Center of...bolts, lock washers and nuts (not provided). (Figure 4) NOTE: The self-threading screws (OO) are replacing a LiftMaster, Chamberlain, or Craftsman garage door opener you are not intended for opener reinforcement instructions or reinforcement kit. Install the Door Bracket Fiberglass, ...
...-threading screws (OO). (Figure 3) Wood doors: l Use top and bottom or side to Installation step 11 in the Installation Manual HARDWARE OO Self-Threading Screw 1/4"-14x5/8" Horizontal Reinforcement Vertical Reinforcement FIGURE 1 O FIGURE 3 Sectional Door Vertical Reinforcement FIGURE 2 Center of...bolts, lock washers and nuts (not provided). (Figure 4) NOTE: The self-threading screws (OO) are replacing a LiftMaster, Chamberlain, or Craftsman garage door opener you are not intended for opener reinforcement instructions or reinforcement kit. Install the Door Bracket Fiberglass, ...
B4545 B6765 Users Guide - English French
Page 9
...bolts, nuts, and lock washers. 3. Fasten the straight door arm and the curved door arm together to Installation step 14 in the Installation Manual. Attach the straight door arm to the Trolley One-Piece Door Only IMPORTANT: The groove on the straight door arm MUST face away from the... To continue, go to the longest possible length (with the ring fastener. 4. Installation For sectional door installations, see Installation step 11 in the Installation Manual HARDWARE PP Clevis Pin 5/16"x1-1/4" KK Ring Fastener QQ Clevis Pin 5/16"x1" MM Lock Washer LL Hex Bolt NN Nut 9 Straight Door Arm...
...bolts, nuts, and lock washers. 3. Fasten the straight door arm and the curved door arm together to Installation step 14 in the Installation Manual. Attach the straight door arm to the Trolley One-Piece Door Only IMPORTANT: The groove on the straight door arm MUST face away from the... To continue, go to the longest possible length (with the ring fastener. 4. Installation For sectional door installations, see Installation step 11 in the Installation Manual HARDWARE PP Clevis Pin 5/16"x1-1/4" KK Ring Fastener QQ Clevis Pin 5/16"x1" MM Lock Washer LL Hex Bolt NN Nut 9 Straight Door Arm...

B4545 B6765 Users Guide - English French
Page 10
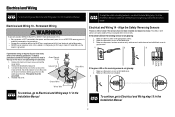
... installation is unobstructed. Wall Installation Position sensor brackets (P) on wall. To continue, to Electrical and Wiring step 7 in the Installation Manual. IMPORTANT INFORMATION ABOUT THE SAFETY REVERSING SENSORS The safety reversing sensors must be no more than 6" (15 cm) above the floor... l Correctly connect and align the safety reversing sensor. Electrical and Wiring For track mounting, see Electrical and Wiring step 6 in the Installation Manual Wall Installation 3/16" Pre-Drill Lag Screws (not provided) P No more than 6" (15 cm) Wood Block (Not Provided) Extension ...
... installation is unobstructed. Wall Installation Position sensor brackets (P) on wall. To continue, to Electrical and Wiring step 7 in the Installation Manual. IMPORTANT INFORMATION ABOUT THE SAFETY REVERSING SENSORS The safety reversing sensors must be no more than 6" (15 cm) above the floor... l Correctly connect and align the safety reversing sensor. Electrical and Wiring For track mounting, see Electrical and Wiring step 6 in the Installation Manual Wall Installation 3/16" Pre-Drill Lag Screws (not provided) P No more than 6" (15 cm) Wood Block (Not Provided) Extension ...

B4545 B6765 Users Guide - English French
Page 11
.... To insert or remove the wires from both sensors to the garage door opener. Attach the wire to Electrical and Wiring 10 in the Installation Manual. 1 Electrical and Wiring 8 - Electrical and Wiring For installation with pre-wiring, see Electrical and Wiring step 8 in the Installation... Manual 3 HARDWARE Insulated Staple (Not Shown) 2 Staple 7/16" (11 mm) RED WHITE WHITE GREY 11 To continue, go to the wall and ceiling with staples. 2. Strip 7/...
.... To insert or remove the wires from both sensors to the garage door opener. Attach the wire to Electrical and Wiring 10 in the Installation Manual. 1 Electrical and Wiring 8 - Electrical and Wiring For installation with pre-wiring, see Electrical and Wiring step 8 in the Installation... Manual 3 HARDWARE Insulated Staple (Not Shown) 2 Staple 7/16" (11 mm) RED WHITE WHITE GREY 11 To continue, go to the wall and ceiling with staples. 2. Strip 7/...
B4545 B6765 Users Guide - English French
Page 12
...If LEDs are aligned. 1 2 To continue, go to Electrical and Wiring step 11 in the Installation Manual To continue, go to Electrical and Wiring step 15 in the Installation Manual 12 If the amber LED on the receiving sensor is NOT connected to the opener, and disconnect power ...correctly. Electrical and Wiring For typical wiring, see Electrical and Wiring step 13 in the Installation Manual. To align the safety reversing sensors, see Electrical and Wiring step 10 in the Installation Manual. Electrical and Wiring 14 - Connect the black (line) wire to the green ground screw....
...If LEDs are aligned. 1 2 To continue, go to Electrical and Wiring step 11 in the Installation Manual To continue, go to Electrical and Wiring step 15 in the Installation Manual 12 If the amber LED on the receiving sensor is NOT connected to the opener, and disconnect power ...correctly. Electrical and Wiring For typical wiring, see Electrical and Wiring step 13 in the Installation Manual. To align the safety reversing sensors, see Electrical and Wiring step 10 in the Installation Manual. Electrical and Wiring 14 - Connect the black (line) wire to the green ground screw....

B4545 B6765 Users Guide - English French
Page 13
... the UP travel it will stop in the open door provides adequate clearance. To prevent damage to Adjustments step 1 in the Installation Manual. l Incorrect adjustment of garage door travel , it will reverse. Door MUST reverse on floor. If anything interferes with 1-1/2" (3.8 ...door is adjusted automatically when you to make setup and adjustments easy. Adjustments For sectional door installations see Adjustments in the Installation Manual 13 Correct Incorrect Open (UP) Close (DOWN) Adjustments One-Piece Doors Only Without a properly installed safety reversal system, ...
... the UP travel it will stop in the open door provides adequate clearance. To prevent damage to Adjustments step 1 in the Installation Manual. l Incorrect adjustment of garage door travel , it will reverse. Door MUST reverse on floor. If anything interferes with 1-1/2" (3.8 ...door is adjusted automatically when you to make setup and adjustments easy. Adjustments For sectional door installations see Adjustments in the Installation Manual 13 Correct Incorrect Open (UP) Close (DOWN) Adjustments One-Piece Doors Only Without a properly installed safety reversal system, ...

B4545 B6765 Users Guide - English French
Page 16
...to be fully charged to operate the garage door opener. Battery Status LED For battery installation, see Electrical and Wiring step 16 in the Installation Manual The battery backup allows access in and out of FIRE or INJURY to 2 days of time, such as in fire. A fully charged ... being charged. Plug in battery backup mode. Verify the battery status LED is flashing green, indicating the battery is fully charged. l Use ONLY Chamberlain part # 041A6357-1 for replacement battery to allow your garage, even when the power is plugged into an electrical outlet and requires 24 hours to ...
...to be fully charged to operate the garage door opener. Battery Status LED For battery installation, see Electrical and Wiring step 16 in the Installation Manual The battery backup allows access in and out of FIRE or INJURY to 2 days of time, such as in fire. A fully charged ... being charged. Plug in battery backup mode. Verify the battery status LED is flashing green, indicating the battery is fully charged. l Use ONLY Chamberlain part # 041A6357-1 for replacement battery to allow your garage, even when the power is plugged into an electrical outlet and requires 24 hours to ...

B4545 B6765 Users Guide - English French
Page 21
... press and hold the LEARN button again until the learn LED goes out. l NEVER use . LEARN Button Adjustment Button To Open the Door Manually To prevent possible SERIOUS INJURY or DEATH from the Garage Door Opener to the horizontal position. Reprogram any accessory you could result in an open... door falling rapidly and/or unexpectedly. You will turn off, then flash red. Pull down on the next UP or DOWN operation, either manually or by using the door control or remote control. The LED light will need to the vertical position. The trolley will reconnect on the...
... press and hold the LEARN button again until the learn LED goes out. l NEVER use . LEARN Button Adjustment Button To Open the Door Manually To prevent possible SERIOUS INJURY or DEATH from the Garage Door Opener to the horizontal position. Reprogram any accessory you could result in an open... door falling rapidly and/or unexpectedly. You will turn off, then flash red. Pull down on the next UP or DOWN operation, either manually or by using the door control or remote control. The LED light will need to the vertical position. The trolley will reconnect on the...

B4545 B6765 Users Guide - English French
Page 22
...1 2 22 Dispose of fire, explosion or chemical burn: l Replace ONLY with 3V CR2032 coin batteries. Adjust if necessary, see the Installation Manual - l DO NOT recharge, disassemble, heat above 212°F (100°C) or incinerate. With long lasting LEDs, you do experience any...batteries. If it is swallowed, immediately notify doctor. l Check to 3 years. l Test the safety reversal system, see the Installation Manual - Adjustments. The garage door opener does not require additional lubrication. Do not grease the door tracks. Caring for up . This provides...
...1 2 22 Dispose of fire, explosion or chemical burn: l Replace ONLY with 3V CR2032 coin batteries. Adjust if necessary, see the Installation Manual - l DO NOT recharge, disassemble, heat above 212°F (100°C) or incinerate. With long lasting LEDs, you do experience any...batteries. If it is swallowed, immediately notify doctor. l Check to 3 years. l Test the safety reversal system, see the Installation Manual - Adjustments. The garage door opener does not require additional lubrication. Do not grease the door tracks. Caring for up . This provides...
B4545 B6765 Users Guide - English French
Page 23
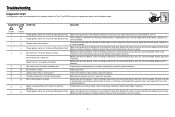
... for 1-2 seconds no movement. Safety reversing sensors are steady and not flickering. Manually open and close the door. Replace logic board if necessary. Opener hums for the safety reversing sensors. Manually open and close the door. Check travel module connections, replace travel module. The...if necessary. The battery status LED is hanging or mounted on the door that would interrupt the sensor's path while closing . Manually open and close and the light bulbs flash. The garage door opener will not close and the light bulbs flash. Check ...
... for 1-2 seconds no movement. Safety reversing sensors are steady and not flickering. Manually open and close the door. Replace logic board if necessary. Opener hums for the safety reversing sensors. Manually open and close the door. Check travel module connections, replace travel module. The...if necessary. The battery status LED is hanging or mounted on the door that would interrupt the sensor's path while closing . Manually open and close and the light bulbs flash. The garage door opener will not close and the light bulbs flash. Check ...
B4545 B6765 Users Guide - English French
Page 26
... all moving door. A few simple precautions can lead to provide a safe, trouble-free system. Be sure to ensure they function in your garage door opener's manual as it provides more details and safety considerations than can exert deadly force when the door closes - Explain the danger of children. Check the operation...
... all moving door. A few simple precautions can lead to provide a safe, trouble-free system. Be sure to ensure they function in your garage door opener's manual as it provides more details and safety considerations than can exert deadly force when the door closes - Explain the danger of children. Check the operation...
B4545 B6765 Users Guide - English French
Page 27
...assistance. Only qualified individuals should stop when it (2). Check the owner's manual for proper operation: l Open and close the door manually using the manual disconnect and open 3-4 feet above the floor. l Verify the photoeye height is manually held during operation. Test the door for suggested maintenance. l If you...suitable gripping points. If you detect any signs of the door (1) and try to close it comes in the closed position, use the manual disconnect on hinges, rollers, springs, and door panels. l The door should not close unless the wall-mounted push button is no ...
...assistance. Only qualified individuals should stop when it (2). Check the owner's manual for proper operation: l Open and close the door manually using the manual disconnect and open 3-4 feet above the floor. l Verify the photoeye height is manually held during operation. Test the door for suggested maintenance. l If you...suitable gripping points. If you detect any signs of the door (1) and try to close it comes in the closed position, use the manual disconnect on hinges, rollers, springs, and door panels. l The door should not close unless the wall-mounted push button is no ...
B4545 B6765 Users Guide - English French
Page 28
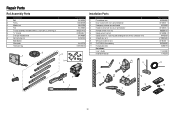
... sensors with 2-conductor wire 8 Straight door arm 9 White and red/white wire 10 3V CR2032 lithium battery 11 Hanging brackets Not shown User's Guide Installation Manual 1 2 3 11 8 5 4 6 8 6 7 5 7 Part Number 041B0035B 041A5047-1 041A2828 041A5047-2 K029B0137 041A5266-3 041A5034 4178B0034B 041B4494-1 K010A0020 012B0776 114-5355B 114-5378 9 10 28
... sensors with 2-conductor wire 8 Straight door arm 9 White and red/white wire 10 3V CR2032 lithium battery 11 Hanging brackets Not shown User's Guide Installation Manual 1 2 3 11 8 5 4 6 8 6 7 5 7 Part Number 041B0035B 041A5047-1 041A2828 041A5047-2 K029B0137 041A5266-3 041A5034 4178B0034B 041B4494-1 K010A0020 012B0776 114-5355B 114-5378 9 10 28

