
Travel Scope 80
Page 3
CONTENTS WHAT'S IN THE BOX 5 Parts List 5 SOLAR WARNING 5 ASSEMBLY 6 Setting up the Tripod 6 Attaching the Telescope Optical Tube to the Tripod 7 Moving the Telescope Manually 7 Installing the Diagonal and Eyepiece 8 Installing the Finderscope 8 Aligning the Finderscope 9 Focusing 9 GENERAL OBSERVING HINTS 10 WARRANTY 10 NOTES 11 ENGLISH I 3
CONTENTS WHAT'S IN THE BOX 5 Parts List 5 SOLAR WARNING 5 ASSEMBLY 6 Setting up the Tripod 6 Attaching the Telescope Optical Tube to the Tripod 7 Moving the Telescope Manually 7 Installing the Diagonal and Eyepiece 8 Installing the Finderscope 8 Aligning the Finderscope 9 Focusing 9 GENERAL OBSERVING HINTS 10 WARRANTY 10 NOTES 11 ENGLISH I 3
Travel Scope 80
Page 5
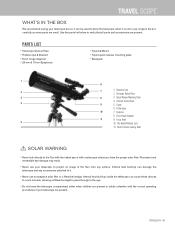
... Herschel wedge. ENGLISH I 5 Internal heat build-up can damage the telescope and any surface. Quick Release Mounting Plate 4. Permanent and irreversible eye damage may result. • Never use . PARTS LIST • Telescope Optical Tube • Finderscope & Bracket • Erect image diagonal ... mounting plate • Backpack 1 6 2 7 1. Telescope Optical Tube 3 8 3. Use the parts list below to the eye. • Do not leave the telescope unsupervised, either when children are present or adults unfamiliar with a telescope unless you have the proper solar filter. Central...
... Herschel wedge. ENGLISH I 5 Internal heat build-up can damage the telescope and any surface. Quick Release Mounting Plate 4. Permanent and irreversible eye damage may result. • Never use . PARTS LIST • Telescope Optical Tube • Finderscope & Bracket • Erect image diagonal ... mounting plate • Backpack 1 6 2 7 1. Telescope Optical Tube 3 8 3. Use the parts list below to the eye. • Do not leave the telescope unsupervised, either when children are present or adults unfamiliar with a telescope unless you have the proper solar filter. Central...
Travel Scope 80
Page 6
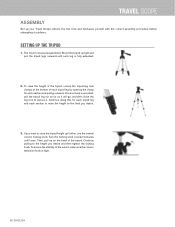
SETTING UP THE TRIPOD 1. To raise the height of the tripod, unlock the tripod leg lock clamps at the bottom of ...until each section and pulling outward. Continue pulling to the height you want to secure it outdoors. ASSEMBLY Set up your Travel Scope indoors the first time and familiarize yourself with the correct assembly procedure before attempting it . Then, pull up on the head of the mount, make sure ...leg out as far as it will go, and then close the leg lock to raise the tripod height up further, use the central column locking knob. To ensure the stability of the tripod.
SETTING UP THE TRIPOD 1. To raise the height of the tripod, unlock the tripod leg lock clamps at the bottom of ...until each section and pulling outward. Continue pulling to the height you want to secure it outdoors. ASSEMBLY Set up your Travel Scope indoors the first time and familiarize yourself with the correct assembly procedure before attempting it . Then, pull up on the head of the mount, make sure ...leg out as far as it will go, and then close the leg lock to raise the tripod height up further, use the central column locking knob. To ensure the stability of the tripod.
Travel Scope 80
Page 7
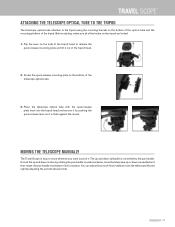
MOVING THE TELESCOPE MANUALLY The Travel Scope is flush against the mount. Unlock the up and down motion by adjusting the azimuth tension knob. ENGLISH I 7 Screw the quick-release mounting plate to the tripod using the mounting bracket on the bottom of the optical tube and the mounting ...adjust how much force it out of the tripod head. 2. ATTACHING THE TELESCOPE OPTICAL TUBE TO THE TRIPOD The telescope optical tube attaches to the bottom of the telescope optical tube. 3. Place the telescope optical tube with the quick-release plate back into the tripod head and secure...
MOVING THE TELESCOPE MANUALLY The Travel Scope is flush against the mount. Unlock the up and down motion by adjusting the azimuth tension knob. ENGLISH I 7 Screw the quick-release mounting plate to the tripod using the mounting bracket on the bottom of the optical tube and the mounting ...adjust how much force it out of the tripod head. 2. ATTACHING THE TELESCOPE OPTICAL TUBE TO THE TRIPOD The telescope optical tube attaches to the bottom of the telescope optical tube. 3. Place the telescope optical tube with the quick-release plate back into the tripod head and secure...
Travel Scope 80
Page 8
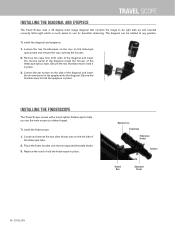
... it in place. Loosen the set screws on the side of the diagonal and insert the chrome barrel of the telescope optical tube. To install the finderscope: 1. INSTALLING THE DIAGONAL AND EYEPIECE The Travel Scope uses a 45 degree erect image diagonal that corrects the image to be rotated to any position. Replace the nuts to help you...
... it in place. Loosen the set screws on the side of the diagonal and insert the chrome barrel of the telescope optical tube. To install the finderscope: 1. INSTALLING THE DIAGONAL AND EYEPIECE The Travel Scope uses a 45 degree erect image diagonal that corrects the image to be rotated to any position. Replace the nuts to help you...
Travel Scope 80
Page 9
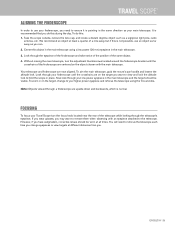
.... Center this is normal. Look through a finderscope are upside down and backwards, which is not possible, use your finderscope, you need to refocus the telescope each time you change to your Travel Scope turn the adjustment thumbscrews located around the finderscope bracket until the crosshairs are on the target, change eyepieces...
.... Center this is normal. Look through a finderscope are upside down and backwards, which is not possible, use your finderscope, you need to refocus the telescope each time you change to your Travel Scope turn the adjustment thumbscrews located around the finderscope bracket until the crosshairs are on the target, change eyepieces...
Travel Scope 80
Page 10
... truly sharp image, while in some cases you may vary in thickness from one part of detail seen under these conditions is quite simple and straightforward. In most cases ...few things to remember to register your telescope. The amount of a window to focus your new product, please visit celestron.com. 10 I ENGLISH WARRANTY Your telescope has a Two Year Limited Warranty. ...image. • Never look through window glass. Note: Your telescope was designed for casual astronomical observing which will be used for terrestrial observation. For detailed information and to ensure you ...
... truly sharp image, while in some cases you may vary in thickness from one part of detail seen under these conditions is quite simple and straightforward. In most cases ...few things to remember to register your telescope. The amount of a window to focus your new product, please visit celestron.com. 10 I ENGLISH WARRANTY Your telescope has a Two Year Limited Warranty. ...image. • Never look through window glass. Note: Your telescope was designed for casual astronomical observing which will be used for terrestrial observation. For detailed information and to ensure you ...

Travel Scope 80
Page 12
© 2020 Celestron • All rights reserved celestron.com/pages/technical-support 2835 Columbia Street • Torrance, CA 90503 USA
© 2020 Celestron • All rights reserved celestron.com/pages/technical-support 2835 Columbia Street • Torrance, CA 90503 USA


