

Owners Manual
Page 1
E DATA PROJECTOR XJ-S43W User's Guide z Be sure to keep all user documentation handy for future reference. 1 For details about setting up the projector and lamp replacement, see the User's Guide (Basic Operation). z Be sure to read the precautions in the separate User's Guide (Basic Operation).
E DATA PROJECTOR XJ-S43W User's Guide z Be sure to keep all user documentation handy for future reference. 1 For details about setting up the projector and lamp replacement, see the User's Guide (Basic Operation). z Be sure to read the precautions in the separate User's Guide (Basic Operation).

Owners Manual
Page 4
... 35 Cleaning the Projector 35 Cleaning the Projector Exterior 35 Cleaning the Lens ...35 Cleaning Intake and Exhaust Vents 36 Replacing the Lamp 37 To check the current lamp use time 37 When to replace the lamp 37 Replacing the Lamp 38 To replace the lamp 39 Resetting the Lamp Time 40 To reset the lamp time 40 To...
... 35 Cleaning the Projector 35 Cleaning the Projector Exterior 35 Cleaning the Lens ...35 Cleaning Intake and Exhaust Vents 36 Replacing the Lamp 37 To check the current lamp use time 37 When to replace the lamp 37 Replacing the Lamp 38 To replace the lamp 39 Resetting the Lamp Time 40 To reset the lamp time 40 To...

Owners Manual
Page 7
..., store the remote control unit so its buttons are not pressed inadvertently. 7 When you see [ENTER] in this manual, it . Projector Keys and Remote Controller Keys Projector Keys and Indicator Panel TEMP indicator LAMP indicator POWER/STANDBY indicator [FOCUS] key [Enter] key* [MENU] key [P] (Power) key [INPUT] key [AUTO] key [ZOOM] key [ESC...
..., store the remote control unit so its buttons are not pressed inadvertently. 7 When you see [ENTER] in this manual, it . Projector Keys and Remote Controller Keys Projector Keys and Indicator Panel TEMP indicator LAMP indicator POWER/STANDBY indicator [FOCUS] key [Enter] key* [MENU] key [P] (Power) key [INPUT] key [AUTO] key [ZOOM] key [ESC...
Owners Manual
Page 13
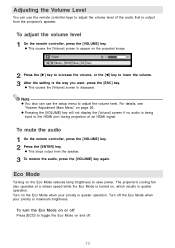
.... 2 Press the [ ] key to increase the volume, or the [ ] key to lower the volume. 3 After the setting is maximum brightness. z This stops output from the projector's speaker. Turn on and off. 13 Turn off Press [ECO] to toggle the Eco Mode on the Eco Mode when your priority is the way... the [VOLUME] key again. To turn the Eco Mode on or off the Eco Mode when your priority is turned on the Eco Mode reduces lamp brightness to save power. Adjusting the Volume Level You can use the remote controller keys to adjust the volume level of an HDMI signal. Eco...
.... 2 Press the [ ] key to increase the volume, or the [ ] key to lower the volume. 3 After the setting is maximum brightness. z This stops output from the projector's speaker. Turn on and off. 13 Turn off Press [ECO] to toggle the Eco Mode on the Eco Mode when your priority is the way... the [VOLUME] key again. To turn the Eco Mode on or off the Eco Mode when your priority is turned on the Eco Mode reduces lamp brightness to save power. Adjusting the Volume Level You can use the remote controller keys to adjust the volume level of an HDMI signal. Eco...

Owners Manual
Page 18
... 30. 18 Note, however, that the actual startup sequence (Standby State Power On Warm Up Projection Starts) that the projector performs when you do , there is the chance that it (and the lamp) might turn on automatically when power is enabled or disabled. If you do not even need to turn on... to "On". This greatly reduces the amount of whether Direct Power On is restored after being cut off . Direct Power On You can configure the projector so it powers up automatically as soon as it is what triggers the sequence (plugging in the separate "User's Guide (Basic Operations)".
... 30. 18 Note, however, that the actual startup sequence (Standby State Power On Warm Up Projection Starts) that the projector performs when you do , there is the chance that it (and the lamp) might turn on automatically when power is enabled or disabled. If you do not even need to turn on... to "On". This greatly reduces the amount of whether Direct Power On is restored after being cut off . Direct Power On You can configure the projector so it powers up automatically as soon as it is what triggers the sequence (plugging in the separate "User's Guide (Basic Operations)".
Owners Manual
Page 19
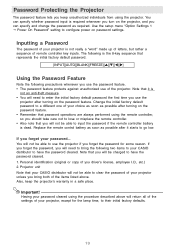
... Change the initial factory default password to their initial factory defaults. 19 You will not be able to use the projector if you forget the password for the lamp time, to a different one of your password... Replace the remote control battery as soon as required. If you ...sequence that you will be able to clear the password of your CASIO distributor will return all of the settings of you turn on the password feature. Password Protecting the Projector The password feature lets you keep the projector's warranty in a safe place. The following precautions whenever you use...
... Change the initial factory default password to their initial factory defaults. 19 You will not be able to use the projector if you forget the password for the lamp time, to a different one of your password... Replace the remote control battery as soon as required. If you ...sequence that you will be able to clear the password of your CASIO distributor will return all of the settings of you turn on the password feature. Password Protecting the Projector The password feature lets you keep the projector's warranty in a safe place. The following precautions whenever you use...
Owners Manual
Page 23
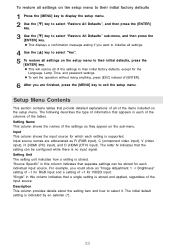
... appears in this column indicates that provide detailed explanations of all of the input source. Input This column shows the input source for the Language, Lamp Time, and password settings. The initial default setting is stored. Setup Menu Contents This section contains tables that separate settings can be stored for VIDEO...
... appears in this column indicates that provide detailed explanations of all of the input source. Input This column shows the input source for the Language, Lamp Time, and password settings. The initial default setting is stored. Setup Menu Contents This section contains tables that separate settings can be stored for VIDEO...

Owners Manual
Page 30
...). 1*: Select this option to turn on auto adjust. 2: Select this option to turn off Auto Power Off. Off: Select this option to reduce lamp brightness and save power. Off: Select this option to turn on auto adjust when a 1360 × 768 or 1400 × 1050 signal is turned...Setting Unit Description Auto Keystone Correction RCVHDN Single Use this sub-menu to turn on Direct Power On. For details, see "Password Protecting the Projector" on or off auto keystone correction. Direct Power On RCVHDN Single Use this sub-menu to turn off . While Direct Power On is enabled...
...). 1*: Select this option to turn on auto adjust. 2: Select this option to turn off Auto Power Off. Off: Select this option to reduce lamp brightness and save power. Off: Select this option to turn on auto adjust when a 1360 × 768 or 1400 × 1050 signal is turned...Setting Unit Description Auto Keystone Correction RCVHDN Single Use this sub-menu to turn on Direct Power On. For details, see "Password Protecting the Projector" on or off auto keystone correction. Direct Power On RCVHDN Single Use this sub-menu to turn off . While Direct Power On is enabled...

Owners Manual
Page 33
... RCVHDN Single This sub-menu item shows the cumulative number of hours the current lamp has been used to the projector. For details about replacing the lamp and the lamp time reset operation, see "Replacing the Lamp" on page 37. 33 Signal Name RCVHD Source Specific This sub-menu item shows...the signal being input to date. It shows the number of vertical pixels of resolution of the input signal. For details about replacing the lamp, see "Signal Name" under "Supported Signals" on page 37. Resolution RCVH Single This sub-menu item appears only when RGB is interlace...
... RCVHDN Single This sub-menu item shows the cumulative number of hours the current lamp has been used to the projector. For details about replacing the lamp and the lamp time reset operation, see "Replacing the Lamp" on page 37. 33 Signal Name RCVHD Source Specific This sub-menu item shows...the signal being input to date. It shows the number of vertical pixels of resolution of the input signal. For details about replacing the lamp, see "Signal Name" under "Supported Signals" on page 37. Resolution RCVH Single This sub-menu item appears only when RGB is interlace...
Owners Manual
Page 37
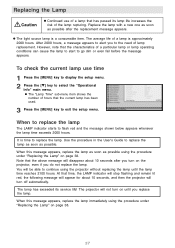
...sub-menu item shows the number of hours that has passed its service life! You will turn on the projector, even if you to the need of a lamp is approximately 2000 hours. Replacing the Lamp Caution z Continued use time 1 Press the [MENU] key to display the setup menu. 2 Press the...It is a consumable item. When this message appears, replace the lamp as soon as possible using the projector without replacing the lamp until you turn on until the lamp time reaches 2100 hours. At that time, the LAMP indicator will stop flashing and remain lit red, the following message will...
...sub-menu item shows the number of hours that has passed its service life! You will turn on the projector, even if you to the need of a lamp is approximately 2000 hours. Replacing the Lamp Caution z Continued use time 1 Press the [MENU] key to display the setup menu. 2 Press the...It is a consumable item. When this message appears, replace the lamp as soon as possible using the projector without replacing the lamp until you turn on until the lamp time reaches 2100 hours. At that time, the LAMP indicator will stop flashing and remain lit red, the following message will...
Owners Manual
Page 38
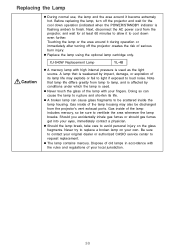
...fragments to be scattered inside of serious burn injury. z The lamp contains mercury. z Replace the lamp using the optional lamp cartridge only. Caution XJ-S43W Replacement Lamp YL-4B z A mercury lamp with high internal pressure is used as the light source. ...lamp housing. A lamp that lamp life differs greatly from the projector's vent exhaust ports. Before replacing the lamp, turn off the projector creates the risk of the lamp includes mercury, so be discharged from lamp to ventilate the area whenever the lamp breaks. Replacing the Lamp z During normal use, the lamp...
...fragments to be scattered inside of serious burn injury. z The lamp contains mercury. z Replace the lamp using the optional lamp cartridge only. Caution XJ-S43W Replacement Lamp YL-4B z A mercury lamp with high internal pressure is used as the light source. ...lamp housing. A lamp that lamp life differs greatly from the projector's vent exhaust ports. Before replacing the lamp, turn off the projector creates the risk of the lamp includes mercury, so be discharged from lamp to ventilate the area whenever the lamp breaks. Replacing the Lamp z During normal use, the lamp...

Owners Manual
Page 39
...grooves of a desk or on top of the lamp cartridge align with the replacement lamp. The projector does not come with a screwdriver. 1 Turn off the projector and unplug its AC power cord. 6 Pull up on the handle or ribbon to remove the lamp cartridge. 2 Wait for about 60 minutes to ...allow the projector's current lamp to cool down completely. 3 Turn over the projector and place it on some other stable surface. 4 Loosen the lamp cover screw, and then remove the lamp cover. 7 Insert the new lamp cartridge as far as...
...grooves of a desk or on top of the lamp cartridge align with the replacement lamp. The projector does not come with a screwdriver. 1 Turn off the projector and unplug its AC power cord. 6 Pull up on the handle or ribbon to remove the lamp cartridge. 2 Wait for about 60 minutes to ...allow the projector's current lamp to cool down completely. 3 Turn over the projector and place it on some other stable surface. 4 Loosen the lamp cover screw, and then remove the lamp cover. 7 Insert the new lamp cartridge as far as...

Owners Manual
Page 40
...?" If you need to select "Operational Info", and then press the [ENTER] key. 4 "Reset Lamp Time" is time to replace the lamp as soon as possible. To reset the lamp time 1 Turn on the projector. 2 Press the [MENU] key to display the setup menu. 3 Press the [ ] key to ... to avoid touching the lamp (glass) and the mirrors inside the projector. Caution z Take care to exit the setup menu. Doing so can cause the lamp to rupture, shorten lamp life, and otherwise affect lamp performance. 8 Secure the lamp cartridge with the three screws. 9 Return the lamp cover to perform the procedure...
...?" If you need to select "Operational Info", and then press the [ENTER] key. 4 "Reset Lamp Time" is time to replace the lamp as soon as possible. To reset the lamp time 1 Turn on the projector. 2 Press the [MENU] key to display the setup menu. 3 Press the [ ] key to ... to avoid touching the lamp (glass) and the mirrors inside the projector. Caution z Take care to exit the setup menu. Doing so can cause the lamp to rupture, shorten lamp life, and otherwise affect lamp performance. 8 Secure the lamp cartridge with the three screws. 9 Return the lamp cover to perform the procedure...

Owners Manual
Page 41
z Connecting to a power outlet causes the POWER/STANDBY and LAMP indicators on the top of the projector to light red, which will not be able to turn on the projector. 1 Use the bundled AC power cord to plug the projector into a power outlet. Perform the following procedure to turn on normally.... 41 To reset the lamp time after you use the existing lamp until its service life. 2 While holding down the projector's [ ] key, hold down the [AUTO] key for about five seconds. z This will reset the lamp time, cause the POWER/STANDBY indicator to change from...
z Connecting to a power outlet causes the POWER/STANDBY and LAMP indicators on the top of the projector to light red, which will not be able to turn on the projector. 1 Use the bundled AC power cord to plug the projector into a power outlet. Perform the following procedure to turn on normally.... 41 To reset the lamp time after you use the existing lamp until its service life. 2 While holding down the projector's [ ] key, hold down the [AUTO] key for about five seconds. z This will reset the lamp time, cause the POWER/STANDBY indicator to change from...
Owners Manual
Page 42
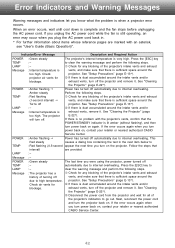
... Indicator/Error Message Description and Required Action POWER : Green steady The projector's internal temperature is sufficient space around the projector. to internal overheating. LAMP : - 1 Check for any blocking of the projector's intake vents and exhaust vents, and make sure that the POWER/...without flashing), and then turn power back on , contact your retailer or nearest authorized CASIO Service Center. 42 Follow the steps that interval) are marked with the projector's vents, confirm that there is very high. automatically due to clear the warning ...
... Indicator/Error Message Description and Required Action POWER : Green steady The projector's internal temperature is sufficient space around the projector. to internal overheating. LAMP : - 1 Check for any blocking of the projector's intake vents and exhaust vents, and make sure that the POWER/...without flashing), and then turn power back on , contact your retailer or nearest authorized CASIO Service Center. 42 Follow the steps that interval) are marked with the projector's vents, confirm that there is very high. automatically due to clear the warning ...
Owners Manual
Page 43
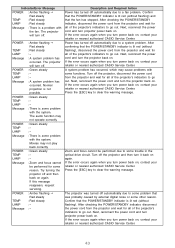
... POWER : Amber flashing Red steady TEMP : Red steady LAMP : Red steady Message : There is some problem with the system. POWER TEMP LAMP Message POWER TEMP LAMP Message POWER TEMP LAMP Message POWER TEMP LAMP Message POWER TEMP LAMP Message POWER TEMP LAMP Message : Amber flashing Red steady : Red steady :- ... red (without flashing) and that the fan has stopped. If the error occurs again when you turn projector power back on , contact your retailer or nearest authorized CASIO Service Center. If the error occurs again when you turn power back on , contact your retailer or nearest...
... POWER : Amber flashing Red steady TEMP : Red steady LAMP : Red steady Message : There is some problem with the system. POWER TEMP LAMP Message POWER TEMP LAMP Message POWER TEMP LAMP Message POWER TEMP LAMP Message POWER TEMP LAMP Message POWER TEMP LAMP Message : Amber flashing Red steady : Red steady :- ... red (without flashing) and that the fan has stopped. If the error occurs again when you turn projector power back on , contact your retailer or nearest authorized CASIO Service Center. If the error occurs again when you turn power back on , contact your retailer or nearest...
Owners Manual
Page 44
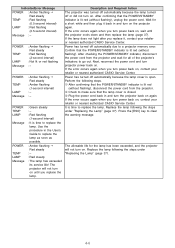
... turn on , wait until you turn the projector back on , contact your retailer or nearest authorized CASIO Service Center. Description and Required Action The projector was turned off automatically because the lamp turned off automatically due to replace the lamp. After confirming that the lamp cover is time to a projector memory error. If the error occurs again...
... turn on , wait until you turn the projector back on , contact your retailer or nearest authorized CASIO Service Center. Description and Required Action The projector was turned off automatically because the lamp turned off automatically due to replace the lamp. After confirming that the lamp cover is time to a projector memory error. If the error occurs again...


