
Owners Manual
Page 1
E DATA PROJECTOR XJ-S43W User's Guide z Be sure to keep all user documentation handy for future reference. 1 For details about setting up the projector and lamp replacement, see the User's Guide (Basic Operation). z Be sure to read the precautions in the separate User's Guide (Basic Operation).
E DATA PROJECTOR XJ-S43W User's Guide z Be sure to keep all user documentation handy for future reference. 1 For details about setting up the projector and lamp replacement, see the User's Guide (Basic Operation). z Be sure to read the precautions in the separate User's Guide (Basic Operation).
Owners Manual
Page 3
...13 To adjust the volume level 13 To mute the audio ...13 Eco Mode ...13 Using the [FUNC] Key 14 Configuring Advanced Projector Settings 15 Basic Setup Menu Operations 15 Displaying the Setup Menu 15 Configuring Setup Menu Settings 15 Basic Setup Menu Example 16 Direct ...Power On 18 Password Protecting the Projector 19 Inputting a Password 19 Using the Password Feature 19 Entering the Password when Turning On the Projector 21 Restoring Projector Settings to Their Initial Factory Defaults 22 Setup Menu Contents 23 Image Adjustment 1...
...13 To adjust the volume level 13 To mute the audio ...13 Eco Mode ...13 Using the [FUNC] Key 14 Configuring Advanced Projector Settings 15 Basic Setup Menu Operations 15 Displaying the Setup Menu 15 Configuring Setup Menu Settings 15 Basic Setup Menu Example 16 Direct ...Power On 18 Password Protecting the Projector 19 Inputting a Password 19 Using the Password Feature 19 Entering the Password when Turning On the Projector 21 Restoring Projector Settings to Their Initial Factory Defaults 22 Setup Menu Contents 23 Image Adjustment 1...

Owners Manual
Page 4
...Option Settings 2 Main Menu 32 Operational Info Main Menu 33 Restore All Defaults Main Menu 34 User Maintenance 35 Cleaning the Projector 35 Cleaning the Projector Exterior 35 Cleaning the Lens ...35 Cleaning Intake and Exhaust Vents 36 Replacing the Lamp 37 To check the current lamp... 42 Appendix 45 Connecting to a Component Video Output Device 45 Connecting the HDMI Output of a Video Device or Computer to the Projector 46 Remote Controller Signal Range 47 Replacing the Remote Controller Battery 48 Projection Distance and Screen Size 49 Aspect Ratio Setting and Projection ...
...Option Settings 2 Main Menu 32 Operational Info Main Menu 33 Restore All Defaults Main Menu 34 User Maintenance 35 Cleaning the Projector 35 Cleaning the Projector Exterior 35 Cleaning the Lens ...35 Cleaning Intake and Exhaust Vents 36 Replacing the Lamp 37 To check the current lamp... 42 Appendix 45 Connecting to a Component Video Output Device 45 Connecting the HDMI Output of a Video Device or Computer to the Projector 46 Remote Controller Signal Range 47 Replacing the Remote Controller Battery 48 Projection Distance and Screen Size 49 Aspect Ratio Setting and Projection ...

Owners Manual
Page 5
To perform this remote controller operation: [ENTER] [ZOOM +], [ZOOM -] [FOCUS ], [FOCUS ] Use this projector button: Button in the center of the cursor keys [ZOOM] button in combination with the [ ] and [ ] (or [ ] and [ ]) buttons [FOCUS] ...[MENU ENTER], [ESC], [ ], [INPUT], [AUTO], [ZOOM +], [ZOOM -], [FOCUS ], [FOCUS ]. The following key operations can also be performed on the projector instead of the operations in combination with the projector. z This manual assumes that you are explained using the remote controller that comes with the [ ] and [ ] (or [ ] and [ ]) buttons 5
To perform this remote controller operation: [ENTER] [ZOOM +], [ZOOM -] [FOCUS ], [FOCUS ] Use this projector button: Button in the center of the cursor keys [ZOOM] button in combination with the [ ] and [ ] (or [ ] and [ ]) buttons [FOCUS] ...[MENU ENTER], [ESC], [ ], [INPUT], [AUTO], [ZOOM +], [ZOOM -], [FOCUS ], [FOCUS ]. The following key operations can also be performed on the projector instead of the operations in combination with the projector. z This manual assumes that you are explained using the remote controller that comes with the [ ] and [ ] (or [ ] and [ ]) buttons 5
Owners Manual
Page 6
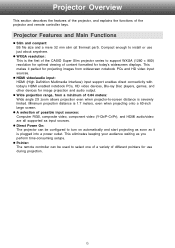
...and compact: B5 file size and a mere 32 mm slim (at thinnest part). z WXGA resolution: This is plugged into a power outlet. This makes it is the first of the CASIO Super Slim projector series to support WXGA (1280 × 800) resolution for optimal viewing of 0.84 meters: Wide angle 2X zoom... allows projection even when projector-to turn on automatically and start projecting as soon as it perfect...
...and compact: B5 file size and a mere 32 mm slim (at thinnest part). z WXGA resolution: This is plugged into a power outlet. This makes it is the first of the CASIO Super Slim projector series to support WXGA (1280 × 800) resolution for optimal viewing of 0.84 meters: Wide angle 2X zoom... allows projection even when projector-to turn on automatically and start projecting as soon as it perfect...

Owners Manual
Page 7
...] key [Enter] key* [MENU] key [P] (Power) key [INPUT] key [AUTO] key [ZOOM] key [ESC] key Cursor keys * The projector's enter key does not have anything printed on it means you should press the projector's enter key or the [ENTER] key of the remote controller. z To avoid running down the battery, store the...
...] key [Enter] key* [MENU] key [P] (Power) key [INPUT] key [AUTO] key [ZOOM] key [ESC] key Cursor keys * The projector's enter key does not have anything printed on it means you should press the projector's enter key or the [ENTER] key of the remote controller. z To avoid running down the battery, store the...

Owners Manual
Page 8
... source image and projection of operations you can perform the following operations while projecting an image. Image Operations During Projection You can perform while the projector is projecting an image. z This displays the brightness adjustment window. 2 Use the [ ] and [ ] keys to adjust image brightness. 3 To hide the window, press the [ESC...
... source image and projection of operations you can perform the following operations while projecting an image. Image Operations During Projection You can perform while the projector is projecting an image. z This displays the brightness adjustment window. 2 Use the [ ] and [ ] keys to adjust image brightness. 3 To hide the window, press the [ESC...

Owners Manual
Page 10
... image 1 While an image is on page 28. Note You can specify projection of the image from the input source and projects a black screen in projector memory. z This temporarily cuts off the image from an input source, press the [ESC] key. 10 Momentarily Cutting Off the Input Source Image 1 Press the...
... image 1 While an image is on page 28. Note You can specify projection of the image from the input source and projects a black screen in projector memory. z This temporarily cuts off the image from an input source, press the [ESC] key. 10 Momentarily Cutting Off the Input Source Image 1 Press the...
Owners Manual
Page 13
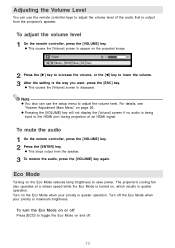
... the [VOLUME] key will not display the [Volume] screen if no audio is being input to adjust the volume level of an HDMI signal. The projector's cooling fan also operates at a slower speed while the Eco Mode is quieter operation. For details, see "Volume Adjustment Main Menu" on or off... . 13 z This stops output from the projector's speaker. Turn off the Eco Mode when your priority is turned on, which results in quieter operation. Adjusting the Volume Level You can use the...
... the [VOLUME] key will not display the [Volume] screen if no audio is being input to adjust the volume level of an HDMI signal. The projector's cooling fan also operates at a slower speed while the Eco Mode is quieter operation. For details, see "Volume Adjustment Main Menu" on or off... . 13 z This stops output from the projector's speaker. Turn off the Eco Mode when your priority is turned on, which results in quieter operation. Adjusting the Volume Level You can use the...
Owners Manual
Page 15
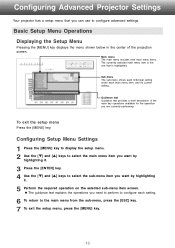
... exit the setup menu, press the [MENU] key. 15 z The guidance text explains the operations you can use to configure advanced settings. Configuring Advanced Projector Settings Your projector has a setup menu that is highlighted. Guidance text Guidance text provides a brief description of the projection screen. To exit the setup menu Press the...
... exit the setup menu, press the [MENU] key. 15 z The guidance text explains the operations you can use to configure advanced settings. Configuring Advanced Projector Settings Your projector has a setup menu that is highlighted. Guidance text Guidance text provides a brief description of the projection screen. To exit the setup menu Press the...

Owners Manual
Page 16
..." on the main menu, so simply press the [ENTER] key. 3 Press the [ ] key once to select "Contrast". 4 Use the [ ] (lighter) and [ ] (darker) keys to the projector. Basic Setup Menu Example The procedure below shows how to configure the following three settings: • Image Adjustment 1 Contrast • Image Adjustment 1 Color Mode •...
..." on the main menu, so simply press the [ENTER] key. 3 Press the [ ] key once to select "Contrast". 4 Use the [ ] (lighter) and [ ] (darker) keys to the projector. Basic Setup Menu Example The procedure below shows how to configure the following three settings: • Image Adjustment 1 Contrast • Image Adjustment 1 Color Mode •...

Owners Manual
Page 18
Important! This greatly reduces the amount of a breaker, etc. z For details about the startup sequence that it (and the lamp) might turn on the projector" in or pressing the [P] (power) key). To enable Direct Power On, display the Setup Menu, and then change the "Direct Power On" setting to ..., see "To turn on page 30. 18 Note, however, that the actual startup sequence (Standby State Power On Warm Up Projection Starts) that the projector performs is the same, regardless of whether Direct Power On is turned off by a power outage, tripping of time it takes until you do not...
Important! This greatly reduces the amount of a breaker, etc. z For details about the startup sequence that it (and the lamp) might turn on the projector" in or pressing the [P] (power) key). To enable Direct Power On, display the Setup Menu, and then change the "Direct Power On" setting to ..., see "To turn on page 30. 18 Note, however, that the actual startup sequence (Standby State Power On Warm Up Projection Starts) that the projector performs is the same, regardless of whether Direct Power On is turned off by a power outage, tripping of time it takes until you do not...
Owners Manual
Page 19
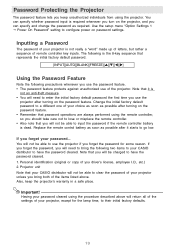
...lamp time, to configure power on the projector, and you can specify whether password input is the 8-key sequence that password operations are always performed using the projector. Projector unit Note that you use of your CASIO distributor to clear the password of remote ...controller key inputs. Password Protecting the Projector The password feature lets you keep the projector's warranty in a safe place. You can...
...lamp time, to configure power on the projector, and you can specify whether password input is the 8-key sequence that password operations are always performed using the projector. Projector unit Note that you use of your CASIO distributor to clear the password of remote ...controller key inputs. Password Protecting the Projector The password feature lets you keep the projector's warranty in a safe place. You can...

Owners Manual
Page 20
...Use the [ ] key to select "Power On Password", and then press the [ENTER] key. z This will display a dialog box prompting you can use the projector if you to step 7. 20 Press the [ESC] key to return to enter the current password. 4 Enter the current password. Press the [ESC] key. ...z If the projector is wrong." You will display a dialog box prompting you forget its password. z You can look it . [INPUT][AUTO][BLANK][FREEZE 5 After entering the ...
...Use the [ ] key to select "Power On Password", and then press the [ENTER] key. z This will display a dialog box prompting you can use the projector if you to step 7. 20 Press the [ESC] key to return to enter the current password. 4 Enter the current password. Press the [ESC] key. ...z If the projector is wrong." You will display a dialog box prompting you forget its password. z You can look it . [INPUT][AUTO][BLANK][FREEZE 5 After entering the ...

Owners Manual
Page 21
Entering the Password when Turning On the Projector Turning on the projector while password protection is enabled will be accessible to appear on password setting from "Off" to "On" causes the confirmation dialog box shown below to ... 1 Display the Power On Password setting screen by performing steps 1 through 5 of the procedure under "To change the password" on the projection screen. 21 All projector operations will cause a password input dialog box to you after you are finished, press the [MENU] key to appear. z Changing the power on the projection...
Entering the Password when Turning On the Projector Turning on the projector while password protection is enabled will be accessible to appear on password setting from "Off" to "On" causes the confirmation dialog box shown below to ... 1 Display the Power On Password setting screen by performing steps 1 through 5 of the procedure under "To change the password" on the projection screen. 21 All projector operations will cause a password input dialog box to you after you are finished, press the [MENU] key to appear. z Changing the power on the projection...

Owners Manual
Page 22
... you select Option Settings 1 in this section to restore all of the settings on a particular main menu or all settings on page 23. 22 Restoring Projector Settings to Their Initial Factory Defaults You can select Image Adjustment 1, Image Adjustment 2, Volume Adjustment, Screen Settings, Input Settings, Option Settings 1, or Option Settings 2. 3 Press...
... you select Option Settings 1 in this section to restore all of the settings on a particular main menu or all settings on page 23. 22 Restoring Projector Settings to Their Initial Factory Defaults You can select Image Adjustment 1, Image Adjustment 2, Volume Adjustment, Screen Settings, Input Settings, Option Settings 1, or Option Settings 2. 3 Press...

Owners Manual
Page 25
... default settings. Frequency R Signal Specific When vertical bands appear in the projected image while RGB is not correct. In particular, this sub-menu to the projector's VIDEO terminal. Image Adjustment 2 Main Menu Setting Name Input Setting Unit Description Vertical Position RCV Signal Specific Use this setting should cause the image to...
... default settings. Frequency R Signal Specific When vertical bands appear in the projected image while RGB is not correct. In particular, this sub-menu to the projector's VIDEO terminal. Image Adjustment 2 Main Menu Setting Name Input Setting Unit Description Vertical Position RCV Signal Specific Use this setting should cause the image to...
Owners Manual
Page 26
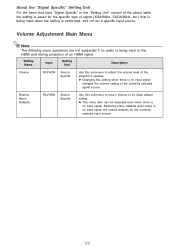
... Main Menu Note The following menu operations are not supported if no input signal. z Changing this sub-menu to adjust the volume level of the projector's speaker. Restoring menu defaults when there is no audio is being input when the setting is performed, and not for a specific input source. Restore Menu...
... Main Menu Note The following menu operations are not supported if no input signal. z Changing this sub-menu to adjust the volume level of the projector's speaker. Restoring menu defaults when there is no audio is being input when the setting is performed, and not for a specific input source. Restore Menu...

Owners Manual
Page 27
...of 16:9, the aspect ratio is fixed at 16:9 and the setting cannot be from the front of the screen or the back of the projector's projection screen. Projection Mode RCVHDN Single Important! Note that has been squeezed from 16:9 to project from the front of the screen. Rear... input source only): Projects with an aspect ratio of the original material. Full (RGB or HDMI (PC) input source only): Projects at the projector's maximum possible size while maintaining the input signal aspect ratio. Use this sub-menu to specify whether projection will resize the image horizontally to one...
...of 16:9, the aspect ratio is fixed at 16:9 and the setting cannot be from the front of the screen or the back of the projector's projection screen. Projection Mode RCVHDN Single Important! Note that has been squeezed from 16:9 to project from the front of the screen. Rear... input source only): Projects with an aspect ratio of the original material. Full (RGB or HDMI (PC) input source only): Projects at the projector's maximum possible size while maintaining the input signal aspect ratio. Use this sub-menu to specify whether projection will resize the image horizontally to one...

Owners Manual
Page 28
... sub-menu items on . Use this option when you do not want to specify whether or not a startup screen should be projected whenever the projector is no input signal to project a black screen. Blue: Select this option to project a blue screen. Black: Select this option to project ... are always returned to their initial default settings. On: Flips the projected image horizontally and vertically. Use this option to the projector. z Restoring menu defaults will restore defaults for use in an installation in logo screen at startup. Logo: Select this option to project the...
... sub-menu items on . Use this option when you do not want to specify whether or not a startup screen should be projected whenever the projector is no input signal to project a black screen. Blue: Select this option to project a blue screen. Black: Select this option to project ... are always returned to their initial default settings. On: Flips the projected image horizontally and vertically. Use this option to the projector. z Restoring menu defaults will restore defaults for use in an installation in logo screen at startup. Logo: Select this option to project the...

