User Manual
Page 1
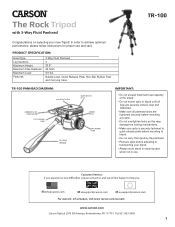
In order to tripod. • Do not carry the tripod by the panhead. • Remove optic before mounting to achieve optimum performance, please follow instructions for proper use . www.carson.com Carson Optical 2070 5th Avenue, Ronkonkoma, NY 11779 | Tel: 631-963-5000 1 Bubble Level, Quick Release Plate, Non-Slip Rubber Feet, and Carrying Case TR-100 PANHEAD DIAGRAM: MOUNTING SCREW QUICK RELEASE PLATE PAN LOCKING KNOB...
In order to tripod. • Do not carry the tripod by the panhead. • Remove optic before mounting to achieve optimum performance, please follow instructions for proper use . www.carson.com Carson Optical 2070 5th Avenue, Ronkonkoma, NY 11779 | Tel: 631-963-5000 1 Bubble Level, Quick Release Plate, Non-Slip Rubber Feet, and Carrying Case TR-100 PANHEAD DIAGRAM: MOUNTING SCREW QUICK RELEASE PLATE PAN LOCKING KNOB...
User Manual
Page 2
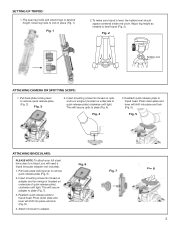
... height as needed to desired height. Fig. 2 Bubble Level ATTACHING CAMERA OR SPOTTING SCOPE: 1. Insert mounting screw into place and lock (Fig. 5). Fig. 4 3. Reattach quick release plate to tripod head. Reattach quick release plate to tripod head. Fig. 6 Fig. 7 Fig. 8 2 Fig. 3 2. This will secure adapter to a tripod, you will secure optic to plate (Fig. 4). Fig. 5 ATTACHING BINOCULARS: PLEASE NOTE: To attach your...
... height as needed to desired height. Fig. 2 Bubble Level ATTACHING CAMERA OR SPOTTING SCOPE: 1. Insert mounting screw into place and lock (Fig. 5). Fig. 4 3. Reattach quick release plate to tripod head. Reattach quick release plate to tripod head. Fig. 6 Fig. 7 Fig. 8 2 Fig. 3 2. This will secure adapter to a tripod, you will secure optic to plate (Fig. 4). Fig. 5 ATTACHING BINOCULARS: PLEASE NOTE: To attach your...
User Manual
Page 3
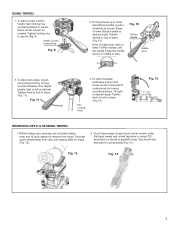
...optic upward to secure (Fig. 9). Raise center column as desired. Tighten locking ring to remove from optic and replace plate on tripod (Fig. 13). 2. Unscrew quick release plate from tripod. To put tripod away, loosen tripod center column collar. Secure all locks and place in middle of tube. Note: To keep level, raise or ... Fig. 14 3 Tilt optic to loosen. To tilt panhead up or down, twist tilt/pan handle counterclockwise to desired angle. USING TRIPOD: 1. Center Column Locking Ring Fig. 9 2. Fig. 11 Pan Locking Knob 4. Fig. 12 REMOVING OPTIC & STORING...
...optic upward to secure (Fig. 9). Raise center column as desired. Tighten locking ring to remove from optic and replace plate on tripod (Fig. 13). 2. Unscrew quick release plate from tripod. To put tripod away, loosen tripod center column collar. Secure all locks and place in middle of tube. Note: To keep level, raise or ... Fig. 14 3 Tilt optic to loosen. To tilt panhead up or down, twist tilt/pan handle counterclockwise to desired angle. USING TRIPOD: 1. Center Column Locking Ring Fig. 9 2. Fig. 11 Pan Locking Knob 4. Fig. 12 REMOVING OPTIC & STORING...
