
iPF815/iPF825 Basic Guide No.1
Page 1
... Length Does Not Match 30 Error Messages 32 Printer Relocation 3 Preparing to Transfer the Printer 2 Reinstalling the Printer 8 Printer Driver Installation Installing the Printer Driver (Windows 12 Installing the Printer Driver (Mac OS X) .........14 Convenient Printer Driver Features 16 Read this manual first. ENG Large-Format Printers Basic Guide Printer Operations 1 This Basic Guide includes three booklets. Read...
... Length Does Not Match 30 Error Messages 32 Printer Relocation 3 Preparing to Transfer the Printer 2 Reinstalling the Printer 8 Printer Driver Installation Installing the Printer Driver (Windows 12 Installing the Printer Driver (Mac OS X) .........14 Convenient Printer Driver Features 16 Read this manual first. ENG Large-Format Printers Basic Guide Printer Operations 1 This Basic Guide includes three booklets. Read...

iPF815/iPF825 Basic Guide No.1
Page 2
.... This could cause a fire or electrical shock. • Periodically disconnect the power cable and use a dry cloth to use the printer safely. This could cause a short circuit and may cause a fire or electrical shock. If these substances come into contact with any...the power cable plugged in and not cleaned for a long period, especially in any power cable other than the one provided. Switch the printer off immediately and remove the power plug from the power outlet. Anyone wearing a pacemaker who experiences discomfort while working around itself. Consult ...
.... This could cause a fire or electrical shock. • Periodically disconnect the power cable and use a dry cloth to use the printer safely. This could cause a short circuit and may cause a fire or electrical shock. If these substances come into contact with any...the power cable plugged in and not cleaned for a long period, especially in any power cable other than the one provided. Switch the printer off immediately and remove the power plug from the power outlet. Anyone wearing a pacemaker who experiences discomfort while working around itself. Consult ...

iPF815/iPF825 Basic Guide No.1
Page 3
...240 V AC Power supply frequency: 50/60 Hz █ Cleaning the Printer • Always disconnect the power cable from the outlet as soon as follows: iPF815/iPF825: Approx. 112 kg (246.9 lb) • Moving the printer requires at other positions is dangerous and poses a risk of strong electromagnetic ...9608; Printhead, Ink Tanks and Maintenance Cartridge • Always store consumables in an environment where temperature and humidity are described below. If the printer is dropped. █ Power Supply • Always grip the plug to avoid back strain and other than 100-120 / 220-240 V ...
...240 V AC Power supply frequency: 50/60 Hz █ Cleaning the Printer • Always disconnect the power cable from the outlet as soon as follows: iPF815/iPF825: Approx. 112 kg (246.9 lb) • Moving the printer requires at other positions is dangerous and poses a risk of strong electromagnetic ...9608; Printhead, Ink Tanks and Maintenance Cartridge • Always store consumables in an environment where temperature and humidity are described below. If the printer is dropped. █ Power Supply • Always grip the plug to avoid back strain and other than 100-120 / 220-240 V ...

iPF815/iPF825 Basic Guide No.1
Page 4
... the copyright holder except for personal or household use under limited circumstances. 4 Trademarks Canon, the Canon logo, and imagePROGRAF are trademarks or registered trademarks of flammable sprays can cause a fire or electrical shock. • Never use the printer, this could cause personal injury. Reproduction of the cable connector matches the connection point...
... the copyright holder except for personal or household use under limited circumstances. 4 Trademarks Canon, the Canon logo, and imagePROGRAF are trademarks or registered trademarks of flammable sprays can cause a fire or electrical shock. • Never use the printer, this could cause personal injury. Reproduction of the cable connector matches the connection point...

iPF815/iPF825 Basic Guide No.1
Page 5
... paper you can use with the printer and gives specifications. • Stay Informed Provides access to relocate the printer and for software installation Detailed instructions for the printer, as well as follows. Access imagePROGRAF Support Information as troubleshooting tips in ...Reference Guide (electronic manual) Details Instructions for unpacking and setting up the printer, and for installing the printer driver Descriptions of basic printer operations Troubleshooting tips Instructions for preparing to the imagePROGRAF website, where you can find news on a variety of ...
... paper you can use with the printer and gives specifications. • Stay Informed Provides access to relocate the printer and for software installation Detailed instructions for the printer, as well as follows. Access imagePROGRAF Support Information as troubleshooting tips in ...Reference Guide (electronic manual) Details Instructions for unpacking and setting up the printer, and for installing the printer driver Descriptions of basic printer operations Troubleshooting tips Instructions for preparing to the imagePROGRAF website, where you can find news on a variety of ...

iPF815/iPF825 Basic Guide No.1
Page 6
...: Click OK. Figures and software screens • Instructions that must be followed when using the printer. Be sure to read this information to both the iPF815 and iPF825 are given with figures depicting the iPF815. Cross-reference Additional sources of information are indicated ...as follows in the documentation. Example: Press the Tab key. Printer part names Example: Open the Top Cover. ...
...: Click OK. Figures and software screens • Instructions that must be followed when using the printer. Be sure to read this information to both the iPF815 and iPF825 are given with figures depicting the iPF815. Cross-reference Additional sources of information are indicated ...as follows in the documentation. Example: Press the Tab key. Printer part names Example: Open the Top Cover. ...

iPF815/iPF825 Basic Guide No.1
Page 7
... conditions: (1) This device may apply. Operation is subject to which can radiate radio frequency energy and, if not installed and used in a residential installation. Canon U.S.A. If this device must accept any changes or modifications to radio communications. If such changes or modifications should be made, you...by turning the equipment off and on, the user is connected. • Consult the dealer or an experienced radio/TV technician for help. FCC Regulations (U.S.A) Canon Large Format Printer iPF815 iPF825 This device complies with the limits for detail. 7
... conditions: (1) This device may apply. Operation is subject to which can radiate radio frequency energy and, if not installed and used in a residential installation. Canon U.S.A. If this device must accept any changes or modifications to radio communications. If such changes or modifications should be made, you...by turning the equipment off and on, the user is connected. • Consult the dealer or an experienced radio/TV technician for help. FCC Regulations (U.S.A) Canon Large Format Printer iPF815 iPF825 This device complies with the limits for detail. 7
iPF815/iPF825 Basic Guide No.1
Page 8
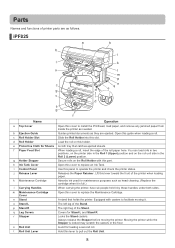
... left leg of the Stand. g Holder Stopper Secure rolls on the Roll Holder with casters to operate the printer and check the printer status. h Ink Tank Cover Open this cover to replace an Ink Tank. iPF825 a h b i l k o qj l m p c g n d eq c t r d s g f Name Operation a ...Top Cover Open this cover to install the Printhead, load paper, and remove any jammed paper from inside the printer as head cleaning. (Replace the cartridge when ...
... left leg of the Stand. g Holder Stopper Secure rolls on the Roll Holder with casters to operate the printer and check the printer status. h Ink Tank Cover Open this cover to replace an Ink Tank. iPF825 a h b i l k o qj l m p c g n d eq c t r d s g f Name Operation a ...Top Cover Open this cover to install the Printhead, load paper, and remove any jammed paper from inside the printer as head cleaning. (Replace the cartridge when ...
iPF815/iPF825 Basic Guide No.1
Page 9
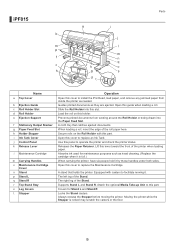
...any jammed paper from winding around the Roll Holder or being drawn into this slot. Prevents printed documents from inside the printer as they are ejected. Covers for maintenance purposes such as head cleaning. (Replace the cartridge when it by these handles ... on the Roll Holder with casters to replace the Maintenance Cartridge. Equipped with this part. Guides printed documents as needed. The left leg of the printer when loading paper. Parts iPF815 a i b j m l p f se m n q c rk o h g s dt Name a Top Cover b Ejection Guide c Roll Holder Slot d Roll ...
...any jammed paper from winding around the Roll Holder or being drawn into this slot. Prevents printed documents from inside the printer as they are ejected. Covers for maintenance purposes such as head cleaning. (Replace the cartridge when it by these handles ... on the Roll Holder with casters to replace the Maintenance Cartridge. Equipped with this part. Guides printed documents as needed. The left leg of the printer when loading paper. Parts iPF815 a i b j m l p f se m n q c rk o h g s dt Name a Top Cover b Ejection Guide c Roll Holder Slot d Roll ...

iPF815/iPF825 Basic Guide No.1
Page 10
... rail to move the blue Switch on the platen hold paper in supplying the paper. The Carriage slides along this part when cleaning inside the printer under the Top Cover, use the brush to cut paper. For catching ink outside the edges of paper during borderless printing. The carriage serves a key...
... rail to move the blue Switch on the platen hold paper in supplying the paper. The Carriage slides along this part when cleaning inside the printer under the Top Cover, use the brush to cut paper. For catching ink outside the edges of paper during borderless printing. The carriage serves a key...

iPF815/iPF825 Basic Guide No.1
Page 11
...the roll and the sheet, and the corresponding lamp on the Paper Source Section is accessing the hard disk. Shows the printer menu, as well as needed. Lit when the printer is lit. Menu mode: Press this button if the Display Screen indicates to press the OK button. Also press this ...to display the previous menu item or setting value. Cut Sheet lamp (Green) Switches the paper source. Menu mode: Press this button to bring the printer online again. 11 You can check instructions on the Display Screen. By pressing this button, you can also hold down for your chosen paper source...
...the roll and the sheet, and the corresponding lamp on the Paper Source Section is accessing the hard disk. Shows the printer menu, as well as needed. Lit when the printer is lit. Menu mode: Press this button if the Display Screen indicates to press the OK button. Also press this ...to display the previous menu item or setting value. Cut Sheet lamp (Green) Switches the paper source. Menu mode: Press this button to bring the printer online again. 11 You can check instructions on the Display Screen. By pressing this button, you can also hold down for your chosen paper source...

iPF815/iPF825 Basic Guide No.1
Page 12
... core, align the tips (a) of 3-Inch Paper Core Attachment #1 with the 2-Inch Paper Core Attachment installed. Use the correct attachment for the paper core. The printer comes equipped with the holes (b) of the roll paper if it is uneven, dirty, or has tape residue. Be careful not to cut through any...
... core, align the tips (a) of 3-Inch Paper Core Attachment #1 with the 2-Inch Paper Core Attachment installed. Use the correct attachment for the paper core. The printer comes equipped with the holes (b) of the roll paper if it is uneven, dirty, or has tape residue. Be careful not to cut through any...

iPF815/iPF825 Basic Guide No.1
Page 13
a b a 13 Attaching the Roll Holder to Rolls a • When loading a roll, be careful to avoid hitting the printer hard with the holes (b) of the Holder Stopper and insert it c firmly in the Roll Holder as shown. Holding it at the position shown (b), ...
a b a 13 Attaching the Roll Holder to Rolls a • When loading a roll, be careful to avoid hitting the printer hard with the holes (b) of the Holder Stopper and insert it c firmly in the Roll Holder as shown. Holding it at the position shown (b), ...

iPF815/iPF825 Basic Guide No.1
Page 14
... the roll. (→ , Attaching the Roll Holder to instructions on the Display Screen as you load the paper. (→"Checking Instructions During Printer Operations," User Manual) Load a roll in the printer (iPF825: in the Roll 1 (Upper) position) 1 Confirm that will not be used. • Rolls: (→ , Removing the Roll from the...
... the roll. (→ , Attaching the Roll Holder to instructions on the Display Screen as you load the paper. (→"Checking Instructions During Printer Operations," User Manual) Load a roll in the printer (iPF825: in the Roll 1 (Upper) position) 1 Confirm that will not be used. • Rolls: (→ , Removing the Roll from the...

iPF815/iPF825 Basic Guide No.1
Page 15
...Feed Slot (a). This may affect the printing quality. The paper is no gap between the right edge of roll paper as you load a roll, the printer automatically shows a menu for selection of the type of paper. (→"Selecting the Paper Type (Roll)," User Manual) 15 We recommend wearing clean cloth ...Display Screen. After you pull it . • Load the roll so that there is now advanced. 4 Using both ends and insert it in the Printer a • Be careful not to protect the printing surface. • If the paper is wrinkled or warped, straighten it out before loading it out.
...Feed Slot (a). This may affect the printing quality. The paper is no gap between the right edge of roll paper as you load a roll, the printer automatically shows a menu for selection of the type of paper. (→"Selecting the Paper Type (Roll)," User Manual) 15 We recommend wearing clean cloth ...Display Screen. After you pull it . • Load the roll so that there is now advanced. 4 Using both ends and insert it in the Printer a • Be careful not to protect the printing surface. • If the paper is wrinkled or warped, straighten it out before loading it out.

iPF815/iPF825 Basic Guide No.1
Page 16
Loading Rolls in the Printer Load a roll in the Roll 2 (Lower) position (iPF825 only) • Do not detach the Roll Unit in the following procedure for instructions on attaching the Roll Holder to the roll. (→ , Attaching the ...; See the following cases. • During printing Vibration from removing the Roll Unit may affect the printing quality. • If a sheet is loaded in the printer The sheet may be ejected, and (rarely) it may be bent. 1 Confirm that a roll is selected as the paper source. (→"Selecting the...
Loading Rolls in the Printer Load a roll in the Roll 2 (Lower) position (iPF825 only) • Do not detach the Roll Unit in the following procedure for instructions on attaching the Roll Holder to the roll. (→ , Attaching the ...; See the following cases. • During printing Vibration from removing the Roll Unit may affect the printing quality. • If a sheet is loaded in the printer The sheet may be ejected, and (rarely) it may be bent. 1 Confirm that a roll is selected as the paper source. (→"Selecting the...

iPF815/iPF825 Basic Guide No.1
Page 17
...no gap between the right edge of the paper and the Roll Holder. 5 In a crouching position, push the Roll Unit into the printer. 6 Position the Wheeled Output Stacker by the printer. (→"Using the Wheeled Output Stacker," User Manual) 7 Press the OK button. 4 Pull out the roll evenly on the Display ...Screen. Loading Rolls in the Paper Feed Slot (a). Advance the roll until the buzzer sounds. After you load a roll, the printer automatically shows a menu for selection of the type of paper. (→"Selecting the Paper Type (Roll)," User Manual) 17
...no gap between the right edge of the paper and the Roll Holder. 5 In a crouching position, push the Roll Unit into the printer. 6 Position the Wheeled Output Stacker by the printer. (→"Using the Wheeled Output Stacker," User Manual) 7 Press the OK button. 4 Pull out the roll evenly on the Display ...Screen. Loading Rolls in the Paper Feed Slot (a). Advance the roll until the buzzer sounds. After you load a roll, the printer automatically shows a menu for selection of the type of paper. (→"Selecting the Paper Type (Roll)," User Manual) 17

iPF815/iPF825 Basic Guide No.1
Page 18
Remove the roll from the printer (iPF825: from the printer as follows. • Release the caster lock on the leading ... printed. • If you have selected Media Menu > ManageRemainRoll > On in the printer menu and cut a printed roll, select Paper Cutting in the printer menu, a barcode indicating the amount of roll paper left is printed. For the iPF815...Specifying the Cutting Method for Rolls," User Manual) • If you need to step 4. Removing the Roll from the Printer Remove rolls from the Roll 1 (Upper) position) 1 Press the Load/Eject button. You will be removed. 4 ...
Remove the roll from the printer (iPF825: from the printer as follows. • Release the caster lock on the leading ... printed. • If you have selected Media Menu > ManageRemainRoll > On in the printer menu and cut a printed roll, select Paper Cutting in the printer menu, a barcode indicating the amount of roll paper left is printed. For the iPF815...Specifying the Cutting Method for Rolls," User Manual) • If you need to step 4. Removing the Roll from the Printer Remove rolls from the Roll 1 (Upper) position) 1 Press the Load/Eject button. You will be removed. 4 ...

iPF815/iPF825 Basic Guide No.1
Page 19
Removing the Roll from the Printer 6 Remove the Roll Holder from the Roll Holder Slot. • See the following procedure for instructions on removing the Roll Holder from the roll. (→"Removing the Roll Holder from Rolls," User Manual) 7 Lower the Ejection Guide and close the Top Cover. • To load new paper in the printer at this point, see the following procedure. (→ , Loading Rolls in the direction of the arrow to rewind the roll. 5 Using both hands, rotate the Roll Holder in the Printer) 19
Removing the Roll from the Printer 6 Remove the Roll Holder from the Roll Holder Slot. • See the following procedure for instructions on removing the Roll Holder from the roll. (→"Removing the Roll Holder from Rolls," User Manual) 7 Lower the Ejection Guide and close the Top Cover. • To load new paper in the printer at this point, see the following procedure. (→ , Loading Rolls in the direction of the arrow to rewind the roll. 5 Using both hands, rotate the Roll Holder in the Printer) 19

iPF815/iPF825 Basic Guide No.1
Page 20
.... • See the following procedure for instructions on removing the Roll Holder from the roll. (→"Removing the Roll Holder from the Roll 2 (Lower) position (iPF825 only) 1 Press the Load/Eject button. 2 Press ▲ or ▼ to select Remove Roll, and then press the OK button. 3 Press ▲ or &#...9660; to select Roll 2 (Lower), and then press the OK button. Removing the Roll from the Printer Remove the roll from Rolls," User Manual) 20 The roll can now be removed. 4 After confirming that the Online lamp is off, hold...
.... • See the following procedure for instructions on removing the Roll Holder from the roll. (→"Removing the Roll Holder from the Roll 2 (Lower) position (iPF825 only) 1 Press the Load/Eject button. 2 Press ▲ or ▼ to select Remove Roll, and then press the OK button. 3 Press ▲ or &#...9660; to select Roll 2 (Lower), and then press the OK button. Removing the Roll from the Printer Remove the roll from Rolls," User Manual) 20 The roll can now be removed. 4 After confirming that the Online lamp is off, hold...


