
iPF815/iPF825 Basic Guide No.1
Page 1
... Loading Rolls in the Printer 14 Removing the Roll from the Printer 18 Loading Sheets in the Printer 22 Removing Sheets 24 Consumables 25 Replacing Ink Tanks 26 Replacing the Maintenance Cartridge 32 Replacing the Printhead 37 Menu Map 42 Troubleshooting 2 Troubleshooting 2 If Roll Paper Jams 18 If a Sheet Jams 21...
... Loading Rolls in the Printer 14 Removing the Roll from the Printer 18 Loading Sheets in the Printer 22 Removing Sheets 24 Consumables 25 Replacing Ink Tanks 26 Replacing the Maintenance Cartridge 32 Replacing the Printhead 37 Menu Map 42 Troubleshooting 2 Troubleshooting 2 If Roll Paper Jams 18 If a Sheet Jams 21...

iPF815/iPF825 Basic Guide No.1
Page 3
...printer near sources of the unit. In the event of a printer malfunction, remove the power cable from the outlet as soon as follows: iPF815/iPF825: Approx. 112 kg (246.9 lb) • Moving the printer requires at least six people, one person on each side of strong electromagnetic ...printer, firmly grasp the Carrying Handles located on a heavy wool or shag carpet. The fibers may cause personal injuries. █ Printhead, Ink Tanks and Maintenance Cartridge • Always store consumables in a location that is exposed to 80% RH (with no condensation). • Never place the...
...printer near sources of the unit. In the event of a printer malfunction, remove the power cable from the outlet as soon as follows: iPF815/iPF825: Approx. 112 kg (246.9 lb) • Moving the printer requires at least six people, one person on each side of strong electromagnetic ...printer, firmly grasp the Carrying Handles located on a heavy wool or shag carpet. The fibers may cause personal injuries. █ Printhead, Ink Tanks and Maintenance Cartridge • Always store consumables in a location that is exposed to 80% RH (with no condensation). • Never place the...
iPF815/iPF825 Basic Guide No.1
Page 8
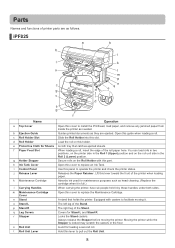
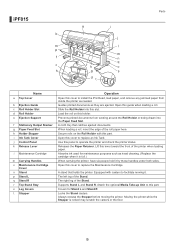
... Unit Lever Hold this slot. d Roll Holder Load the roll on the roll unit side in the Roll 2 (Lower) position. h Ink Tank Cover Open this holder. Lift this part. q Leg Covers Covers for loading a second roll. Moving the printer while the Stopper is... the printer status. b Ejection Guide Guides printed documents as they are as head cleaning. (Replace the cartridge when it by these handles under both sides. iPF825 a h b i l k o qj l m p c g n d eq c t r d s g f Name Operation a Top Cover Open this panel to install the Printhead, load ...
... Unit Lever Hold this slot. d Roll Holder Load the roll on the roll unit side in the Roll 2 (Lower) position. h Ink Tank Cover Open this holder. Lift this part. q Leg Covers Covers for loading a second roll. Moving the printer while the Stopper is... the printer status. b Ejection Guide Guides printed documents as they are as head cleaning. (Replace the cartridge when it by these handles under both sides. iPF825 a h b i l k o qj l m p c g n d eq c t r d s g f Name Operation a Top Cover Open this panel to install the Printhead, load ...
iPF815/iPF825 Basic Guide No.1
Page 9
... When carrying the printer, have six people hold it . A cloth tray that holds the printer. Absorbs ink used for Stand L and Stand R. Equipped with this part. Prevents printed documents from inside the printer as... rk o h g s dt Name a Top Cover b Ejection Guide c Roll Holder Slot d Roll Holder e Ejection Support f Stationary Output Stacker g Paper Feed Slot h Holder Stopper i Ink Tank Cover j Control Panel k Release Lever l Maintenance Cartridge m Carrying Handles n Maintenance Cartridge Cover o Stand p Stand L q Stand R r Top Stand Stay s Leg Covers t Stopper ...
... When carrying the printer, have six people hold it . A cloth tray that holds the printer. Absorbs ink used for Stand L and Stand R. Equipped with this part. Prevents printed documents from inside the printer as... rk o h g s dt Name a Top Cover b Ejection Guide c Roll Holder Slot d Roll Holder e Ejection Support f Stationary Output Stacker g Paper Feed Slot h Holder Stopper i Ink Tank Cover j Control Panel k Release Lever l Maintenance Cartridge m Carrying Handles n Maintenance Cartridge Cover o Stand p Stand L q Stand R r Top Stand Stay s Leg Covers t Stopper ...

iPF815/iPF825 Basic Guide No.1
Page 10
...holes on the platen hold paper in detecting the Carriage position. Holds ink tubes securely. • Do not touch the Linear Scale (k), Carriage Shaft (d), or Ink Tube Stabilizer (m). For catching ink outside the edges of paper during borderless printing. Also use this part...) i a j h m c k d Name a Top Cover Roller b Paper Alignment Line c Carriage d Carriage Shaft e Paper Retainer f Platen g Borderless Printing Ink Grooves h Cleaning Brush i Cutter Rail j Cutter Unit k Linear Scale l Switch m Ink Tube Stabilizer ef g b l Operation Prevents paper from rising when ejected.
...holes on the platen hold paper in detecting the Carriage position. Holds ink tubes securely. • Do not touch the Linear Scale (k), Carriage Shaft (d), or Ink Tube Stabilizer (m). For catching ink outside the edges of paper during borderless printing. Also use this part...) i a j h m c k d Name a Top Cover Roller b Paper Alignment Line c Carriage d Carriage Shaft e Paper Retainer f Platen g Borderless Printing Ink Grooves h Cleaning Brush i Cutter Rail j Cutter Unit k Linear Scale l Switch m Ink Tube Stabilizer ef g b l Operation Prevents paper from rising when ejected.

iPF815/iPF825 Basic Guide No.1
Page 11
.... The labels correspond to rewind rolls manually. Offline: Press this button to display the menu one level lower. Press this button to the ink levels on the Paper Source Section is loaded, and instructions for removing paper are displayed. By pressing this button, the paper source switches between... is accessing the hard disk. Offline mode: Press this button to bring the printer online again. 11 Hold down this button to display information about ink, paper, and so on and off. Displays the main menu of the printer. (→ , Menu Map) Indicates the status of ejection, as...
.... The labels correspond to rewind rolls manually. Offline: Press this button to display the menu one level lower. Press this button to the ink levels on the Paper Source Section is loaded, and instructions for removing paper are displayed. By pressing this button, the paper source switches between... is accessing the hard disk. Offline mode: Press this button to bring the printer online again. 11 Hold down this button to display information about ink, paper, and so on and off. Displays the main menu of the printer. (→ , Menu Map) Indicates the status of ejection, as...

iPF815/iPF825 Basic Guide No.1
Page 24
... ejected from the printer as follows. 1 Press the Load/Eject button. Before ejecting paper, press the Stop button to cancel printing, print job processing, or ink drying. 2 Press the OK button to remove sheets from the printer. OK • Paper cannot be ejected by using the Load/Eject button when print...
... ejected from the printer as follows. 1 Press the Load/Eject button. Before ejecting paper, press the Stop button to cancel printing, print job processing, or ink drying. 2 Press the OK button to remove sheets from the printer. OK • Paper cannot be ejected by using the Load/Eject button when print...

iPF815/iPF825 Basic Guide No.1
Page 25
... the following Ink Tank serial numbers. 330 ml (11.2 fl oz) • MBK Ink Tank PFI-303MBK • BK Ink Tank PFI-303BK • C Ink Tank PFI-303C • M Ink Tank PFI-303M • Y Ink Tank PFI-303Y 700 ml (23.7 fl oz) • MBK Ink Tank PFI-703MBK • BK Ink Tank PFI-...703BK • C Ink Tank PFI-703C • M Ink Tank PFI-703M • Y Ink Tank PFI...
... the following Ink Tank serial numbers. 330 ml (11.2 fl oz) • MBK Ink Tank PFI-303MBK • BK Ink Tank PFI-303BK • C Ink Tank PFI-303C • M Ink Tank PFI-303M • Y Ink Tank PFI-303Y 700 ml (23.7 fl oz) • MBK Ink Tank PFI-703MBK • BK Ink Tank PFI-...703BK • C Ink Tank PFI-703C • M Ink Tank PFI-703M • Y Ink Tank PFI...

iPF815/iPF825 Basic Guide No.1
Page 26
... message requests you to check the amount of ink left or replace ink tanks. Residual ink may be ink around the ink supply section of printing within six months after turning on the printer, or during replacement. CMY M B B K K • Ink Tank replacement is possible even when print jobs are... or if paper is Online or Offline, or if messages advise you to "Remove the Ink Tanks" without ink tanks installed for ink tank replacement Ink Tank replacement is empty. C MY M B B K K Ink tank is possible in the following the instructions in 330 ml (11.2 fl oz)...
... message requests you to check the amount of ink left or replace ink tanks. Residual ink may be ink around the ink supply section of printing within six months after turning on the printer, or during replacement. CMY M B B K K • Ink Tank replacement is possible even when print jobs are... or if paper is Online or Offline, or if messages advise you to "Remove the Ink Tanks" without ink tanks installed for ink tank replacement Ink Tank replacement is empty. C MY M B B K K Ink tank is possible in the following the instructions in 330 ml (11.2 fl oz)...

iPF815/iPF825 Basic Guide No.1
Page 27
...to display MAIN MENU. Remove the Ink Tank at this point. Remove the ink tanks 1 Open the Ink Tank Cover of the tank for ink tank replacement Replacing Ink Tanks • This step is no ink left. Check the message on the Display Screen requests you to replace ink tanks. Access the menu for ...button to select Rep. A message on the Display Screen and press the OK button. Ink Tank, and then press the ► button. 3 Press ▲ or ▼ to open the Ink Tank Cover. B 27 The Ink Lamp flashes quickly if there is not necessary if a message requests you to select...
...to display MAIN MENU. Remove the Ink Tank at this point. Remove the ink tanks 1 Open the Ink Tank Cover of the tank for ink tank replacement Replacing Ink Tanks • This step is no ink left. Check the message on the Display Screen requests you to replace ink tanks. Access the menu for ...button to select Rep. A message on the Display Screen and press the OK button. Ink Tank, and then press the ► button. 3 Press ▲ or ▼ to open the Ink Tank Cover. B 27 The Ink Lamp flashes quickly if there is not necessary if a message requests you to select...

iPF815/iPF825 Basic Guide No.1
Page 28
... MBK BK M 330 ml tanks b A A Y GY MBK BK M 700 ml tanks a 28 Press the OK button. • Store the Ink Tank you removed in the box with the ink holes (a) facing up. Otherwise, ink may leak and cause stains. A A M BK R GG B A A M BK R GG B B a 330 ml tanks A A A A B GG B B a 700 ml... tanks • Push the Ink Tank Lock Lever down to the front. Lift the Ink Tank Lock Lever until it down until...
... MBK BK M 330 ml tanks b A A Y GY MBK BK M 700 ml tanks a 28 Press the OK button. • Store the Ink Tank you removed in the box with the ink holes (a) facing up. Otherwise, ink may leak and cause stains. A A M BK R GG B A A M BK R GG B B a 330 ml tanks A A A A B GG B B a 700 ml... tanks • Push the Ink Tank Lock Lever down to the front. Lift the Ink Tank Lock Lever until it down until...

iPF815/iPF825 Basic Guide No.1
Page 29
... printing quality. • Do not remove and agitate ink tanks that have already been installed in two hands, as shown. Install the ink tanks 1 Before opening the pouch, tilt the Ink Tank to the left and right gently seven or eight times. Replacing Ink Tanks 330 ml tanks 700 ml tanks • If... you do not agitate the Ink Tank, the ink may sediment, which may affect printing quality. 2 Open the pouch and remove the Ink Tank. 330 ml tanks 700 ml tanks • Never touch...
... printing quality. • Do not remove and agitate ink tanks that have already been installed in two hands, as shown. Install the ink tanks 1 Before opening the pouch, tilt the Ink Tank to the left and right gently seven or eight times. Replacing Ink Tanks 330 ml tanks 700 ml tanks • If... you do not agitate the Ink Tank, the ink may sediment, which may affect printing quality. 2 Open the pouch and remove the Ink Tank. 330 ml tanks 700 ml tanks • Never touch...

iPF815/iPF825 Basic Guide No.1
Page 30
... ml tanks A A Y M GY MBK BK 700 ml tanks 30 Replacing Ink Tanks 3 Press the OK button and insert the Ink Tank into the holder with the ink holes facing down until it stops, and then push it down , as shown. If the Ink Tank does not fit in the holder if the color or... orientation is incorrect. Make sure the color of the Ink Tank Lock Lever matches the color of the Ink Tank, and check the orientation of the Ink Tank before reloading it. 4 Lift the Ink Tank Lock Lever until it into place. A A Y GY MBK BK M 330 ml tanks A A Y GY...
... ml tanks A A Y M GY MBK BK 700 ml tanks 30 Replacing Ink Tanks 3 Press the OK button and insert the Ink Tank into the holder with the ink holes facing down until it stops, and then push it down , as shown. If the Ink Tank does not fit in the holder if the color or... orientation is incorrect. Make sure the color of the Ink Tank Lock Lever matches the color of the Ink Tank, and check the orientation of the Ink Tank before reloading it. 4 Lift the Ink Tank Lock Lever until it into place. A A Y GY MBK BK M 330 ml tanks A A Y GY...

iPF815/iPF825 Basic Guide No.1
Page 31
5 Make sure the Ink Lamp is lit. • If the Ink Lamp is not lit, reload the tank. 6 Close the Ink Tank Cover. Replacing Ink Tanks M 31 The printer will go online or offline.
5 Make sure the Ink Lamp is lit. • If the Ink Lamp is not lit, reload the tank. 6 Close the Ink Tank Cover. Replacing Ink Tanks M 31 The printer will go online or offline.

iPF815/iPF825 Basic Guide No.1
Page 32
... leak out. • If you pause printing to check the remaining cartridge capacity or replace the Maintenance Cartridge. Otherwise, ink may leak and cause stains. • Ink adheres to the top of the Maintenance Cartridge after turning on the printer, during replacement. Offline FeedPaper 1 Glossy Photo 2 Plain Paper If ... Cartridge, avoid dropping the cartridge or storing it at an angle. Handle the Maintenance Cartridge carefully during Printhead cleaning, or while ink is Offline, or if messages advise you to be blurry. 32 In this case, go to replace it. • To prevent...
... leak out. • If you pause printing to check the remaining cartridge capacity or replace the Maintenance Cartridge. Otherwise, ink may leak and cause stains. • Ink adheres to the top of the Maintenance Cartridge after turning on the printer, during replacement. Offline FeedPaper 1 Glossy Photo 2 Plain Paper If ... Cartridge, avoid dropping the cartridge or storing it at an angle. Handle the Maintenance Cartridge carefully during Printhead cleaning, or while ink is Offline, or if messages advise you to be blurry. 32 In this case, go to replace it. • To prevent...

iPF815/iPF825 Basic Guide No.1
Page 33
...; button. 4 Press ▲ or ▼ to display MAIN MENU. A message on each printer. If you drop a used Maintenance Cartridge or store it at an angle, ink may leak and cause stains. • The remaining Maintenance Cartridge capacity is recorded on the Display Screen advises you pull it level as you to...
...; button. 4 Press ▲ or ▼ to display MAIN MENU. A message on each printer. If you drop a used Maintenance Cartridge or store it at an angle, ink may leak and cause stains. • The remaining Maintenance Cartridge capacity is recorded on the Display Screen advises you pull it level as you to...

iPF815/iPF825 Basic Guide No.1
Page 34
..., packaging material, and Shaft Cleaner (a), and then take out the Maintenance Cartridge (b). • Never touch the metal contacts (a). a 7 Close the Maintenance Cartridge Cover. 34 Otherwise, ink may damage the Maintenance Cartridge. 4 Keep the used Maintenance Cartridge level as you put the used Maintenance Cartridge back in the plastic bag. This may...
..., packaging material, and Shaft Cleaner (a), and then take out the Maintenance Cartridge (b). • Never touch the metal contacts (a). a 7 Close the Maintenance Cartridge Cover. 34 Otherwise, ink may damage the Maintenance Cartridge. 4 Keep the used Maintenance Cartridge level as you put the used Maintenance Cartridge back in the plastic bag. This may...

iPF815/iPF825 Basic Guide No.1
Page 35
... Cleaner replacement, press ▲ or ▼ to remove it toward the front. Accidentally opening the Printhead Fixer Lever toward the front will draw out ink, which consumes ink. 3 Hold the Shaft Cleaner on the right side of the Carriage by the grips (a) and pull it . a 35 S. Cleaner in the MAIN MENU. 2 Open...
... Cleaner replacement, press ▲ or ▼ to remove it toward the front. Accidentally opening the Printhead Fixer Lever toward the front will draw out ink, which consumes ink. 3 Hold the Shaft Cleaner on the right side of the Carriage by the grips (a) and pull it . a 35 S. Cleaner in the MAIN MENU. 2 Open...

iPF815/iPF825 Basic Guide No.1
Page 37
... removing the Printhead from the printer menu • If the Display Screen indicates Open top cover and replace the printhead. • If your Canon dealer has advised you remove. Access the menu for replacement. 1 If the roll is not ejected because of the cutting method selected, cut ... situations. • If the printing quality does not improve even after one or two cycles of the Printhead become dirty during replacement. The ink may affect printing quality. The metal parts of Head Cleaning B from the pouch, install it . When to replace the Printhead Compatible printheads ...
... removing the Printhead from the printer menu • If the Display Screen indicates Open top cover and replace the printhead. • If your Canon dealer has advised you remove. Access the menu for replacement. 1 If the roll is not ejected because of the cutting method selected, cut ... situations. • If the printing quality does not improve even after one or two cycles of the Printhead become dirty during replacement. The ink may affect printing quality. The metal parts of Head Cleaning B from the pouch, install it . When to replace the Printhead Compatible printheads ...

iPF815/iPF825 Basic Guide No.1
Page 38
.... After about two minutes, a message is dirty, use a damp cloth that you to wipe it clean. • Never touch the metal contacts of the Carriage. Ink is now filled. This may damage the printer. 38 Replace the printhead 1 Open the Top Cover.
.... After about two minutes, a message is dirty, use a damp cloth that you to wipe it clean. • Never touch the metal contacts of the Carriage. Ink is now filled. This may damage the printer. 38 Replace the printhead 1 Open the Top Cover.


