
User Manual for Windows
Page 3
Contents Contents Introduction 1 How to use this manual 1 About This User Manual...1 HTML Version of the Manual for Printing 3 Printer Parts 7 Printer parts...7 Front...7 Back...9 Top Cover (Inside)...10 Carriage...11 Ink Tank Cover (Inside)...12 Control Panel...14 Stand...16 Media ...
Contents Contents Introduction 1 How to use this manual 1 About This User Manual...1 HTML Version of the Manual for Printing 3 Printer Parts 7 Printer parts...7 Front...7 Back...9 Top Cover (Inside)...10 Carriage...11 Ink Tank Cover (Inside)...12 Control Panel...14 Stand...16 Media ...

User Manual for Windows
Page 4
...Workflow 142 Printing procedure 142 Loading and Printing on Rolls 142 Loading and Printing on Sheets 146 Printing Options Using Rolls and Sheets 149 Manually Loading Paper to the Position for Printing 150 Printing from Windows...151 Printing from Mac OS X...152 Printing from Mac OS 9...154 ...182 Removing the Roll from the Printer 186 Selecting the Paper Type (Roll 188 Specifying the Paper Length (Roll 189 Feeding Roll Paper Manually 190 Detection of the Remaining Roll Paper 191 Cutting the Leading Edge of Roll Paper Automatically 192 Specifying the Cutting Method for Rolls ...
...Workflow 142 Printing procedure 142 Loading and Printing on Rolls 142 Loading and Printing on Sheets 146 Printing Options Using Rolls and Sheets 149 Manually Loading Paper to the Position for Printing 150 Printing from Windows...151 Printing from Mac OS X...152 Printing from Mac OS 9...154 ...182 Removing the Roll from the Printer 186 Selecting the Paper Type (Roll 188 Specifying the Paper Length (Roll 189 Feeding Roll Paper Manually 190 Detection of the Remaining Roll Paper 191 Cutting the Leading Edge of Roll Paper Automatically 192 Specifying the Cutting Method for Rolls ...

User Manual for Windows
Page 5
... the Paper Source 211 Loading the Sheet in the Printer 212 Selecting the Paper Type (Sheet 215 Removing the Sheet...216 Clearing a Jammed Sheet...217 Manually Loading Paper to the Position for Printing 220 Output Stacker 221 Using the Output Stacker...221 Stowing the Output Stacker...226 Media take-up unit...
... the Paper Source 211 Loading the Sheet in the Printer 212 Selecting the Paper Type (Sheet 215 Removing the Sheet...216 Clearing a Jammed Sheet...217 Manually Loading Paper to the Position for Printing 220 Output Stacker 221 Using the Output Stacker...221 Stowing the Output Stacker...226 Media take-up unit...
User Manual for Windows
Page 10
... Protocols 631 Configuring NetWare Network Settings 633 Configuring the Printer Driver Destination (Windows 634 Installing imagePROGRAF Device Setup Utility 635 Configuring the IP Address Using imagePROGRAF Device Setup Utility 636 Network Setting (Macintosh 637 Configuring the Printer's AppleTalk Network Settings 637... 649 Correcting Print Misalignment 649 Adjusting the Printhead Alignment Automatically 649 Adjusting the Printhead Alignment Manually 651 Adjusting the Printhead Height 653 Adjusting the feed amount 654 Adjusting the Feed Amount Automatically 654 Adjusting the Feed...
... Protocols 631 Configuring NetWare Network Settings 633 Configuring the Printer Driver Destination (Windows 634 Installing imagePROGRAF Device Setup Utility 635 Configuring the IP Address Using imagePROGRAF Device Setup Utility 636 Network Setting (Macintosh 637 Configuring the Printer's AppleTalk Network Settings 637... 649 Correcting Print Misalignment 649 Adjusting the Printhead Alignment Automatically 649 Adjusting the Printhead Alignment Manually 651 Adjusting the Printhead Height 653 Adjusting the feed amount 654 Adjusting the Feed Amount Automatically 654 Adjusting the Feed...

User Manual for Windows
Page 11
... indicates the system is filling with ink 731 Cannot print over a network 732 Cannot connect the printer to the network 732 Configuring the Communication Mode Manually 733 Cannot print over a TCP/IP network 734 Cannot print over AppleTalk or Bonjour networks 735 Cannot print over a NetWare network 736 The printer stops...
... indicates the system is filling with ink 731 Cannot print over a network 732 Cannot connect the printer to the network 732 Configuring the Communication Mode Manually 733 Cannot print over a TCP/IP network 734 Cannot print over AppleTalk or Bonjour networks 735 Cannot print over a NetWare network 736 The printer stops...

User Manual for Windows
Page 15
...on the control panel and user interface elements in software (such as menus and buttons) are indicated as follows in this User Manual. To ensure safe use, always follow these precautions. Caution Indicates caution items for which operating error poses a risk of printer... parts are indicated as follows in this User Manual. Introduction 1 Printer part names Example: Open the Top Cover . Control Panel Interface Items and Messages Example: Head Cleaning is displayed....
...on the control panel and user interface elements in software (such as menus and buttons) are indicated as follows in this User Manual. To ensure safe use, always follow these precautions. Caution Indicates caution items for which operating error poses a risk of printer... parts are indicated as follows in this User Manual. Introduction 1 Printer part names Example: Open the Top Cover . Control Panel Interface Items and Messages Example: Head Cleaning is displayed....

User Manual for Windows
Page 16
... screens because of subsequent updates. • Windows XP screens are used in explanations of Windows operations in this User Manual. • Trademarks • Canon, the Canon logo, and imagePROGRAF are trademarks or registered trademarks of Canon Inc. • Microsoft and Windows are registered trademarks of Microsoft Corporation in the United States and other countries. •...
... screens because of subsequent updates. • Windows XP screens are used in explanations of Windows operations in this User Manual. • Trademarks • Canon, the Canon logo, and imagePROGRAF are trademarks or registered trademarks of Canon Inc. • Microsoft and Windows are registered trademarks of Microsoft Corporation in the United States and other countries. •...

User Manual for Windows
Page 17
This section describes how to use this manual HTML Version of the Manual for printing. How to print sections of the manual, using the content of the sections in "Using the Printer" on the top page are combined in the left frame, click Printing Procedure. Introduction 3 Under Basic Printing Workow in one le for Printing For your convenience when printing this manual, HTML versions of Printing Procedure in Basic Printing Workow as an example. 1. On the top page, click Basic Printing Workow. 2. All topics in a section are available.
This section describes how to use this manual HTML Version of the Manual for printing. How to print sections of the manual, using the content of the sections in "Using the Printer" on the top page are combined in the left frame, click Printing Procedure. Introduction 3 Under Basic Printing Workow in one le for Printing For your convenience when printing this manual, HTML versions of Printing Procedure in Basic Printing Workow as an example. 1. On the top page, click Basic Printing Workow. 2. All topics in a section are available.

User Manual for Windows
Page 18
How to the HTML for printing. 4 Introduction An HTML version of Printing Procedure, click Access to use this manual 3. In the title area of the topics in Printing Procedure is displayed, suitable for printing.
How to the HTML for printing. 4 Introduction An HTML version of Printing Procedure, click Access to use this manual 3. In the title area of the topics in Printing Procedure is displayed, suitable for printing.

User Manual for Windows
Page 19
How to display the Print dialog box. Access the printing dialog box as follows, depending on your computer's operating system. • Windows In Windows, right-click anywhere in the explanation area except on a gure or a link. Introduction 5 In the shortcut menu, click Print to display the Print dialog box. • Macintosh On a Macintosh computer, click anywhere in the explanation area except on a gure or a link while holding the Ctrl key. In the shortcut menu, click Print Frame to use this manual 4.
How to display the Print dialog box. Access the printing dialog box as follows, depending on your computer's operating system. • Windows In Windows, right-click anywhere in the explanation area except on a gure or a link. Introduction 5 In the shortcut menu, click Print to display the Print dialog box. • Macintosh On a Macintosh computer, click anywhere in the explanation area except on a gure or a link while holding the Ctrl key. In the shortcut menu, click Print Frame to use this manual 4.

User Manual for Windows
Page 20
How to use this manual 5. Specify conditions as needed, and then click Print (Windows) or Print (Macintosh). • Windows • Macintosh Note • To print "Software" on the top page or individual topics that are displayed, follow steps 4 and 5. 6 Introduction
How to use this manual 5. Specify conditions as needed, and then click Print (Windows) or Print (Macintosh). • Windows • Macintosh Note • To print "Software" on the top page or individual topics that are displayed, follow steps 4 and 5. 6 Introduction
User Manual for Windows
Page 21
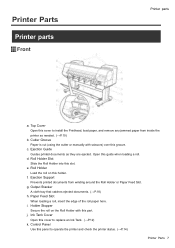
... check the printer status. (→P.14) Printer Parts 7 Open this slot. e. g. Control Panel Use this holder. Cutter Groove Paper is cut (using the cutter or manually with this groove. Roll Holder Load the roll on the Roll Holder with scissors) over this part. f. c. Ejection Support Prevents printed documents from inside the...
... check the printer status. (→P.14) Printer Parts 7 Open this slot. e. g. Control Panel Use this holder. Cutter Groove Paper is cut (using the cutter or manually with this groove. Roll Holder Load the roll on the Roll Holder with scissors) over this part. f. c. Ejection Support Prevents printed documents from inside the...

User Manual for Windows
Page 23
... printer, have four people hold it by these handles under both sides. This port is possible between the computer and printer. b. d. Accessory Pocket Holds printer manuals, assembly tools, and other items. g. Back Printer parts a. Ethernet Port Connect an Ethernet cable to this port. f. e. Printer Parts 9 The lamp is lit if the...
... printer, have four people hold it by these handles under both sides. This port is possible between the computer and printer. b. d. Accessory Pocket Holds printer manuals, assembly tools, and other items. g. Back Printer parts a. Ethernet Port Connect an Ethernet cable to this port. f. e. Printer Parts 9 The lamp is lit if the...

User Manual for Windows
Page 29
...; Button Menu mode: Press this button to display the menu one level lower. o. p. n. Load/Eject Button By pressing this button to feed the roll manually in progress or end the ink drying period. Note • In Sleep mode, you can check instructions on the Display Screen. The label corresponds to... press the OK button. k. ▲ Button Ofine: Press this button to rewind rolls manually. (→P.190) Menu mode: Press this button if the Display Screen indicates to the ink level on loading and removing paper. OK Button In ...
...; Button Menu mode: Press this button to display the menu one level lower. o. p. n. Load/Eject Button By pressing this button to feed the roll manually in progress or end the ink drying period. Note • In Sleep mode, you can check instructions on the Display Screen. The label corresponds to... press the OK button. k. ▲ Button Ofine: Press this button to rewind rolls manually. (→P.190) Menu mode: Press this button if the Display Screen indicates to the ink level on loading and removing paper. OK Button In ...

User Manual for Windows
Page 35
... can be processed, such as if errors occur. • Menu mode Menus are displayed on the printer, and you can feed or cut roll paper manually. The printer automatically enters Sleep mode to receive jobs sent from the computer are processed immediately. While the printer is of ine automatically if...
... can be processed, such as if errors occur. • Menu mode Menus are displayed on the printer, and you can feed or cut roll paper manually. The printer automatically enters Sleep mode to receive jobs sent from the computer are processed immediately. While the printer is of ine automatically if...

User Manual for Windows
Page 42
... items, see "Main Menu Operations". (→P.30) 28 Printer Parts The following operations are available from the main menu during printing. • Printhead cleaning • Manual adjustment of the paper feed amount • Display of printer-related information • Job management For a description of specic items available in the main...
... items, see "Main Menu Operations". (→P.30) 28 Printer Parts The following operations are available from the main menu during printing. • Printhead cleaning • Manual adjustment of the paper feed amount • Display of printer-related information • Job management For a description of specic items available in the main...

User Manual for Windows
Page 44
... Menu mode after you press the Menu button when printing is in progress) Note • The main menu will not be displayed in this User Manual. • Accessing Menus (→P.31) • Specifying menu items (→P.32) • Specifying numerical values (→P.33) • Executing menu commands (→P.34) 30 Printer...
... Menu mode after you press the Menu button when printing is in progress) Note • The main menu will not be displayed in this User Manual. • Accessing Menus (→P.31) • Specifying menu items (→P.32) • Specifying numerical values (→P.33) • Executing menu commands (→P.34) 30 Printer...

User Manual for Windows
Page 53
... Weak Weakest Width Detection Off On * NearEnd RollMrgn 5mm 20mm Cut Speed Fast Standard Slow Trim Edge First Automatic Off On Cutting Mode Automatic Eject Manual Bordless Margin Automatic Fixed CutDustReduct. Control Panel First Level Second Level Job Management Job Queue Ope.
... Weak Weakest Width Detection Off On * NearEnd RollMrgn 5mm 20mm Cut Speed Fast Standard Slow Trim Edge First Automatic Off On Cutting Mode Automatic Eject Manual Bordless Margin Automatic Fixed CutDustReduct. Control Panel First Level Second Level Job Management Job Queue Ope.

User Manual for Windows
Page 54
Manual Band Adj No Yes Adjust Length (*3) No Yes Calibration Auto Adjust Calibration Log Use Adj. Fourth Level Delete No Yes No Yes No Yes Off On * No Yes No Yes No Yes Date Paper Type Disabled Enabled * No Yes Fifth Level 40 Printer Parts Auto Print Manual Head Adj (*10) Auto Band Adj. Value Return Defaults EOP Timer 10 sec. 30 sec. 1 min. 2 min. 5 min. 10 min. * 30 min. Control Panel First Level Adjust Printer Interface Setup Second Level Third Level Print Job List Auto Head Adj. Advanced Adj. No Yes Standard Adj. Advanced Adj. Standard Adj.
Manual Band Adj No Yes Adjust Length (*3) No Yes Calibration Auto Adjust Calibration Log Use Adj. Fourth Level Delete No Yes No Yes No Yes Off On * No Yes No Yes No Yes Date Paper Type Disabled Enabled * No Yes Fifth Level 40 Printer Parts Auto Print Manual Head Adj (*10) Auto Band Adj. Value Return Defaults EOP Timer 10 sec. 30 sec. 1 min. 2 min. 5 min. 10 min. * 30 min. Control Panel First Level Adjust Printer Interface Setup Second Level Third Level Print Job List Auto Head Adj. Advanced Adj. No Yes Standard Adj. Advanced Adj. Standard Adj.

User Manual for Windows
Page 55
IP Mode Protocol (*4) Fourth Level Automatic Manual * DHCP BOOTP RARP IP Setting IP Address Subnet Mask Default G/W NetWare On Off * Frame Type (*6) Auto Detect Ethernet 2 Ethernet 802.2 * Ethernet 802.3 Ethernet SNAP Print ...
IP Mode Protocol (*4) Fourth Level Automatic Manual * DHCP BOOTP RARP IP Setting IP Address Subnet Mask Default G/W NetWare On Off * Frame Type (*6) Auto Detect Ethernet 2 Ethernet 802.2 * Ethernet 802.3 Ethernet SNAP Print ...


