iPF650 655 750 755 Basic Guide Step2
Page 15
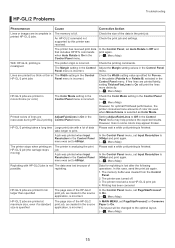
... analyzing the print job. In MAIN MENU, set Input Resolution to Off and print again. (→ , Menu Map) With HP-GL/2, printing is misaligned The plotter origin is incorrect. Lines are AdjustFaintLines is On in the Control Panel menu. However, lines in some colors may help produce the expected results. replotting...
... analyzing the print job. In MAIN MENU, set Input Resolution to Off and print again. (→ , Menu Map) With HP-GL/2, printing is misaligned The plotter origin is incorrect. Lines are AdjustFaintLines is On in the Control Panel menu. However, lines in some colors may help produce the expected results. replotting...
iPF650 655 750 755 Basic Guide Step3
Page 18
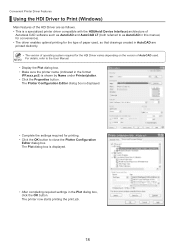
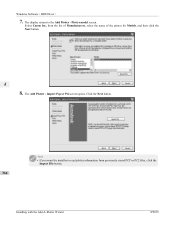
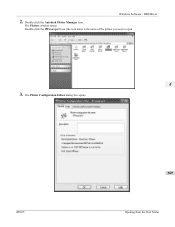
... (indicated in the Plot dialog box, click the OK button. The printer now starts printing the print job. 18 For details, refer to close the Plotter Configuration Editor dialog box. The Plotter Configuration Editor dialog box is shown by Name under Printer...
... (indicated in the Plot dialog box, click the OK button. The printer now starts printing the print job. 18 For details, refer to close the Plotter Configuration Editor dialog box. The Plotter Configuration Editor dialog box is shown by Name under Printer...
iPF655 User Manual Ver.1.30
Page 7
...Features of HDI Driver ...353 Operating Environment ...353 Installation Procedure ...354 Installing with the Canon Installer ...354 Installing with the Add-A-Plotter Wizard ...361 Opening the Plotter Configuration Dialog Box ...366 Opening from the AutoCAD File Menu ...367 Opening from the Start... Box ...381 Color Compatibility Dialog Box ...381 Printing ...382 Status Monitor 386 The Features of imagePROGRAF Status Monitor ...386 Job Management Using imagePROGRAF Status Monitor 387 Accounting 389 Accounting Manager ...389 Launching the Accounting Manager ...390 Accounting Manager Main...
...Features of HDI Driver ...353 Operating Environment ...353 Installation Procedure ...354 Installing with the Canon Installer ...354 Installing with the Add-A-Plotter Wizard ...361 Opening the Plotter Configuration Dialog Box ...366 Opening from the AutoCAD File Menu ...367 Opening from the Start... Box ...381 Color Compatibility Dialog Box ...381 Printing ...382 Status Monitor 386 The Features of imagePROGRAF Status Monitor ...386 Job Management Using imagePROGRAF Status Monitor 387 Accounting 389 Accounting Manager ...389 Launching the Accounting Manager ...390 Accounting Manager Main...

iPF655 User Manual Ver.1.30
Page 43
... sheet. 2 4. iPF655 HP-GL/2 Printing Note • For details on configuring these settings, refer to the following topic. • Choosing the Document Type and Printing Conditions (Windows) →P.57 HP-GL/2 Printing 27 This printer supports the original Canon GARO printer control language... as well as HP-GL/2 and HP RTL(*1 →P.28 ) emulation.(*2 →P.28 ) When printing from applications that support HP-GL/2 output, specify HP-GL/2 in the A Color Compatibility list. Select the desired color settings in the application's plotter...
... sheet. 2 4. iPF655 HP-GL/2 Printing Note • For details on configuring these settings, refer to the following topic. • Choosing the Document Type and Printing Conditions (Windows) →P.57 HP-GL/2 Printing 27 This printer supports the original Canon GARO printer control language... as well as HP-GL/2 and HP RTL(*1 →P.28 ) emulation.(*2 →P.28 ) When printing from applications that support HP-GL/2 output, specify HP-GL/2 in the A Color Compatibility list. Select the desired color settings in the application's plotter...

iPF655 User Manual Ver.1.30
Page 369
... • The supported OS version differs for the media and print clear, sharp printouts of plans and diagrams created with AutoCAD. iPF655 The Features of HDI Driver Windows Software > HDI Driver > HDI Driver The Features of HDI Driver ...353 Operating Environment ...353... Installation Procedure ...354 Installing with the Canon Installer ...354 Installing with the Add-A-Plotter Wizard ...361 Opening the Plotter Configuration Dialog Box 366 Opening from the AutoCAD File Menu ...367 Opening from the Start Menu ......
... • The supported OS version differs for the media and print clear, sharp printouts of plans and diagrams created with AutoCAD. iPF655 The Features of HDI Driver Windows Software > HDI Driver > HDI Driver The Features of HDI Driver ...353 Operating Environment ...353... Installation Procedure ...354 Installing with the Canon Installer ...354 Installing with the Add-A-Plotter Wizard ...361 Opening the Plotter Configuration Dialog Box 366 Opening from the AutoCAD File Menu ...367 Opening from the Start Menu ......
iPF655 User Manual Ver.1.30
Page 370
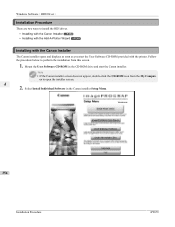
...driver. • Installing with the Canon Installer →P.354 • Installing with the Add-A-Plotter Wizard →P.361 Installing with the printer. Mount the User Software CD-ROM in the Canon installer Setup Menu. 354 Installation Procedure iPF655 er to perform the installation from the... My Comput- Note • If the Canon installer screen does ...
...driver. • Installing with the Canon Installer →P.354 • Installing with the Add-A-Plotter Wizard →P.361 Installing with the printer. Mount the User Software CD-ROM in the Canon installer Setup Menu. 354 Installation Procedure iPF655 er to perform the installation from the... My Comput- Note • If the Canon installer screen does ...
iPF655 User Manual Ver.1.30
Page 373
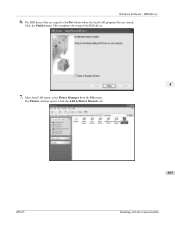
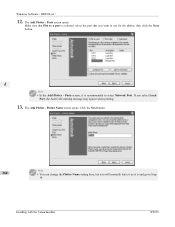
Click the Finish button. After AutoCAD starts, select Plotter Manager from the File menu. Click the Add-A-Plotter Wizard icon. iPF655 357 Installing with the Canon Installer The Plotters window opens. This completes the setup of the HDI driver. 4 7. The HDI driver files are copied to the Drv folder where the AutoCAD program files are stored. Windows Software > HDI Driver > 6.
Click the Finish button. After AutoCAD starts, select Plotter Manager from the File menu. Click the Add-A-Plotter Wizard icon. iPF655 357 Installing with the Canon Installer The Plotters window opens. This completes the setup of the HDI driver. 4 7. The HDI driver files are copied to the Drv folder where the AutoCAD program files are stored. Windows Software > HDI Driver > 6.
iPF655 User Manual Ver.1.30
Page 374
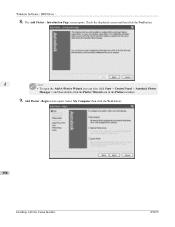
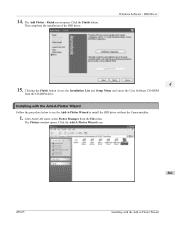
Add Plotter - Check the displayed screen and then click the Nextbutton. 4 Note • To open the Add-A-Plotter Wizard you can also click Start > Control Panel > Autodesk Plotter Manager > and then double-click the Plotter Wizard icon in the Plotters window. 9. Select My Computer then click the Next button. 358 Installing with the Canon Installer iPF655 Begin screen opens. Introduction Page screen opens. Windows Software > HDI Driver > 8. The Add Plotter -
Add Plotter - Check the displayed screen and then click the Nextbutton. 4 Note • To open the Add-A-Plotter Wizard you can also click Start > Control Panel > Autodesk Plotter Manager > and then double-click the Plotter Wizard icon in the Plotters window. 9. Select My Computer then click the Next button. 358 Installing with the Canon Installer iPF655 Begin screen opens. Introduction Page screen opens. Windows Software > HDI Driver > 8. The Add Plotter -
iPF655 User Manual Ver.1.30
Page 375
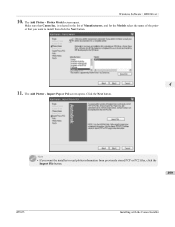
Plotter Model screen opens. Import Pcp or Pc2 screen opens. Click the Next button. Make sure that you want to read plotter information from previously stored PCP or PC2 files, click the Import File button. 359 iPF655 Installing with the Canon Installer The Add Plotter - is selected in the list of Manufacturers, and for the Models select the name of the printer that Canon Inc. Note • If you want the installer to install then click the Next button. 4 11. The Add Plotter - Windows Software > HDI Driver > 10.
Plotter Model screen opens. Import Pcp or Pc2 screen opens. Click the Next button. Make sure that you want to read plotter information from previously stored PCP or PC2 files, click the Import File button. 359 iPF655 Installing with the Canon Installer The Add Plotter - is selected in the list of Manufacturers, and for the Models select the name of the printer that Canon Inc. Note • If you want the installer to install then click the Next button. 4 11. The Add Plotter - Windows Software > HDI Driver > 10.
iPF655 User Manual Ver.1.30
Page 376
... opens. Ports screen opens. Installing with the Canon Installer iPF655 If you will normally leave it as it is selected, select the port that Plot to a port is recommended to use for the plotter, then click the Next button. 4 Note • In the Add Plotter - Click the Next button. 360 Note • You can...
... opens. Ports screen opens. Installing with the Canon Installer iPF655 If you will normally leave it as it is selected, select the port that Plot to a port is recommended to use for the plotter, then click the Next button. 4 Note • In the Add Plotter - Click the Next button. 360 Note • You can...
iPF655 User Manual Ver.1.30
Page 377
... opens. Click the Add-A-Plotter Wizard icon. 14. The Add Plotter - Installing with the Add-A-Plotter Wizard Click the Finish button. Windows Software > HDI Driver > 4 15. iPF655 361 Installing with the Add-A-Plotter Wizard Follow the procedure below to use the Add-A-Plotter Wizard to install the HDI driver without the Canon installer. 1. The Plotters window opens. This...
... opens. Click the Add-A-Plotter Wizard icon. 14. The Add Plotter - Installing with the Add-A-Plotter Wizard Click the Finish button. Windows Software > HDI Driver > 4 15. iPF655 361 Installing with the Add-A-Plotter Wizard Follow the procedure below to use the Add-A-Plotter Wizard to install the HDI driver without the Canon installer. 1. The Plotters window opens. This...
iPF655 User Manual Ver.1.30
Page 378
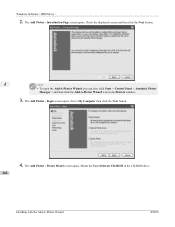
The Add Plotter - Begin screen opens. Plotter Model screen opens. Windows Software > HDI Driver > 2. Introduction Page screen opens. The Add Plotter - Select My Computer then click the Next button. 4. Check the displayed screen and then click the Next button. 4 Note • To open the Add-A-Plotter Wizard you can also click Start > Control Panel > Autodesk Plotter Manager > and then click the Add-A-Plotter Wizard icon in the CD-ROM drive. 362 Installing with the Add-A-Plotter Wizard iPF655 The Add Plotter - Mount the User Software CD-ROM in the Plotters window. 3.
The Add Plotter - Begin screen opens. Plotter Model screen opens. Windows Software > HDI Driver > 2. Introduction Page screen opens. The Add Plotter - Select My Computer then click the Next button. 4. Check the displayed screen and then click the Next button. 4 Note • To open the Add-A-Plotter Wizard you can also click Start > Control Panel > Autodesk Plotter Manager > and then click the Add-A-Plotter Wizard icon in the CD-ROM drive. 362 Installing with the Add-A-Plotter Wizard iPF655 The Add Plotter - Mount the User Software CD-ROM in the Plotters window. 3.
iPF655 User Manual Ver.1.30
Page 379
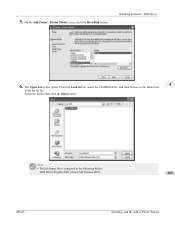
Windows Software > HDI Driver > 6. Note • The hif format file is contained in box, select the CD-ROM drive, and then browse to the folder that 4 holds the hif file. From the Look in the following folder. \HDI Driver\English\2007 (AutoCAD Version 2007) 363 iPF655 Installing with the Add-A-Plotter Wizard Select the hif file then click the Open button. Plotter Model screen, click the Have Disk button. On the Add Plotter - The Open dialog box opens. 5.
Windows Software > HDI Driver > 6. Note • The hif format file is contained in box, select the CD-ROM drive, and then browse to the folder that 4 holds the hif file. From the Look in the following folder. \HDI Driver\English\2007 (AutoCAD Version 2007) 363 iPF655 Installing with the Add-A-Plotter Wizard Select the hif file then click the Open button. Plotter Model screen, click the Have Disk button. On the Add Plotter - The Open dialog box opens. 5.
iPF655 User Manual Ver.1.30
Page 380
Note • If you want the installer to the Add Plotter - Import Pcp or Pc2 screen opens. The Add Plotter - Windows Software > HDI Driver > 7. from previously stored PCP or PC2 files, click the Import File button. 364 Installing with the Add-A-Plotter Wizard iPF655 The display returns to read plotter information from the list of Manufacturers, select the name of the printer for Models, and then click the Next button. 4 8. Select Canon Inc. Click the Next button. Plotter model screen.
Note • If you want the installer to the Add Plotter - Import Pcp or Pc2 screen opens. The Add Plotter - Windows Software > HDI Driver > 7. from previously stored PCP or PC2 files, click the Import File button. 364 Installing with the Add-A-Plotter Wizard iPF655 The display returns to read plotter information from the list of Manufacturers, select the name of the printer for Models, and then click the Next button. 4 8. Select Canon Inc. Click the Next button. Plotter model screen.

iPF655 User Manual Ver.1.30
Page 381
... select the port that Plot to a port is and go to Step 365 11. If you want to select Network Port. iPF655 Installing with the Add-A-Plotter Wizard The Add Plotter - Click the Nextbutton. Make sure that you select Local Port, the AutoCAD warning message may appear when printing. 10. Ports ...screen opens. Note • You can change the Plotter Name setting here, but you will normally leave it as it is recommended to use for the plotter, then click the Nextbutton. 4 Note • In the Add...
... select the port that Plot to a port is and go to Step 365 11. If you want to select Network Port. iPF655 Installing with the Add-A-Plotter Wizard The Add Plotter - Click the Nextbutton. Make sure that you select Local Port, the AutoCAD warning message may appear when printing. 10. Ports ...screen opens. Note • You can change the Plotter Name setting here, but you will normally leave it as it is recommended to use for the plotter, then click the Nextbutton. 4 Note • In the Add...
iPF655 User Manual Ver.1.30
Page 382
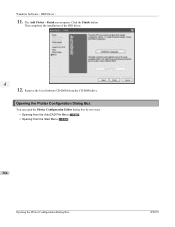
Remove the User Software CD-ROM from the Start Menu →P.368 366 Opening the Plotter Configuration Dialog Box iPF655 Windows Software > HDI Driver > 11. Click the Finish button. Opening the Plotter Configuration Dialog Box You can open the Plotter Configuration Editor dialog box by two ways. • Opening from the AutoCAD File Menu →P.367 • Opening from the CD-ROM drive. Finish screen opens. This completes the installation of the HDI driver. 4 12. The Add Plotter -
Remove the User Software CD-ROM from the Start Menu →P.368 366 Opening the Plotter Configuration Dialog Box iPF655 Windows Software > HDI Driver > 11. Click the Finish button. Opening the Plotter Configuration Dialog Box You can open the Plotter Configuration Editor dialog box by two ways. • Opening from the AutoCAD File Menu →P.367 • Opening from the CD-ROM drive. Finish screen opens. This completes the installation of the HDI driver. 4 12. The Add Plotter -
iPF655 User Manual Ver.1.30
Page 383
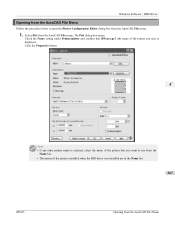
Check the Name setting under Printer/plotter and confirm that you use from the Name list. • The names of the printers installed when the HDI driver was installed are in the Name list. 367 iPF655 Opening from the AutoCAD File Menu Select Plot from the AutoCAD File menu. Windows Software > HDI Driver... any other printer name is selected, select the name of the printer that iPFxxxx.pc3 (the name of the printer you want to open the Plotter Configuration Editor dialog box from the AutoCAD File menu. 1. The Plot dialog box opens.
Check the Name setting under Printer/plotter and confirm that you use from the Name list. • The names of the printers installed when the HDI driver was installed are in the Name list. 367 iPF655 Opening from the AutoCAD File Menu Select Plot from the AutoCAD File menu. Windows Software > HDI Driver... any other printer name is selected, select the name of the printer that iPFxxxx.pc3 (the name of the printer you want to open the Plotter Configuration Editor dialog box from the AutoCAD File menu. 1. The Plot dialog box opens.
iPF655 User Manual Ver.1.30
Page 384
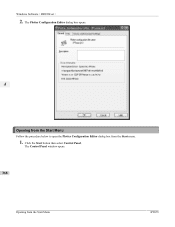
The Control Panel window opens. 368 Opening from the Start menu. 1. The Plotter Configuration Editor dialog box opens. 4 Opening from the Start Menu Follow the procedure below to open the Plotter Configuration Editor dialog box from the Start Menu iPF655 Windows Software > HDI Driver > 2. Click the Start button then select Control Panel.
The Control Panel window opens. 368 Opening from the Start menu. 1. The Plotter Configuration Editor dialog box opens. 4 Opening from the Start Menu Follow the procedure below to open the Plotter Configuration Editor dialog box from the Start Menu iPF655 Windows Software > HDI Driver > 2. Click the Start button then select Control Panel.
iPF655 User Manual Ver.1.30
Page 385
Double-click the iPFxxxx.pc3 icon (the icon name is the name of the printer you use) to open. 4 3. Double-click the Autodesk Plotter Manager icon. The Plotter Configuration Editor dialog box opens. iPF655 369 Opening from the Start Menu The Plotters window opens. Windows Software > HDI Driver > 2.
Double-click the iPFxxxx.pc3 icon (the icon name is the name of the printer you use) to open. 4 3. Double-click the Autodesk Plotter Manager icon. The Plotter Configuration Editor dialog box opens. iPF655 369 Opening from the Start Menu The Plotters window opens. Windows Software > HDI Driver > 2.

iPF655 User Manual Ver.1.30
Page 386
... as follows. • Media Source and Media Size Settings →P.371 • Graphics Settings →P.372 • Custom Properties dialog box →P.377 Plotter Configuration Editor Dialog Box iPF655 Note • For more details about the General sheet and the Ports sheet, please refer to perform the main printing settings. Device and...
... as follows. • Media Source and Media Size Settings →P.371 • Graphics Settings →P.372 • Custom Properties dialog box →P.377 Plotter Configuration Editor Dialog Box iPF655 Note • For more details about the General sheet and the Ports sheet, please refer to perform the main printing settings. Device and...