iPF650 655 750 755 Basic Guide Step1
Page 1
... 21 Replacing Ink Tanks 22 Replacing the Maintenance Cartridge 26 Replacing the Printhead 30 Menu Map 35 Troubleshooting 2 Troubleshooting 2 If Roll Paper Jams 18 If a Sheet Jams 21 If Paper is Soiled 23 If Printing is Faint 25 If Vertical Lines are Warped or Colors are Misaligned 26 If Banding Occurs 28...
... 21 Replacing Ink Tanks 22 Replacing the Maintenance Cartridge 26 Replacing the Printhead 30 Menu Map 35 Troubleshooting 2 Troubleshooting 2 If Roll Paper Jams 18 If a Sheet Jams 21 If Paper is Soiled 23 If Printing is Faint 25 If Vertical Lines are Warped or Colors are Misaligned 26 If Banding Occurs 28...
iPF650 655 750 755 Basic Guide Step1
Page 4
...use under limited circumstances. 4 If you continue to reproduce currency, bills, negotiable securities and other documents prohibited by law. Trademarks Canon, the Canon logo, and imagePROGRAF are trademarks of flammable sprays can cause a fire or electrical shock, if it contacts high voltage points inside the...cable connector matches the connection point on the printer. • During printing, turn on the printer such as small metal objects (paper clips, staples), liquids, any type of Apple Inc., registered in the room. • We recommend ensuring ample space for service....
...use under limited circumstances. 4 If you continue to reproduce currency, bills, negotiable securities and other documents prohibited by law. Trademarks Canon, the Canon logo, and imagePROGRAF are trademarks of flammable sprays can cause a fire or electrical shock, if it contacts high voltage points inside the...cable connector matches the connection point on the printer. • During printing, turn on the printer such as small metal objects (paper clips, staples), liquids, any type of Apple Inc., registered in the room. • We recommend ensuring ample space for service....
iPF650 655 750 755 Basic Guide Step1
Page 5
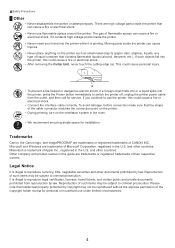
... in case of printing issues. • Paper Reference Guide The Paper Reference Guide identifies the types of paper you can use with the printer and gives specifications. • Stay Informed Provides access to the imagePROGRAF website, where you can also access the imagePROGRAF website from imagePROGRAF Support Information. • User Manual The...
... in case of printing issues. • Paper Reference Guide The Paper Reference Guide identifies the types of paper you can use with the printer and gives specifications. • Stay Informed Provides access to the imagePROGRAF website, where you can also access the imagePROGRAF website from imagePROGRAF Support Information. • User Manual The...
iPF650 655 750 755 Basic Guide Step1
Page 8
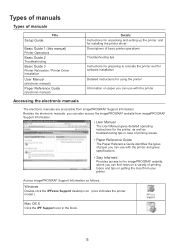
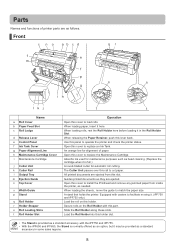
... to facilitate moving it. (iPF750 and iPF755 only.) Load the roll on the Roll Holder with the iPF750 and iPF755. • With the iPF650 and iPF655, the Stand is provided as a standard accessory in the Roll Holder Slot. Slide the Roll Holder along these slots. When releasing the.... Open this panel to replace the Maintenance Cartridge. All printed documents are ejected. Open this cover to install the Printhead and remove any jammed paper from this slot. Open this cover to replace an Ink Tank. Guides printed documents as they are ejected from inside the printer, as an ...
... to facilitate moving it. (iPF750 and iPF755 only.) Load the roll on the Roll Holder with the iPF750 and iPF755. • With the iPF650 and iPF655, the Stand is provided as a standard accessory in the Roll Holder Slot. Slide the Roll Holder along these slots. When releasing the.... Open this panel to replace the Maintenance Cartridge. All printed documents are ejected. Open this cover to install the Printhead and remove any jammed paper from this slot. Open this cover to replace an Ink Tank. Guides printed documents as they are ejected from inside the printer, as an ...
iPF650 655 750 755 Basic Guide Step1
Page 9
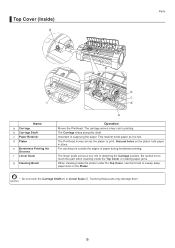
...the Printhead. The Carriage slides along this brush to sweep away paper dust on the platen hold paper in supplying the paper. The Printhead moves across the platen to touch this part when cleaning inside the Top Cover or clearing paper jams. When cleaning inside the printer under the Top Cover, ...use this shaft. This retainer holds paper as it is fed. The linear scale serves a key role in printing. Vacuum holes ...
...the Printhead. The Carriage slides along this brush to sweep away paper dust on the platen hold paper in supplying the paper. The Printhead moves across the platen to touch this part when cleaning inside the Top Cover or clearing paper jams. When cleaning inside the printer under the Top Cover, ...use this shaft. This retainer holds paper as it is fed. The linear scale serves a key role in printing. Vacuum holes ...
iPF650 655 750 755 Basic Guide Step1
Page 10
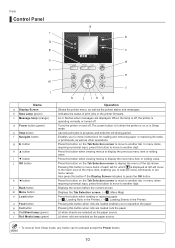
...the Printer), (→ , Loading Sheets in Sleep mode. Indicates the status of each tab for loading and removing paper or replacing ink tanks or printheads, as well as the paper source. Pressing this button when rolls are displayed. Turns the printer on the Tab Selection screen to move to ...normally or turned off . Pressing this button to move to the lower level of the tab shown. Lit when sheets are loaded cuts the paper. Cancels print jobs in menu items of print jobs or the printer firmware. Lit when rolls are selected as the printer status and messages....
...the Printer), (→ , Loading Sheets in Sleep mode. Indicates the status of each tab for loading and removing paper or replacing ink tanks or printheads, as well as the paper source. Pressing this button when rolls are displayed. Turns the printer on the Tab Selection screen to move to ...normally or turned off . Pressing this button to move to the lower level of the tab shown. Lit when sheets are loaded cuts the paper. Cancels print jobs in menu items of print jobs or the printer firmware. Lit when rolls are selected as the printer status and messages....
iPF650 655 750 755 Basic Guide Step1
Page 11
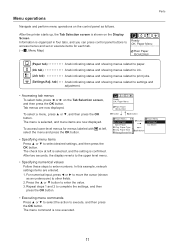
..., and menu items are now displayed. For numerical input, press ◄ or ► to move the cursor (shown as follows. Paper Size Back button ManageRemainRoll Paper Menu Roll Paper Cut Sheet • Specifying menu items Press ▲ or ▼ to enter the value. 3. The check box at left is ...print jobs. (Settings/Adj. Press the ▲ or ▼ button to select desired settings, and then press the OK button. Ready OK: Paper Menu Plain Paper ISO A2 Roll To select a menu, press ▲ or ▼, and then press the OK button. To access lower-level menus for ...
..., and menu items are now displayed. For numerical input, press ◄ or ► to move the cursor (shown as follows. Paper Size Back button ManageRemainRoll Paper Menu Roll Paper Cut Sheet • Specifying menu items Press ▲ or ▼ to enter the value. 3. The check box at left is ...print jobs. (Settings/Adj. Press the ▲ or ▼ button to select desired settings, and then press the OK button. Ready OK: Paper Menu Plain Paper ISO A2 Roll To select a menu, press ▲ or ▼, and then press the OK button. To access lower-level menus for ...
iPF650 655 750 755 Basic Guide Step1
Page 12
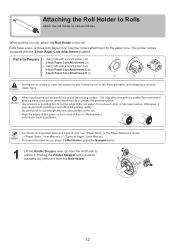
... holder to Prepare • Using rolls with a 2-inch paper core 2-Inch Paper Core Attachment (a) • Using rolls with the 2-Inch Paper Core Attachment installed. Rolls have a two- The printer comes equipped with a 3-inch paper core 3-Inch Paper Core Attachment L (b) 3-Inch Paper Core Attachment R (c) a b c • Set the...Holder Stopper lever (a) from the shaft side to cut through any barcodes printed on the roll. • Align the edges of the paper on a table or other flat the position indicated (b), remove it is uneven, dirty, or has tape residue. Holding the ...
... holder to Prepare • Using rolls with a 2-inch paper core 2-Inch Paper Core Attachment (a) • Using rolls with the 2-Inch Paper Core Attachment installed. Rolls have a two- The printer comes equipped with a 3-inch paper core 3-Inch Paper Core Attachment L (b) 3-Inch Paper Core Attachment R (c) a b c • Set the...Holder Stopper lever (a) from the shaft side to cut through any barcodes printed on the roll. • Align the edges of the paper on a table or other flat the position indicated (b), remove it is uneven, dirty, or has tape residue. Holding the ...
iPF650 655 750 755 Basic Guide Step1
Page 13
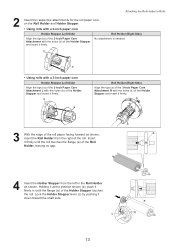
...ange (a) of the Holder Stopper and insert it firmly. c a b 13 b a • Using rolls with a 3-inch paper core Holder Stopper (Left Side) Align the tips (a) of the 3-Inch Paper Core Attachment L with the holes (b) of the Holder Stopper touches the roll. Lock the Holder Stopper lever (c) by pushing it... Holder Stopper from the right of the Holder Stopper and insert it firmly. b a Roll Holder (Right Side) Align the tips (a) of the 3-Inch Paper Core Attachment R with the holes (b) of the roll. Attaching the Roll Holder to Rolls 2 Insert the respective attachments for the roll...
...ange (a) of the Holder Stopper and insert it firmly. c a b 13 b a • Using rolls with a 3-inch paper core Holder Stopper (Left Side) Align the tips (a) of the 3-Inch Paper Core Attachment L with the holes (b) of the Holder Stopper touches the roll. Lock the Holder Stopper lever (c) by pushing it... Holder Stopper from the right of the Holder Stopper and insert it firmly. b a Roll Holder (Right Side) Align the tips (a) of the 3-Inch Paper Core Attachment R with the holes (b) of the roll. Attaching the Roll Holder to Rolls 2 Insert the respective attachments for the roll...
iPF650 655 750 755 Basic Guide Step1
Page 14
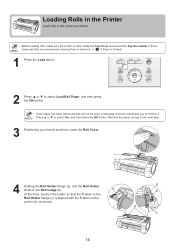
If these areas are dirty, we recommend cleaning them in the printer as shown. a c 14 Remove the paper and go to remove it. b d b At this time, position the holder so that will not be used, a message is shown requesting you to the next ... ▲ or ▼ to select Yes, and then press the OK button. Press ▲ or ▼ to select Load Roll Paper, and then press the OK button. • If any paper has been advanced that the R label on the Roll Holder flange (c) is aligned with the R label on the Roll Ledge...
If these areas are dirty, we recommend cleaning them in the printer as shown. a c 14 Remove the paper and go to remove it. b d b At this time, position the holder so that will not be used, a message is shown requesting you to the next ... ▲ or ▼ to select Yes, and then press the OK button. Press ▲ or ▼ to select Load Roll Paper, and then press the OK button. • If any paper has been advanced that the R label on the Roll Holder flange (c) is aligned with the R label on the Roll Ledge...
iPF650 655 750 755 Basic Guide Step1
Page 15
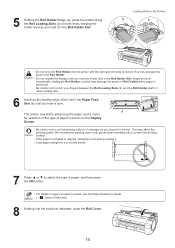
... not fed askew. 7 Press ▲ or ▼ to select the type of paper, and then press the OK button. • For details on types of paper to soil the printing surface of roll paper as you load it in the Roll Holder Slot. Be careful not to protect the printing surface. • ...If the paper is wrinkled or warped, straighten it out before loading it. • Load paper straight so it is advanced. 5 Holding the Roll Holder flange (a), guide the holder along the Roll Loading ...
... not fed askew. 7 Press ▲ or ▼ to select the type of paper, and then press the OK button. • For details on types of paper to soil the printing surface of roll paper as you load it in the Roll Holder Slot. Be careful not to protect the printing surface. • ...If the paper is wrinkled or warped, straighten it out before loading it. • Load paper straight so it is advanced. 5 Holding the Roll Holder flange (a), guide the holder along the Roll Loading ...
iPF650 655 750 755 Basic Guide Step1
Page 16
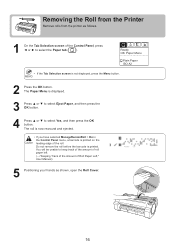
... the Roll from the Printer Remove rolls from the printer as shown, open the Roll Cover. 16 Ready OK: Paper Menu Plain Paper ISO A2 • If the Tab Selection screen is printed. The Paper Menu is printed on the leading edge of the Control Panel, press ◄ or ► to select Yes... then press the OK button. 4 Press ▲ or ▼ to select the Paper tab ( ). You will be unable to keep track of the amount of roll paper left. (→"Keeping Track of the Amount of Roll Paper Left," User Manual) 5 Positioning your hands as follows. 1 On the Tab Selection screen of the ...
... the Roll from the Printer Remove rolls from the printer as shown, open the Roll Cover. 16 Ready OK: Paper Menu Plain Paper ISO A2 • If the Tab Selection screen is printed. The Paper Menu is printed on the leading edge of the Control Panel, press ◄ or ► to select Yes... then press the OK button. 4 Press ▲ or ▼ to select the Paper tab ( ). You will be unable to keep track of the amount of roll paper left. (→"Keeping Track of the Amount of Roll Paper Left," User Manual) 5 Positioning your hands as follows. 1 On the Tab Selection screen of the ...
iPF650 655 750 755 Basic Guide Step1
Page 17
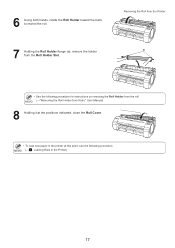
Removing the Roll from the Printer 7 Holding the Roll Holder flange (a), remove the holder from Rolls," User Manual) 8 Holding it at the positions indicated, close the Roll Cover. • To load new paper in the printer at this point, see the following procedure. (→ , Loading Rolls in the Printer) 17 a • See the following procedure for instructions on removing the Roll Holder from the roll. (→"Removing the Roll Holder from the Roll Holder Slot. 6 Using both hands, rotate the Roll Holder toward the back to rewind the roll.
Removing the Roll from the Printer 7 Holding the Roll Holder flange (a), remove the holder from Rolls," User Manual) 8 Holding it at the positions indicated, close the Roll Cover. • To load new paper in the printer at this point, see the following procedure. (→ , Loading Rolls in the Printer) 17 a • See the following procedure for instructions on removing the Roll Holder from the roll. (→"Removing the Roll Holder from the Roll Holder Slot. 6 Using both hands, rotate the Roll Holder toward the back to rewind the roll.
iPF650 655 750 755 Basic Guide Step1
Page 18
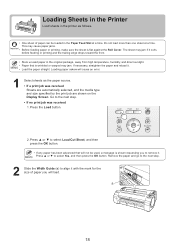
Go to align it curls before feeding or printing and the trailing edge drops toward the front. • Store unused paper in the Paper Feed Slot at a time. Remove the paper and go to the next step. 2 Slide the Width Guide (a) to the next step. • If no print job was received Sheets are... specified by the print job are shown on the Display Screen. This may jam if it with the mark for the size of paper can be used, a message is flat a time. Press ▲ or ▼ to select Load Cut Sheet, and then press the OK button. • If...
Go to align it curls before feeding or printing and the trailing edge drops toward the front. • Store unused paper in the Paper Feed Slot at a time. Remove the paper and go to the next step. 2 Slide the Width Guide (a) to the next step. • If no print job was received Sheets are... specified by the print job are shown on the Display Screen. This may jam if it with the mark for the size of paper can be used, a message is flat a time. Press ▲ or ▼ to select Load Cut Sheet, and then press the OK button. • If...
iPF650 655 750 755 Basic Guide Step1
Page 19
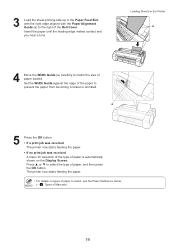
... makes contact and you hear a tone. The printer now starts feeding the paper. • For details on the Display Screen. Loading Sheets in the Paper Feed Slot, with the right edge aligned with the Paper Alignment Guide (a) to prevent the paper from becoming crooked or wrinkled. a 5 Press the OK button. •... If a print job was received The printer now starts feeding the paper. • If no print job was received A menu for selection of the type of paper is automatically shown on types of paper to match the size of Manuals) 19 Set the Width Guide against the edge ...
... makes contact and you hear a tone. The printer now starts feeding the paper. • For details on the Display Screen. Loading Sheets in the Paper Feed Slot, with the right edge aligned with the Paper Alignment Guide (a) to prevent the paper from becoming crooked or wrinkled. a 5 Press the OK button. •... If a print job was received The printer now starts feeding the paper. • If no print job was received A menu for selection of the type of paper is automatically shown on types of paper to match the size of Manuals) 19 Set the Width Guide against the edge ...
iPF650 655 750 755 Basic Guide Step1
Page 20
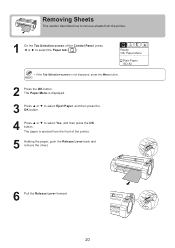
...sheets from the front of the Control Panel, press ◄ or ► to select Yes, and then press the OK button. Ready OK: Paper Menu Plain Paper ISO A2 • If the Tab Selection screen is ejected from the printer. 1 On the Tab Selection screen of the printer. 5 Holding ... and remove the sheet. 6 Pull the Release Lever forward. 20 The Paper Menu is displayed. 3 Press ▲ or ▼ to select Eject Paper, and then press the OK button. 4 Press ▲ or ▼ to select the Paper tab ( ). The paper is not displayed, press the Menu button. 2 Press the OK button....
...sheets from the front of the Control Panel, press ◄ or ► to select Yes, and then press the OK button. Ready OK: Paper Menu Plain Paper ISO A2 • If the Tab Selection screen is ejected from the printer. 1 On the Tab Selection screen of the printer. 5 Holding ... and remove the sheet. 6 Pull the Release Lever forward. 20 The Paper Menu is displayed. 3 Press ▲ or ▼ to select Eject Paper, and then press the OK button. 4 Press ▲ or ▼ to select the Paper tab ( ). The paper is not displayed, press the Menu button. 2 Press the OK button....
iPF650 655 750 755 Basic Guide Step1
Page 22
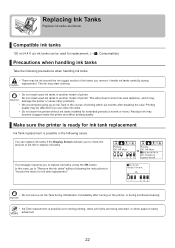
... turning on the printer, or during printhead cleaning. • Ink Tank replacement is possible even during printing, when print jobs are being canceled, or when paper is being advanced. 22 Replace ink tank. Do not install used ink tanks in another model of ink left . Printing quality may become clogged inside...
... turning on the printer, or during printhead cleaning. • Ink Tank replacement is possible even during printing, when print jobs are being canceled, or when paper is being advanced. 22 Replace ink tank. Do not install used ink tanks in another model of ink left . Printing quality may become clogged inside...
iPF650 655 750 755 Basic Guide Step1
Page 30
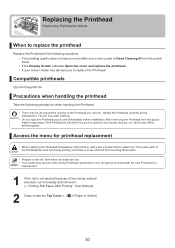
... Cleaning B from the printer menu • If the Display Screen indicates Open top cover and replace the printhead. • If your Canon dealer has advised you to replace the printhead Replace the Printhead in the following precautions when handling the Printhead. • There may affect .... • Do not open the Printhead pouch until immediately before replacing it . (→"Cutting Roll Paper After Printing," User Manual) 2 Clean inside the Top Cover. (→ , If Paper is not ejected because of the Printhead you remove. Replacing the Printhead Replace the Printhead as follows....
... Cleaning B from the printer menu • If the Display Screen indicates Open top cover and replace the printhead. • If your Canon dealer has advised you to replace the printhead Replace the Printhead in the following precautions when handling the Printhead. • There may affect .... • Do not open the Printhead pouch until immediately before replacing it . (→"Cutting Roll Paper After Printing," User Manual) 2 Clean inside the Top Cover. (→ , If Paper is not ejected because of the Printhead you remove. Replacing the Printhead Replace the Printhead as follows....

iPF650 655 750 755 Basic Guide Step1
Page 35
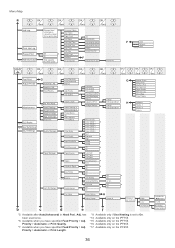
... *1: For information on the types of paper the printer supports, refer to select the tab, and then press the OK button. Paper Size ManageRemainRoll Paper Details Paper Details Keep Paper Type OK Back Roll Paper Cut Sheet Roll Paper Cut Sheet Sheet Size *3 Roll Roll Length... Width *4 Off On (The paper type is *1 displayed here.) OK Back *1 (The paper type is displayed here.) (The paper type is *1 displayed here.) (The paper...
... *1: For information on the types of paper the printer supports, refer to select the tab, and then press the OK button. Paper Size ManageRemainRoll Paper Details Paper Details Keep Paper Type OK Back Roll Paper Cut Sheet Roll Paper Cut Sheet Sheet Size *3 Roll Roll Length... Width *4 Off On (The paper type is *1 displayed here.) OK Back *1 (The paper type is displayed here.) (The paper type is *1 displayed here.) (The paper...
iPF650 655 750 755 Basic Guide Step1
Page 36
... Available only on the iPF755. *15: Available only on the iPF750. *16: Available only on the iPF655. *17: Available only on the iPF650. 36 Head Inc. xxxxxxxxsq.mm F (Indicates the ink color.) xxx.xxx ml F USB Network *14*16 HDD Set./Adj. Quality *6 Adjust...Length *7 Head Cleaning A Head Cleaning B ProductName: s/n: Days elapsed: Count [Mdot]: Color Mode Print Quality Input Resolution Print (Economy) Paper Source Margin Conserve Paper Auto Rotate Nesting *14*16 Line & Pen Manager Enable merge G Automatic * Print Quality Print Length Auto(GenuinePpr) Auto(OtherPaper) Manual ...
... Available only on the iPF755. *15: Available only on the iPF750. *16: Available only on the iPF655. *17: Available only on the iPF650. 36 Head Inc. xxxxxxxxsq.mm F (Indicates the ink color.) xxx.xxx ml F USB Network *14*16 HDD Set./Adj. Quality *6 Adjust...Length *7 Head Cleaning A Head Cleaning B ProductName: s/n: Days elapsed: Count [Mdot]: Color Mode Print Quality Input Resolution Print (Economy) Paper Source Margin Conserve Paper Auto Rotate Nesting *14*16 Line & Pen Manager Enable merge G Automatic * Print Quality Print Length Auto(GenuinePpr) Auto(OtherPaper) Manual ...


