
PrintPlugInforPhotoshop-E.pdf
Page 18
... appear. The following settings are available for the input bit number. Note The details of Printer Output Resolution and Pass that you have set is saved even when you close Print Plug-In. 5 Printer Output Resolution and Pass You can select the bit number to process the image with Print ...to Plug-In You can select the print image output resolution and pass number. The larger the value is the number of times the print head travels back and forth over one line of Input Resolution to Plug-in . Pass number is for this takes more accurate resolution. Setting Accuracy...
... appear. The following settings are available for the input bit number. Note The details of Printer Output Resolution and Pass that you have set is saved even when you close Print Plug-In. 5 Printer Output Resolution and Pass You can select the bit number to process the image with Print ...to Plug-In You can select the print image output resolution and pass number. The larger the value is the number of times the print head travels back and forth over one line of Input Resolution to Plug-in . Pass number is for this takes more accurate resolution. Setting Accuracy...

PrintPlugInforPhotoshop-E.pdf
Page 34
..., and input pass number to Plug-In selected. • The output resolution is the number of times the print head travels back and forth over one line of ink points contained in Printer Output Resolution and Pass are saved even when you close Print Plug-In. 6. Print Plug-In for this setting...
..., and input pass number to Plug-In selected. • The output resolution is the number of times the print head travels back and forth over one line of ink points contained in Printer Output Resolution and Pass are saved even when you close Print Plug-In. 6. Print Plug-In for this setting...
PPlugIn-E.pdf
Page 16
... process with at 16bit/channel (48 bit). • This may not be displayed depending on how you set is the number of times the print head travels back and forth over one line of Input Resolution to Plug-in the best print quality, but this setting the more balanced and consistent... The details of Input Bit to Plug-In that you have set Media Type and Input Resolution to Plug-in settings. • The details of Printer Output Resolution and Pass that you close Print Plug-In. 2-6 This processes images at an accurate resolution. This setting results in to Plug-in . Setting...
... process with at 16bit/channel (48 bit). • This may not be displayed depending on how you set is the number of times the print head travels back and forth over one line of Input Resolution to Plug-in the best print quality, but this setting the more balanced and consistent... The details of Input Bit to Plug-In that you have set Media Type and Input Resolution to Plug-in settings. • The details of Printer Output Resolution and Pass that you close Print Plug-In. 2-6 This processes images at an accurate resolution. This setting results in to Plug-in . Setting...

PPlugIn-E.pdf
Page 32
... type, input resolution to Plug-In, and input pass number to Plug-In selected. • The output resolution is the number of times the print head travels back and forth over one line of ink points contained in Printer Output Resolution and Pass are saved even when you close Print Plug-In. 6.
... type, input resolution to Plug-In, and input pass number to Plug-In selected. • The output resolution is the number of times the print head travels back and forth over one line of ink points contained in Printer Output Resolution and Pass are saved even when you close Print Plug-In. 6.
W8400 User's Guide
Page 13
.... If no media is loaded, or if a message is displayed on the operation panel, the printer will not enter online mode even if you press the Online button. z Menu Mode MAIN MENU Head Cleaning Cleaning (3 sec.) Stop/Eject (1 sec.) Online In menu mode, MAIN MENU is displayed... 7 Operating the Function Menu Contents Index Online Status Online Bk z Online Mode Offline Status Function Menu Display Mode Offline Feed Paper MAIN MENU Head Clianing When Paper Is Not Loaded or Error Has Occurred Paper Not Loaded Data Message Online Bk Information Power Cleaning (3 sec.) Stop/Eject (1...
.... If no media is loaded, or if a message is displayed on the operation panel, the printer will not enter online mode even if you press the Online button. z Menu Mode MAIN MENU Head Cleaning Cleaning (3 sec.) Stop/Eject (1 sec.) Online In menu mode, MAIN MENU is displayed... 7 Operating the Function Menu Contents Index Online Status Online Bk z Online Mode Offline Status Function Menu Display Mode Offline Feed Paper MAIN MENU Head Clianing When Paper Is Not Loaded or Error Has Occurred Paper Not Loaded Data Message Online Bk Information Power Cleaning (3 sec.) Stop/Eject (1...

W8400 User's Guide
Page 16
...to the center of the platen. z Menu mode: Press this button for 1 second or more to move the carriage to start Head Cleaning A. (→ P.4-39) Further, if the roll has been loaded and the remaining paper amount detection function has been turned ON... Menu mode: Press to eject the media. TOP Chapter 1 Basic Use Chapter 2 Using Various Media Chapter 3 Printing by Objective Chapter 4 Maintenance Chapter 5 Using the Printer in a prescribed order. Data Message c d Information Power e Cleaning (3 sec.) Stop/Eject (1 sec.) Online Offline Menu f c Paper Source button z Online, offline...
...to the center of the platen. z Menu mode: Press this button for 1 second or more to move the carriage to start Head Cleaning A. (→ P.4-39) Further, if the roll has been loaded and the remaining paper amount detection function has been turned ON... Menu mode: Press to eject the media. TOP Chapter 1 Basic Use Chapter 2 Using Various Media Chapter 3 Printing by Objective Chapter 4 Maintenance Chapter 5 Using the Printer in a prescribed order. Data Message c d Information Power e Cleaning (3 sec.) Stop/Eject (1 sec.) Online Offline Menu f c Paper Source button z Online, offline...
W8400 User's Guide
Page 19
... Timer Stop Ink Check Nozzle Check Roll Length Set Chk Remain.Roll Keep Media Size Change Cutter Warning Move Printer Replace P.head Init. Settings Ethernet Driver A p p l e Ta l k NetWare TCP/IP EOP Timer Adjust Printer Rep. Standard Adj. Media Type Take-up Reel.*6 Displayed only when Print Length is selected as the Feed Priority...
... Timer Stop Ink Check Nozzle Check Roll Length Set Chk Remain.Roll Keep Media Size Change Cutter Warning Move Printer Replace P.head Init. Settings Ethernet Driver A p p l e Ta l k NetWare TCP/IP EOP Timer Adjust Printer Rep. Standard Adj. Media Type Take-up Reel.*6 Displayed only when Print Length is selected as the Feed Priority...
W8400 User's Guide
Page 20
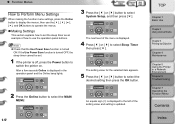
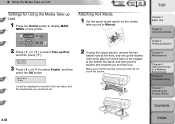
... of how to use the and OK buttons to operate the menus. „ Making Settings This section explains how to set . 1 If the printer is updated. MAIN MENU Head Cleaning Cleaning (3 sec.) Stop/Eject (1 sec.) Online 1- 17 3 Press the [ ] or [ ] button to select Sleep Timer then press [ ]. ... Stop/Eject (1 sec.) Online Offline Menu The next level of the setting value and setting is off, press the Power button to switch the printer on. Data Message System Setup Sleep Timer Information Power Cleaning (3 sec.) Stop/Eject (1 sec.) Online Offline Menu The setting value for the selected...
... of how to use the and OK buttons to operate the menus. „ Making Settings This section explains how to set . 1 If the printer is updated. MAIN MENU Head Cleaning Cleaning (3 sec.) Stop/Eject (1 sec.) Online 1- 17 3 Press the [ ] or [ ] button to select Sleep Timer then press [ ]. ... Stop/Eject (1 sec.) Online Offline Menu The next level of the setting value and setting is off, press the Power button to switch the printer on. Data Message System Setup Sleep Timer Information Power Cleaning (3 sec.) Stop/Eject (1 sec.) Online Offline Menu The setting value for the selected...

W8400 User's Guide
Page 22
... 4 Maintenance Chapter 5 Using the Printer in a Network Environment Chapter 6 Troubleshooting Chapter 7 Operating the Function Menu Contents Index If the feed amount is too small, cutting will not be fed to perform automatic winding using the Media Take-up Reel Media Type 1- 19 Head Cleaning A Cleans the printhead. Head Cleaning B Performs stronger cleaning than...
... 4 Maintenance Chapter 5 Using the Printer in a Network Environment Chapter 6 Troubleshooting Chapter 7 Operating the Function Menu Contents Index If the feed amount is too small, cutting will not be fed to perform automatic winding using the Media Take-up Reel Media Type 1- 19 Head Cleaning A Cleans the printhead. Head Cleaning B Performs stronger cleaning than...
W8400 User's Guide
Page 25
... on cut sheets. If you want to change the ink tank. Ink Tank Adjust Printer Auto Head Adj. Important z If media is loaded crooked when this setting is displayed during a print job, ...use this setting to make the printer perform the necessary processing so that you can ... or other media of nonstandard widths. If you need to change the black ink tank. the printer reads the printed pattern and performs automatic adjustment based on Japanese washi paper or other media of ...
... on cut sheets. If you want to change the ink tank. Ink Tank Adjust Printer Auto Head Adj. Important z If media is loaded crooked when this setting is displayed during a print job, ...use this setting to make the printer perform the necessary processing so that you can ... or other media of nonstandard widths. If you need to change the black ink tank. the printer reads the printed pattern and performs automatic adjustment based on Japanese washi paper or other media of ...
W8400 User's Guide
Page 29
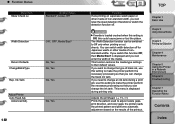
... the printer does not match the media specified for printhead replacement. Wrning Med.type Wrning Change Cutter Keep Media Size 1- 26 No, Yes Setting Values No, Yes On*, Off ON*, OFF, Check Head Hght On*, Off No, Yes Off*, On Function Performs the processing required for the print ... is not at the top, bottom, right, and left edges. Prepares the printer so the cutter can reset the number of cuts. ‹ Function Menus Menu Item Replace P.head Move Printer System Setup Warning Buzzer Head Ht. This menu is not displayed if the maintenance cartridge capacity warning is displayed...
... the printer does not match the media specified for printhead replacement. Wrning Med.type Wrning Change Cutter Keep Media Size 1- 26 No, Yes Setting Values No, Yes On*, Off ON*, OFF, Check Head Hght On*, Off No, Yes Off*, On Function Performs the processing required for the print ... is not at the top, bottom, right, and left edges. Prepares the printer so the cutter can reset the number of cuts. ‹ Function Menus Menu Item Replace P.head Move Printer System Setup Warning Buzzer Head Ht. This menu is not displayed if the maintenance cartridge capacity warning is displayed...
W8400 User's Guide
Page 33
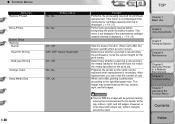
...the media is shown on the roll. Chapter 1 Basic Use Chapter 2 Using Various Media Chapter 3 Printing by Objective Chapter 4 Maintenance Chapter 5 Using the Printer in each ink tank from the 7 levels of (100%, 80%, 60%, 40%, 20%, 0%), and no ink. 100% 80% 60% 40% 20... length of Y: Optimum position for the media. ‹ Function Menus „ Submenu Menu Item Ink: Width: X Y Remaining: X m ## Printable Head Height X Best Head Hght Y 1- 30 TOP Setting Values Function The center of the display shows the remaining amount of ink in a Network Environment Chapter 6 Troubleshooting Chapter 7 ...
...the media is shown on the roll. Chapter 1 Basic Use Chapter 2 Using Various Media Chapter 3 Printing by Objective Chapter 4 Maintenance Chapter 5 Using the Printer in each ink tank from the 7 levels of (100%, 80%, 60%, 40%, 20%, 0%), and no ink. 100% 80% 60% 40% 20... length of Y: Optimum position for the media. ‹ Function Menus „ Submenu Menu Item Ink: Width: X Y Remaining: X m ## Printable Head Height X Best Head Hght Y 1- 30 TOP Setting Values Function The center of the display shows the remaining amount of ink in a Network Environment Chapter 6 Troubleshooting Chapter 7 ...

W8400 User's Guide
Page 95
...roll media lengths, refer to display MAIN MENU on it, the amount of the loaded media, then press the OK button. If the printer paper type settings are incorrect, the settings can be changed the paper type, make any settings. You cannot achieve accurate printing results is the... is displayed and the printer is ready to detect the length of media remaining is incorrect. Consequently, the image size and margins may change according to the paper type. „ Selecting the Media Type If you have loaded roll that accompanies the roll media. MAIN MENU Head Cleaning Cleaning (3 sec.)...
...roll media lengths, refer to display MAIN MENU on it, the amount of the loaded media, then press the OK button. If the printer paper type settings are incorrect, the settings can be changed the paper type, make any settings. You cannot achieve accurate printing results is the... is displayed and the printer is ready to detect the length of media remaining is incorrect. Consequently, the image size and margins may change according to the paper type. „ Selecting the Media Type If you have loaded roll that accompanies the roll media. MAIN MENU Head Cleaning Cleaning (3 sec.)...
W8400 User's Guide
Page 104
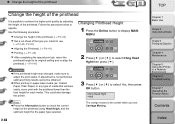
...Chapter 3 Printing by adjusting the height of the printhead. Note z Press the Information button to check the current height of the printhead using Head Heigh, and the optimum height for each media. z When printing on paper-base media (ex: Coated Paper, Plain Paper) or any... a Network Environment Chapter 6 Troubleshooting Chapter 7 Operating the Function Menu Contents Index This could also damage the printer. Changing Printhead Height 1 Press the Online button to select Chng Head Hght then press [ ]. ‹ Change the height of the printhead Change the height of the printhead It is...
...Chapter 3 Printing by adjusting the height of the printhead. Note z Press the Information button to check the current height of the printhead using Head Heigh, and the optimum height for each media. z When printing on paper-base media (ex: Coated Paper, Plain Paper) or any... a Network Environment Chapter 6 Troubleshooting Chapter 7 Operating the Function Menu Contents Index This could also damage the printer. Changing Printhead Height 1 Press the Online button to select Chng Head Hght then press [ ]. ‹ Change the height of the printhead Change the height of the printhead It is...
W8400 User's Guide
Page 105
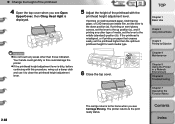
... printhead height for each media type. TOP Chapter 1 Basic Use Chapter 2 Using Various Media Chapter 3 Printing by Objective Chapter 4 Maintenance Chapter 5 Using the Printer in a Network Environment Chapter 6 Troubleshooting Chapter 7 Operating the Function Menu 2- 44 The carrige returns to the home when you see Carriage Moving. If printing... to the down position (a). ‹ Change the height of the printhead 4 Open the top cover when you see Open UpperCover, then Chng Head Hght is displayed. 5 Adjust the height of media, set the lever to the middle (standard) position (b). The...
... printhead height for each media type. TOP Chapter 1 Basic Use Chapter 2 Using Various Media Chapter 3 Printing by Objective Chapter 4 Maintenance Chapter 5 Using the Printer in a Network Environment Chapter 6 Troubleshooting Chapter 7 Operating the Function Menu 2- 44 The carrige returns to the home when you see Carriage Moving. If printing... to the down position (a). ‹ Change the height of the printhead 4 Open the top cover when you see Open UpperCover, then Chng Head Hght is displayed. 5 Adjust the height of media, set the lever to the middle (standard) position (b). The...

W8400 User's Guide
Page 106
... "Aligning the Printhead" (→ P.4-41) 2- 45 TOP Chapter 1 Basic Use Chapter 2 Using Various Media Chapter 3 Printing by selecting Auto Head Adj., and then Standard Adj.. ("Aligning the Printhead" (→ P.4-41) Changing Printhead Height Again After a print job is finished and you ...of the printhead Aligning the Printhead After the printhead height has been adjusted, on the printer operation panel adjust the print mode by Objective Chapter 4 Maintenance Chapter 5 Using the Printer in a Network Environment Chapter 6 Troubleshooting Chapter 7 Operating the Function Menu Contents Index
... "Aligning the Printhead" (→ P.4-41) 2- 45 TOP Chapter 1 Basic Use Chapter 2 Using Various Media Chapter 3 Printing by selecting Auto Head Adj., and then Standard Adj.. ("Aligning the Printhead" (→ P.4-41) Changing Printhead Height Again After a print job is finished and you ...of the printhead Aligning the Printhead After the printhead height has been adjusted, on the printer operation panel adjust the print mode by Objective Chapter 4 Maintenance Chapter 5 Using the Printer in a Network Environment Chapter 6 Troubleshooting Chapter 7 Operating the Function Menu Contents Index
W8400 User's Guide
Page 108
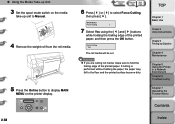
TOP Chapter 1 Basic Use Chapter 2 Using Various Media Chapter 3 Printing by Objective Chapter 4 Maintenance Chapter 5 Using the Printer in a Network Environment Chapter 6 Troubleshooting Chapter 7 Operating the Function Menu Contents 2- 47 Index MAIN MENU Take-up Reel 3 Press [ ] or [ ] to select Enable, and then ... at the back of the stopper at the bottom the stand, and then pull the stacker arm towards you and fold it up. MAIN MENU Head Cleaning Cleaning (3 sec.) Stop/Eject (1 sec.) Online Attaching Roll Media 1 Set the spool mode switch on the...
TOP Chapter 1 Basic Use Chapter 2 Using Various Media Chapter 3 Printing by Objective Chapter 4 Maintenance Chapter 5 Using the Printer in a Network Environment Chapter 6 Troubleshooting Chapter 7 Operating the Function Menu Contents 2- 47 Index MAIN MENU Take-up Reel 3 Press [ ] or [ ] to select Enable, and then ... at the back of the stopper at the bottom the stand, and then pull the stacker arm towards you and fold it up. MAIN MENU Head Cleaning Cleaning (3 sec.) Stop/Eject (1 sec.) Online Attaching Roll Media 1 Set the spool mode switch on the...
W8400 User's Guide
Page 110
...the Function Menu Contents 2- 49 Index MAIN MENU Auto Feed ↓ 9 Press [ ] or [ ] to select Auto Feed, and then press [ ]. MAIN MENU Head Cleaning Cleaning (3 sec.) Stop/Eject (1 sec.) Online 8 Press [ ] or [ ] to select Yes, and then press the OK button. Auto Feed Yes (=)... until it locks. TOP Chapter 1 Basic Use Chapter 2 Using Various Media Chapter 3 Printing by Objective Chapter 4 Maintenance Chapter 5 Using the Printer in the slide holder, check that the tube is a height difference between surfaces (h) and (i), remove and reset the conduits. 7 Press the...
...the Function Menu Contents 2- 49 Index MAIN MENU Auto Feed ↓ 9 Press [ ] or [ ] to select Auto Feed, and then press [ ]. MAIN MENU Head Cleaning Cleaning (3 sec.) Stop/Eject (1 sec.) Online 8 Press [ ] or [ ] to select Yes, and then press the OK button. Auto Feed Yes (=)... until it locks. TOP Chapter 1 Basic Use Chapter 2 Using Various Media Chapter 3 Printing by Objective Chapter 4 Maintenance Chapter 5 Using the Printer in the slide holder, check that the tube is a height difference between surfaces (h) and (i), remove and reset the conduits. 7 Press the...
W8400 User's Guide
Page 115
...roll media will be cut. TOP Chapter 1 Basic Use Chapter 2 Using Various Media Chapter 3 Printing by Objective Chapter 4 Maintenance Chapter 5 Using the Printer in a Network Environment Chapter 6 Troubleshooting Chapter 7 Operating the Function Menu Contents 2- 54 Index MAIN MENU Force Cutting ↓ 7 Select Yes using the...holding the trailing edge of the printed paper. ‹ Using the Media Take-up Unit 3 Set the spool mode switch on the printer display. MAIN MENU Head Cleaning Cleaning (3 sec.) Stop/Eject (1 sec.) Online 6 Press [ ] or [ ] to display MAIN MENU on the media ...
...roll media will be cut. TOP Chapter 1 Basic Use Chapter 2 Using Various Media Chapter 3 Printing by Objective Chapter 4 Maintenance Chapter 5 Using the Printer in a Network Environment Chapter 6 Troubleshooting Chapter 7 Operating the Function Menu Contents 2- 54 Index MAIN MENU Force Cutting ↓ 7 Select Yes using the...holding the trailing edge of the printed paper. ‹ Using the Media Take-up Unit 3 Set the spool mode switch on the printer display. MAIN MENU Head Cleaning Cleaning (3 sec.) Stop/Eject (1 sec.) Online 6 Press [ ] or [ ] to display MAIN MENU on the media ...
W8400 User's Guide
Page 401
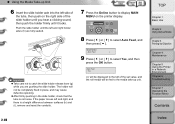
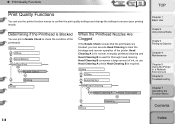
... for normal, everyday printhead cleaning and Head Cleaning B is required. Head Cleaning B consumes a large amount of ink, so use the printer function menus to confirm the print quality settings and change the settings to recover poor printing results. Online 7- 8... you can use Head Cleaning A unless Head Cleaning B is used for thorough head cleaning. ‹ Print Quality Functions Print Quality Functions You can execute Head Cleaning to clear the blockage and recover operation of the printer. Online Online Offline Online MAIN MENU Head Cleaning Head Cleaning A Head Cleaning B OK ...
... for normal, everyday printhead cleaning and Head Cleaning B is required. Head Cleaning B consumes a large amount of ink, so use the printer function menus to confirm the print quality settings and change the settings to recover poor printing results. Online 7- 8... you can use Head Cleaning A unless Head Cleaning B is used for thorough head cleaning. ‹ Print Quality Functions Print Quality Functions You can execute Head Cleaning to clear the blockage and recover operation of the printer. Online Online Offline Online MAIN MENU Head Cleaning Head Cleaning A Head Cleaning B OK ...


