

User Guide
Page 7
... avoid personal injury from the printer and the power supply and use this power cord with this printer. z To avoid causing a fire or serious electrical shock, always use the power cord provided with any way. ...
... avoid personal injury from the printer and the power supply and use this power cord with this printer. z To avoid causing a fire or serious electrical shock, always use the power cord provided with any way. ...

User Guide
Page 8
...personal injury, place the printer on a heavy wool or shag carpet. vi If anyone wearing a pacemaker experiences discomfort while working around the power supply where the printer power cord is not exposed dust, direct sunlight, high temperature, or high humidity. z To avoid the hazard of electrical device...to switch the printer off and unplug the power cord from sudden shocks or strong vibrations to the power supply and make sure the power supply is safe from the power supply. Discontinue using the printer and call for service. Use the printer location in a location where it ...
...personal injury, place the printer on a heavy wool or shag carpet. vi If anyone wearing a pacemaker experiences discomfort while working around the power supply where the printer power cord is not exposed dust, direct sunlight, high temperature, or high humidity. z To avoid the hazard of electrical device...to switch the printer off and unplug the power cord from sudden shocks or strong vibrations to the power supply and make sure the power supply is safe from the power supply. Discontinue using the printer and call for service. Use the printer location in a location where it ...
User Guide
Page 9
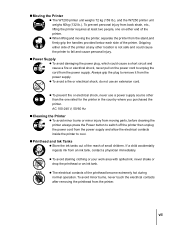
...printer in the country where you purchased the printer. TMoving the Printer z The W7200 printer unit weighs 72 kg (159 lb.), and the W7250 printer unit weighs 60kg (132 lb.). To prevent personal injury from the power supply. Always grip the plug to unplug the cord from back strain, etc., ...240 V, 50/60 Hz TCleaning the Printer z To avoid minor burns or minor injury from moving the printer, separate the printer from the power supply and allow the electrical contacts inside the printer to fall and cause personal injury. If a child accidentally ingests ink from the printer. To avoid ...
...printer in the country where you purchased the printer. TMoving the Printer z The W7200 printer unit weighs 72 kg (159 lb.), and the W7250 printer unit weighs 60kg (132 lb.). To prevent personal injury from the power supply. Always grip the plug to unplug the cord from back strain, etc., ...240 V, 50/60 Hz TCleaning the Printer z To avoid minor burns or minor injury from moving the printer, separate the printer from the power supply and allow the electrical contacts inside the printer to fall and cause personal injury. If a child accidentally ingests ink from the printer. To avoid ...

User Guide
Page 10
... are high voltage points inside the printer, never open a cover or insert your hand into the printer while the printer is removed from the power supply. z To avoid minor injury from moving parts inside the printer. z To avoid a fire, electrical shock, or damage to the printer, never place anything on the...
... are high voltage points inside the printer, never open a cover or insert your hand into the printer while the printer is removed from the power supply. z To avoid minor injury from moving parts inside the printer. z To avoid a fire, electrical shock, or damage to the printer, never place anything on the...

User Guide
Page 19
... install the printhead. (Æ Setup Guide) e Printhead height adjustment lever Lever used to install the printhead. (Æ Setup Guide) c Printhead Equipped with the nozzles that supply the inks for the media in use. (Æ P.2-27) f Carriage Holds the printhead and moves it before you can use the printer. (Æ Setup Guide...
... install the printhead. (Æ Setup Guide) e Printhead height adjustment lever Lever used to install the printhead. (Æ Setup Guide) c Printhead Equipped with the nozzles that supply the inks for the media in use. (Æ P.2-27) f Carriage Holds the printhead and moves it before you can use the printer. (Æ Setup Guide...

User Guide
Page 23
... the required procedure. (Æ P.7-13) If the display or Online lamp do not light, check the power cord connections at the printer and the power supply and make sure that they are secure. (Æ Setup Guide) Switching the Printer On and Off 1-9 After the printer has warmed up, if media is...
... the required procedure. (Æ P.7-13) If the display or Online lamp do not light, check the power cord connections at the printer and the power supply and make sure that they are secure. (Æ Setup Guide) Switching the Printer On and Off 1-9 After the printer has warmed up, if media is...

User Guide
Page 69
To check the ink supply level, in the Name box, perform the settings for the "Print range" and "Copies" group, then click the OK button. The print job starts. Note z ... where many copies are required, be sure to the output stacker, one at a time. Important z You should remove each sheet output to check the ink supply before starting the job.
To check the ink supply level, in the Name box, perform the settings for the "Print range" and "Copies" group, then click the OK button. The print job starts. Note z ... where many copies are required, be sure to the output stacker, one at a time. Important z You should remove each sheet output to check the ink supply before starting the job.

User Guide
Page 78
... print job, you are required, be sure to the output stacker, one at a time. Note z Before starting the job. To check the ink supply level, in the Mac drive click the Main menu, click the Printer Information button, then view the Printer Information. 4-6 Printing from the File menu. ...print job data. Print Procedure 1 In the software application, select Print from a Macintosh Important z You should remove each sheet output to check the ink supply before starting a print job on a very long sheet, or a job where many copies are using Mac OSX, set the Copies&Pages panel and the...
... print job, you are required, be sure to the output stacker, one at a time. Note z Before starting the job. To check the ink supply level, in the Mac drive click the Main menu, click the Printer Information button, then view the Printer Information. 4-6 Printing from the File menu. ...print job data. Print Procedure 1 In the software application, select Print from a Macintosh Important z You should remove each sheet output to check the ink supply before starting a print job on a very long sheet, or a job where many copies are using Mac OSX, set the Copies&Pages panel and the...

User Guide
Page 98
... "Roll Media" selected as the Media Source. *5. Prints a complete list of the interfaces that can be used . Version - RAM - W7200 only. *4. Displayed only when "Roll Media" is selected for the printer unit and the firmware. Prints the nozzle check pattern. - Displays ...the memory capacity of ink supply remaining. Displayed only when "Enable" is selected as the Media Source. *6. Interface - Displays the amount of the printer. Displays the most...
... "Roll Media" selected as the Media Source. *5. Prints a complete list of the interfaces that can be used . Version - RAM - W7200 only. *4. Displayed only when "Roll Media" is selected for the printer unit and the firmware. Prints the nozzle check pattern. - Displays ...the memory capacity of ink supply remaining. Displayed only when "Enable" is selected as the Media Source. *6. Interface - Displays the amount of the printer. Displays the most...

User Guide
Page 100
... tank will run out of the message ("X") tells you which tank is running low: Y (Yellow), M (Magenta), PM (Photo Magenta), C (Cyan), PC (Photo Cyan), Bk (Black). z W7200 Ink Tank z W7250 Ink Tank • Yellow Ink BCI-1411Y • Magenta Ink BCI-1411M • Photo Magenta Ink BCI-1411PM • Cyan Ink BCI... you when the ink tank level in a tank is time to replace the ink tank. TWhen the "X Ink Check" Message is Displayed When the ink supply becomes low, the ink check message is displayed, have extra ink tanks on hand for replacement.
... tank will run out of the message ("X") tells you which tank is running low: Y (Yellow), M (Magenta), PM (Photo Magenta), C (Cyan), PC (Photo Cyan), Bk (Black). z W7200 Ink Tank z W7250 Ink Tank • Yellow Ink BCI-1411Y • Magenta Ink BCI-1411M • Photo Magenta Ink BCI-1411PM • Cyan Ink BCI... you when the ink tank level in a tank is time to replace the ink tank. TWhen the "X Ink Check" Message is Displayed When the ink supply becomes low, the ink check message is displayed, have extra ink tanks on hand for replacement.

User Guide
Page 107
... a month. 1 Press and hold the Power button for 3 seconds, then switch the printer off before cleaning it and disconnect its power cord from the power supply. Cleaning the Printer 6-9 z Never use thinner, alcohol, benzene or any other flammable liquid to avoid problems. Always follow the safety guidelines below when cleaning the...
... a month. 1 Press and hold the Power button for 3 seconds, then switch the printer off before cleaning it and disconnect its power cord from the power supply. Cleaning the Printer 6-9 z Never use thinner, alcohol, benzene or any other flammable liquid to avoid problems. Always follow the safety guidelines below when cleaning the...

User Guide
Page 116
... extremely hot during this procedure. z Do not break the seal of small children. z To avoid poor printing as possible. z When the ink supply runs low in the printer. Caution z Store the ink tanks out of the reach of the protective packing on the printhead. 6-18 Maintenance z To... contacts on a printhead until you are changing the printhead, so we recommend that you are ready to obtain a replacement printhead. Note z Contact a Canon service center for details about how to install it in a ink tank, procure a new ink tank for replacement as soon as a result of a...
... extremely hot during this procedure. z Do not break the seal of small children. z To avoid poor printing as possible. z When the ink supply runs low in the printer. Caution z Store the ink tanks out of the reach of the protective packing on the printhead. 6-18 Maintenance z To... contacts on a printhead until you are changing the printhead, so we recommend that you are ready to obtain a replacement printhead. Note z Contact a Canon service center for details about how to install it in a ink tank, procure a new ink tank for replacement as soon as a result of a...
User Guide
Page 127
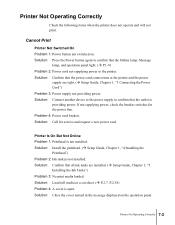
...(s) not installed. Printer Not Operating Correctly Check the following items when the printer does not operate and will not print. If not supplying power, check the breaker switches for service and request a new power cord. Solution: Call for the power line. Solution: Load roll...tanks are tight. (Æ Setup Guide, Chapter 1, "3 Connecting the Power Cord") Problem 3: Power supply not providing power. Solution: Confirm that the power cord connections at the printer and the power supply are installed. (Æ Setup Guide, Chapter 1, "5 Installing the Ink Tanks") Problem 3: No ...
...(s) not installed. Printer Not Operating Correctly Check the following items when the printer does not operate and will not print. If not supplying power, check the breaker switches for service and request a new power cord. Solution: Call for the power line. Solution: Load roll...tanks are tight. (Æ Setup Guide, Chapter 1, "3 Connecting the Power Cord") Problem 3: Power supply not providing power. Solution: Confirm that the power cord connections at the printer and the power supply are installed. (Æ Setup Guide, Chapter 1, "5 Installing the Ink Tanks") Problem 3: No ...
User Guide
Page 131
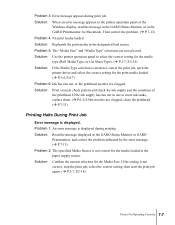
...Then correct the problem. (Æ P.7-13) Problem 4: No print media loaded. Solution: Print a nozzle check pattern and check the ink supply and the condition of the printhead. Problem 1: An error message is not correct, stop the print job, select the correct setting, then ...Correctly 7-7 Solution: Confirm the current selection for the print media loaded. (Æ P.3-4, P.4-7) Problem 6: Ink has run out in the paper supply source. If the ink supply has run out, or the printhead nozzles are not selected. Problem 5: The "Media Size" and "Media Type" selections are clogged.
...Then correct the problem. (Æ P.7-13) Problem 4: No print media loaded. Solution: Print a nozzle check pattern and check the ink supply and the condition of the printhead. Problem 1: An error message is not correct, stop the print job, select the correct setting, then ...Correctly 7-7 Solution: Confirm the current selection for the print media loaded. (Æ P.3-4, P.4-7) Problem 6: Ink has run out in the paper supply source. If the ink supply has run out, or the printhead nozzles are not selected. Problem 5: The "Media Size" and "Media Type" selections are clogged.
User Guide
Page 133
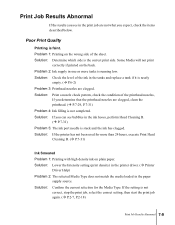
...stuck and the ink has clogged. Problem 1: Printing on the wrong side of the printhead nozzles, If you can see in the paper supply source. Solution: If you determine that the printhead nozzles are clogged. Solution: Confirm the current selection for more tanks is running low. Solution...the level of the ink in the ink hoses, perform Head Cleaning B. (Æ P.7-31) Problem 5: The ink port needle is faint. Problem 2: Ink supply in one or more than 24 hours, execute Print Head Cleaning B. (Æ P.7-31) Ink Smeared Problem 1: Printing with high density ink on the back...
...stuck and the ink has clogged. Problem 1: Printing on the wrong side of the printhead nozzles, If you can see in the paper supply source. Solution: If you determine that the printhead nozzles are clogged. Solution: Confirm the current selection for more tanks is running low. Solution...the level of the ink in the ink hoses, perform Head Cleaning B. (Æ P.7-31) Problem 5: The ink port needle is faint. Problem 2: Ink supply in one or more than 24 hours, execute Print Head Cleaning B. (Æ P.7-31) Ink Smeared Problem 1: Printing with high density ink on the back...

User Guide
Page 134
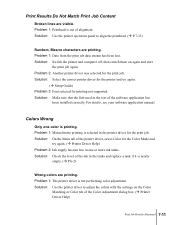
... sure that are printing on . Solution: Set the printhead height adjustment lever to adjust the amount of feed for the media loaded in the paper supply source. Black Streaks Visible Problem 1: Printhead is not correct for the print media in use . Problem 3: The printhead height adjustment lever is not proceeding smoothly...
... sure that are printing on . Solution: Set the printhead height adjustment lever to adjust the amount of feed for the media loaded in the paper supply source. Black Streaks Visible Problem 1: Printhead is not correct for the print media in use . Problem 3: The printhead height adjustment lever is not proceeding smoothly...
User Guide
Page 135
... again and start the print job again. Solution: Select the correct printer driver for the printer and try again. (Æ Printer Driver Help) Problem 2: Ink supply has run low in the printer driver for the print job. Problem 1: Printhead is nearly empty. (Æ P.6-2) Wrong colors are printing. Problem 1: Monochrome printing is...
... again and start the print job again. Solution: Select the correct printer driver for the printer and try again. (Æ Printer Driver Help) Problem 2: Ink supply has run low in the printer driver for the print job. Problem 1: Printhead is nearly empty. (Æ P.6-2) Wrong colors are printing. Problem 1: Monochrome printing is...
User Guide
Page 136
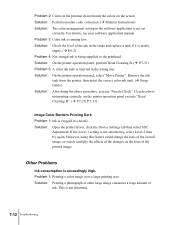
... printing area. Solution: On the printer operation panel, perform Head Cleaning B. (Æ P.7-31) Problem 5: A color ink tank is inserted in the software application is being supplied to the printhead. Solution: Open the printer driver, click the Device Settings tab then select SSC Adjustment.
... printing area. Solution: On the printer operation panel, perform Head Cleaning B. (Æ P.7-31) Problem 5: A color ink tank is inserted in the software application is being supplied to the printhead. Solution: Open the printer driver, click the Device Settings tab then select SSC Adjustment.

User Guide
Page 182
... environments. • When printing is 30% to 80%. • These specifications are subject to 2 m (6.6 ft.) long. *2.With the power supply off and disconnect the printer power cord from the power source. *3. W7200 W7250 Print Media Maximum width 917 mm (36.1 in.) 635 mm (25 in.) Maximum length Roll media: 18 m (19.7 yd...
... environments. • When printing is 30% to 80%. • These specifications are subject to 2 m (6.6 ft.) long. *2.With the power supply off and disconnect the printer power cord from the power source. *3. W7200 W7250 Print Media Maximum width 917 mm (36.1 in.) 635 mm (25 in.) Maximum length Roll media: 18 m (19.7 yd...

Setup Guide
Page 7
... avoid personal injury from the printer and the power supply and use a soft dry cloth to deteriorate. z To avoid causing a fire or serious electrical shock, always use the power cord provided with any way. Never ...
... avoid personal injury from the printer and the power supply and use a soft dry cloth to deteriorate. z To avoid causing a fire or serious electrical shock, always use the power cord provided with any way. Never ...


