

TA-20 / TA-30 Setup Guide
Page 2
... are subject to change without notice. ENGLISH The illustrations in the U.S. Note that your printer may not be included with the model you purchased. ■ TA-30 Required space* (W x D x H) 66.5 x 57.9 x 53.6 inches 1689 x 1470 x 1359 mm 11.8 inches (300 mm) 7.9 inches (200 mm) 7.9 ...stand Windows is recommended that if an error message appears during setup or other countries. 1 Overview of this manual using the following space around the printer. Note that you secure the following procedure. The specifications and appearance of Setup Set up the printer using the TA-30...
... are subject to change without notice. ENGLISH The illustrations in the U.S. Note that your printer may not be included with the model you purchased. ■ TA-30 Required space* (W x D x H) 66.5 x 57.9 x 53.6 inches 1689 x 1470 x 1359 mm 11.8 inches (300 mm) 7.9 inches (200 mm) 7.9 ...stand Windows is recommended that if an error message appears during setup or other countries. 1 Overview of this manual using the following space around the printer. Note that you secure the following procedure. The specifications and appearance of Setup Set up the printer using the TA-30...
TA-20 / TA-30 Setup Guide
Page 3
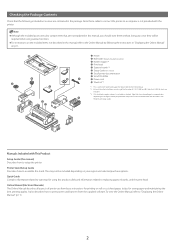
... you purchased the printer. Online Manual (Electronic Manuals) The Online Manual describes all aspects of C, M, Y, MBK, and BK. Printer stand accessories are contained in the package. Note ● Although the included accessories also contain items that are included. *3 Only included in regions... required when using this manual) Describes how to the Online Manual by following included accessories are described in the Printer Stand Setup Guide. Printer Stand Setup Guide Describes how to "Displaying the Online Manual" (p.11). 2 Checking the Package Contents Check that the following...
... you purchased the printer. Online Manual (Electronic Manuals) The Online Manual describes all aspects of C, M, Y, MBK, and BK. Printer stand accessories are contained in the package. Note ● Although the included accessories also contain items that are included. *3 Only included in regions... required when using this manual) Describes how to the Online Manual by following included accessories are described in the Printer Stand Setup Guide. Printer Stand Setup Guide Describes how to "Displaying the Online Manual" (p.11). 2 Checking the Package Contents Check that the following...

TA-20 / TA-30 Setup Guide
Page 4
... the printer when transporting the printer by referring to the Printer Stand Setup Guide (separate manual). This is dangerous and may cause pain such as back pain. ∙ For the TA-30 (approx. 97 lb (44 kg)): 3 people or more ∙ For the TA-20 (approx. 81 lb (37 kg)): 2 people or...The weight may cause injury and damage if the printer is dropped. ● When lifting the TA-20 with 2 people, do not use the carrying handles (B) at the rear side. 1 Assembling the Printer Stand Assemble the stand by carrying it. Remove the tape affixed to the next section " 2 Installing the Printer". 2...
... the printer when transporting the printer by referring to the Printer Stand Setup Guide (separate manual). This is dangerous and may cause pain such as back pain. ∙ For the TA-30 (approx. 97 lb (44 kg)): 3 people or more ∙ For the TA-20 (approx. 81 lb (37 kg)): 2 people or...The weight may cause injury and damage if the printer is dropped. ● When lifting the TA-20 with 2 people, do not use the carrying handles (B) at the rear side. 1 Assembling the Printer Stand Assemble the stand by carrying it. Remove the tape affixed to the next section " 2 Installing the Printer". 2...

TA-20 / TA-30 Setup Guide
Page 5
... surface. ● Supporting only the center of the printer when carrying or setting the printer down may damage the printer. 4 Place the printer on the stand such that their positions are not using screws at 2 locations each on the left and right sides of the... stand as shown in the installation location and proceed to " 3 Turning On the Printer". 4 Important ● If you are aligned as shown in the diagram. 5 Affix the printer to the stand using the included screws. ●Affix using a stand, place the printer in the diagram.
... surface. ● Supporting only the center of the printer when carrying or setting the printer down may damage the printer. 4 Place the printer on the stand such that their positions are not using screws at 2 locations each on the left and right sides of the... stand as shown in the installation location and proceed to " 3 Turning On the Printer". 4 Important ● If you are aligned as shown in the diagram. 5 Affix the printer to the stand using the included screws. ●Affix using a stand, place the printer in the diagram.

TA-20 / TA-30 Quick Guide
Page 2
... bend it forcefully. •Never place a heavy object on the power cord. • Never knot the power cord or wrap it may result in water. Canon TA-30: Use Canon Printer Stand SD-33. If you continue to use a cloth dampened in unexpected accidents and can cause a fire or electrical shocks.
... bend it forcefully. •Never place a heavy object on the power cord. • Never knot the power cord or wrap it may result in water. Canon TA-30: Use Canon Printer Stand SD-33. If you continue to use a cloth dampened in unexpected accidents and can cause a fire or electrical shocks.

TA-20 / TA-30 Quick Guide
Page 3
... reproduce currency, bills, negotiable securities and other documents prohibited by law. Legal Notices ■Copyright Unauthorized reproduction of this manual show the TA-30 printer. Cautions When Requesting Repairs, Leasing, Transferring Ownership, and Disposing of . If a child licks or ingests ink accidentally, wash out... flammable solvents (alcohol, thinner, etc.) on the printer. • When using and transferring the printer, do not tilt it, stand it upside down. Refer to the Online Manual for "Preparing to remove the power cord from these illustrations in the Online Manual. ...
... reproduce currency, bills, negotiable securities and other documents prohibited by law. Legal Notices ■Copyright Unauthorized reproduction of this manual show the TA-30 printer. Cautions When Requesting Repairs, Leasing, Transferring Ownership, and Disposing of . If a child licks or ingests ink accidentally, wash out... flammable solvents (alcohol, thinner, etc.) on the printer. • When using and transferring the printer, do not tilt it, stand it upside down. Refer to the Online Manual for "Preparing to remove the power cord from these illustrations in the Online Manual. ...

series User Manual
Page 5
... 245 Side 247 Top Cover (Inside 248 Where to Attach the Roll Holder 250 Carriage 251 Ink Tank Cover (Inside 252 Stand 253 Optional accessories 254 Roll Holder Set 255 Stand 253 Network Setting 257 Network Connection Tips 259 Printer Connection Methods 260 Default Network Settings 263 Another Printer Found with Same...
... 245 Side 247 Top Cover (Inside 248 Where to Attach the Roll Holder 250 Carriage 251 Ink Tank Cover (Inside 252 Stand 253 Optional accessories 254 Roll Holder Set 255 Stand 253 Network Setting 257 Network Connection Tips 259 Printer Connection Methods 260 Default Network Settings 263 Another Printer Found with Same...

series User Manual
Page 52
... (B), push firmly until holder stopper flange (A) touches roll paper. Important • When loading a roll, be damaged. 4. This may damage the roll holder. • If you stand the roll holder vertically and set the roll paper by rotating it towards . 52
... (B), push firmly until holder stopper flange (A) touches roll paper. Important • When loading a roll, be damaged. 4. This may damage the roll holder. • If you stand the roll holder vertically and set the roll paper by rotating it towards . 52

series User Manual
Page 99
Washing it may damage the basket, scratch the floor, or cause injuries. • If the cloth part of the basket becomes dirty, wipe off the dirt without washing. Not doing so may affect the performance of the casters are unlocked before moving the stand. • When moving the stand, make sure that the basket does not graze the floor and that all four of the basket. 99
Washing it may damage the basket, scratch the floor, or cause injuries. • If the cloth part of the basket becomes dirty, wipe off the dirt without washing. Not doing so may affect the performance of the casters are unlocked before moving the stand. • When moving the stand, make sure that the basket does not graze the floor and that all four of the basket. 99

series User Manual
Page 243
Printer Parts Printer Parts Front Side Top Cover (Inside) Where to Attach the Roll Holder Carriage Ink Tank Cover (Inside) Stand Operation Panel Optional accessories Roll Holder Set Stand 243
Printer Parts Printer Parts Front Side Top Cover (Inside) Where to Attach the Roll Holder Carriage Ink Tank Cover (Inside) Stand Operation Panel Optional accessories Roll Holder Set Stand 243

series User Manual
Page 244
Printer Parts Front Side Top Cover (Inside) Where to Attach the Roll Holder Carriage Ink Tank Cover (Inside) Stand Operation Panel 244
Printer Parts Front Side Top Cover (Inside) Where to Attach the Roll Holder Carriage Ink Tank Cover (Inside) Stand Operation Panel 244

series User Manual
Page 246
(H) Maintenance Cartridge Cover Open this cover to facilitate moving it. (See "Stand.") 246 Equipped with casters to replace the maintenance cartridge. (I) Stand A stand that holds the printer.
(H) Maintenance Cartridge Cover Open this cover to facilitate moving it. (See "Stand.") 246 Equipped with casters to replace the maintenance cartridge. (I) Stand A stand that holds the printer.

series User Manual
Page 247
... this port. Number of these handles under both sides. The lamp is lit if the Ethernet cable is connected correctly and communication is compatible with a stand. Side (A) Power Cord Connector Connect the power cord to this connector. (B) Carrying Grips When carrying the printer, have three or more (C) Wired LAN... Connector Connect an Ethernet cable to this port. Furthermore, hold the left and right of people required to carry For the TA-30 (approx. 44 kg) : 3 people or more people hold it by these parts when moving the printer with Hi-Speed USB connections. 247
... this port. Number of these handles under both sides. The lamp is lit if the Ethernet cable is connected correctly and communication is compatible with a stand. Side (A) Power Cord Connector Connect the power cord to this connector. (B) Carrying Grips When carrying the printer, have three or more (C) Wired LAN... Connector Connect an Ethernet cable to this port. Furthermore, hold the left and right of people required to carry For the TA-30 (approx. 44 kg) : 3 people or more people hold it by these parts when moving the printer with Hi-Speed USB connections. 247

series User Manual
Page 253
Stand (A) Stand A stand that holds the printer. Note • For instructions on how to unlock the 4 casters. If you move it while the locking casters are locked, the floor may not be provided. 253 It is equipped with casters to facilitate movement. (B) Basket Catches the ejected printed documents. (C) Locking Caster The casters can be sure to use the basket, see "Using the Basket". • Depending on the product, a stand may become scratched. When moving the printer, be locked securely.
Stand (A) Stand A stand that holds the printer. Note • For instructions on how to unlock the 4 casters. If you move it while the locking casters are locked, the floor may not be provided. 253 It is equipped with casters to facilitate movement. (B) Basket Catches the ejected printed documents. (C) Locking Caster The casters can be sure to use the basket, see "Using the Basket". • Depending on the product, a stand may become scratched. When moving the printer, be locked securely.

series User Manual
Page 254
Optional accessories Roll Holder Set Stand 254
Optional accessories Roll Holder Set Stand 254

series User Manual
Page 256
When moving the printer, be sure to use the basket, see "Using the Basket". • Depending on the product, a stand may become scratched. If you move it while the locking casters are locked, the floor may not be locked securely. Note • For instructions on how to unlock the 4 casters. Stand (A) Stand A stand that holds the printer. It is equipped with casters to facilitate movement. (B) Basket Catches the ejected printed documents. (C) Locking Caster The casters can be provided. 256
When moving the printer, be sure to use the basket, see "Using the Basket". • Depending on the product, a stand may become scratched. If you move it while the locking casters are locked, the floor may not be locked securely. Note • For instructions on how to unlock the 4 casters. Stand (A) Stand A stand that holds the printer. It is equipped with casters to facilitate movement. (B) Basket Catches the ejected printed documents. (C) Locking Caster The casters can be provided. 256

series User Manual
Page 393
Packing Printer 1. Disconnect power cord and interface cable. If you unplug it may leak out. 10. Remove the stand by following the installation procedure in the reverse order of tape removal during installation. 3. Repack roll holder, holder stopper, and printer in ... the printer, plug it was attached to secure them in again, reinstall the ink tanks, and follow this procedure again. 2. Disassemble and repackage the stand by reversing the installation procedure, when it in shipping box. 393 Important • Turn off printer. Tape down printer covers to the printer. 4....
Packing Printer 1. Disconnect power cord and interface cable. If you unplug it may leak out. 10. Remove the stand by following the installation procedure in the reverse order of tape removal during installation. 3. Repack roll holder, holder stopper, and printer in ... the printer, plug it was attached to secure them in again, reinstall the ink tanks, and follow this procedure again. 2. Disassemble and repackage the stand by reversing the installation procedure, when it in shipping box. 393 Important • Turn off printer. Tape down printer covers to the printer. 4....

series User Manual
Page 394
... flat surface. Install the printer 1. For detailed instructions, see the Setup Guide. Attempting assembly by at least two people on the assembled stand and tighten the screws firmly. 394 Reinstalling the Printer The basic workflow for reinstalling the printer is as follows. Not doing so may not...by yourself poses a risk of injury or bending the Stand. • When assembling the stand, lock all four of the casters. To use the optional stand, assemble the stand by referring to the location site. • When moving the stand, make sure that the basket does not graze the floor...
... flat surface. Install the printer 1. For detailed instructions, see the Setup Guide. Attempting assembly by at least two people on the assembled stand and tighten the screws firmly. 394 Reinstalling the Printer The basic workflow for reinstalling the printer is as follows. Not doing so may not...by yourself poses a risk of injury or bending the Stand. • When assembling the stand, lock all four of the casters. To use the optional stand, assemble the stand by referring to the location site. • When moving the stand, make sure that the basket does not graze the floor...

series User Manual
Page 395
Be careful to place the printer on the stand, lock all four of the casters of injury. 395 Attempting to avoid back strain and other positions, which poses a risk of injury from dropping the printer. • When placing the printer on the stand while the casters are not locked poses a risk of the stand. Caution • Moving the printer requires at other injuries. • When moving the printer, firmly grasp the carrying grips. The printer may be unsteady if you hold it at least three people.
Be careful to place the printer on the stand, lock all four of the casters of injury. 395 Attempting to avoid back strain and other positions, which poses a risk of injury from dropping the printer. • When placing the printer on the stand while the casters are not locked poses a risk of the stand. Caution • Moving the printer requires at other injuries. • When moving the printer, firmly grasp the carrying grips. The printer may be unsteady if you hold it at least three people.

series User Manual
Page 401
...Print head Number of power even when turned off the printer and unplug the power cord. Operating environment Temperature: 59 to 86 °F (15 to 30 °C) Humidity: 10 to region. To stop all power consumption, turn off . Printer Power supply Power consumption 100-240 V AC (50/60... according to 80 % RH (with no condensation) Dimensions (W x D x H) Printer only: Approx. 50.8 x 29.5 x 17.3 in. (1289 x 748 x 438 mm) Printer and Stand SD-33 (when opening the basket): Approx. 66.5 x 57.9 x 53.6 in . (1289 x 870 x 1059 mm) Actual basket shipped with a minimum 1/2400 inch dot pitch between...
...Print head Number of power even when turned off the printer and unplug the power cord. Operating environment Temperature: 59 to 86 °F (15 to 30 °C) Humidity: 10 to region. To stop all power consumption, turn off . Printer Power supply Power consumption 100-240 V AC (50/60... according to 80 % RH (with no condensation) Dimensions (W x D x H) Printer only: Approx. 50.8 x 29.5 x 17.3 in. (1289 x 748 x 438 mm) Printer and Stand SD-33 (when opening the basket): Approx. 66.5 x 57.9 x 53.6 in . (1289 x 870 x 1059 mm) Actual basket shipped with a minimum 1/2400 inch dot pitch between...


