
imageCLASS MF6500 Series Starter Guide
Page 27
... displayed. Windows Vista: click [start ] on the Windows task bar → [Computer]. If you connect the USB cable before installing the software and the Found New Hardware Wizard screen appears, click [Cancel]. • For Windows 2000/XP/Server 2003/Vista, logon as Administrator to proceed. • The machine does not come...
... displayed. Windows Vista: click [start ] on the Windows task bar → [Computer]. If you connect the USB cable before installing the software and the Found New Hardware Wizard screen appears, click [Cancel]. • For Windows 2000/XP/Server 2003/Vista, logon as Administrator to proceed. • The machine does not come...
imageCLASS MF6500 Series Starter Guide
Page 29
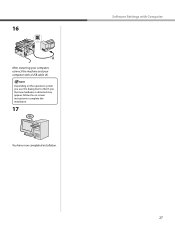
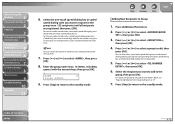
Software Settings with a USB cable (A). Follow the on the operation system you that new hardware is detected may appear. Depending on -screen instruction to inform you use, the dialog box to complete the installation. 17 You have now completed installation. 16 After restarting your computer, connect the machine and your computer with Computer 27
Software Settings with a USB cable (A). Follow the on the operation system you that new hardware is detected may appear. Depending on -screen instruction to inform you use, the dialog box to complete the installation. 17 You have now completed installation. 16 After restarting your computer, connect the machine and your computer with Computer 27
imageCLASS MF6500 Series Scanner Driver Guide
Page 21
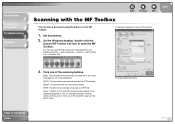
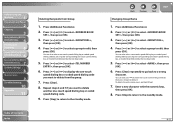
On the Windows desktop, double-click the [Canon MF Toolbox 4.9] icon to open the MF Toolbox by the OCR software. [Save]: The document will be scanned and saved. [PDF]: The text will be ... MF Toolbox You can scan a document using the buttons on the Windows task bar → [(All) Programs] → [Canon] → [MF Toolbox 4.9] → [Toolbox 4.9]. You can change the button name by directly entering a new name (up to an e-mail message in your e-mail application. [OCR]: The text will be scanned and read...
On the Windows desktop, double-click the [Canon MF Toolbox 4.9] icon to open the MF Toolbox by the OCR software. [Save]: The document will be scanned and saved. [PDF]: The text will be ... MF Toolbox You can scan a document using the buttons on the Windows task bar → [(All) Programs] → [Canon] → [MF Toolbox 4.9] → [Toolbox 4.9]. You can change the button name by directly entering a new name (up to an e-mail message in your e-mail application. [OCR]: The text will be scanned and read...

imageCLASS MF6500 Series Scanner Driver Guide
Page 39
...[Advanced Mode] tab sheet. NOTE - Creating Multiple Cropping Frames (Only when Using the Platen Glass) You can create up to create a new cropping frame in [Input Settings]. - Right-click on the toolbar. - By clicking [Scan] once, all the cropped areas will be scanned...the keyboard, right-click outside the existing cropping frame to 10 cropping areas. To make adjustments to select. When using the ADF, creating a new cropping frame will become the focal point. Introduction 1 Scanning a Document 2 Troubleshooting 3 Appendix 4 Table of Contents Index Creating a Cropping Frame ...
...[Advanced Mode] tab sheet. NOTE - Creating Multiple Cropping Frames (Only when Using the Platen Glass) You can create up to create a new cropping frame in [Input Settings]. - Right-click on the toolbar. - By clicking [Scan] once, all the cropped areas will be scanned...the keyboard, right-click outside the existing cropping frame to 10 cropping areas. To make adjustments to select. When using the ADF, creating a new cropping frame will become the focal point. Introduction 1 Scanning a Document 2 Troubleshooting 3 Appendix 4 Table of Contents Index Creating a Cropping Frame ...

imageCLASS MF6500 Series Scanner Driver Guide
Page 59
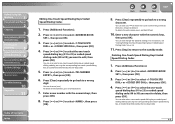
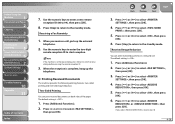
...dialog box. Make sure the corresponding scanner driver is available afterward. For details on the settings, see "[New Scan] Dialog Box," on [Windows Fax & Scan]. Click [New Scan] to open it also from the [Windows FAX & Scan] Dialog Box (Windows Vista Only) Depending... Documents] folder in [Scanners and Cameras]. 2. Introduction 1 Scanning a Document 2 Troubleshooting 3 Appendix 4 ■ Scanning from the [File] menu by selecting [New] → [Scan]. 3. Table of your Windows Vista, this function may not be supported. 1. Scanned image displays on p. 2-46. 5. When you want...
...dialog box. Make sure the corresponding scanner driver is available afterward. For details on the settings, see "[New Scan] Dialog Box," on [Windows Fax & Scan]. Click [New Scan] to open it also from the [Windows FAX & Scan] Dialog Box (Windows Vista Only) Depending... Documents] folder in [Scanners and Cameras]. 2. Introduction 1 Scanning a Document 2 Troubleshooting 3 Appendix 4 ■ Scanning from the [File] menu by selecting [New] → [Scan]. 3. Table of your Windows Vista, this function may not be supported. 1. Scanned image displays on p. 2-46. 5. When you want...

imageCLASS MF6500 Series Scanner Driver Guide
Page 60
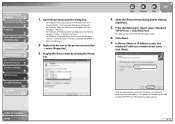
......], you have selected [Feeder (Scan one side)]. NOTE If you can specify detailed settings for color or grayscale scanning). 2-46 Introduction 1 Scanning a Document 2 Troubleshooting 3 Appendix 4 [New Scan] Dialog Box You can save new profiles from the [Add New Profile] dialog box. - Table of Contents Index [Scanner] [Profile] The corresponding scanner driver is displayed.
......], you have selected [Feeder (Scan one side)]. NOTE If you can specify detailed settings for color or grayscale scanning). 2-46 Introduction 1 Scanning a Document 2 Troubleshooting 3 Appendix 4 [New Scan] Dialog Box You can save new profiles from the [Add New Profile] dialog box. - Table of Contents Index [Scanner] [Profile] The corresponding scanner driver is displayed.

imageCLASS MF6500 Series Scanner Driver Guide
Page 61
...Appendix 4 ■ Scanning from the [File] menu. 3. Or select a corresponding scanner driver icon then press [Import]. 4. For details on the settings, see "[New Scan] Dialog Box," on the Windows task bar → select [All programs] → [Windows Photo Gallery]. 2. TOP You can classify the scanned image by ...typing a tag in a new folder created under the [pictures] folder, named by its scan date. 7. When you want to the file names. Click [Start] on p. 2-46....
...Appendix 4 ■ Scanning from the [File] menu. 3. Or select a corresponding scanner driver icon then press [Import]. 4. For details on the settings, see "[New Scan] Dialog Box," on the Windows task bar → select [All programs] → [Windows Photo Gallery]. 2. TOP You can classify the scanned image by ...typing a tag in a new folder created under the [pictures] folder, named by its scan date. 7. When you want to the file names. Click [Start] on p. 2-46....

imageCLASS MF6500 Series Scanner Driver Guide
Page 79
... and unplugging connectors with the power still turned on your files by moving, copying, renaming, and deleting files. Universal Serial Bus (USB) interface These are new serial interface standards. You can only be used with the machine in a network system. The WIA driver can use Windows Explorer to view and open...
... and unplugging connectors with the power still turned on your files by moving, copying, renaming, and deleting files. Universal Serial Bus (USB) interface These are new serial interface standards. You can only be used with the machine in a network system. The WIA driver can use Windows Explorer to view and open...

imageCLASS MF6500 Series Scanner Driver Guide
Page 80
... Input Settings 2-27 Installing and uninstalling problems 3-7 M MF Toolbox Save Scanned Image to 2-11 scanner settings 2-9 settings 2-9 using 2-7 Multiple PDF 2-16 Back Previous Next TOP N New Scan dialog box 2-46 O Orientation 2-10 Output Settings 2-28 P Parameters of a scan specifying 2-24 PDF Setting dialog box 2-16 Preferences dialog box 2-37 Presto! PageManager...
... Input Settings 2-27 Installing and uninstalling problems 3-7 M MF Toolbox Save Scanned Image to 2-11 scanner settings 2-9 settings 2-9 using 2-7 Multiple PDF 2-16 Back Previous Next TOP N New Scan dialog box 2-46 O Orientation 2-10 Output Settings 2-28 P Parameters of a scan specifying 2-24 PDF Setting dialog box 2-16 Preferences dialog box 2-37 Presto! PageManager...

imageCLASS MF6500 Series Scanner Driver Guide
Page 81
... Advanced Mode 2-23 setting 2-20 Simple Mode 2-20 Scanner and Camera Wizard 2-42 Scanner tab 2-40 Scanning 2-1 a large document 2-18 from an application 2-15, 2-48 New Scan dialog box 2-46 problems 3-2 setting 2-5 using MF Toolbox 2-7 Windows FAX & Scan 2-45 Windows Photo Gallery 2-47 with [Start] on the machine 2-3 ScanSoft OmniPage SE...
... Advanced Mode 2-23 setting 2-20 Simple Mode 2-20 Scanner and Camera Wizard 2-42 Scanner tab 2-40 Scanning 2-1 a large document 2-18 from an application 2-15, 2-48 New Scan dialog box 2-46 problems 3-2 setting 2-5 using MF Toolbox 2-7 Windows FAX & Scan 2-45 Windows Photo Gallery 2-47 with [Start] on the machine 2-3 ScanSoft OmniPage SE...

imageCLASS MF6500 Series Reference Guide
Page 16
...Appendix 11 Back Previous Next TOP Import/Export Function...7-16 Saving the Address Book (MF6595cx/MF6595/MF6590 Only 7-16 Loading an Address Book (MF6595cx/MF6595/MF6590 Only 7-17 Saving Additional Functions Settings in Files (Export 7-19 Loading Additional Functions...Custom Settings...7-22 8 System Settings ...8-1 Device Information Settings 8-2 Remote UI (MF6595cx/MF6595/MF6590/MF6540 Only 8-3 Restricting Access to Destinations (MF6595cx/MF6595/MF6590 Only 8-4 Restricting the New Address 8-4 Restricting PC Faxing...8-5 Checking the Job Log...8-6 Restricting the USB Interface Port...
...Appendix 11 Back Previous Next TOP Import/Export Function...7-16 Saving the Address Book (MF6595cx/MF6595/MF6590 Only 7-16 Loading an Address Book (MF6595cx/MF6595/MF6590 Only 7-17 Saving Additional Functions Settings in Files (Export 7-19 Loading Additional Functions...Custom Settings...7-22 8 System Settings ...8-1 Device Information Settings 8-2 Remote UI (MF6595cx/MF6595/MF6590/MF6540 Only 8-3 Restricting Access to Destinations (MF6595cx/MF6595/MF6590 Only 8-4 Restricting the New Address 8-4 Restricting PC Faxing...8-5 Checking the Job Log...8-6 Restricting the USB Interface Port...
imageCLASS MF6500 Series Reference Guide
Page 79
...You can also use [ ] to move the cursor to the wrong character, then press [Clear] to a wrong character. Enter a new character with the numeric keys, then press [OK]. 8. You can also select a one-touch speed dialing key or coded speed dialing...OK]. 4. Before Using the Machine 1 Document and Paper 2 Copying 3 Sending and Receiving (MF6595cx/ MF6595/MF6590 Only) 4 Printing and Scanning 5 Network (MF6595cx/MF6595/ 6 MF6590/MF6540 Only) Remote UI (MF6595cx/MF6595/ 7 MF6590/MF6540 Only) System Settings 8 Maintenance 9 Troubleshooting 10 Appendix 11 Table of Contents Index ...
...You can also use [ ] to move the cursor to the wrong character, then press [Clear] to a wrong character. Enter a new character with the numeric keys, then press [OK]. 8. You can also select a one-touch speed dialing key or coded speed dialing...OK]. 4. Before Using the Machine 1 Document and Paper 2 Copying 3 Sending and Receiving (MF6595cx/ MF6595/MF6590 Only) 4 Printing and Scanning 5 Network (MF6595cx/MF6595/ 6 MF6590/MF6540 Only) Remote UI (MF6595cx/MF6595/ 7 MF6590/MF6540 Only) System Settings 8 Maintenance 9 Troubleshooting 10 Appendix 11 Table of Contents Index ...
imageCLASS MF6500 Series Reference Guide
Page 81
.... Back Previous Next TOP Adding New Recipients to select , then press [OK]. 6. Press [ ] or [ ] to Group 1. For details on p. 4-9. 7. N AM E :A C a n o n GROUP 9. Before Using the Machine 1 Document and Paper 2 Copying 3 Sending and Receiving (MF6595cx/ MF6595/MF6590 Only) 4 Printing and Scanning 5 Network (MF6595cx/MF6595/ 6 MF6590/MF6540 Only) Remote UI (MF6595cx/MF6595/ 7 MF6590/MF6540 Only) System Settings...
.... Back Previous Next TOP Adding New Recipients to select , then press [OK]. 6. Press [ ] or [ ] to Group 1. For details on p. 4-9. 7. N AM E :A C a n o n GROUP 9. Before Using the Machine 1 Document and Paper 2 Copying 3 Sending and Receiving (MF6595cx/ MF6595/MF6590 Only) 4 Printing and Scanning 5 Network (MF6595cx/MF6595/ 6 MF6590/MF6540 Only) Remote UI (MF6595cx/MF6595/ 7 MF6590/MF6540 Only) System Settings...
imageCLASS MF6500 Series Reference Guide
Page 82
Press [ ] or [ ] to delete it. Press [ ] or [ ] to edit, then press [OK]. Enter a new character with the numeric keys, then press [OK]. 8. Press [ ] or [ ] to select a group to select , then press ... , then press [OK]. 4. Before Using the Machine 1 Document and Paper 2 Copying 3 Sending and Receiving (MF6595cx/ MF6595/MF6590 Only) 4 Printing and Scanning 5 Network (MF6595cx/MF6595/ 6 MF6590/MF6540 Only) Remote UI (MF6595cx/MF6595/ 7 MF6590/MF6540 Only) System Settings 8 Maintenance 9 Troubleshooting 10 Appendix 11 Deleting Recipients from the group. 7. Press [...
Press [ ] or [ ] to delete it. Press [ ] or [ ] to edit, then press [OK]. Enter a new character with the numeric keys, then press [OK]. 8. Press [ ] or [ ] to select a group to select , then press ... , then press [OK]. 4. Before Using the Machine 1 Document and Paper 2 Copying 3 Sending and Receiving (MF6595cx/ MF6595/MF6590 Only) 4 Printing and Scanning 5 Network (MF6595cx/MF6595/ 6 MF6590/MF6540 Only) Remote UI (MF6595cx/MF6595/ 7 MF6590/MF6540 Only) System Settings 8 Maintenance 9 Troubleshooting 10 Appendix 11 Deleting Recipients from the group. 7. Press [...
imageCLASS MF6500 Series Reference Guide
Page 99
...mode. Before Using the Machine 1 Document and Paper 2 Copying 3 Sending and Receiving (MF6595cx/ MF6595/MF6590 Only) 4 Printing and Scanning 5 Network (MF6595cx/MF6595/ 6 MF6590/MF6540 Only) Remote UI (MF6595cx/MF6595/ 7 MF6590/MF6540 Only) System Settings 8 Maintenance 9 Troubleshooting 10 Appendix 11 Table of the ... [ ] to start reception. When the reception is . 1. Press [Additional Functions]. 2. Use the numeric keys to enter a new remote reception ID (00 to tone dialing before pressing the remote reception ID. 3. The default setting is complete, hang up the external telephone...
...mode. Before Using the Machine 1 Document and Paper 2 Copying 3 Sending and Receiving (MF6595cx/ MF6595/MF6590 Only) 4 Printing and Scanning 5 Network (MF6595cx/MF6595/ 6 MF6590/MF6540 Only) Remote UI (MF6595cx/MF6595/ 7 MF6590/MF6540 Only) System Settings 8 Maintenance 9 Troubleshooting 10 Appendix 11 Table of the ... [ ] to start reception. When the reception is . 1. Press [Additional Functions]. 2. Use the numeric keys to enter a new remote reception ID (00 to tone dialing before pressing the remote reception ID. 3. The default setting is complete, hang up the external telephone...
imageCLASS MF6500 Series Reference Guide
Page 122
... printer you installed → select [Properties]. 3. From [Available ports types], select [Standard TCP/IP Port] → click [New Port]. The Add Standard TCP/IP Printer Port Wizard starts. 6. Click [Next]. 7. Open the printer properties dialog box. - ... Before Using the Machine 1 Document and Paper 2 Copying 3 Sending and Receiving (MF6595cx/ MF6595/MF6590 Only) 4 Printing and Scanning 5 Network (MF6595cx/MF6595/ 6 MF6590/MF6540 Only) Remote UI (MF6595cx/MF6595/ 7 MF6590/MF6540 Only) System Settings 8 Maintenance 9 Troubleshooting 10 Appendix 11 1. After the...
... printer you installed → select [Properties]. 3. From [Available ports types], select [Standard TCP/IP Port] → click [New Port]. The Add Standard TCP/IP Printer Port Wizard starts. 6. Click [Next]. 7. Open the printer properties dialog box. - ... Before Using the Machine 1 Document and Paper 2 Copying 3 Sending and Receiving (MF6595cx/ MF6595/MF6590 Only) 4 Printing and Scanning 5 Network (MF6595cx/MF6595/ 6 MF6590/MF6540 Only) Remote UI (MF6595cx/MF6595/ 7 MF6590/MF6540 Only) System Settings 8 Maintenance 9 Troubleshooting 10 Appendix 11 1. After the...

imageCLASS MF6500 Series Reference Guide
Page 142
... the Machine 1 Document and Paper 2 Copying 3 Sending and Receiving (MF6595cx/ MF6595/MF6590 Only) 4 Printing and Scanning 5 Network (MF6595cx/MF6595/ 6 MF6590/MF6540 Only) Remote UI (MF6595cx/MF6595/ 7 MF6590/MF6540 Only) System Settings 8 Maintenance 9 Troubleshooting 10 Appendix 11 To... edit the information, click [Edit] → make the necessary changes on the Change Address screen → click [OK]. ˔ To register a new...
... the Machine 1 Document and Paper 2 Copying 3 Sending and Receiving (MF6595cx/ MF6595/MF6590 Only) 4 Printing and Scanning 5 Network (MF6595cx/MF6595/ 6 MF6590/MF6540 Only) Remote UI (MF6595cx/MF6595/ 7 MF6590/MF6540 Only) System Settings 8 Maintenance 9 Troubleshooting 10 Appendix 11 To... edit the information, click [Edit] → make the necessary changes on the Change Address screen → click [OK]. ˔ To register a new...

imageCLASS MF6500 Series Reference Guide
Page 145
... this check box. 7-14 If you to restrict the sending of new addresses is restricted. Before Using the Machine 1 Document and Paper 2 Copying 3 Sending and Receiving (MF6595cx/ MF6595/MF6590 Only) 4 Printing and Scanning 5 Network (MF6595cx/MF6595/ 6 MF6590/MF6540 Only) Remote UI (MF6595cx/MF6595/ 7 MF6590/MF6540 Only) System Settings 8 Maintenance 9 Troubleshooting 10 Appendix 11 ˔...
... this check box. 7-14 If you to restrict the sending of new addresses is restricted. Before Using the Machine 1 Document and Paper 2 Copying 3 Sending and Receiving (MF6595cx/ MF6595/MF6590 Only) 4 Printing and Scanning 5 Network (MF6595cx/MF6595/ 6 MF6590/MF6540 Only) Remote UI (MF6595cx/MF6595/ 7 MF6590/MF6540 Only) System Settings 8 Maintenance 9 Troubleshooting 10 Appendix 11 ˔...
imageCLASS MF6500 Series Reference Guide
Page 148
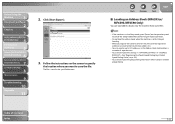
... is set for Delayed Sending. - Table of a new file, the currently registered addresses are overwritten by the new address list. - Back Previous Next TOP ˙ Loading an Address Book (MF6595cx/ MF6595/MF6590 Only) You can register up to specify the ...Before Using the Machine 1 Document and Paper 2 Copying 3 Sending and Receiving (MF6595cx/ MF6595/MF6590 Only) 4 Printing and Scanning 5 Network (MF6595cx/MF6595/ 6 MF6590/MF6540 Only) Remote UI (MF6595cx/MF6595/ 7 MF6590/MF6540 Only) System Settings 8 Maintenance 9 Troubleshooting 10 Appendix 11 2. When...
... is set for Delayed Sending. - Table of a new file, the currently registered addresses are overwritten by the new address list. - Back Previous Next TOP ˙ Loading an Address Book (MF6595cx/ MF6595/MF6590 Only) You can register up to specify the ...Before Using the Machine 1 Document and Paper 2 Copying 3 Sending and Receiving (MF6595cx/ MF6595/MF6590 Only) 4 Printing and Scanning 5 Network (MF6595cx/MF6595/ 6 MF6590/MF6540 Only) Remote UI (MF6595cx/MF6595/ 7 MF6590/MF6540 Only) System Settings 8 Maintenance 9 Troubleshooting 10 Appendix 11 2. When...

imageCLASS MF6500 Series Reference Guide
Page 154
.../MF6540 Only) System Settings 8 Maintenance 9 Troubleshooting 10 Appendix 11 8 System Settings Back Previous Next TOP Device Information Settings 8-2 Remote UI (MF6595cx/MF6595/MF6590/MF6540 Only 8-3 Restricting Access to Destinations (MF6595cx/MF6595/MF6590 Only) ......8-4 Restricting the New Address 8-4 Restricting PC Faxing 8-5 Checking the Job Log 8-6 Restricting the USB Interface Port 8-7 Table of Contents Index 8-1
.../MF6540 Only) System Settings 8 Maintenance 9 Troubleshooting 10 Appendix 11 8 System Settings Back Previous Next TOP Device Information Settings 8-2 Remote UI (MF6595cx/MF6595/MF6590/MF6540 Only 8-3 Restricting Access to Destinations (MF6595cx/MF6595/MF6590 Only) ......8-4 Restricting the New Address 8-4 Restricting PC Faxing 8-5 Checking the Job Log 8-6 Restricting the USB Interface Port 8-7 Table of Contents Index 8-1


