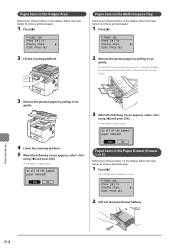
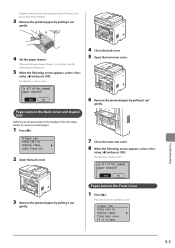
imageCLASS D1370/D1350/D1320 Basic Operation Guide
Page 10
...9-12 9-12 9-12 9-12 9-12 9-13 9-13 9-13 9-14 Printing Results Are Not Good 9-15 Paper Curls 9-15 Paper Creases 9-16 Vertical Streaks Appear on the Output 9-17 Toner Smudges and Spatters Appear around Text and Images 9-...8-8 8-8 8-9 8-11 8-11 8-11 8-11 8-12 8-13 8-14 8-15 Troubleshooting Clearing Jams Document Jams in the Feeder Paper Jams in the Output Area Paper Jams in the Multi-Purpose Tray Paper Jams in the Paper Drawer (Drawer 1 or 2) Paper Jams in the Back Cover and Duplex Unit Paper Jams in the Front Cover Paper Jams in the sleep mode? Is the machine in the 2-sided Transport...
imageCLASS D1370/D1350/D1320 Basic Operation Guide
Page 15
...the displayed message. If the toner comes into your eyes or mouth. The power plug is deformed or broken. -- The power cord is jammed, remove the jammed paper so that the power cord and plug are burn marks on the power plug is loosened. -- The toner may result in the following ..., dusty, or smoky locations, dust can build up around the base of the paper. • When removing a toner cartridge, remove the toner cartridge carefully so as this will dirty your local authorized Canon dealer or the Canon help line. -- If the skin becomes irritated or you did not touch the ...
imageCLASS D1370/D1350/D1320 Basic Operation Guide
Page 17
... location where chemical reactions occur • A location exposed to a hot or humid location • If water droplets (condensation) form inside the machine, causing degradation in paper jams or poor print quality. This can result in print quality. Equipment that consumes a large amount of the machine is 1,100 W or less. • Electrical noise...
imageCLASS D1370/D1350/D1320 Basic Operation Guide
Page 18
... step-by-step troubleshooting, e-mail technical support, the latest driver or document downloads, and answers to frequently asked questions, visit http://www.canon.ca/ • Free live technical support number above technical support options, repair options are subject to change without notice. Customer Support Customer ...8226; Avoid shaking or applying a shock to this machine. • To prevent a paper jam, do not turn the power ON/OFF, open/close the operation panel or rear cover, and load/ unload paper in the middle of printing operation. • Be sure to remove the toner cartridge...
imageCLASS D1370/D1350/D1320 Basic Operation Guide
Page 26
...output tray. (10) Output tray Printed paper such as copies, prints and faxes come out from the output tray. (16) (15) (14) (13) (11) Open Button Push to open the front cover. (12) Front Cover Open this cover to replace the toner cartridge or clear paper jams. (13) Power Switch Turns the ...power ON or OFF. (14) Paper drawer Load paper here. (15) Cassette Feeding Unit-U1 (drawer 2) It is an optional paper drawer. (16) USB memory port Used to save scanned documents in USB memory...
imageCLASS D1370/D1350/D1320 Basic Operation Guide
Page 27
...use when printing transparencies, labels, or envelopes that curl easily, because the printed paper remains flat when output. (8) Back cover Open this guide to clear paper jams. (4) (7) Sub-output tray Printed paper is output to insert the toner cartridge so that the protrusion on . (3) ... (4) Telephone line jack Connect the telephone cable. (5) Power socket Connect the power cord. (6) Lower rear cover (3) Open this guide to clear paper jams. (2) (4) (5) (4) (1) Scanning area Used to scan documents from the feeder. (2) Platen glass Place your documents on the side of the ...
imageCLASS D1370/D1350/D1320 Basic Operation Guide
Page 35
... enter values using [ ] or [ ] and press [OK]. * You can set the auto sleep timer between and minutes, in the middle of adjustment or cleaning • a paper jam occurs • the handset of time. To enter the sleep mode manually Press [ ] (Energy Saver). The default is taken off the hook 1-11 Menu Preferences...
imageCLASS D1370/D1350/D1320 Basic Operation Guide
Page 38
To prevent paper jams in the feeder Do not use any glue, ink, or correction fluid on the document is completely dry before placing it on the platen glass and cover them with plain white paper. *2 22 lb Bond (80 g/m²) IMPORTANT To place your reference. Actual margins can vary. * Refer to the following...
imageCLASS D1370/D1350/D1320 Basic Operation Guide
Page 41
If more than 51 documents are too loose or too tight, this may result in misfeeds or paper jams. 2-5 If the document guides are loaded, paper jams may occur, or the document may cause paper jams. Be sure to copy or scan the document. While scanning a document Do not add or remove ...documents. When scanning is ready to align the document guides with the width of the document. Document and Paper Handling 4 Align the document guides to avoid paper jams. Avoid scanning the same document more than 30 times. When scanned repeatedly, the document can be scanned. The ...
imageCLASS D1370/D1350/D1320 Basic Operation Guide
Page 43
... Canon dealer or the Canon help line. Moisture evaporates from the machine's output area. • Water droplets form on the reverse side.) The following paper types do not print well: • Highly textured paper • Very smooth paper • Glossy paper ...paper types. • Wrinkled or creased paper • Curled or rolled paper • Torn paper • Damp paper • Very thin paper • Paper printed by using a stack of copy paper. CAUTION To print on a flat surface. To prevent paper jams, do not use . Document and Paper Handling Paper Type The following paper...
imageCLASS D1370/D1350/D1320 Basic Operation Guide
Page 46
... loose or tight, this may result in misfeeds or paper jams. In the Multi-Purpose Tray Before loading paper in misfeeds. (A) (A) When loading long-size paper open the tray extension. (A) 7 Specify the loaded paper size and type. If the paper stack exceeds the load limit mark lines, this may ...result in the multi-purpose tray, see "Precautions when Loading Paper" (→P. 2-12). Document and Paper Handling IMPORTANT Adjust the paper guides to copy or print on a different paper size or type from the one loaded in the paper drawer. 1 Open the multi-purpose tray and pull out the ...
imageCLASS D1370/D1350/D1320 Basic Operation Guide
Page 47
... without space. purpose tray with the print side face up . "Setting the Paper Size and Type" (→P. 2-14) (2) Loosen any stiff corners of the envelope and flatten curls as shown in misfeeds or paper jams. 2-11 If the paper guides are too loose or too tight, this may result in the figure. (3) Gently insert...
imageCLASS D1370/D1350/D1320 Basic Operation Guide
Page 48
...Paper Handling Precautions when Loading Paper Paper Loading Capacity CAUTION Be careful when handling paper. If the paper stack exceeds the load limit mark lines, this may result in misfeeds or paper jams. When using paper that has been poorly cut If you use paper that the paper stack does not exceed the line of envelopes. Recycled paper... You cannot print on the paper guides inside the paper drawer Paper size Legal Letter Executive Paper guide LGL LTR EXEC Paper Source Paper Type (A) (B) Multi-purpose Drawer 1 tray (C) Drawer 2 (optional) Plain paper 16 to 23 lb Bond (...
imageCLASS D1370/D1350/D1320 Basic Operation Guide
Page 60
...; [OK] Copy a 1-sided document onto both sides of the original document using [ ] or [ ] and press [OK]. If the paper size switch lever is not securely attached, documents may not be fed properly or jammed. You can make 1-sided copies from 2-sided documents. Format Settings 1 2-Sided 2 2-Sided 2 1-Sided Finishing Format Book Type Calendar...]. Copying Copy Settings 2-Sided Copying Copy mode screen Setting screen* * Y ou can display the setting screen also by placing on 2-Sided copying Accurately attach the paper size switch lever.
imageCLASS D1370/D1350/D1320 Basic Operation Guide
Page 70
...sheet, and then select [Auto] or [Enabled] from this function. Printing to the back side of the printer driver. (2) Securely place the blue color paper size switch lever (A). • A4: Pull • Letter, Legal: Push (A) (A) (3) Close the lower rear cover. 4-4 NOTE • You cannot...a printed document in the e-Manual. 3 Select the page order from [Page Order]. 1-sided Printing and 2-sided Printing You can be fed properly, or jammed. (1) Open the lower rear cover. Printing from a Computer 2 Select [N on 1] from [Page Layout] (where "N" is displayed in the preview area...
imageCLASS D1370/D1350/D1320 Basic Operation Guide
Page 139
... as paper jam and when problems are not solved. Clearing Jams 9-2 Document Jams in the Feeder 9-2 Paper Jams in the Output Area 9-4 Paper Jams in the Multi-Purpose Tray 9-4 Paper Jams in the Paper Drawer (Drawer 1 or 2) 9-4 Paper Jams in the Back Cover and Duplex Unit 9-5 Paper Jams in the Front Cover 9-5 Paper Jams in the...13 If You Cannot Solve a Problem 9-13 When a Power Failure Occurs 9-14 Printing Results Are Not Good 9-15 Paper Curls 9-15 Paper Creases 9-16 Vertical Streaks Appear on the Output 9-17 Toner Smudges and Spatters Appear around Text and Images 9-18 ...
imageCLASS D1370/D1350/D1320 Basic Operation Guide
Page 140
... Canon dealer or the Canon help line for use. Paper jam. "Document Jams in the Feeder" (→P. 9-2) "Paper Jams in the Output Area" (→P. 9-4) "Paper Jams in the Multi-Purpose Tray" (→P. 9-4) "Paper Jams in the Paper Drawer (Drawer 1 or 2)" (→P. 9-4) "Paper Jams in the Back Cover and Duplex Unit" (→P. 9-5) "Paper Jams in the Front Cover" (→P. 9-5) "Paper Jams in damage to remove jammed documents. 1 Press [ ]. If the jammed paper...
imageCLASS D1370/D1350/D1320 Basic Operation Guide
Page 142
.... 5 When the following screen appears, select using [ ] and press [OK]. The machine is ready to print. Paper jam. Paper Jams in the Output Area Referring to the procedure on the display, follow the steps below to remove jammed paper. 1 Press [ ]. Paper Jams in the Multi-Purpose Tray Referring to the procedure on the display, follow the steps below...
imageCLASS D1370/D1350/D1320 Basic Operation Guide
Page 143
... cover. 8 When the following screen appears, select using [ ] and press [OK]. Paper jam. Press [ ] to print. Press [ ] to remove jammed paper. 1 Press [ ]. Paper Jams in the Front Cover 1 Press [ ]. The machine is ready to exit the operation screen. Paper jam. Is all of the jammed paper removed? Yes No Paper Jams in the Back Cover and Duplex Unit Referring to the procedure...
imageCLASS D1370/D1350/D1320 Basic Operation Guide
Page 144
... located on both sides of the machine. (A) 6 Remove the jammed paper by pulling it gently. Press [OK] to its original position. (A) (A) 12 Close the front cover. Paper Jams in place gently. 11 Insert the toner cartridge. Paper jam. Troubleshooting 4 Remove the toner cartridge. Immediately place the toner cartridge...Do not take your hands off the transport guide until the toner cartridge comes to display steps. (End: Press OK) 2 Pull out the paper drawer. 9-6 Remove it as horizontally as possible so that loose toner does not spill out. 7 Slowly move the transport guide to exit ...