

Set-up Sheet for imageCLASS 2300N
Page 1
Check that you for one-touch speed dialing keys (2) Set-Up Sheet for the Machine Thank you have the following: G Machine with cabinet stand G Toner cartridge (in this sheet before referring to any other documentation. To get your machine ready for use, please follow the instructions in carton) G Stamp cartridge and tweezers G Paper size notice cards (2) G Paper size plates (2) G Paper size labels (2) G Power cord G Telephone cable G Destination labels for purchasing the Canon imageCLASS 2300. Unpack the machine and its components.
Check that you for one-touch speed dialing keys (2) Set-Up Sheet for the Machine Thank you have the following: G Machine with cabinet stand G Toner cartridge (in this sheet before referring to any other documentation. To get your machine ready for use, please follow the instructions in carton) G Stamp cartridge and tweezers G Paper size notice cards (2) G Paper size plates (2) G Paper size labels (2) G Power cord G Telephone cable G Destination labels for purchasing the Canon imageCLASS 2300. Unpack the machine and its components.

Set-up Sheet for imageCLASS 2300N
Page 3
... on the stamp receptacle, and push down the stamp until it snaps into the underside of the stamp cartridge with the indentations on the black panel behind the front cover. Install the stamp cartridge. 1 Pull up the latch to open the feeder cover. 2 Open the black inner cover. 3 Use the supplied tweezers...
... on the stamp receptacle, and push down the stamp until it snaps into the underside of the stamp cartridge with the indentations on the black panel behind the front cover. Install the stamp cartridge. 1 Pull up the latch to open the feeder cover. 2 Open the black inner cover. 3 Use the supplied tweezers...

Set-up Sheet for imageCLASS 2300N
Page 4
... both hands and slowly shake it sideways 1 and then back and forth 2 to distribute the toner inside the toner cartridge. 7 Hold the cartridge by its handles (marked with the other hand. 6 Remove the tape holding the orange protective cover, and pull the release tabs on the cover ...to detach it will go. 1 Tabs Protective cover 8 Close the left cover of the stack bypass. 3 Remove the toner cartridge from the cartridge. Install the toner cartridge. 1 Open the stack bypass. 2 Slide out the left cover and the stack bypass. Keep the bag in the machine horizontally as far as...
... both hands and slowly shake it sideways 1 and then back and forth 2 to distribute the toner inside the toner cartridge. 7 Hold the cartridge by its handles (marked with the other hand. 6 Remove the tape holding the orange protective cover, and pull the release tabs on the cover ...to detach it will go. 1 Tabs Protective cover 8 Close the left cover of the stack bypass. 3 Remove the toner cartridge from the cartridge. Install the toner cartridge. 1 Open the stack bypass. 2 Slide out the left cover and the stack bypass. Keep the bag in the machine horizontally as far as...

iC2300_spec.pdf
Page 1
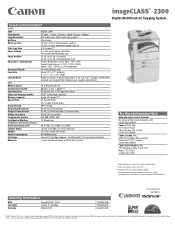
... - Move up to the convenience and cost savings. The Canon Single Cartridge System means you need , combined with quality laser output and a space saving design. Copy and fax with all add up to -replace cartridge without service calls or the inconvenient two-cartridge system. imageCLASS® 2300 Digital Multifunction Imaging System PRELIMINARY Workplace Digital Imaging...
... - Move up to the convenience and cost savings. The Canon Single Cartridge System means you need , combined with quality laser output and a space saving design. Copy and fax with all add up to -replace cartridge without service calls or the inconvenient two-cartridge system. imageCLASS® 2300 Digital Multifunction Imaging System PRELIMINARY Workplace Digital Imaging...
iC2300_spec.pdf
Page 2
...Stand 16"(H) x 22"(W) x 21.8"(D) (29 Lbs.) Weight 113 Lbs. (main unit only) Power Consumption 940W Maximum Cartridge Canon P Cartridge (approx. 10,000 yield/ 5% coverage) included Warranty 1 year limited warranty with On-Site Service† For More Information Visit www.usa... 24 Lb. (cassette) 16 Lb. Ordering Information MFP Cartridge Upgrade imageCLASS® 2300 Fax Model Canon P Cartridge Network Kit 7158A043AA 7138A002AA 7444A012AA CIG-C468-0403 0087W943 ©2003 Canon U.S.A., Inc., Canon, Canon Know How, imageCLASS and the Super G3 Logo are trademarks of their respective...
...Stand 16"(H) x 22"(W) x 21.8"(D) (29 Lbs.) Weight 113 Lbs. (main unit only) Power Consumption 940W Maximum Cartridge Canon P Cartridge (approx. 10,000 yield/ 5% coverage) included Warranty 1 year limited warranty with On-Site Service† For More Information Visit www.usa... 24 Lb. (cassette) 16 Lb. Ordering Information MFP Cartridge Upgrade imageCLASS® 2300 Fax Model Canon P Cartridge Network Kit 7158A043AA 7138A002AA 7444A012AA CIG-C468-0403 0087W943 ©2003 Canon U.S.A., Inc., Canon, Canon Know How, imageCLASS and the Super G3 Logo are trademarks of their respective...
Basic Guide for imageCLASS 2300
Page 7
... Printer 8-2 Connecting to a Computer 8-4 Connecting to a Network 8-4 Connecting through a Parallel Interface 8-5 Connecting through a USB Interface 8-5 Printing a Document 8-6 Canceling a Print Job 8-7 Chapter 9 Maintenance Replacing the Toner Cartridge 9-2 Routine Cleaning 9-10 Platen Glass and Cover 9-10 Feeder Cleaning 9-11 Roller Cleaning 9-15 More Information 9-17 vi Basic Operations Features of the I-Fax Functions...
... Printer 8-2 Connecting to a Computer 8-4 Connecting to a Network 8-4 Connecting through a Parallel Interface 8-5 Connecting through a USB Interface 8-5 Printing a Document 8-6 Canceling a Print Job 8-7 Chapter 9 Maintenance Replacing the Toner Cartridge 9-2 Routine Cleaning 9-10 Platen Glass and Cover 9-10 Feeder Cleaning 9-11 Roller Cleaning 9-15 More Information 9-17 vi Basic Operations Features of the I-Fax Functions...
Basic Guide for imageCLASS 2300
Page 13
... Radiological Health (CDRH) of procedures other than those specified in this manual may result in hazardous radiation exposure. CANON CANADA INC. 3128 ORLANDO DRIVE, UNIT#1, BUILDING F, MISSISSAUGA, ONTARIO, L4V1R5, CANADA MANUFACTURED: THIS PRODUCT CONFORMS WITH DHHS ...JAPAN CANON U.S.A., INC. ONE CANON PLAZA, LAKE SUCCESS, N.Y. 11042, U.S.A. The label shown below indicates compliance with the CDRH regulations and must be attached to laser products manufactured since August 1, 1976. Invisible laser radiation when opening the cover, removing developing assembly, or cartridges. ...
... Radiological Health (CDRH) of procedures other than those specified in this manual may result in hazardous radiation exposure. CANON CANADA INC. 3128 ORLANDO DRIVE, UNIT#1, BUILDING F, MISSISSAUGA, ONTARIO, L4V1R5, CANADA MANUFACTURED: THIS PRODUCT CONFORMS WITH DHHS ...JAPAN CANON U.S.A., INC. ONE CANON PLAZA, LAKE SUCCESS, N.Y. 11042, U.S.A. The label shown below indicates compliance with the CDRH regulations and must be attached to laser products manufactured since August 1, 1976. Invisible laser radiation when opening the cover, removing developing assembly, or cartridges. ...

Basic Guide for imageCLASS 2300
Page 19
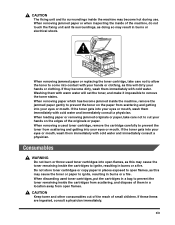
...re or electrical shock. Check detergent for flammability prior to the cover of the laser scanner unit. Do not burn or throw used toner cartridges into contact with a high-voltage area inside of the machine, as overnight. The laser beam can build up around the base of the power plug... for safety when the machine will not be used for an extended period of time, such as this may cause the toner remaining inside the cartridge to observe these steps may cause a short circuit and result in a fire. If flammable substances come into open covers other than those ...
...re or electrical shock. Check detergent for flammability prior to the cover of the laser scanner unit. Do not burn or throw used toner cartridges into contact with a high-voltage area inside of the machine, as overnight. The laser beam can build up around the base of the power plug... for safety when the machine will not be used for an extended period of time, such as this may cause the toner remaining inside the cartridge to observe these steps may cause a short circuit and result in a fire. If flammable substances come into open covers other than those ...
Basic Guide for imageCLASS 2300
Page 20
... and getting into your eyes or mouth, wash them immediately with cold water and immediately consult a physician. When removing a used toner cartridge, remove the cartridge carefully to prevent the toner from open flames. If the toner gets into contact with cold water and immediately consult a physician.... clothing, as this will set the toner, and make it impossible to remove the toner stains. When discarding used toner cartridges into your eyes or mouth. When removing jammed paper or when inspecting the inside of the originals or paper. Do not store toner...
... and getting into your eyes or mouth, wash them immediately with cold water and immediately consult a physician. When removing a used toner cartridge, remove the cartridge carefully to prevent the toner from open flames. If the toner gets into contact with cold water and immediately consult a physician.... clothing, as this will set the toner, and make it impossible to remove the toner stains. When discarding used toner cartridges into your eyes or mouth. When removing jammed paper or when inspecting the inside of the originals or paper. Do not store toner...

Basic Guide for imageCLASS 2300
Page 21
... Personal Copier Authorized Service Facilities. Machine Model: imageCLASS 2300 Serial Number: (located on the label at : 1-800-828-4040 1-800-OK-CANON Canon USA Consumer Products Information Center Canon Canada Information/Service Center Please have any problems with your machine, DO NOT return it to each other. Cartridges Canon Cartridge P xx Other Warnings WARNING For cardiac pacemaker...
... Personal Copier Authorized Service Facilities. Machine Model: imageCLASS 2300 Serial Number: (located on the label at : 1-800-828-4040 1-800-OK-CANON Canon USA Consumer Products Information Center Canon Canada Information/Service Center Please have any problems with your machine, DO NOT return it to each other. Cartridges Canon Cartridge P xx Other Warnings WARNING For cardiac pacemaker...

Basic Guide for imageCLASS 2300
Page 31
... Glass Place originals here when scanning books, thick originals, thin originals, etc. i Upper Left Cover Open this cover to replace the toner cartridge. c Front Cover You can open this cover to remove jammed paper. e Lower Left Cover 4 3 f Stack Bypass Feeds transparencies and ...nonstandard or alternate paper stock. g Left Cover Open this cartridge when replacing the toner. Available in the feeder are scanned here. 1-8 Parts and Their Functions h Toner Cartridge Pull out the handle of the Feeder This holds originals in place on the platen...
... Glass Place originals here when scanning books, thick originals, thin originals, etc. i Upper Left Cover Open this cover to replace the toner cartridge. c Front Cover You can open this cover to remove jammed paper. e Lower Left Cover 4 3 f Stack Bypass Feeds transparencies and ...nonstandard or alternate paper stock. g Left Cover Open this cartridge when replacing the toner. Available in the feeder are scanned here. 1-8 Parts and Their Functions h Toner Cartridge Pull out the handle of the Feeder This holds originals in place on the platen...
Basic Guide for imageCLASS 2300
Page 106
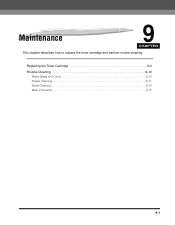
Replacing the Toner Cartridge 9-2 Routine Cleaning 9-10 Platen Glass and Cover 9-10 Feeder Cleaning 9-11 Roller Cleaning 9-15 More Information 9-17 9-1 Maintenance 9 CHAPTER This chapter describes how to replace the toner cartridge and perform routine cleaning.
Replacing the Toner Cartridge 9-2 Routine Cleaning 9-10 Platen Glass and Cover 9-10 Feeder Cleaning 9-11 Roller Cleaning 9-15 More Information 9-17 9-1 Maintenance 9 CHAPTER This chapter describes how to replace the toner cartridge and perform routine cleaning.
Basic Guide for imageCLASS 2300
Page 107
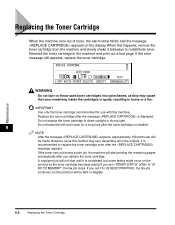
...9 NOTE After the message appears, approximately 150 prints can still be faint or illegible. If you replace the toner cartridge. When this machine. IMPORTANT Use only the toner cartridge recommended for a long time after the message appears. A copy/print job will start printing the remaining pages automatically ... completed, but the printout will be made. Do not leave the left cover open flames, as the toner cartridge becomes empty. Replacing the Toner Cartridge When the machine runs out of toner, the alarm lamp blinks and the message appears on the printout as they may...
...9 NOTE After the message appears, approximately 150 prints can still be faint or illegible. If you replace the toner cartridge. When this machine. IMPORTANT Use only the toner cartridge recommended for a long time after the message appears. A copy/print job will start printing the remaining pages automatically ... completed, but the printout will be made. Do not leave the left cover open flames, as the toner cartridge becomes empty. Replacing the Toner Cartridge When the machine runs out of toner, the alarm lamp blinks and the message appears on the printout as they may...

Basic Guide for imageCLASS 2300
Page 108
1 Open the stack bypass. 2 Pull out the left cover of the stack bypass. 9 CAUTION Grasp the handle and pull out the left cover horizontally to the left. (Be careful not to pull it upward as it may easily come off.) Maintenance Replacing the Toner Cartridge 9-3
1 Open the stack bypass. 2 Pull out the left cover of the stack bypass. 9 CAUTION Grasp the handle and pull out the left cover horizontally to the left. (Be careful not to pull it upward as it may easily come off.) Maintenance Replacing the Toner Cartridge 9-3
Basic Guide for imageCLASS 2300
Page 109
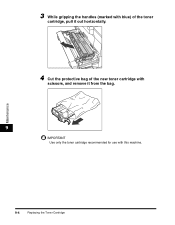
Maintenance 9-4 Replacing the Toner Cartridge 3 While gripping the handles (marked with blue) of the toner cartridge, pull it out horizontally. 4 Cut the protective bag of the new toner cartridge with scissors, and remove it from the bag. 9 IMPORTANT Use only the toner cartridge recommended for use with this machine.
Maintenance 9-4 Replacing the Toner Cartridge 3 While gripping the handles (marked with blue) of the toner cartridge, pull it out horizontally. 4 Cut the protective bag of the new toner cartridge with scissors, and remove it from the bag. 9 IMPORTANT Use only the toner cartridge recommended for use with this machine.

Basic Guide for imageCLASS 2300
Page 110
Do not hold it by the handles with both hands and gently shake it later to distribute the toner evenly inside the cartridge. 1 2 9 1 Maintenance Replacing the Toner Cartridge 9-5 When handling the toner cartridge, hold the toner cartridge vertically or upside down. You will need it sideways a several times, and then back and forth b several times, to store the cartridge temporarily when the machine needs servicing. 5 Hold the new toner cartridge with the triangle facing up as shown in the illustration below. Do not discard the protective bag for the toner cartridge.
Do not hold it by the handles with both hands and gently shake it later to distribute the toner evenly inside the cartridge. 1 2 9 1 Maintenance Replacing the Toner Cartridge 9-5 When handling the toner cartridge, hold the toner cartridge vertically or upside down. You will need it sideways a several times, and then back and forth b several times, to store the cartridge temporarily when the machine needs servicing. 5 Hold the new toner cartridge with the triangle facing up as shown in the illustration below. Do not discard the protective bag for the toner cartridge.

Basic Guide for imageCLASS 2300
Page 111
... the toner may scatter and printing quality may deteriorate. Pulling the seal upwards or downwards may not be removed completely, the toner cartridge may break the seal. Maintenance 7 Remove the tape that holds the orange protective cover, and pull the two release tabs on a &#...with the other hand. Tabs Protective cover 9-6 Replacing the Toner Cartridge If the seal breaks inside the toner cartridge and cannot be used. Seal IMPORTANT Do not stop pulling the seal until it from the toner cartridge. 6 Place the toner cartridge on the cover to detach it from the 9 toner...
... the toner may scatter and printing quality may deteriorate. Pulling the seal upwards or downwards may not be removed completely, the toner cartridge may break the seal. Maintenance 7 Remove the tape that holds the orange protective cover, and pull the two release tabs on a &#...with the other hand. Tabs Protective cover 9-6 Replacing the Toner Cartridge If the seal breaks inside the toner cartridge and cannot be used. Seal IMPORTANT Do not stop pulling the seal until it from the toner cartridge. 6 Place the toner cartridge on the cover to detach it from the 9 toner...

Basic Guide for imageCLASS 2300
Page 112
Be careful not to touch the toothed wheels on the toner cartridge, as this may result in personal injury. CAUTION When removing the protective cover, be careful not to touch the blue-green drum inside the cartridge. Toothed wheel IMPORTANT Do not reattach the protective cover on the covered side of the toner cartridge, as this may damage the drum inside the toner cartridge. 9 Drum Maintenance Replacing the Toner Cartridge 9-7
Be careful not to touch the toothed wheels on the toner cartridge, as this may result in personal injury. CAUTION When removing the protective cover, be careful not to touch the blue-green drum inside the cartridge. Toothed wheel IMPORTANT Do not reattach the protective cover on the covered side of the toner cartridge, as this may damage the drum inside the toner cartridge. 9 Drum Maintenance Replacing the Toner Cartridge 9-7

Basic Guide for imageCLASS 2300
Page 113
If the cover is not fully closed, the printout might come out lighter. 9-8 Replacing the Toner Cartridge 8 While holding the toner cartridge with both hands, align both sides of the stack bypass. 9 CAUTION When closing the left cover, be careful not to get your fingers caught, ... in personal injury. Close the left cover until it will go. 1 Maintenance IMPORTANT Be careful not to touch the blue-green drum inside the toner cartridge, as this may damage the drum. 9 Close the left cover of the...
If the cover is not fully closed, the printout might come out lighter. 9-8 Replacing the Toner Cartridge 8 While holding the toner cartridge with both hands, align both sides of the stack bypass. 9 CAUTION When closing the left cover, be careful not to get your fingers caught, ... in personal injury. Close the left cover until it will go. 1 Maintenance IMPORTANT Be careful not to touch the blue-green drum inside the toner cartridge, as this may damage the drum. 9 Close the left cover of the...

Basic Guide for imageCLASS 2300
Page 114
10 Close the stack bypass. IMPORTANT Be sure to get your fingers caught, as this may result in personal injury. CAUTION When closing the stack bypass, be careful not to clean the roller every time you replace the toner cartridge. (See "Roller Cleaning," on p. 9-15.) 9 Maintenance Replacing the Toner Cartridge 9-9
10 Close the stack bypass. IMPORTANT Be sure to get your fingers caught, as this may result in personal injury. CAUTION When closing the stack bypass, be careful not to clean the roller every time you replace the toner cartridge. (See "Roller Cleaning," on p. 9-15.) 9 Maintenance Replacing the Toner Cartridge 9-9


