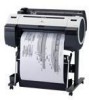
iPF650 655 750 755 Basic Guide Step1
Page 1
... in the Printer 18 Removing Sheets 20 Consumables 21 Replacing Ink Tanks 22 Replacing the Maintenance Cartridge 26 Replacing the Printhead 30 Menu Map 35 Troubleshooting 2 Troubleshooting 2 If Roll Paper Jams 18 If a Sheet Jams 21 If Paper is Soiled 23 If Printing is Faint 25 If Vertical Lines are Warped or Colors are...
... in the Printer 18 Removing Sheets 20 Consumables 21 Replacing Ink Tanks 22 Replacing the Maintenance Cartridge 26 Replacing the Printhead 30 Menu Map 35 Troubleshooting 2 Troubleshooting 2 If Roll Paper Jams 18 If a Sheet Jams 21 If Paper is Soiled 23 If Printing is Faint 25 If Vertical Lines are Warped or Colors are...
iPF650 655 750 755 Basic Guide Step1
Page 3
... dropping or shaking printheads, ink tanks, and maintenance cartridges. This could cause a fire or electrical shock. If ink gets on both sides and from the outlet as soon as follows: iPF750 or iPF755: approx. 52 kg (115 lb) iPF650 or iPF655: approx. 43 kg (95 lb) • Moving the printer requires at other injuries...
... dropping or shaking printheads, ink tanks, and maintenance cartridges. This could cause a fire or electrical shock. If ink gets on both sides and from the outlet as soon as follows: iPF750 or iPF755: approx. 52 kg (115 lb) iPF650 or iPF655: approx. 43 kg (95 lb) • Moving the printer requires at other injuries...
iPF650 655 750 755 Basic Guide Step1
Page 8
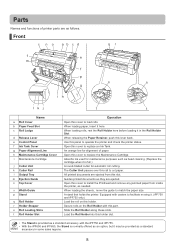
...Holder with the iPF750 and iPF755. • With the iPF650 and iPF655, the Stand is full.) A round-bladed cutter for alignment of printer parts are as they are ejected from inside the printer, as a standard accessory with this slot. Use this ... o ab c d qr f e m f p s s g ih lk j t t Name a Roll Cover b Paper Feed Slot c Roll Ledge d Release Lever e Control Panel f Ink Tank Cover g Paper Alignment Line h Maintenance Cartridge Cover i Maintenance Cartridge j Cutter Unit k Cutter Rail l Output Tray m Ejection Guide n Top Cover o Width Guide p Stand q Roll Holder r ...
...Holder with the iPF750 and iPF755. • With the iPF650 and iPF655, the Stand is full.) A round-bladed cutter for alignment of printer parts are as they are ejected from inside the printer, as a standard accessory with this slot. Use this ... o ab c d qr f e m f p s s g ih lk j t t Name a Roll Cover b Paper Feed Slot c Roll Ledge d Release Lever e Control Panel f Ink Tank Cover g Paper Alignment Line h Maintenance Cartridge Cover i Maintenance Cartridge j Cutter Unit k Cutter Rail l Output Tray m Ejection Guide n Top Cover o Width Guide p Stand q Roll Holder r ...
iPF650 655 750 755 Basic Guide Step1
Page 10
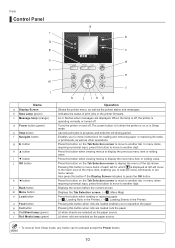
... displayed at left will move to the lower level of each tab for loading and removing paper or replacing ink tanks or printheads, as well as the printer status and messages. Press this button on the Tab Selection screen to move to another tab. Press this button ... pressed except the Power button. 10 Press this button when rolls are displayed. Pressing this button on or in progress and ends the ink drying period. Turns the printer on the Tab Selection screen to another digit. Parts Control Panel r q p a b c o n m l Name a Display Screen b Data Lamp (green) c Message ...
... displayed at left will move to the lower level of each tab for loading and removing paper or replacing ink tanks or printheads, as well as the printer status and messages. Press this button on the Tab Selection screen to move to another tab. Press this button ... pressed except the Power button. 10 Press this button when rolls are displayed. Pressing this button on or in progress and ends the ink drying period. Turns the printer on the Tab Selection screen to another digit. Parts Control Panel r q p a b c o n m l Name a Display Screen b Data Lamp (green) c Message ...
iPF650 655 750 755 Basic Guide Step1
Page 21
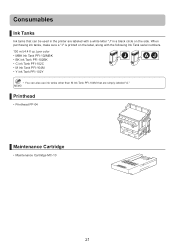
... the label, along with a white letter "J" in the printer are labeled with the following Ink Tank serial numbers. 130 ml (4.4 fl oz.) per color • MBK Ink Tank PFI-102MBK • BK Ink Tank PFI-102BK • C Ink Tank PFI-102C • M Ink Tank PFI-104M • Y Ink Tank PFI-102Y • You can also use ink tanks other than M Ink Tank PFI-104M that are simply labeled "A."
... the label, along with a white letter "J" in the printer are labeled with the following Ink Tank serial numbers. 130 ml (4.4 fl oz.) per color • MBK Ink Tank PFI-102MBK • BK Ink Tank PFI-102BK • C Ink Tank PFI-102C • M Ink Tank PFI-104M • Y Ink Tank PFI-102Y • You can also use ink tanks other than M Ink Tank PFI-104M that are simply labeled "A."
iPF650 655 750 755 Basic Guide Step1
Page 22
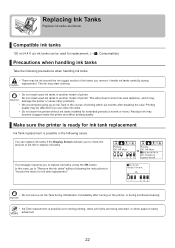
.... Compatible ink tanks 130 ml (4.4 fl oz) ink tanks can replace ink tanks if the Display Screen advises you remove. Residual ink may damage the printer or cause other problems. • We recommend using up an Ink Tank in "Access the menu for replacement. (→ , Consumables) Precautions when handling ink tanks Take the following cases. No ink left. Replace ink tank. Replacing Ink Tanks Replace ink tanks as follows...
.... Compatible ink tanks 130 ml (4.4 fl oz) ink tanks can replace ink tanks if the Display Screen advises you remove. Residual ink may damage the printer or cause other problems. • We recommend using up an Ink Tank in "Access the menu for replacement. (→ , Consumables) Precautions when handling ink tanks Take the following cases. No ink left. Replace ink tank. Replacing Ink Tanks Replace ink tanks as follows...
iPF650 655 750 755 Basic Guide Step1
Page 23
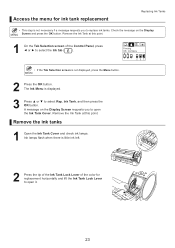
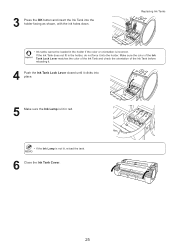
... Selection screen of the color for ink tank replacement Replacing Ink Tanks • This step is displayed. 3 Press ▲ or ▼ to select the Ink tab ( ). A message on the Display Screen and press the OK button. Check the message on the Display Screen requests you to replace ink tanks. Remove the Ink Tank at this point. Ink Tank, and then press the...
... Selection screen of the color for ink tank replacement Replacing Ink Tanks • This step is displayed. 3 Press ▲ or ▼ to select the Ink tab ( ). A message on the Display Screen and press the OK button. Check the message on the Display Screen requests you to replace ink tanks. Remove the Ink Tank at this point. Ink Tank, and then press the...
iPF650 655 750 755 Basic Guide Step1
Page 24
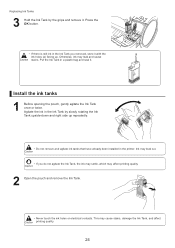
... there is still ink in the printer. This may leak and cause stains. Ink may affect printing quality. 2 Open the pouch and remove the Ink Tank. • Never touch the ink holes or electrical contacts. Replacing Ink Tanks 3 Hold the Ink Tank by slowly rotating the Ink Tank upside-down and right side up . Otherwise, ink may cause stains, damage the Ink Tank, and affect...
... there is still ink in the printer. This may leak and cause stains. Ink may affect printing quality. 2 Open the pouch and remove the Ink Tank. • Never touch the ink holes or electrical contacts. Replacing Ink Tanks 3 Hold the Ink Tank by slowly rotating the Ink Tank upside-down and right side up . Otherwise, ink may cause stains, damage the Ink Tank, and affect...
iPF650 655 750 755 Basic Guide Step1
Page 25
... the Ink Tank Cover. 25 Make sure the color of the Ink Tank Lock Lever matches the color of the Ink Tank and check the orientation of the Ink Tank before reloading it. 4 Push the Ink Tank Lock Lever closed until it into the holder. 3 Press the OK button and insert the Ink Tank into place. 5 Make sure the Ink Lamp is incorrect. Replacing Ink Tanks • Ink tanks...
... the Ink Tank Cover. 25 Make sure the color of the Ink Tank Lock Lever matches the color of the Ink Tank and check the orientation of the Ink Tank before reloading it. 4 Push the Ink Tank Lock Lever closed until it into the holder. 3 Press the OK button and insert the Ink Tank into place. 5 Make sure the Ink Lamp is incorrect. Replacing Ink Tanks • Ink tanks...
iPF650 655 750 755 Basic Guide Step1
Page 30
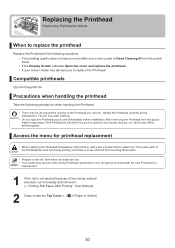
...opened, the nozzles may dry out, which may stain clothing. • Do not open the Printhead pouch until immediately before replacing it. The ink may affect printing quality. After removing the Printhead from the pouch, install it . (→"Cutting Roll Paper After Printing," User Manual) 2 ... these parts. • Prepare a new Ink Tank when ink levels are low. • Your hands may be ink around the nozzles of burns from the printer menu • If the Display Screen indicates Open top cover and replace the printhead. • If your Canon dealer has advised you remove. Access the ...
...opened, the nozzles may dry out, which may stain clothing. • Do not open the Printhead pouch until immediately before replacing it. The ink may affect printing quality. After removing the Printhead from the pouch, install it . (→"Cutting Roll Paper After Printing," User Manual) 2 ... these parts. • Prepare a new Ink Tank when ink levels are low. • Your hands may be ink around the nozzles of burns from the printer menu • If the Display Screen indicates Open top cover and replace the printhead. • If your Canon dealer has advised you remove. Access the ...
iPF650 655 750 755 Basic Guide Step1
Page 34
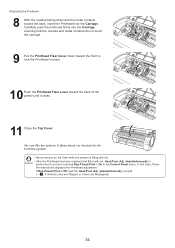
...printer until it clicks. 11 Close the Top Cover. Adj. (Auto(Advanced)) yourself. (→ , If Vertical Lines are Warped or Colors are Misaligned) 34 Adj. (Auto(Advanced)) is Off, perform Head Posi. Replacing the Printhead 8 With the nozzles facing down toward the front to fill the system. • Never remove an Ink Tank... while the system is filling with ink. ...
...printer until it clicks. 11 Close the Top Cover. Adj. (Auto(Advanced)) yourself. (→ , If Vertical Lines are Warped or Colors are Misaligned) 34 Adj. (Auto(Advanced)) is Off, perform Head Posi. Replacing the Printhead 8 With the nozzles facing down toward the front to fill the system. • Never remove an Ink Tank... while the system is filling with ink. ...

iPF650 655 750 755 Basic Guide Step1
Page 35
... sec. 1 min. 3 min. 5 min. 10 min. 30 min. 60 min. * *1: For information on the types of paper the printer supports, refer to select the tab, and then press the OK button. Ink Tank Head Cleaning A Job Menu OK Back OK Back OK Back OK Back Print Job *14*16 Stored Job *14... the User Software CD-ROM or if you change paper information by using the Media Configuration Tool. *2: For information on the sizes of paper the printer supports, refer to the User Manual. (→"Paper Sizes," User Manual) *3: Available only if ManageRemainRoll is On. *4: Available only if Width Detection...
... sec. 1 min. 3 min. 5 min. 10 min. 30 min. 60 min. * *1: For information on the types of paper the printer supports, refer to select the tab, and then press the OK button. Ink Tank Head Cleaning A Job Menu OK Back OK Back OK Back OK Back Print Job *14*16 Stored Job *14... the User Software CD-ROM or if you change paper information by using the Media Configuration Tool. *2: For information on the sizes of paper the printer supports, refer to the User Manual. (→"Paper Sizes," User Manual) *3: Available only if ManageRemainRoll is On. *4: Available only if Width Detection...

iPF650 655 750 755 Basic Guide Step1
Page 39
... 12 c Carriage 9, 31, 32 d Display Screen 10 e Ejection Guide 8 Electronic manuals (User Manual 5, 6 f Flange 13 h Holder Stopper 8, 12 i imagePROGRAF Support Information 5 Ink Lamp 23, 25 Ink Tank Cover 8, 23, 25 Ink Tank Lock Lever 23, 25 Ink tank replacement 22 Ink tanks 21, 22 m Maintenance Cartridge 8, 21, 26 Maintenance Cartridge Cover 8 Maintenance cartridge replacement 26 Menu map (menu structure 35...
... 12 c Carriage 9, 31, 32 d Display Screen 10 e Ejection Guide 8 Electronic manuals (User Manual 5, 6 f Flange 13 h Holder Stopper 8, 12 i imagePROGRAF Support Information 5 Ink Lamp 23, 25 Ink Tank Cover 8, 23, 25 Ink Tank Lock Lever 23, 25 Ink tank replacement 22 Ink tanks 21, 22 m Maintenance Cartridge 8, 21, 26 Maintenance Cartridge Cover 8 Maintenance cartridge replacement 26 Menu map (menu structure 35...
iPF650 655 750 755 Basic Guide Step2
Page 1
... Attaching the Roll Holder to Rolls 12 Loading Rolls in the Printer 14 Removing the Roll from the Printer 16 Loading Sheets in the Printer 18 Removing Sheets 20 Consumables 21 Replacing Ink Tanks 22 Replacing the Maintenance Cartridge 26 Replacing the Printhead 30 Menu... Map 35 Troubleshooting 2 Troubleshooting 2 If Roll Paper Jams 18 If a Sheet Jams 21 If Paper is Soiled 23 If Printing is Faint 25 If Vertical Lines are Warped or Colors...
... Attaching the Roll Holder to Rolls 12 Loading Rolls in the Printer 14 Removing the Roll from the Printer 16 Loading Sheets in the Printer 18 Removing Sheets 20 Consumables 21 Replacing Ink Tanks 22 Replacing the Maintenance Cartridge 26 Replacing the Printhead 30 Menu... Map 35 Troubleshooting 2 Troubleshooting 2 If Roll Paper Jams 18 If a Sheet Jams 21 If Paper is Soiled 23 If Printing is Faint 25 If Vertical Lines are Warped or Colors...
iPF650 655 750 755 Basic Guide Step2
Page 5
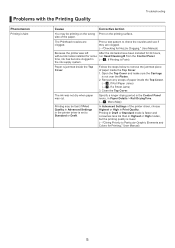
...inside the Top Cover. (→ , If Roll Paper Jams) (→ , If a Sheet Jams) 3. Paper is set to Particular Graphic Elements and Colors for Printing," User Manual) 5 Follow the steps below to check the nozzles and see if they are clogged. The Printhead nozzles are clogged. (→"... Cover and make sure the Carriage is Faint) the ink supply system. The ink was not dry when paper was left After the ink tanks have been installed for 24 hours, without ink tanks installed for Nozzle Clogging," User Manual) Because the printer was cut. Printing in Draft or Standard mode is ...
...inside the Top Cover. (→ , If Roll Paper Jams) (→ , If a Sheet Jams) 3. Paper is set to Particular Graphic Elements and Colors for Printing," User Manual) 5 Follow the steps below to check the nozzles and see if they are clogged. The Printhead nozzles are clogged. (→"... Cover and make sure the Carriage is Faint) the ink supply system. The ink was not dry when paper was left After the ink tanks have been installed for 24 hours, without ink tanks installed for Nozzle Clogging," User Manual) Because the printer was cut. Printing in Draft or Standard mode is ...
iPF650 655 750 755 Basic Guide Step2
Page 16
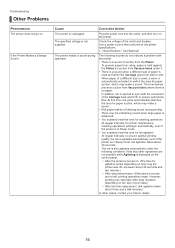
..., depending on the size of print data.) • After ink tank replacement. (Ink agitation takes about three and a half minutes.) In other operations are not possible while Agitating is displayed on the control panel. • After the printer is automatically activated to side When paper of paper is used ... holes under the following conditions. Use a power source that other cases, contact your Canon dealer. 16 Corrective Action Plug the power cord into the outlet, and then turn on the printer. The specified voltage is unplugged. Check the voltage of suction from the Platen To ...
..., depending on the size of print data.) • After ink tank replacement. (Ink agitation takes about three and a half minutes.) In other operations are not possible while Agitating is displayed on the control panel. • After the printer is automatically activated to side When paper of paper is used ... holes under the following conditions. Use a power source that other cases, contact your Canon dealer. 16 Corrective Action Plug the power cord into the outlet, and then turn on the printer. The specified voltage is unplugged. Check the voltage of suction from the Platen To ...
iPF650 655 750 755 Basic Guide Step2
Page 17
... happen after power outages or if the printer is displayed after transfer, ink flows into the system between the Ink Tank and Printhead, which may have just finished initial installation, when more ink is executed frequently. If an error message is unplugged before it again firmly. Many full-page color images are clogged. In print jobs...
... happen after power outages or if the printer is displayed after transfer, ink flows into the system between the Ink Tank and Printhead, which may have just finished initial installation, when more ink is executed frequently. If an error message is unplugged before it again firmly. Many full-page color images are clogged. In print jobs...
iPF650 655 750 755 Basic Guide Step2
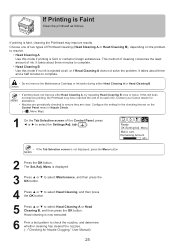
Page 25
...mode if printing is Faint Clean the printhead as follows. Contact your Canon dealer for assistance. • Nozzles are clear. It takes about three minutes to complete. • Head Cleaning B Use this mode if no ink is displayed. 3 Press ▲ or ▼ to select Maintenance,.... It takes about three and a half minutes to ensure they are periodically checked to complete. • Do not remove the Maintenance Cartridge or ink tanks during either Head Cleaning A or Head Cleaning B. • If printing does not improve after Head Cleaning A, try repeating Head Cleaning B once ...
...mode if printing is Faint Clean the printhead as follows. Contact your Canon dealer for assistance. • Nozzles are clear. It takes about three minutes to complete. • Head Cleaning B Use this mode if no ink is displayed. 3 Press ▲ or ▼ to select Maintenance,.... It takes about three and a half minutes to ensure they are periodically checked to complete. • Do not remove the Maintenance Cartridge or ink tanks during either Head Cleaning A or Head Cleaning B. • If printing does not improve after Head Cleaning A, try repeating Head Cleaning B once ...

iPF650 655 750 755 Basic Guide Step2
Page 32
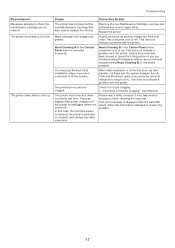
... Cannot adjust paper feed. • Cannot adjust printhead. • Cannot detect papr • Check printed document. • Close Ink Tank Cover • Do not pull out ink tank. • End of range. • GL2: W0504 This command is not supported. • GL2: Wxxxx The memory is full... time has passed. • Prepare for job • Mail box full. xxxxxxxx-xxxx (x represents a letter or number) • Ink insufficient. • Ink tank is empty. • Insert the maintenance cartridge. • Insufficient paper for parts replacement. • Printhead error • ...
... Cannot adjust paper feed. • Cannot adjust printhead. • Cannot detect papr • Check printed document. • Close Ink Tank Cover • Do not pull out ink tank. • End of range. • GL2: W0504 This command is not supported. • GL2: Wxxxx The memory is full... time has passed. • Prepare for job • Mail box full. xxxxxxxx-xxxx (x represents a letter or number) • Ink insufficient. • Ink tank is empty. • Insert the maintenance cartridge. • Insufficient paper for parts replacement. • Printhead error • ...

iPF650 655 750 755 Basic Guide Step2
Page 33
... in contact with HP-GL/2. • Too many jobs for mail box. • Top cover is open. • Unable to detect ink level correctly. • Unknown file. • Wrong ink tank. • Wrong maintenance cartridge. • Wrong printhead. Check the message on the Display Screen and take action as follows. • Remaining... too small. • The roll is empty. • This paper cannot be correctly detected. 33 Other messages These messages do not indicate problems that prevent printer operation.
... in contact with HP-GL/2. • Too many jobs for mail box. • Top cover is open. • Unable to detect ink level correctly. • Unknown file. • Wrong ink tank. • Wrong maintenance cartridge. • Wrong printhead. Check the message on the Display Screen and take action as follows. • Remaining... too small. • The roll is empty. • This paper cannot be correctly detected. 33 Other messages These messages do not indicate problems that prevent printer operation.


