CONSOLE_V1-1_ENG.pdf
Page 1
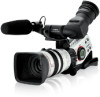
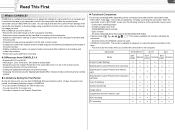
You can adjust and save the Custom Preset settings of a camcorder from a computer and to compose the image you want. Shortcut Keys English PUB. DIE-272 Image Control & Storage Software Version 1.1 Installing the Software CONSOLE Windows ... use with Windows® XP (Service Pack 2) only. Uninstalling the Software Troubleshooting This software is a software that enables you to adjust the settings of the camcorder and analyze a shooting image using a waveform monitor and a vector scope to record on the tape in the...
You can adjust and save the Custom Preset settings of a camcorder from a computer and to compose the image you want. Shortcut Keys English PUB. DIE-272 Image Control & Storage Software Version 1.1 Installing the Software CONSOLE Windows ... use with Windows® XP (Service Pack 2) only. Uninstalling the Software Troubleshooting This software is a software that enables you to adjust the settings of the camcorder and analyze a shooting image using a waveform monitor and a vector scope to record on the tape in the...
CONSOLE_V1-1_ENG.pdf
Page 2
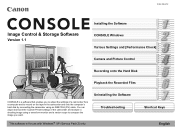
..., Connection, Launch, Activation) Installing the Software and Drivers 1-6 Installing CONSOLE and the Canon Virtual VCR Driver 1-6 Installing the AV/C Camera Storage Subunit-WIA Driver 1-7 Connecting the Camcorder 1-8 Connecting the Camcorder to the Computer 1-8 Launching CONSOLE 1-9 Changing the Software Event Setting 1-9 Starting the...Recording 5-47 Data Dropping 5-48 Recording History 5-48 Playback the Recorded Files [Play Viewer 6-50 Output to the Camcorder 6-51 Time Slider...6-51 Waveform Vector Monitor 6-52 File Browser 6-52 Copying from the Memory Card 6-52 Uninstall ...
..., Connection, Launch, Activation) Installing the Software and Drivers 1-6 Installing CONSOLE and the Canon Virtual VCR Driver 1-6 Installing the AV/C Camera Storage Subunit-WIA Driver 1-7 Connecting the Camcorder 1-8 Connecting the Camcorder to the Computer 1-8 Launching CONSOLE 1-9 Changing the Software Event Setting 1-9 Starting the...Recording 5-47 Data Dropping 5-48 Recording History 5-48 Playback the Recorded Files [Play Viewer 6-50 Output to the Camcorder 6-51 Time Slider...6-51 Waveform Vector Monitor 6-52 File Browser 6-52 Copying from the Memory Card 6-52 Uninstall ...
CONSOLE_V1-1_ENG.pdf
Page 3
... accepted for any errors or omissions. Select [Always On] in 24F (NTSC only). In such case, see Camcorder will not be recognized or controlled. ( Appx-59) This software will not run properly. - Canon reserves the right to change the software settings to the maximum. Use an editing software that has been... recordings, regardless of the operations, the CPU usage may go up to reduce the usage. To edit a file recorded in HDV, use some functions XL2* Required Accessories Canon digital camcorder compatible with CONSOLE.
... accepted for any errors or omissions. Select [Always On] in 24F (NTSC only). In such case, see Camcorder will not be recognized or controlled. ( Appx-59) This software will not run properly. - Canon reserves the right to change the software settings to the maximum. Use an editing software that has been... recordings, regardless of the operations, the CPU usage may go up to reduce the usage. To edit a file recorded in HDV, use some functions XL2* Required Accessories Canon digital camcorder compatible with CONSOLE.
CONSOLE_V1-1_ENG.pdf
Page 4
... switch - CONT. During the trial period, the following functions of the camcorder can record for directly controlling the camcorder. - Handle and grip zoom lever - Camera EXT. CONT. Camcorder's start CONSOLE 50 times limited to the computer. Camcorder XH G1/XH A1 XL H1 XL2 Mode EXT. Camera Custom Preset Settings ...
... switch - CONT. During the trial period, the following functions of the camcorder can record for directly controlling the camcorder. - Handle and grip zoom lever - Camera EXT. CONT. Camcorder's start CONSOLE 50 times limited to the computer. Camcorder XH G1/XH A1 XL H1 XL2 Mode EXT. Camera Custom Preset Settings ...
CONSOLE_V1-1_ENG.pdf
Page 5
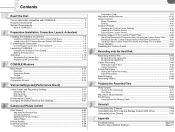
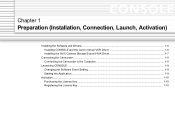
Chapter 1 Preparation (Installation, Connection, Launch, Activation) Installing the Software and Drivers...1-6 Installing CONSOLE and the Canon Virtual VCR Driver 1-6 Installing the AV/C Camera Storage Subunit-WIA Driver 1-7 Connecting the Camcorder ...1-8 Connecting the Camcorder to the Computer 1-8 Launching CONSOLE ...1-9 Changing the Software Event Setting ...1-9 Starting the Application ...1-9 Activation...1-10 Purchasing the License Key...1-10 Registering the License Key ...1-10
Chapter 1 Preparation (Installation, Connection, Launch, Activation) Installing the Software and Drivers...1-6 Installing CONSOLE and the Canon Virtual VCR Driver 1-6 Installing the AV/C Camera Storage Subunit-WIA Driver 1-7 Connecting the Camcorder ...1-8 Connecting the Camcorder to the Computer 1-8 Launching CONSOLE ...1-9 Changing the Software Event Setting ...1-9 Starting the Application ...1-9 Activation...1-10 Purchasing the License Key...1-10 Registering the License Key ...1-10
CONSOLE_V1-1_ENG.pdf
Page 6
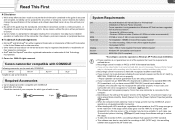
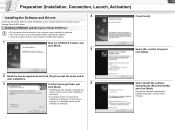
The dedicated driver will be installed automatically. Select [Install the software automatically (Recommended)] and click [Next]. Installing CONSOLE and the Canon Virtual VCR Driver Do not connect the camcorder to the computer when installing the software. You need to create a shortcut for CONSOLE, click [Yes]. • If ... [Next]. 5 Click [Finish]. 1-6 Preparation (Installation, Connection, Launch, Activation) Installing the Software and Drivers 4 Follow the procedure below to install CONSOLE, Canon Virtual VCR driver and AV/C Camera Storage Subunit-WIA driver.
The dedicated driver will be installed automatically. Select [Install the software automatically (Recommended)] and click [Next]. Installing CONSOLE and the Canon Virtual VCR Driver Do not connect the camcorder to the computer when installing the software. You need to create a shortcut for CONSOLE, click [Yes]. • If ... [Next]. 5 Click [Finish]. 1-6 Preparation (Installation, Connection, Launch, Activation) Installing the Software and Drivers 4 Follow the procedure below to install CONSOLE, Canon Virtual VCR driver and AV/C Camera Storage Subunit-WIA driver.
CONSOLE_V1-1_ENG.pdf
Page 7
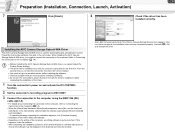
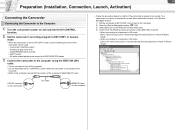
...to choose the software may be displayed. Refer to Connecting the Camcorder to the Computer ( 1-8). Without Installing the AV/C Camera Storage Subunit-WIA driver, you to the camcorder. Open [My Computer] and check if the [Canon Camera Storage Device] icon appears. In the next window, select...or a window asking you cannot adjust the Custom Preset settings. This driver will not be installed. You need to connect the camcorder to the Computer ( 1-8). • When the [Found New Hardware Wizard] window appears, select [No, not this happens, close the window. ...
...to choose the software may be displayed. Refer to Connecting the Camcorder to the Computer ( 1-8). Without Installing the AV/C Camera Storage Subunit-WIA driver, you to the camcorder. Open [My Computer] and check if the [Canon Camera Storage Device] icon appears. In the next window, select...or a window asking you cannot adjust the Custom Preset settings. This driver will not be installed. You need to connect the camcorder to the Computer ( 1-8). • When the [Found New Hardware Wizard] window appears, select [No, not this happens, close the window. ...
CONSOLE_V1-1_ENG.pdf
Page 8
... connecting to a computer in HD mode: [AV/C Tape Device], [Canon Camera Storage Device] and [Canon Virtual VCR] are shown. and connect to confirm if the camcorder is correctly connected if you see items described in step 4 in SD mode: [Canon DV camcorder], [Canon Camera Storage Device] and [Canon Virtual VCR] are shown. • When connecting to a computer...
... connecting to a computer in HD mode: [AV/C Tape Device], [Canon Camera Storage Device] and [Canon Virtual VCR] are shown. and connect to confirm if the camcorder is correctly connected if you see items described in step 4 in SD mode: [Canon DV camcorder], [Canon Camera Storage Device] and [Canon Virtual VCR] are shown. • When connecting to a computer...
CONSOLE_V1-1_ENG.pdf
Page 9
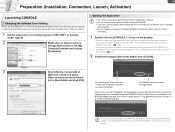
..., a warning window appears. you start CONSOLE are running software that automatically prompts you to choose an application when you connect the camcorder to the computer (set the video folder to change window will not appear next time the target folder. 1-9 Preparation (Installation, Connection...are displayed. Click on an NTFS formatted hard disk, the following dialog appears. or Camera mode. ( 1-8) 2 Right-click on [Canon Camera Storage Device] icon in Windows [Display Properties] window while launching CONSOLE. 1 Double-click the [CONSOLE 1.1] icon on an NTFS formatted hard ...
..., a warning window appears. you start CONSOLE are running software that automatically prompts you to choose an application when you connect the camcorder to the computer (set the video folder to change window will not appear next time the target folder. 1-9 Preparation (Installation, Connection...are displayed. Click on an NTFS formatted hard disk, the following dialog appears. or Camera mode. ( 1-8) 2 Right-click on [Canon Camera Storage Device] icon in Windows [Display Properties] window while launching CONSOLE. 1 Double-click the [CONSOLE 1.1] icon on an NTFS formatted hard ...
CONSOLE_V1-1_ENG.pdf
Page 10
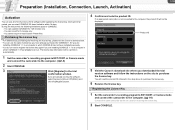
...] in the step above to the computer. ( 1-8) Connect the same camcorder as the one used for 120 minutes only. - Purchasing the License Key • For details about purchasing and receiving the license key, please visit the Canon's download site. • You can use all of the functions of ...this software after registering the license key. The license key information will be displayed. or Camera mode and connect the camcorder to purchase the license key. 6 Receive ...
...] in the step above to the computer. ( 1-8) Connect the same camcorder as the one used for 120 minutes only. - Purchasing the License Key • For details about purchasing and receiving the license key, please visit the Canon's download site. • You can use all of the functions of ...this software after registering the license key. The license key information will be displayed. or Camera mode and connect the camcorder to purchase the license key. 6 Receive ...
CONSOLE_V1-1_ENG.pdf
Page 12
Chapter 2 CONSOLE Windows Main Panel ...2-13 Menu Bar...2-13 Camcorder Status ...2-14 Toolbar ...2-14 Work Space ...2-15 Camcorder Screen ...2-15
Chapter 2 CONSOLE Windows Main Panel ...2-13 Menu Bar...2-13 Camcorder Status ...2-14 Toolbar ...2-14 Work Space ...2-15 Camcorder Screen ...2-15
CONSOLE_V1-1_ENG.pdf
Page 13
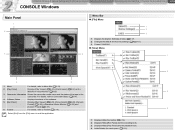
.... 4 Adds/Deletes the work space ( 2-15). For details, refer to Camcorder Status ( 2-14). 4 Software Status Displays the status of the tape in the camcorder. CONSOLE Windows Various Settings and [Performance Check] Camera and Picture Control Recording onto...to Menu Bar ( 2-13). 2 [Play Panel] Displays [Play Viewer] ( 6-50), [File Browser] ( 6-52) and a Waveform Vector Monitor ( 4-32). 3 3 Camcorder Information Shows the camcorder model name and the status of the software. 5 [Rec Panel] Displays [Rec Viewer] ( 4-23), [Focus Assist] ( 4-28), [Camera Control] ( 4-28), a Waveform...
.... 4 Adds/Deletes the work space ( 2-15). For details, refer to Camcorder Status ( 2-14). 4 Software Status Displays the status of the tape in the camcorder. CONSOLE Windows Various Settings and [Performance Check] Camera and Picture Control Recording onto...to Menu Bar ( 2-13). 2 [Play Panel] Displays [Play Viewer] ( 6-50), [File Browser] ( 6-52) and a Waveform Vector Monitor ( 4-32). 3 3 Camcorder Information Shows the camcorder model name and the status of the software. 5 [Rec Panel] Displays [Rec Viewer] ( 4-23), [Focus Assist] ( 4-28), [Camera Control] ( 4-28), a Waveform...

CONSOLE_V1-1_ENG.pdf
Page 14
.../Hides the [File Browser] window. 3 Displays/Hides the waveform vector monitor. Icon No tape in the main panel. Camcorder Status This status shows the name of the camcorder connected and status of the tape Stop mode Recording 1 Displays/Hides [Rec Panel]. 2 Displays/Hides [Play Panel]. 3...6 Tape reached the end Tape is write-protected. Tape error Toolbar There are "Main Toolbar", "Recording Toolbar" and "Playback Toolbar" in the camcorder Status of the tape. To redisplay the toolbar, select [View] [Toolbars] and the name of the toolbar you want to redisplay. CONSOLE Windows...
.../Hides the [File Browser] window. 3 Displays/Hides the waveform vector monitor. Icon No tape in the main panel. Camcorder Status This status shows the name of the camcorder connected and status of the tape Stop mode Recording 1 Displays/Hides [Rec Panel]. 2 Displays/Hides [Play Panel]. 3...6 Tape reached the end Tape is write-protected. Tape error Toolbar There are "Main Toolbar", "Recording Toolbar" and "Playback Toolbar" in the camcorder Status of the tape. To redisplay the toolbar, select [View] [Toolbars] and the name of the toolbar you want to redisplay. CONSOLE Windows...
CONSOLE_V1-1_ENG.pdf
Page 15
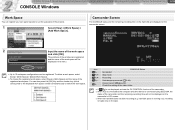
... video folder. If [ ] is not displayed, activate the DV CONTROL function of the camcorder. When XL2 is connected to switch the work space will not be displayed on the camcorder's LCD screen. When the hard disk does not allow recording (e.g. Icon CONSOLE Status Not ... key (which corresponds to the displayed work space number) simultaneously to the computer and other device is connected using IEEE1394, the status of the camcorder and the remaining recording time will be displayed in the menu. Up to suit the purposes of the projects. 1 Select [View]...
... video folder. If [ ] is not displayed, activate the DV CONTROL function of the camcorder. When XL2 is connected to switch the work space will not be displayed on the camcorder's LCD screen. When the hard disk does not allow recording (e.g. Icon CONSOLE Status Not ... key (which corresponds to the displayed work space number) simultaneously to the computer and other device is connected using IEEE1394, the status of the camcorder and the remaining recording time will be displayed in the menu. Up to suit the purposes of the projects. 1 Select [View]...
CONSOLE_V1-1_ENG.pdf
Page 17
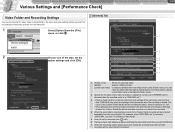
...3 • Place a check mark to record the Custom Preset settings of the camcorder onto the hard disk. CONSOLE only saves the settings of the camcorder when the recoding is started the recording. 4 When the camcorder's sound setting is selected in video folder. 5 Sets the cache recording time ...( 5-46). 6 Placing a check mark displays a dialog confirming the video folder each time you start the recording the camcorder pictures onto the hard disk. [General] Tab 1 Select [Option] from the recording file. CONSOLE Windows Various Settings and [Performance Check] ...
...3 • Place a check mark to record the Custom Preset settings of the camcorder onto the hard disk. CONSOLE only saves the settings of the camcorder when the recoding is started the recording. 4 When the camcorder's sound setting is selected in video folder. 5 Sets the cache recording time ...( 5-46). 6 Placing a check mark displays a dialog confirming the video folder each time you start the recording the camcorder pictures onto the hard disk. [General] Tab 1 Select [Option] from the recording file. CONSOLE Windows Various Settings and [Performance Check] ...

CONSOLE_V1-1_ENG.pdf
Page 18
... details, refer to 4CH, the sounds on channel 3 and 4 will be output to repeatedly record the frame image at [Interval recording] makes CONSOLE to the camcorder. When [All pictures] or [I picture and P picture] is selected, data dropping ( 5-48) may occur. When the color of the preview image appears odd, select...
... details, refer to 4CH, the sounds on channel 3 and 4 will be output to repeatedly record the frame image at [Interval recording] makes CONSOLE to the camcorder. When [All pictures] or [I picture and P picture] is selected, data dropping ( 5-48) may occur. When the color of the preview image appears odd, select...
CONSOLE_V1-1_ENG.pdf
Page 20
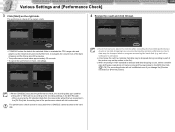
... performance check or no data dropping has occurred during the system performance check, data may be executed. When receiving the DV standard data from the camcorder while [Frame] is selected in the [DV Rec] tab. - The performance check of the performance check will be written to the hard disk. anti-virus...
... performance check or no data dropping has occurred during the system performance check, data may be executed. When receiving the DV standard data from the camcorder while [Frame] is selected in the [DV Rec] tab. - The performance check of the performance check will be written to the hard disk. anti-virus...
CONSOLE_V1-1_ENG.pdf
Page 22
... Exporting the Custom Preset ...4-39 Practical Usages of the Custom Preset Files 4-40 Use of the Disconnected Camcorder After Adjusting the Custom Preset Files 4-40 Passing Down the Custom Preset Setting to the Other Camcorders 4-41 Creating a New Custom Preset File Using an Existing File as a Base 4-41 Preset Variation ...4-42 Resetting...
... Exporting the Custom Preset ...4-39 Practical Usages of the Custom Preset Files 4-40 Use of the Disconnected Camcorder After Adjusting the Custom Preset Files 4-40 Passing Down the Custom Preset Setting to the Other Camcorders 4-41 Creating a New Custom Preset File Using an Existing File as a Base 4-41 Preset Variation ...4-42 Resetting...
CONSOLE_V1-1_ENG.pdf
Page 23
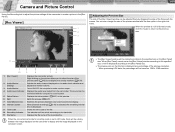
... Recording onto the Hard Disk Playback the Recorded Files Camera and Picture Control 4-23 Using the Recording tool to adjust the picture settings of the camcorder to create a picture in the [Rec Panel]. [Rec Viewer] 1 2 3 Adjusting the Preview Size The size of the [Rec Viewer] ... can be displayed according to the [Rec Panel] size. The preview size on 1920 x 1080 resolution. Displays the audio level output from the camcorder. Splits the preview ( 4-27). When previewing HDV data, the percentage will be a delay between color and monochrome display. Displays the zebra pattern ( ...
... Recording onto the Hard Disk Playback the Recorded Files Camera and Picture Control 4-23 Using the Recording tool to adjust the picture settings of the camcorder to create a picture in the [Rec Panel]. [Rec Viewer] 1 2 3 Adjusting the Preview Size The size of the [Rec Viewer] ... can be displayed according to the [Rec Panel] size. The preview size on 1920 x 1080 resolution. Displays the audio level output from the camcorder. Splits the preview ( 4-27). When previewing HDV data, the percentage will be a delay between color and monochrome display. Displays the zebra pattern ( ...
CONSOLE_V1-1_ENG.pdf
Page 27
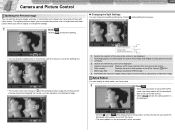
...to on the preview image and dragging the mouse, you can reposition the displayed image. 1 2 3 1 Selects the position of the camcorder picture to be recorded. CONSOLE Windows Various Settings and [Performance Check] Camera and Picture Control Recording onto the Hard Disk Playback the Recorded ...Files Camera and Picture Control 4-27 Splitting the Preview Image You can split the preview image vertically or horizontally and compare the camcorder picture with other picture. The splitting function helps you to compare the picture color or brightness with other picture when you ...
...to on the preview image and dragging the mouse, you can reposition the displayed image. 1 2 3 1 Selects the position of the camcorder picture to be recorded. CONSOLE Windows Various Settings and [Performance Check] Camera and Picture Control Recording onto the Hard Disk Playback the Recorded ...Files Camera and Picture Control 4-27 Splitting the Preview Image You can split the preview image vertically or horizontally and compare the camcorder picture with other picture. The splitting function helps you to compare the picture color or brightness with other picture when you ...


