Instruction Manual
Page 2
...granted or implied for any other countries. • Avid and Media Composer are trademarks or registered trademarks of Avid Technology, Inc. and other use for a personal and noncommercial purpose or (2) by a video provider licensed under the AT&T patents to copyright laws. 2 Trademark Acknowledgements • ... • JavaScript is licensed under AT&T patents for the MPEG-4 standard and may infringe on the rights of copyright owners and be used for encoding MPEG-4 compliant video and/or decoding MPEG-4 compliant video that was encoded only (1) for MPEG-4 standard. • THIS ...
...granted or implied for any other countries. • Avid and Media Composer are trademarks or registered trademarks of Avid Technology, Inc. and other use for a personal and noncommercial purpose or (2) by a video provider licensed under the AT&T patents to copyright laws. 2 Trademark Acknowledgements • ... • JavaScript is licensed under AT&T patents for the MPEG-4 standard and may infringe on the rights of copyright owners and be used for encoding MPEG-4 compliant video and/or decoding MPEG-4 compliant video that was encoded only (1) for MPEG-4 standard. • THIS ...

Instruction Manual
Page 3
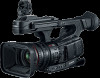
... with 100% coverage) and a large eye cup for independent focus, zoom and iris operation. Highlights of the XF705 The Canon XF705 4K Camcorder is a high-performance camcorder whose advanced functionality and versatile usability make it the perfect choice for a ...variety of functions (A 119) to personalize the camcorder to your needs and preferences. 3 Improved displays The camcorder features a 4.0-in. The camcorder also features 14 buttons to use...
... with 100% coverage) and a large eye cup for independent focus, zoom and iris operation. Highlights of the XF705 The Canon XF705 4K Camcorder is a high-performance camcorder whose advanced functionality and versatile usability make it the perfect choice for a ...variety of functions (A 119) to personalize the camcorder to your needs and preferences. 3 Improved displays The camcorder features a 4.0-in. The camcorder also features 14 buttons to use...

Instruction Manual
Page 4
... (A 175) and transfer recordings from an SD card to work with the 12G-SDI standard that can also focus automatically on another XF705 camcorder (A 131). • Battery packs compatible with Intelligent System for better remaining usage time information. • INPUT terminals (XLR)... 112). • Color bars and test tone output and recording (A 106). • Advanced remote operation using the optional RC-V100 Remote Controller (A 39). Software for example, use the Canon XF plugins to a computer, play back the clips and organize them on the screen and viewfinder. Enhanced Focusing...
... (A 175) and transfer recordings from an SD card to work with the 12G-SDI standard that can also focus automatically on another XF705 camcorder (A 131). • Battery packs compatible with Intelligent System for better remaining usage time information. • INPUT terminals (XLR)... 112). • Color bars and test tone output and recording (A 106). • Advanced remote operation using the optional RC-V100 Remote Controller (A 39). Software for example, use the Canon XF plugins to a computer, play back the clips and organize them on the screen and viewfinder. Enhanced Focusing...
Instruction Manual
Page 5
...Accessories 10 Names of Contents 1. Table of Parts 11 Camcorder 11 WL-D6000 Wireless Controller 18 2. Preparations 19 Preparing the Power Supply 19 Using a Battery Pack 19 Using a Power Outlet 21 Turning the Camcorder On and Off 22 Date, Time and Language Settings 23 Setting the Date and Time 23 Changing... 30 Adjusting the Grip Belt 31 Attaching the Shoulder Strap 31 Removing and Attaching the Terminal Covers 31 Removing the Shoulder Pad 32 Using a Tripod 32 Using SD Cards 33 Compatible SD Cards 33 Inserting and Removing an SD Card 34 Initializing an SD Card 35 Switching Between the SD ...
...Accessories 10 Names of Contents 1. Table of Parts 11 Camcorder 11 WL-D6000 Wireless Controller 18 2. Preparations 19 Preparing the Power Supply 19 Using a Battery Pack 19 Using a Power Outlet 21 Turning the Camcorder On and Off 22 Date, Time and Language Settings 23 Setting the Date and Time 23 Changing... 30 Adjusting the Grip Belt 31 Attaching the Shoulder Strap 31 Removing and Attaching the Terminal Covers 31 Removing the Shoulder Pad 32 Using a Tripod 32 Using SD Cards 33 Compatible SD Cards 33 Inserting and Removing an SD Card 34 Initializing an SD Card 35 Switching Between the SD ...
Instruction Manual
Page 6
... 70 Selecting the Zoom Mode 70 Selecting the Zoom Controls 71 Using the Zoom Ring 71 Using the Grip Zoom Rocker 71 Using the Handle Zoom Rocker 73 Using the Supplied Wireless Controller or an Optional Remote Controller 74 Using Optional Conversion Lenses 75 Adjusting the Focus 76 Manual Focus 76...Marks while Recording 109 Adding an $ Mark or % Mark to the Last XF-HEVC or XF-AVC Clip Recorded 109 Using Metadata 110 Setting a User Memo Created with Canon XF Utility 110 Entering Slate Information About the Recording 111 Recording GPS Information (Geotagging) 112 Connecting the GPS Receiver 112 ...
... 70 Selecting the Zoom Mode 70 Selecting the Zoom Controls 71 Using the Zoom Ring 71 Using the Grip Zoom Rocker 71 Using the Handle Zoom Rocker 73 Using the Supplied Wireless Controller or an Optional Remote Controller 74 Using Optional Conversion Lenses 75 Adjusting the Focus 76 Manual Focus 76...Marks while Recording 109 Adding an $ Mark or % Mark to the Last XF-HEVC or XF-AVC Clip Recorded 109 Using Metadata 110 Setting a User Memo Created with Canon XF Utility 110 Entering Slate Information About the Recording 111 Recording GPS Information (Geotagging) 112 Connecting the GPS Receiver 112 ...
Instruction Manual
Page 7
... 145 Video Output Configuration 145 Recording Video Signal Configuration and Video Output Configuration by Terminal 145 Connecting to an External Monitor 147 Using the SDI Terminal 147 Using the HDMI OUT Terminal 148 Superimposing Onscreen Displays on a Computer 153 Saving XF-HEVC or XF-AVC Clips to a Wired... Network Settings 163 Browser Remote: Controlling the Camcorder from a Network Device 164 Setting Up Browser Remote 164 Starting Browser Remote 165 Using Browser Remote 166 IP Streaming 175 IP Streaming Settings 175 Streaming Video over IP 176 FTP File Transfer 178 FTP Server and Transfer...
... 145 Video Output Configuration 145 Recording Video Signal Configuration and Video Output Configuration by Terminal 145 Connecting to an External Monitor 147 Using the SDI Terminal 147 Using the HDMI OUT Terminal 148 Superimposing Onscreen Displays on a Computer 153 Saving XF-HEVC or XF-AVC Clips to a Wired... Network Settings 163 Browser Remote: Controlling the Camcorder from a Network Device 164 Setting Up Browser Remote 164 Starting Browser Remote 165 Using Browser Remote 166 IP Streaming 175 IP Streaming Settings 175 Streaming Video over IP 176 FTP File Transfer 178 FTP Server and Transfer...
Instruction Manual
Page 9
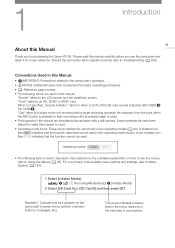
...page number. • The following style is pressed again to start recording until it for purchasing the Canon XF705. A shaded icon (like ) indicates that the function described can be used. Operating modes: • The following terms are simulated pictures taken with a single recording operation (...menu options and settings, refer to represent menu selections. Brackets [ ] indicate text as it appears on how to use the camcorder and retain it is used in a procedure. 1 Introduction 9 About this manual carefully before you for future reference. a non-shaded icon ...
...page number. • The following style is pressed again to start recording until it for purchasing the Canon XF705. A shaded icon (like ) indicates that the function described can be used. Operating modes: • The following terms are simulated pictures taken with a single recording operation (...menu options and settings, refer to represent menu selections. Brackets [ ] indicate text as it appears on how to use the camcorder and retain it is used in a procedure. 1 Introduction 9 About this manual carefully before you for future reference. a non-shaded icon ...
Instruction Manual
Page 18
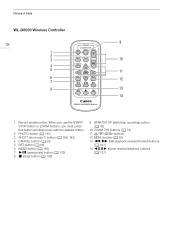
Names of Parts WL-D6000 Wireless Controller 18 9 1 2 3 10 4 5 11 6 12 7 8 13 14 1 Record enable button: When you use the START/ STOP button or ZOOM buttons, you must press this button simultaneously with the desired button. 2 PHOTO button (A 181) 3 SHOT1 (shot mark 1) button (A 109, ...
Names of Parts WL-D6000 Wireless Controller 18 9 1 2 3 10 4 5 11 6 12 7 8 13 14 1 Record enable button: When you use the START/ STOP button or ZOOM buttons, you must press this button simultaneously with the desired button. 2 PHOTO button (A 181) 3 SHOT1 (shot mark 1) button (A 109, ...
Instruction Manual
Page 19
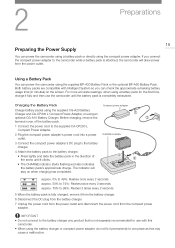
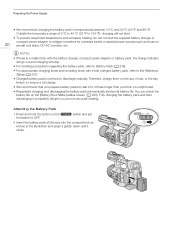
... • Do not connect to the battery charger any product that is not expressly recommended for the first time, charge it fully and then use with Intelligent System so you connect the compact power adapter to one place as this may cause a malfunction. If you can power the camcorder... using a battery pack for use the camcorder until it from the battery charger. 6 Disconnect the DC plug from the battery charger. 7 Unplug the power cord from the ...
... • Do not connect to the battery charger any product that is not expressly recommended for the first time, charge it fully and then use with Intelligent System so you connect the compact power adapter to one place as this may cause a malfunction. If you can power the camcorder... using a battery pack for use the camcorder until it from the battery charger. 6 Disconnect the DC plug from the battery charger. 7 Unplug the power cord from the ...
Instruction Manual
Page 20
... 3 times longer than you think you a more accurate reading. Fully charging the battery pack and then discharging it clicks. ባ Outside the temperature range of use, or the day before, to ensure a full charge. • We recommend that you prepare battery packs to last 2 to voltage converters for overseas travels or...
... 3 times longer than you think you a more accurate reading. Fully charging the battery pack and then discharging it clicks. ባ Outside the temperature range of use, or the day before, to ensure a full charge. • We recommend that you prepare battery packs to last 2 to voltage converters for overseas travels or...
Instruction Manual
Page 21
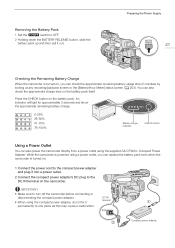
...for approximately 3 seconds and show the approximate remaining battery charge. 0-25% 26-50% 51-75% 76-100% Battery charge indicator CHECK button Using a Power Outlet You can check the approximate remaining battery usage time (in minutes) by looking at any recording/playback screen or the [Battery/...the DC IN terminal on the camcorder. DC IN • When using the supplied CA-CP200 L Compact Power Adapter. While the camcorder is powered using a power outlet, you can also power the camcorder directly from a power outlet using the compact power adapter, do not fix it out. Preparing the...
...for approximately 3 seconds and show the approximate remaining battery charge. 0-25% 26-50% 51-75% 76-100% Battery charge indicator CHECK button Using a Power Outlet You can check the approximate remaining battery usage time (in minutes) by looking at any recording/playback screen or the [Battery/...the DC IN terminal on the camcorder. DC IN • When using the supplied CA-CP200 L Compact Power Adapter. While the camcorder is powered using a power outlet, you can also power the camcorder directly from a power outlet using the compact power adapter, do not fix it out. Preparing the...
Instruction Manual
Page 23
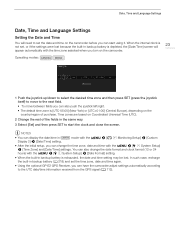
...) and set the date and time on the country/region of the fields in the same way. 3 Select [Set] and then press SET to start using it. In such case, recharge the built-in backup battery is exhausted, the date and time setting may be lost. mode with the > [¢ % ... display the date/time in backup battery is depleted, the [Date/Time] screen will need to set the time zone, date and time again. • Using the optional GP-E2 GPS Receiver, you can have the camcorder adjust settings automatically according to the UTC date/time information received from the GPS...
...) and set the date and time on the country/region of the fields in the same way. 3 Select [Set] and then press SET to start using it. In such case, recharge the built-in backup battery is exhausted, the date and time setting may be lost. mode with the > [¢ % ... display the date/time in backup battery is depleted, the [Date/Time] screen will need to set the time zone, date and time again. • Using the optional GP-E2 GPS Receiver, you can have the camcorder adjust settings automatically according to the UTC date/time information received from the GPS...
Instruction Manual
Page 25
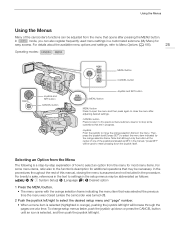
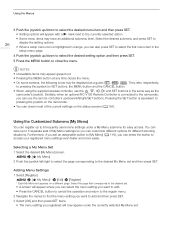
... menu for easy access. CANCEL button Press to return to the previous menu/submenu level or to settings in the setup menus may be used menu settings in a customized submenu (My Menu) for most menu items. For some operations that was selected the previous time the menu was... . Selecting an Option from the Menu The following is assumed and not included in the procedure. Using the Menus Using the Menus Many of the camcorder's functions can also register frequently used to move the orange selection frame in the menu. Note that opens after adjusting desired settings. Joystick...
... menu for easy access. CANCEL button Press to return to the previous menu/submenu level or to settings in the setup menus may be used menu settings in a customized submenu (My Menu) for most menu items. For some operations that was selected the previous time the menu was... . Selecting an Option from the Menu The following is assumed and not included in the procedure. Using the Menus Using the Menus Many of the camcorder's functions can also register frequently used to move the orange selection frame in the menu. Note that opens after adjusting desired settings. Joystick...
Instruction Manual
Page 26
.... Adding Menu Settings 1 Select [Register]. > [¥ My Menu]* > [Edit] > [Register] * Each My Menu set appears on the status screens (A 197). Using the Menus 3 Push the joystick up/down to select the desired menu item and then press SET. • Setting options will now appear under a My... , . They refer, respectively, to pressing the joystick (or SET button), the MENU button and the CANCEL button. • When using the supplied wireless controller, use the remote controller's up /down /left /right to select the page corresponding to the desired My Menu set an assignable button to [My...
.... Adding Menu Settings 1 Select [Register]. > [¥ My Menu]* > [Edit] > [Register] * Each My Menu set appears on the status screens (A 197). Using the Menus 3 Push the joystick up/down to select the desired menu item and then press SET. • Setting options will now appear under a My... , . They refer, respectively, to pressing the joystick (or SET button), the MENU button and the CANCEL button. • When using the supplied wireless controller, use the remote controller's up /down /left /right to select the page corresponding to the desired My Menu set an assignable button to [My...
Instruction Manual
Page 27
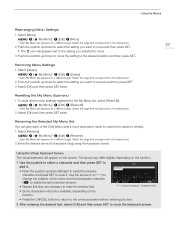
... to the My Menu set, select [Reset All]. > [¥ My Menu]* > [Edit] > [Reset All] * Each My Menu set appears on a different page. Using the Virtual Keyboard Screen The virtual keyboard will appear on a different page. Select the page that corresponds to the desired set. 2 Push the joystick up... to the desired set . 27 2 Push the joystick up/down to select the setting you selected to move the setting to close the keyboard screen. Use the arrows ( / / / ) to change the position of the 5 My Menu sets a more descriptive name to make them easier to identify. 1 Select [Rename]. > [&#...
... to the My Menu set, select [Reset All]. > [¥ My Menu]* > [Edit] > [Reset All] * Each My Menu set appears on a different page. Using the Virtual Keyboard Screen The virtual keyboard will appear on a different page. Select the page that corresponds to the desired set. 2 Push the joystick up... to the desired set . 27 2 Push the joystick up/down to select the setting you selected to move the setting to close the keyboard screen. Use the arrows ( / / / ) to change the position of the 5 My Menu sets a more descriptive name to make them easier to identify. 1 Select [Rename]. > [&#...
Instruction Manual
Page 28
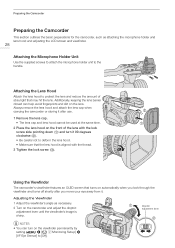
...the viewfinder's angle as attaching the microphone holder and lens hood and adjusting the LCD screen and viewfinder. 28 Attaching the Microphone Holder Unit Use the supplied screws to attach the microphone holder unit to [Off]. ቢ Dioptric adjustment lever ባ Additionally, keeping the lens barrier closed... the lens and reduce the amount of the lens with the thread. 3 Tighten the lock screw (ቤ). ባ ቢ ቤ Using the Viewfinder The camcorder's viewfinder features an OLED screen that may hit the lens. Always remove the lens hood and attach the lens cap when...
...the viewfinder's angle as attaching the microphone holder and lens hood and adjusting the LCD screen and viewfinder. 28 Attaching the Microphone Holder Unit Use the supplied screws to attach the microphone holder unit to [Off]. ቢ Dioptric adjustment lever ባ Additionally, keeping the lens barrier closed... the lens and reduce the amount of the lens with the thread. 3 Tighten the lock screw (ቤ). ባ ቢ ቤ Using the Viewfinder The camcorder's viewfinder features an OLED screen that may hit the lens. Always remove the lens hood and attach the lens cap when...
Instruction Manual
Page 29
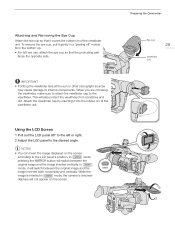
... of the viewfinder unit. This will not appear on the screen according to the LCD panel's position. Preparing the Camcorder Eye cup 29 Viewfinder unit Using the LCD Screen 1 Pull out the LCD panel 90° to the desired angle. NOTES • You can invert the image displayed on the screen.... Attach the viewfinder cap by inserting it covers the rubber rim of the viewfinder unit. When you are not using the viewfinder, make sure to attach the viewfinder cap to internal components. Attaching and Removing the Eye Cup Attach the eye cup so that the...
... of the viewfinder unit. This will not appear on the screen according to the LCD panel's position. Preparing the Camcorder Eye cup 29 Viewfinder unit Using the LCD Screen 1 Pull out the LCD panel 90° to the desired angle. NOTES • You can invert the image displayed on the screen.... Attach the viewfinder cap by inserting it covers the rubber rim of the viewfinder unit. When you are not using the viewfinder, make sure to attach the viewfinder cap to internal components. Attaching and Removing the Eye Cup Attach the eye cup so that the...
Instruction Manual
Page 30
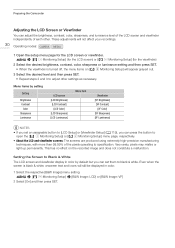
... set them to adjust other . Monitoring Setup] or [¢ " Monitoring Setup] menu page, respectively. • About the LCD and viewfinder screens: The screens are produced using extremely high-precision manufacturing techniques, with more than 99.99% of each other settings as necessary. Preparing the Camcorder Adjusting the LCD Screen or Viewfinder...
... set them to adjust other . Monitoring Setup] or [¢ " Monitoring Setup] menu page, respectively. • About the LCD and viewfinder screens: The screens are produced using extremely high-precision manufacturing techniques, with more than 99.99% of each other settings as necessary. Preparing the Camcorder Adjusting the LCD Screen or Viewfinder...
Instruction Manual
Page 31
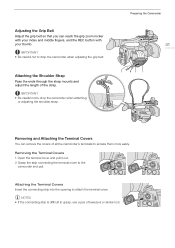
... belt so that you can remove the covers of all the camcorder's terminals to the camcorder and pull. IMPORTANT • Be careful not to grasp, use a pair of the strap. IMPORTANT • Be careful not to attach the terminal cover. Attaching the Terminal Covers Insert the connecting strip into the opening...
... belt so that you can remove the covers of all the camcorder's terminals to the camcorder and pull. IMPORTANT • Be careful not to grasp, use a pair of the strap. IMPORTANT • Be careful not to attach the terminal cover. Attaching the Terminal Covers Insert the connecting strip into the opening...
Instruction Manual
Page 32
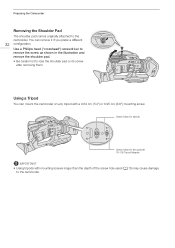
... the shoulder pad. • Be careful not to the camcorder. Screw holes for tripods Screw holes for the optional TA-100 Tripod Adapter IMPORTANT • Using tripods with a 0.64 cm (1/4") or 0.95 cm (3/8") mounting screw. Preparing the Camcorder Removing the Shoulder Pad The shoulder pad comes originally attached to the camcorder.... You can mount the camcorder on any tripod with mounting screws longer than the depth of the screw hole used (A 15) may cause damage to lose the shoulder pad or its screw after removing them...
... the shoulder pad. • Be careful not to the camcorder. Screw holes for tripods Screw holes for the optional TA-100 Tripod Adapter IMPORTANT • Using tripods with a 0.64 cm (1/4") or 0.95 cm (3/8") mounting screw. Preparing the Camcorder Removing the Shoulder Pad The shoulder pad comes originally attached to the camcorder.... You can mount the camcorder on any tripod with mounting screws longer than the depth of the screw hole used (A 15) may cause damage to lose the shoulder pad or its screw after removing them...


