XF100 / XF105 Instruction Manual
Page 6
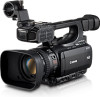
... (0 173). You can assign often-used functions to assignable buttons (0 97) so that you can transfer your setting preferences to other XF105/XF100 camcorders in order to use the built-in microphone, MIC audio input terminal or the two XLR audio input terminals (with the... scopes Check the brightness of a single button. Advanced Professional Features Pro-level connectivity (b only) An industry-standard HD/SD SDI terminal (0 127) for uncompressed HD signal output, embedded audio and SMPTE time code (LTC) give you even more freedom to control many aspects of any multi-camera shooting...
... (0 173). You can assign often-used functions to assignable buttons (0 97) so that you can transfer your setting preferences to other XF105/XF100 camcorders in order to use the built-in microphone, MIC audio input terminal or the two XLR audio input terminals (with the... scopes Check the brightness of a single button. Advanced Professional Features Pro-level connectivity (b only) An industry-standard HD/SD SDI terminal (0 127) for uncompressed HD signal output, embedded audio and SMPTE time code (LTC) give you even more freedom to control many aspects of any multi-camera shooting...
XF100 / XF105 Instruction Manual
Page 9
... Utility (Windows) 132 Installing and Uninstalling Canon XF Utility (Mac OS) 134 Viewing the Software Instruction Manuals 137 7. External Connections 124 Video Output Configuration 124 Video Output Configuration by Terminal 124 SD Output 125 Connecting to an External Monitor 126 Connection Diagram 126 b Using the HD/SD SDI Terminal 127 Using the HDMI OUT Terminal...
... Utility (Windows) 132 Installing and Uninstalling Canon XF Utility (Mac OS) 134 Viewing the Software Instruction Manuals 137 7. External Connections 124 Video Output Configuration 124 Video Output Configuration by Terminal 124 SD Output 125 Connecting to an External Monitor 126 Connection Diagram 126 b Using the HD/SD SDI Terminal 127 Using the HDMI OUT Terminal...
XF100 / XF105 Instruction Manual
Page 43
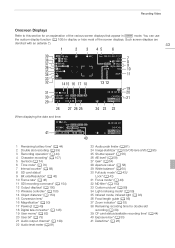
...(0 74) 6 Time code* (0 70) 7 Interval counter* (0 88) 8 SD card status* 9 Bit rate/Resolution* (0 46) 10 Frame rate* (0 46) 11 SDI recording command* (0 154) 12 Output displays* (0 150) 13 Wireless controller* (0 150) 14 Object distance* (0 150) 15 Conversion lens* 16 Magnification* (0 50) 17 Peaking* (0 49) 18 Digital tele...-converter* (0 146) 19 User memo* (0 82) 20 User bit* (0 73) 21 Audio output channel* (0 129) 22 Audio level meter (0 81) 40 23 Audio peak limiter (0 81) 24 Image stabilizer* (0 53)/OIS lens shift (0 95) 25 Shutter...
...(0 74) 6 Time code* (0 70) 7 Interval counter* (0 88) 8 SD card status* 9 Bit rate/Resolution* (0 46) 10 Frame rate* (0 46) 11 SDI recording command* (0 154) 12 Output displays* (0 150) 13 Wireless controller* (0 150) 14 Object distance* (0 150) 15 Conversion lens* 16 Magnification* (0 50) 17 Peaking* (0 49) 18 Digital tele...-converter* (0 146) 19 User memo* (0 82) 20 User bit* (0 73) 21 Audio output channel* (0 129) 22 Audio level meter (0 81) 40 23 Audio peak limiter (0 81) 24 Image stabilizer* (0 53)/OIS lens shift (0 95) 25 Shutter...
XF100 / XF105 Instruction Manual
Page 69
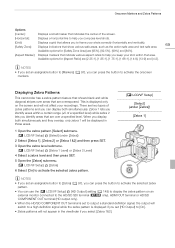
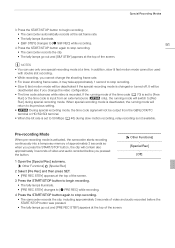
... Setup] [Zebra] 6 Select [On] to activate the selected zebra pattern. [M LCD/VF Setup] [Select] (under [Zebra]) [Zebra 1] NOTES • If you set [HD Output] to [On]. • Zebra patterns will not affect your recordings. There are two types of a specified level) while zebra 2 lets you identify areas that are... (0 149) to display the zebra pattern on an external monitor connected to the HD/SD SDI terminal (b only), HDMI OUT terminal or HD/SD COMPONENT OUT terminal (HD output only). • When the HD/SD COMPONENT OUT terminal is set an assignable button to [Markers] (0 97), you to ...
... Setup] [Zebra] 6 Select [On] to activate the selected zebra pattern. [M LCD/VF Setup] [Select] (under [Zebra]) [Zebra 1] NOTES • If you set [HD Output] to [On]. • Zebra patterns will not affect your recordings. There are two types of a specified level) while zebra 2 lets you identify areas that are... (0 149) to display the zebra pattern on an external monitor connected to the HD/SD SDI terminal (b only), HDMI OUT terminal or HD/SD COMPONENT OUT terminal (HD output only). • When the HD/SD COMPONENT OUT terminal is set an assignable button to [Markers] (0 97), you to ...
XF100 / XF105 Instruction Manual
Page 70
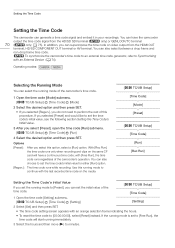
... then press SET. • The time code setting screen appears with an External Device (0 74). with the last recorded time code on video output from the HD/SD SDI terminal (b only) or GENLOCK/TC terminal 70 (b only; 0 75). You can set the time code's initial value for either [Run] option. [Regen.]: The... Setup] [Time Code] [Run] [Rec Run] Setting the Time Code's Initial Value If you set to [Free Run], the time code will have the camcorder output the time code signal from the HDMI OUT terminal, HD/SD COMPONENT OUT terminal or AV terminal. If the running mode is set the running...
... then press SET. • The time code setting screen appears with an External Device (0 74). with the last recorded time code on video output from the HD/SD SDI terminal (b only) or GENLOCK/TC terminal 70 (b only; 0 75). You can set the time code's initial value for either [Run] option. [Regen.]: The... Setup] [Time Code] [Run] [Rec Run] Setting the Time Code's Initial Value If you set to [Free Run], the time code will have the camcorder output the time code signal from the HDMI OUT terminal, HD/SD COMPONENT OUT terminal or AV terminal. If the running mode is set the running...
XF100 / XF105 Instruction Manual
Page 71
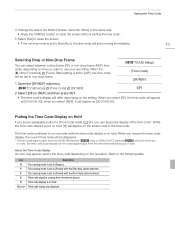
... time code continues to run normally while the time code display is coming from the other terminals will not be put on the video signal output from an external source. Putting the Time Code Display on hold . When you resume the time code display, the current time code will be ...displayed. * The time code signal output from the HD/SD SDI terminal (b only) or GENLOCK/TC terminal (b only) will be put on the operation. The time code superimposed on hold . Time code signal is...
... time code continues to run normally while the time code display is coming from the other terminals will not be put on the video signal output from an external source. Putting the Time Code Display on hold . When you resume the time code display, the current time code will be ...displayed. * The time code signal output from the HD/SD SDI terminal (b only) or GENLOCK/TC terminal (b only) will be put on the operation. The time code superimposed on hold . Time code signal is...
XF100 / XF105 Instruction Manual
Page 72
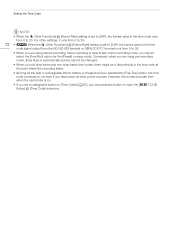
.... Setting the Time Code NOTES • When the [J Other Functions] [Frame Rate] setting is set to [24P], the frames value in the time code signal output from the HD/ SD SDI terminal or GENLOCK/TC terminal runs from 0 to 23.
.... Setting the Time Code NOTES • When the [J Other Functions] [Frame Rate] setting is set to [24P], the frames value in the time code signal output from the HD/ SD SDI terminal or GENLOCK/TC terminal runs from 0 to 23.
XF100 / XF105 Instruction Manual
Page 74
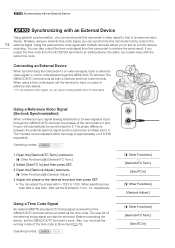
...video signal* or a time code signal through the GENLOCK/TC terminal, the phases of an external video device. If you output the time code from this camcorder to input or output in advance (see below). * For the reference video signal, you can use an analog blackburst or tri-level signal. ...adjusted within -1023 to 10 or -10, respectively. The user bit of approximately ±0.4 H (HD equivalent). You can also output the time code signal from the HD/SD SDI terminal to the 74 external signal. The GENLOCK/TC terminal acts as the time code. The H phase can be recorded. b ...
...video signal* or a time code signal through the GENLOCK/TC terminal, the phases of an external video device. If you output the time code from this camcorder to input or output in advance (see below). * For the reference video signal, you can use an analog blackburst or tri-level signal. ...adjusted within -1023 to 10 or -10, respectively. The user bit of approximately ±0.4 H (HD equivalent). You can also output the time code signal from the HD/SD SDI terminal to the 74 external signal. The GENLOCK/TC terminal acts as the time code. The H phase can be recorded. b ...

XF100 / XF105 Instruction Manual
Page 75
If you set the [N Video Setup] [SDI Output] setting to [HD] or [SD], the embedded time code will be output from the HD/ SD SDI terminal. Turning the camcorder off/on - Changing the frame rate • If the external time code signal is incorrect or there is no input... code's drop-frame bit will be used. • When an external time code signal is received, the camcorder's own time code will be synchronized to output. Operating modes: 1 Open the [Genlock/TC Term.] submenu. [J Other Functions] [Genlock/TC Term.] 2 Select [TC Out] and then press SET. [J Other Functions] [...
If you set the [N Video Setup] [SDI Output] setting to [HD] or [SD], the embedded time code will be output from the HD/ SD SDI terminal. Turning the camcorder off/on - Changing the frame rate • If the external time code signal is incorrect or there is no input... code's drop-frame bit will be used. • When an external time code signal is received, the camcorder's own time code will be synchronized to output. Operating modes: 1 Open the [Genlock/TC Term.] submenu. [J Other Functions] [Genlock/TC Term.] 2 Select [TC Out] and then press SET. [J Other Functions] [...
XF100 / XF105 Instruction Manual
Page 76
In other words, when a recording in 24P mode is output from the HD/SD SDI terminal, the signal is converted to [Pulldown], the user bit will be 2:3 pulldown data. When the [J Other Functions] [Frame Rate] setting is set to 60i ...using the 2:3 pulldown method. b Synchronizing with an External Device NOTES • The user bit of the time code signal is output while the...
In other words, when a recording in 24P mode is output from the HD/SD SDI terminal, the signal is converted to [Pulldown], the user bit will be 2:3 pulldown data. When the [J Other Functions] [Frame Rate] setting is set to 60i ...using the 2:3 pulldown method. b Synchronizing with an External Device NOTES • The user bit of the time code signal is output while the...
XF100 / XF105 Instruction Manual
Page 83
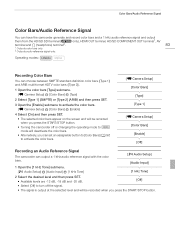
.... • Available levels are -12 dB, -18 dB and -20 dB. [Off] • Select [Off] to turn off the signal. • The signal is output at the selected level and will be recorded when you press the START/STOP button. Operating modes: Recording Color Bars You can choose between SMPTE...] [Enable] [Off] Recording an Audio Reference Signal The camcorder can have the camcorder generate and record color bars and a 1 kHz audio reference signal and output them from the HD/SD SDI terminal (b only), HDMI OUT terminal, HD/SD COMPONENT OUT terminal1, AV terminal and W (headphone) terminal2. 83...
.... • Available levels are -12 dB, -18 dB and -20 dB. [Off] • Select [Off] to turn off the signal. • The signal is output at the selected level and will be recorded when you press the START/STOP button. Operating modes: Recording Color Bars You can choose between SMPTE...] [Enable] [Off] Recording an Audio Reference Signal The camcorder can have the camcorder generate and record color bars and a 1 kHz audio reference signal and output them from the HD/SD SDI terminal (b only), HDMI OUT terminal, HD/SD COMPONENT OUT terminal1, AV terminal and W (headphone) terminal2. 83...
XF100 / XF105 Instruction Manual
Page 89
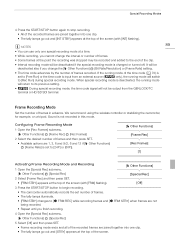
... at the point the recording was stopped may be deactivated if the special recording mode is input from the GENLOCK/TC terminal or HD/SD SDI terminal. We recommend using the wireless controller or stabilizing the camcorder, for example, on a tripod. Configuring Frame Recording Mode 1 Open the [Rec .... • The camcorder automatically records the set to [Free Run] or the time code is changed or turned off. It will not be output from an external source (b only), the running mode will return to [Rec Run] during special recording mode. Sound is deactivated, the running mode...
... at the point the recording was stopped may be deactivated if the special recording mode is input from the GENLOCK/TC terminal or HD/SD SDI terminal. We recommend using the wireless controller or stabilizing the camcorder, for example, on a tripod. Configuring Frame Recording Mode 1 Open the [Rec .... • The camcorder automatically records the set to [Free Run] or the time code is changed or turned off. It will not be output from an external source (b only), the running mode will return to [Rec Run] during special recording mode. Sound is deactivated, the running mode...

XF100 / XF105 Instruction Manual
Page 90
... may be recorded and added to its previous setting. • b During special recording mode, the time code signal will not be output from the GENLOCK/TC terminal or HD/SD SDI terminal. Configuring Slow & Fast Motion Mode 1 Open the [S&F Frame Rate] submenu. [J Other Functions] [Slow & Fast Motion] [S&F Frame Rate] 2 Select the desired...
... may be recorded and added to its previous setting. • b During special recording mode, the time code signal will not be output from the GENLOCK/TC terminal or HD/SD SDI terminal. Configuring Slow & Fast Motion Mode 1 Open the [S&F Frame Rate] submenu. [J Other Functions] [Slow & Fast Motion] [S&F Frame Rate] 2 Select the desired...
XF100 / XF105 Instruction Manual
Page 91
... 4 Press the START/STOP button again to [Rec Run] during slow motion recording, relay recording is input from the GENLOCK/TC terminal or HD/SD SDI terminal. • When the bit rate is set to [Free Run] or the time code is not available. It will be deactivated if the special... recording mode is recorded. If the running mode will not be output from an external source (b only), the running mode of the time code (0 70) is set to stop recording. • Slow & fast motion mode will be...
... 4 Press the START/STOP button again to [Rec Run] during slow motion recording, relay recording is input from the GENLOCK/TC terminal or HD/SD SDI terminal. • When the bit rate is set to [Free Run] or the time code is not available. It will be deactivated if the special... recording mode is recorded. If the running mode will not be output from an external source (b only), the running mode of the time code (0 70) is set to stop recording. • Slow & fast motion mode will be...
XF100 / XF105 Instruction Manual
Page 124
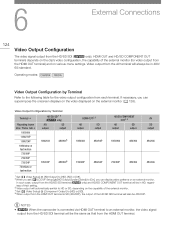
.../60i5 720/slow or fast motion HDMI OUT2, 3 HD output SD output 1080/60i 480/60P 720/60P 480/60P HD/SD COMPONENT OUT2, 4 HD output SD output 1080/60i 480/60i 720/60P 480/60i AV SD output 480/60i 480/60i 1 Set [N Video Setup] [SDI Output] to [HD], [SD] or [Off]. 2 When you set [M LCD.../VF Setup] [HD Output] (under [Zebra]) to [On], you can display zebra patterns on...
.../60i5 720/slow or fast motion HDMI OUT2, 3 HD output SD output 1080/60i 480/60P 720/60P 480/60P HD/SD COMPONENT OUT2, 4 HD output SD output 1080/60i 480/60i 720/60P 480/60i AV SD output 480/60i 480/60i 1 Set [N Video Setup] [SDI Output] to [HD], [SD] or [Off]. 2 When you set [M LCD.../VF Setup] [HD Output] (under [Zebra]) to [On], you can display zebra patterns on...
XF100 / XF105 Instruction Manual
Page 126
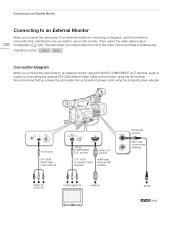
...* BNC cable (commercially available) SDI IN * b only Operating modes: Connection Diagram When you connect the camcorder to an external monitor using the HD/SD COMPONENT OUT terminal, audio is output by connecting the optional STV-250N Stereo Video Cable to the monitor using the compact power adapter. Connecting to an External Monitor...
...* BNC cable (commercially available) SDI IN * b only Operating modes: Connection Diagram When you connect the camcorder to an external monitor using the HD/SD COMPONENT OUT terminal, audio is output by connecting the optional STV-250N Stereo Video Cable to the monitor using the compact power adapter. Connecting to an External Monitor...
XF100 / XF105 Instruction Manual
Page 127
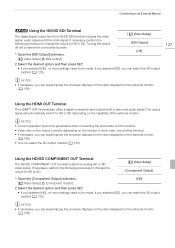
... to HD or SD depending on the external monitor (0 128). Turning the output off will automatically switch to be output correctly depending on the external monitor (0 128). The output signal will conserve the camcorder's power. 1 Open the [SDI Output] submenu. [N Video Setup] [SDI Output] [N Video Setup] [SDI Output] [Off] 2 Select the desired option and then press SET. • If...
... to HD or SD depending on the external monitor (0 128). Turning the output off will automatically switch to be output correctly depending on the external monitor (0 128). The output signal will conserve the camcorder's power. 1 Open the [SDI Output] submenu. [N Video Setup] [SDI Output] [N Video Setup] [SDI Output] [Off] 2 Select the desired option and then press SET. • If...
XF100 / XF105 Instruction Manual
Page 129
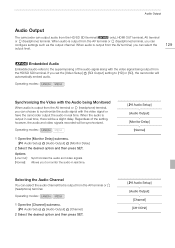
...[HD] or [SD], the camcorder will be a slight delay. If you set the [Video Setup] [SDI Output] setting to synchronize the audio signal with the video signal being Monitored When audio is output from the AV terminal or W (headphone) terminal, you can configure settings such as the.... Operating modes: 1 Open the [Monitor Delay] submenu. [m Audio Setup] [Audio Output] [Monitor Delay] 2 Select the desired option and then press SET. Selecting the Audio Channel You can output audio from the HD/SD SDI terminal (b only), HDMI OUT terminal, AV terminal or W (headphone) terminal. Regardless ...
...[HD] or [SD], the camcorder will be a slight delay. If you set the [Video Setup] [SDI Output] setting to synchronize the audio signal with the video signal being Monitored When audio is output from the AV terminal or W (headphone) terminal, you can configure settings such as the.... Operating modes: 1 Open the [Monitor Delay] submenu. [m Audio Setup] [Audio Output] [Monitor Delay] 2 Select the desired option and then press SET. Selecting the Audio Channel You can output audio from the HD/SD SDI terminal (b only), HDMI OUT terminal, AV terminal or W (headphone) terminal. Regardless ...
XF100 / XF105 Instruction Manual
Page 149
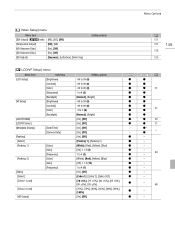
...- - - 49 - - - - - - - 68 - - Menu Options [N Video Setup] menu Menu item [SDI Output] (b only) [Component Output] [HD Onscreen Disp.] [SD Onscreen Disp.] [SD Output] [HD], [SD], [Off] [HD], [SD] [On], [Off] [On], [Off] [Squeeze], [Letterbox], ...[Contrast] [Color] [Sharpness] [Backlight] [Brightness] [Contrast] [Color] [Backlight] [Date/Time] [Camera Data] [Color] [Gain] [Frequency] [Color] [Gain] [Frequency] [Zebra 2 Level] [HD Output] Setting options -99 to 99 (0) N -99 to 99 (0) N -20 to 20 (0) N 1 to 4 (2) N [Normal], [Bright] N -99 to 99 (0) N -99 to 99 (0) N...
...- - - 49 - - - - - - - 68 - - Menu Options [N Video Setup] menu Menu item [SDI Output] (b only) [Component Output] [HD Onscreen Disp.] [SD Onscreen Disp.] [SD Output] [HD], [SD], [Off] [HD], [SD] [On], [Off] [On], [Off] [Squeeze], [Letterbox], ...[Contrast] [Color] [Sharpness] [Backlight] [Brightness] [Contrast] [Color] [Backlight] [Date/Time] [Camera Data] [Color] [Gain] [Frequency] [Color] [Gain] [Frequency] [Zebra 2 Level] [HD Output] Setting options -99 to 99 (0) N -99 to 99 (0) N -20 to 20 (0) N 1 to 4 (2) N [Normal], [Bright] N -99 to 99 (0) N -99 to 99 (0) N...
XF100 / XF105 Instruction Manual
Page 179
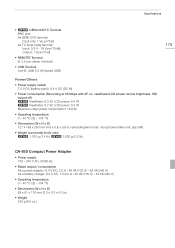
...Power supply (rated) 7.4 V DC (battery pack), 8.4 V DC (DC IN) • Power consumption (Recording at 50 Mbps with AF on, viewfinder/LCD screen normal brightness, SDI output off) b Viewfinder: 6.3 W, LCD screen: 6.4 W c Viewfinder: 5.2 W, LCD screen: 5.3 W Maximum rated power consumption: 18.8 W • Operating temperature 0 - 40...b 1,070 g (2.4 lb.) c 1,020 g (2.2 lb.) 179 CA-930 Compact Power Adapter • Power supply 100 - 240 V AC, 50/60 Hz • Rated output / consumption As a power adapter: 8.4 V DC, 2.0 A / 46 VA (100 V) - 62 VA (240 V) As a battery charger: 8.4 V DC, 1.5/2.0 A ...
...Power supply (rated) 7.4 V DC (battery pack), 8.4 V DC (DC IN) • Power consumption (Recording at 50 Mbps with AF on, viewfinder/LCD screen normal brightness, SDI output off) b Viewfinder: 6.3 W, LCD screen: 6.4 W c Viewfinder: 5.2 W, LCD screen: 5.3 W Maximum rated power consumption: 18.8 W • Operating temperature 0 - 40...b 1,070 g (2.4 lb.) c 1,020 g (2.2 lb.) 179 CA-930 Compact Power Adapter • Power supply 100 - 240 V AC, 50/60 Hz • Rated output / consumption As a power adapter: 8.4 V DC, 2.0 A / 46 VA (100 V) - 62 VA (240 V) As a battery charger: 8.4 V DC, 1.5/2.0 A ...


