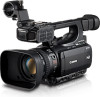
XF100 / XF105 Instruction Manual
Page 5
...Mbps to 1920x1080/60i at a set interval (ideal for details on compatible software. Face detection When a subject's face is detected (0 51), ensuring that captures video at your recordings will rival that of the XF105/XF100 The Canon XF105/XF100 HD Camcorder has been designed with... quality and functionality at the forefront while maintaining a compact size. Supplied Canon XF Utility software Managing your recordings, record a certain number of frames...
...Mbps to 1920x1080/60i at a set interval (ideal for details on compatible software. Face detection When a subject's face is detected (0 51), ensuring that captures video at your recordings will rival that of the XF105/XF100 The Canon XF105/XF100 HD Camcorder has been designed with... quality and functionality at the forefront while maintaining a compact size. Supplied Canon XF Utility software Managing your recordings, record a certain number of frames...
XF100 / XF105 Instruction Manual
Page 6
... of any multi-camera shooting setup. Customization The camcorder features several customization options. Save custom picture and menu settings to an SD card so that you can transfer your setting preferences to other XF105/XF100 camcorders in order to use the built-in microphone, MIC audio input terminal or the two XLR audio...
... of any multi-camera shooting setup. Customization The camcorder features several customization options. Save custom picture and menu settings to an SD card so that you can transfer your setting preferences to other XF105/XF100 camcorders in order to use the built-in microphone, MIC audio input terminal or the two XLR audio...
XF100 / XF105 Instruction Manual
Page 7
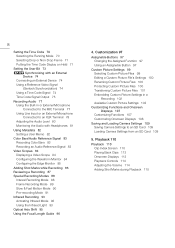
...39 7 3. Preparations 22 Preparing the Power Supply 22 Using a Battery Pack 22 Turning the Camcorder On and Off 25 Date, Time and Language Settings 26 Setting the Date and Time 26 Changing the Time Zone 26 Displaying the Date and Time while Recording 27 Changing the Language 27 Using the Menus...Lens Hood 30 Dioptric Adjustment 30 Using the LCD Panel 31 Using the Viewfinder and LCD Screen Simultaneously 31 Adjusting the Viewfinder/LCD Screen 31 Setting the Screen to Record 40 Recording 40 Onscreen Displays 43 Power Save Mode 45 Video Configuration: Bit Rate, Resolution and Frame Rate 46 Custom...
...39 7 3. Preparations 22 Preparing the Power Supply 22 Using a Battery Pack 22 Turning the Camcorder On and Off 25 Date, Time and Language Settings 26 Setting the Date and Time 26 Changing the Time Zone 26 Displaying the Date and Time while Recording 27 Changing the Language 27 Using the Menus...Lens Hood 30 Dioptric Adjustment 30 Using the LCD Panel 31 Using the Viewfinder and LCD Screen Simultaneously 31 Adjusting the Viewfinder/LCD Screen 31 Setting the Screen to Record 40 Recording 40 Onscreen Displays 43 Power Save Mode 45 Video Configuration: Bit Rate, Resolution and Frame Rate 46 Custom...
XF100 / XF105 Instruction Manual
Page 8
... External Microphone Connected to the MIC Terminal 77 Using Line Input or an External Microphone Connected to an SD Card 109 Loading Camera Settings from an SD Card 109 5. 8 Setting the Time Code 70 Selecting the Running Mode 70 Selecting Drop or Non-Drop Frame 71 Putting the Time Code Display on... Hold 71 Setting the User Bit 73 b Synchronizing with an External Device 74 Connecting an External Device 74 Using a Reference Video Signal (Genlock Synchronization) 74 Using a Time Code ...
... External Microphone Connected to the MIC Terminal 77 Using Line Input or an External Microphone Connected to an SD Card 109 Loading Camera Settings from an SD Card 109 5. 8 Setting the Time Code 70 Selecting the Running Mode 70 Selecting Drop or Non-Drop Frame 71 Putting the Time Code Display on... Hold 71 Setting the User Bit 73 b Synchronizing with an External Device 74 Connecting an External Device 74 Using a Reference Video Signal (Genlock Synchronization) 74 Using a Time Code ...

XF100 / XF105 Instruction Manual
Page 11
...Options (0 145). For a detailed explanation on how to use of the menu, the quick reference shows the submenus and, when applicable, the default setting for the selected duration. [A REVIEW] appears at the top of the screen. • Press the CANCEL button to stop reviewing the clip and ... . Operating modes: mode, you can review the last clip that 1 Open the [Rec Review] submenu to set the review length. [J Other Functions] [Rec Review] 2 Select the desired option and then press SET. 3 After you finish recording, press the U button. • The last clip that you to abbreviate menu...
...Options (0 145). For a detailed explanation on how to use of the menu, the quick reference shows the submenus and, when applicable, the default setting for the selected duration. [A REVIEW] appears at the top of the screen. • Press the CANCEL button to stop reviewing the clip and ... . Operating modes: mode, you can review the last clip that 1 Open the [Rec Review] submenu to set the review length. [J Other Functions] [Rec Review] 2 Select the desired option and then press SET. 3 After you finish recording, press the U button. • The last clip that you to abbreviate menu...
XF100 / XF105 Instruction Manual
Page 16
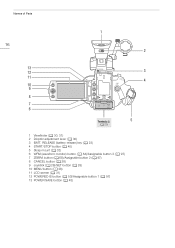
Names of Parts 1 16 2 13 12 3 11 4 10 9 8 7 6 Terminals ባ 5 (0 20) 1 Viewfinder (0 30, 31) 2 Dioptric adjustment lever (0 30) 3 BATT. RELEASE (battery release) key (0 23) 4 START/STOP button (0 40) 5 Strap mount (0 32) 6 WFM (waveform monitor) button (0 84)/Assignable button 3 (0 97) 7 ZEBRA button (0 68)/Assignable button 2 (0 97) 8 CANCEL button (0 28) 9 Joystick (0 28)/SET button (0 28) 10 MENU button (0 28) 11 LCD screen (0 31) 12 POWERED IS button (0 53)/Assignable button 1 (0 97) 13 POWER SAVE button (0 45)
Names of Parts 1 16 2 13 12 3 11 4 10 9 8 7 6 Terminals ባ 5 (0 20) 1 Viewfinder (0 30, 31) 2 Dioptric adjustment lever (0 30) 3 BATT. RELEASE (battery release) key (0 23) 4 START/STOP button (0 40) 5 Strap mount (0 32) 6 WFM (waveform monitor) button (0 84)/Assignable button 3 (0 97) 7 ZEBRA button (0 68)/Assignable button 2 (0 97) 8 CANCEL button (0 28) 9 Joystick (0 28)/SET button (0 28) 10 MENU button (0 28) 11 LCD screen (0 31) 12 POWERED IS button (0 53)/Assignable button 1 (0 97) 13 POWER SAVE button (0 45)
XF100 / XF105 Instruction Manual
Page 21
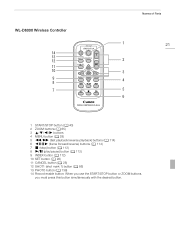
... 4 MENU button (0 28) 5 J/I (fast playback/reverse playback) buttons (0 114) 6 Z/Y (frame forward/reverse) buttons (0 114) 7 B (stop) button (0 112) 8 D (play/pause) button (0 112) 9 INDEX button (0 112) 10 SET button (0 28) 11 CANCEL button (0 28) 12 SHOT1 (shot mark 1) button (0 86) 13 PHOTO button (0 138) 14 Record enable button: When you use the START...
... 4 MENU button (0 28) 5 J/I (fast playback/reverse playback) buttons (0 114) 6 Z/Y (frame forward/reverse) buttons (0 114) 7 B (stop) button (0 112) 8 D (play/pause) button (0 112) 9 INDEX button (0 112) 10 SET button (0 28) 11 CANCEL button (0 28) 12 SHOT1 (shot mark 1) button (0 86) 13 PHOTO button (0 138) 14 Record enable button: When you use the START...
XF100 / XF105 Instruction Manual
Page 26
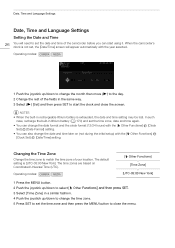
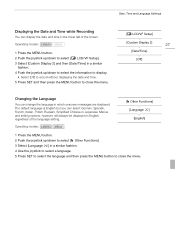
...Changing the Time Zone Change the time zone to start using it. Operating modes: 1 Push the joystick up /down to change the time zone. 5 Press SET to set the date and time of the camcorder before you can also change the date and time later on Coordinated Universal Time (UTC). The default...[J Other Functions] [Time Zone] [UTC-05:00 New York] 1 Press the MENU button. 2 Push the joystick up/down to select [J Other Functions] and then press SET. 3 Select [Time Zone] in a similar fashion. 4 Push the joystick up /down to change the month then move (A) to the day. 2 Change the rest of ...
...Changing the Time Zone Change the time zone to start using it. Operating modes: 1 Push the joystick up /down to change the time zone. 5 Press SET to set the date and time of the camcorder before you can also change the date and time later on Coordinated Universal Time (UTC). The default...[J Other Functions] [Time Zone] [UTC-05:00 New York] 1 Press the MENU button. 2 Push the joystick up/down to select [J Other Functions] and then press SET. 3 Select [Time Zone] in a similar fashion. 4 Push the joystick up /down to change the month then move (A) to the day. 2 Change the rest of ...
XF100 / XF105 Instruction Manual
Page 27
...button. 2 Push the joystick up /down to select [J Other Functions]. 3 Select [Language o] in the lower left of the language setting. Date, Time and Language Settings Displaying the Date and Time while Recording You can display the date and time in a similar fashion. 4 Use the joystick to select a...Simplified Chinese or Japanese. The default language is English but you can change the language in English, regardless of the screen. Menus and setting options, however, will always be displayed in which onscreen messages are displayed. Operating modes: 1 Press the MENU button. 2 Push the ...
...button. 2 Push the joystick up /down to select [J Other Functions]. 3 Select [Language o] in the lower left of the language setting. Date, Time and Language Settings Displaying the Date and Time while Recording You can display the date and time in a similar fashion. 4 Use the joystick to select a...Simplified Chinese or Japanese. The default language is English but you can change the language in English, regardless of the screen. Menus and setting options, however, will always be displayed in which onscreen messages are displayed. Operating modes: 1 Press the MENU button. 2 Push the ...

XF100 / XF105 Instruction Manual
Page 28
... Press to return to the previous menu or to stop some operations that you must scroll up or down to select the desired setting option and then press SET. • Depending on the right side of the submenu indicating that are in the menu. Operating modes: MENU button Press to open the... menu was closed (unless the camcorder was turned off). 2 Push the joystick up/down to select the desired submenu. 3 Push the joystick right or press SET. • The orange selection frame will appear on a menu item in the submenu. • Press the CANCEL button, push the joystick left, or select [a] to...
... Press to return to the previous menu or to stop some operations that you must scroll up or down to select the desired setting option and then press SET. • Depending on the right side of the submenu indicating that are in the menu. Operating modes: MENU button Press to open the... menu was closed (unless the camcorder was turned off). 2 Push the joystick up/down to select the desired submenu. 3 Push the joystick right or press SET. • The orange selection frame will appear on a menu item in the submenu. • Press the CANCEL button, push the joystick left, or select [a] to...

XF100 / XF105 Instruction Manual
Page 29
Using the Menus NOTES • Unavailable items may appear grayed out. • Pressing the MENU button at any time closes the menu. • When using the wireless controller, use the h, i, f, g and SET buttons in the same way as the 29 camcorder's joystick. • You can check the current settings on the status screens (0 156).
Using the Menus NOTES • Unavailable items may appear grayed out. • Pressing the MENU button at any time closes the menu. • When using the wireless controller, use the h, i, f, g and SET buttons in the same way as the 29 camcorder's joystick. • You can check the current settings on the status screens (0 156).
XF100 / XF105 Instruction Manual
Page 31
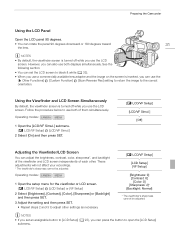
... LCD/VF Setup] [LCD Setup] or [VF Setup] 2 Select [Brightness], [Contrast], [Color], [Sharpness] or [Backlight] and then press SET. 3 Adjust the setting and then press SET. • Repeat steps 2 and 3 to adjust other . Follow the procedure below to the correct orientation. However, you can also use both ...them simultaneously. Operating modes: 1 Open the [LCD/VF Simul.] submenu. [M LCD/VF Setup] [LCD/VF Simul.] 2 Select [On] and then press SET. [M LCD/VF Setup] [LCD/VF Simul.] [Off] Adjusting the Viewfinder/LCD Screen You can use the LCD screen. See the following section. •...
... LCD/VF Setup] [LCD Setup] or [VF Setup] 2 Select [Brightness], [Contrast], [Color], [Sharpness] or [Backlight] and then press SET. 3 Adjust the setting and then press SET. • Repeat steps 2 and 3 to adjust other . Follow the procedure below to the correct orientation. However, you can also use both ...them simultaneously. Operating modes: 1 Open the [LCD/VF Simul.] submenu. [M LCD/VF Setup] [LCD/VF Simul.] 2 Select [On] and then press SET. [M LCD/VF Setup] [LCD/VF Simul.] [Off] Adjusting the Viewfinder/LCD Screen You can use the LCD screen. See the following section. •...
XF100 / XF105 Instruction Manual
Page 32
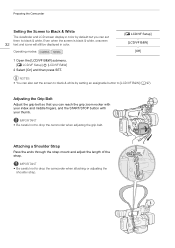
... • Be careful not to drop the camcorder when attaching or adjusting the shoulder strap. NOTES • You can also set them to black & white. Preparing the Camcorder Setting the Screen to Black & White The viewfinder and LCD screen display in color. IMPORTANT • Be careful not to drop the ... the strap mount and adjust the length of the strap. Adjusting the Grip Belt Adjust the grip belt so that you can set the screen to black & white by setting an assignable button to [LCD/VF B&W] (0 97). Even when the screen is black & white, onscreen 32 text and icons will still...
... • Be careful not to drop the camcorder when attaching or adjusting the shoulder strap. NOTES • You can also set them to black & white. Preparing the Camcorder Setting the Screen to Black & White The viewfinder and LCD screen display in color. IMPORTANT • Be careful not to drop the ... the strap mount and adjust the length of the strap. Adjusting the Grip Belt Adjust the grip belt so that you can set the screen to black & white by setting an assignable button to [LCD/VF B&W] (0 97). Even when the screen is black & white, onscreen 32 text and icons will still...
XF100 / XF105 Instruction Manual
Page 33
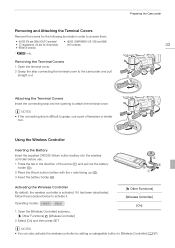
..., follow the procedure below to attach the terminal cover. Operating modes: 1 Open the [Wireless Controller] submenu. [J Other Functions] [Wireless Controller] 2 Select [On] and then press SET. [J Other Functions] [Wireless Controller] [On] NOTES • You can also activate the wireless controller by...
..., follow the procedure below to attach the terminal cover. Operating modes: 1 Open the [Wireless Controller] submenu. [J Other Functions] [Wireless Controller] 2 Select [On] and then press SET. [J Other Functions] [Wireless Controller] [On] NOTES • You can also activate the wireless controller by...
XF100 / XF105 Instruction Manual
Page 35
... • Proper operation cannot be guaranteed for the first time. 35 * The camcorder can record custom picture settings (0 101) and camera settings (0 109) on cards that can be used, visit your local Canon Web site. * The Ultra Direct Memory Access (UDMA) specification allows data to be able to SD and SDHC... CF card slot cover switch in the direction of at high transfer speeds (measured in the clip. Compatible CF cards You can use the supplied Canon XF Utility software to the SD card. To record a user memo (0 82) with a capacity of the E/A mark (ቢ). • The CF card...
... • Proper operation cannot be guaranteed for the first time. 35 * The camcorder can record custom picture settings (0 101) and camera settings (0 109) on cards that can be used, visit your local Canon Web site. * The Ultra Direct Memory Access (UDMA) specification allows data to be able to SD and SDHC... CF card slot cover switch in the direction of at high transfer speeds (measured in the clip. Compatible CF cards You can use the supplied Canon XF Utility software to the SD card. To record a user memo (0 82) with a capacity of the E/A mark (ቢ). • The CF card...
XF100 / XF105 Instruction Manual
Page 36
... to release the CF card (ብ). 5 Pull the CF card all the way out and close the CF card slot cover. NOTES • If you set the [J Other Functions] [Media Access LED] function to the following precautions while the CFj or CFl access indicator is not being accessed. IMPORTANT • Observe...
... to release the CF card (ብ). 5 Pull the CF card all the way out and close the CF card slot cover. NOTES • If you set the [J Other Functions] [Media Access LED] function to the following precautions while the CFj or CFl access indicator is not being accessed. IMPORTANT • Observe...

XF100 / XF105 Instruction Manual
Page 37
... the cover closed if the SD card is initialized and all the data it contains. [J Other Functions] [Initialization] When initializing an SD card, you set the [J Other Functions] [Media Access LED] function to [Off], the access indicators will not illuminate. Operating modes: 1 Open the [Initialization] submenu.... data loss. - To initialize an SD card 3 Select [Complete] (complete initialization) or [Quick] (quick initialization) and then press SET. SD card access indicator Inserting an SD card facing the wrong direction can also initialize recording media to do so may result in step ...
... the cover closed if the SD card is initialized and all the data it contains. [J Other Functions] [Initialization] When initializing an SD card, you set the [J Other Functions] [Media Access LED] function to [Off], the access indicators will not illuminate. Operating modes: 1 Open the [Initialization] submenu.... data loss. - To initialize an SD card 3 Select [Complete] (complete initialization) or [Quick] (quick initialization) and then press SET. SD card access indicator Inserting an SD card facing the wrong direction can also initialize recording media to do so may result in step ...

XF100 / XF105 Instruction Manual
Page 38
... with an e mark, protected photos, and custom picture information. Lost data cannot be erased. 38 5 When the confirmation message appears, press SET. • The SD card is erased. Relay recording: This allows you are using becomes full. Preparing Recording Media 4 Select [OK] and then press... you can switch between CF card slots while recording. If both slots contain a CF card, you are using the [Complete] initialization option, press SET to both CF card slots contain a CF card and you record. NOTES • While recording on a CF card, you can initialize another CF...
... with an e mark, protected photos, and custom picture information. Lost data cannot be erased. 38 5 When the confirmation message appears, press SET. • The SD card is erased. Relay recording: This allows you are using becomes full. Preparing Recording Media 4 Select [OK] and then press... you can switch between CF card slots while recording. If both slots contain a CF card, you are using the [Complete] initialization option, press SET to both CF card slots contain a CF card and you record. NOTES • While recording on a CF card, you can initialize another CF...

XF100 / XF105 Instruction Manual
Page 39
... has been deactivated, follow the procedure below to activate it. 1 Open the [Relay Rec] submenu. [J Other Functions] [Relay Rec] 2 Select [On] and then press SET. [J Other Functions] [Relay Rec] 39 [On] To use double slot recording 1 Open the [Double Slot Rec] submenu. [J Other Functions] [Double Slot Rec] 2... the data on the CF card in length. Preparing Recording Media To use relay recording By default, this function is recovered, press SET when the confirmation message appears. Recovering Data on the CF Card An error may be recovered, such as turning off the camcorder while...
... has been deactivated, follow the procedure below to activate it. 1 Open the [Relay Rec] submenu. [J Other Functions] [Relay Rec] 2 Select [On] and then press SET. [J Other Functions] [Relay Rec] 39 [On] To use double slot recording 1 Open the [Double Slot Rec] submenu. [J Other Functions] [Double Slot Rec] 2... the data on the CF card in length. Preparing Recording Media To use relay recording By default, this function is recovered, press SET when the confirmation message appears. Recovering Data on the CF Card An error may be recovered, such as turning off the camcorder while...
XF100 / XF105 Instruction Manual
Page 40
... a CF card slot (0 35). • Insert another CF card into the other CF card slot to check if the camcorder operates correctly. However, you must set the user memo before recording. • You can attach commercially available accessories to store information such as you begin recording, make a test recording first to...
... a CF card slot (0 35). • Insert another CF card into the other CF card slot to check if the camcorder operates correctly. However, you must set the user memo before recording. • You can attach commercially available accessories to store information such as you begin recording, make a test recording first to...


