
User Manual
Page 2
Table of copyright owners and be contrary to copyright laws. Important Usage Instructions WARNING 2 TO REDUCE THE RISK OF ELECTRIC SHOCK AND TO REDUCE ANNOYING INTERFERENCE, USE THE RECOMMENDED ACCESSORIES ONLY. COPYRIGHT WARNING: Unauthorized recording of copyrighted materials may infringe on the rights of Contents Menus Index
Table of copyright owners and be contrary to copyright laws. Important Usage Instructions WARNING 2 TO REDUCE THE RISK OF ELECTRIC SHOCK AND TO REDUCE ANNOYING INTERFERENCE, USE THE RECOMMENDED ACCESSORIES ONLY. COPYRIGHT WARNING: Unauthorized recording of copyrighted materials may infringe on the rights of Contents Menus Index
User Manual
Page 3
3 Trademark Acknowledgements • SD, SDHC and SDXC Logos are trademarks of SD-3C, LLC. • Canon is an authorized licensee of the CFast 2.0™ trademark, which may be registered in various jurisdictions. • Microsoft and Windows are ...other countries. • Other names and products not mentioned above may be trademarks or registered trademarks of Apple Inc., registered in the U.S. and other use for a personal and noncommercial purpose or (2) by a video provider licensed under license. • Avid and Media Composer are trademarks or registered trademarks of...
3 Trademark Acknowledgements • SD, SDHC and SDXC Logos are trademarks of SD-3C, LLC. • Canon is an authorized licensee of the CFast 2.0™ trademark, which may be registered in various jurisdictions. • Microsoft and Windows are ...other countries. • Other names and products not mentioned above may be trademarks or registered trademarks of Apple Inc., registered in the U.S. and other use for a personal and noncommercial purpose or (2) by a video provider licensed under license. • Avid and Media Composer are trademarks or registered trademarks of...
User Manual
Page 4
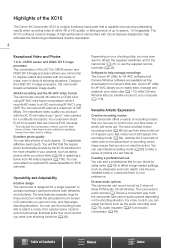
...special scene mode to auto to full manual, that the superb photo functionality provide by using XF-AVC Long GOP. Highlights of the XC10 The Canon 4K Camcorder XC10 is a highly functional camcorder that you can use to control how your final video or photo will come out. You can even attach...slow and fast motion recording mode (A 88) can record sound as sharpness and color depth. Use the preinstalled looks or customize them to your shots by the XC10 will allow it to select a mode, from Canon's Web site. Owing to the DIGIC DV 5 image processor, this camcorder boasts remarkable image ...
...special scene mode to auto to full manual, that the superb photo functionality provide by using XF-AVC Long GOP. Highlights of the XC10 The Canon 4K Camcorder XC10 is a highly functional camcorder that you can use to control how your final video or photo will come out. You can even attach...slow and fast motion recording mode (A 88) can record sound as sharpness and color depth. Use the preinstalled looks or customize them to your shots by the XC10 will allow it to select a mode, from Canon's Web site. Owing to the DIGIC DV 5 image processor, this camcorder boasts remarkable image ...
User Manual
Page 5
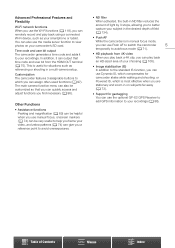
...referencing or shooting in a multi-camera setup. This is most effective when you are stationary and zoom in manual focus mode, you can use the media server function to view photos on subjects far away (A 73). • Support for situations such as your smartphone or tablet. ...Table of Contents Menus Index In addition, it to your recordings. Customization The camcorder features 3 assignable buttons to which is useful for geotagging You can use the optional GP-E2 GPS Receiver to add GPS information to your recordings (A 86). The main camera function menu can also...
...referencing or shooting in a multi-camera setup. This is most effective when you are stationary and zoom in manual focus mode, you can use the media server function to view photos on subjects far away (A 73). • Support for situations such as your smartphone or tablet. ...Table of Contents Menus Index In addition, it to your recordings. Customization The camcorder features 3 assignable buttons to which is useful for geotagging You can use the optional GP-E2 GPS Receiver to add GPS information to your recordings (A 86). The main camera function menu can also...
User Manual
Page 6
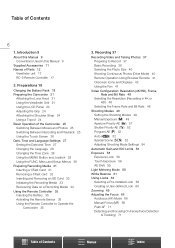
... Operation of Contents 6 1. Recording 37 Recording Video and Taking Photos 37 Preparing to Operate the Camcorder 35 3. Introduction 9 About this Manual 9 Conventions Used in 4K or HD) 48 Selecting the Frame Rate and Bit Rate 48 Shooting Modes 49 Setting the Shooting Modes 49 Manual Exposure (n) 49 Aperture ... 54 Automatic Gain and ISO Limits 56 Exposure 58 Exposure Lock 58 Touch Exposure 58 AE Shift 59 Light Metering Mode 60 White Balance 61 Using Looks 63 Selecting a Pre-installed Look 63 Creating a User-defined Look 64 Zooming 65 Adjusting the Focus 66 Autofocus (AF) Mode 66 Manual Focus...
... Operation of Contents 6 1. Recording 37 Recording Video and Taking Photos 37 Preparing to Operate the Camcorder 35 3. Introduction 9 About this Manual 9 Conventions Used in 4K or HD) 48 Selecting the Frame Rate and Bit Rate 48 Shooting Modes 49 Setting the Shooting Modes 49 Manual Exposure (n) 49 Aperture ... 54 Automatic Gain and ISO Limits 56 Exposure 58 Exposure Lock 58 Touch Exposure 58 AE Shift 59 Light Metering Mode 60 White Balance 61 Using Looks 63 Selecting a Pre-installed Look 63 Creating a User-defined Look 64 Zooming 65 Adjusting the Focus 66 Autofocus (AF) Mode 66 Manual Focus...
User Manual
Page 7
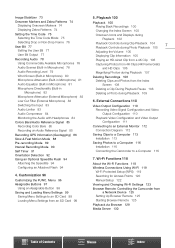
...Mode 75 Selecting Drop or Non-Drop Frame 76 User Bit 77 Setting the User Bit 77 User Bit Output 77 Recording Audio 78 Using Commercially Available Microphones 78 Audio Scenes (Built-in Microphone) 78 Audio Recording Level 79 Wind Screen (Built-in Microphone) 80 Microphone Attenuator ... Information (Geotagging) 86 Slow & Fast Motion Mode 88 Pre-recording Mode 89 Interval Recording Mode 90 Self Timer 91 Orientation Detection 92 Using an Optional Speedlite Flash 94 Attaching the Speedlite 94 Configuring an Attached Flash 94 4. External Connections 110 Video Output Configuration 110 Recording Video ...
...Mode 75 Selecting Drop or Non-Drop Frame 76 User Bit 77 Setting the User Bit 77 User Bit Output 77 Recording Audio 78 Using Commercially Available Microphones 78 Audio Scenes (Built-in Microphone) 78 Audio Recording Level 79 Wind Screen (Built-in Microphone) 80 Microphone Attenuator ... Information (Geotagging) 86 Slow & Fast Motion Mode 88 Pre-recording Mode 89 Interval Recording Mode 90 Self Timer 91 Orientation Detection 92 Using an Optional Speedlite Flash 94 Attaching the Speedlite 94 Configuring an Attached Flash 94 4. External Connections 110 Video Output Configuration 110 Recording Video ...
User Manual
Page 9
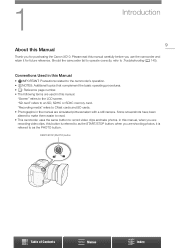
In this manual, when you are shooting photos, it for purchasing the Canon XC10. START/STOP (PHOTO) button Table of Contents Menus Index Conventions Used in this manual. "Recording media" refers to as the START/STOP button; when you are recording video clips,...have been altered to make them easier to read this manual carefully before you for future reference. 1 Introduction 9 About this Manual Thank you use the camcorder and retain it is referred to the camcorder's operation. • NOTES: Additional topics that complement the basic operating procedures. •...
In this manual, when you are shooting photos, it for purchasing the Canon XC10. START/STOP (PHOTO) button Table of Contents Menus Index Conventions Used in this manual. "Recording media" refers to as the START/STOP button; when you are recording video clips,...have been altered to make them easier to read this manual carefully before you for future reference. 1 Introduction 9 About this Manual Thank you use the camcorder and retain it is referred to the camcorder's operation. • NOTES: Additional topics that complement the basic operating procedures. •...

User Manual
Page 10
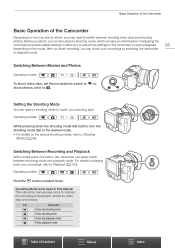
... explanation on screen. The navigation bar at the bottom of the page offers buttons to let you jump quickly to the information you can be used. Takes you to abbreviate menu selections. Takes you to find the function by selecting the [ System Setup] menu and then the [Fan] menu ... format shown in the operating mode shown or for the menu item. The example illustration indicates that the function cannot be used in the icon; About this Manual The arrow > is used to the table of contents. For a concise summary of Contents Menus Index Brackets [ ] are listed within or after...
... explanation on screen. The navigation bar at the bottom of the page offers buttons to let you jump quickly to the information you can be used. Takes you to abbreviate menu selections. Takes you to find the function by selecting the [ System Setup] menu and then the [Fan] menu ... format shown in the operating mode shown or for the menu item. The example illustration indicates that the function cannot be used in the icon; About this Manual The arrow > is used to the table of contents. For a concise summary of Contents Menus Index Brackets [ ] are listed within or after...

User Manual
Page 18
... power cord to the compact power adapter. 2 Plug the power cord into the compartment as shown in the illustration. • Push it in until you use the camcorder, charge the battery pack. For approximate charging times and recording/playback times with a battery pack or directly...
... power cord to the compact power adapter. 2 Plug the power cord into the compartment as shown in the illustration. • Push it in until you use the camcorder, charge the battery pack. For approximate charging times and recording/playback times with a battery pack or directly...

User Manual
Page 20
... of the battery pack and make sure the POWER/CHG indicator has gone out before connecting or disconnecting the compact power adapter. Table of use, or the day before, to discharge naturally. Therefore, charge them on the day of Contents Menus Index Charging the Battery Pack IMPORTANT •...updated on the recording media. After you might need. Be sure to wait until the green POWER/CHG 20 indicator goes out. • When using the compact power adapter so the battery pack will be consumed. • Charged battery packs continue to ensure a full charge. • We ...
... of the battery pack and make sure the POWER/CHG indicator has gone out before connecting or disconnecting the compact power adapter. Table of use, or the day before, to discharge naturally. Therefore, charge them on the day of Contents Menus Index Charging the Battery Pack IMPORTANT •...updated on the recording media. After you might need. Be sure to wait until the green POWER/CHG 20 indicator goes out. • When using the compact power adapter so the battery pack will be consumed. • Charged battery packs continue to ensure a full charge. • We ...

User Manual
Page 21
... the lens hood to protect the lens and reduce the amount of stray light that the lens hood is aligned with the thread. ባ ቢ Using the Viewfinder Unit Attaching the Viewfinder Unit 1 Open the viewfinder unit latch and remove the viewfinder unit cover. ቤ 2 Turn the LCD panel 90 degrees...
... the lens hood to protect the lens and reduce the amount of stray light that the lens hood is aligned with the thread. ባ ቢ Using the Viewfinder Unit Attaching the Viewfinder Unit 1 Open the viewfinder unit latch and remove the viewfinder unit cover. ቤ 2 Turn the LCD panel 90 degrees...

User Manual
Page 23
...of the pixels may occasionally misfire or appear as black, red, blue or green dots. NOTES • About the LCD screen: The screen is produced using the viewfinder unit, make sure to attach the viewfinder unit cap to a comfortable viewing angle. • You can adjust the brightness... using the [ System Setup] > [1] > [LCD Brightness] and [LCD Backlight] settings. This has no effect on the recorded image and does not constitute a malfunction. • If the...
...of the pixels may occasionally misfire or appear as black, red, blue or green dots. NOTES • About the LCD screen: The screen is produced using the viewfinder unit, make sure to attach the viewfinder unit cap to a comfortable viewing angle. • You can adjust the brightness... using the [ System Setup] > [1] > [LCD Brightness] and [LCD Backlight] settings. This has no effect on the recorded image and does not constitute a malfunction. • If the...

User Manual
Page 24
... Attaching the Shoulder Strap Pass the ends through the strap mounts and adjust the length of 6.5 mm (0.26 in.) or smaller. Using tripods with a mounting screw of the shoulder strap. Using a Tripod You can be rotated 90 degrees toward or away from the lens to give you a convenient grip angle. 24 While...
... Attaching the Shoulder Strap Pass the ends through the strap mounts and adjust the length of 6.5 mm (0.26 in.) or smaller. Using tripods with a mounting screw of the shoulder strap. Using a Tripod You can be rotated 90 degrees toward or away from the lens to give you a convenient grip angle. 24 While...
User Manual
Page 25
... movie/photo switch to v; Switching Between Recording and Playback With a single press of the Camcorder Depending on the mode. Operating Mode Icons Used in This Manual This instruction manual uses icons to switch between recording mode and playback mode. For details on the various shooting modes, refer to Playback (A 100). Operating modes...
... movie/photo switch to v; Switching Between Recording and Playback With a single press of the Camcorder Depending on the mode. Operating Mode Icons Used in This Manual This instruction manual uses icons to switch between recording mode and playback mode. For details on the various shooting modes, refer to Playback (A 100). Operating modes...

User Manual
Page 26
... index screen. Pinch Pinch In Place two fingers on the screen and move them together. Basic Operation of Contents Menus Index Used to start playing back the clip. Using your finger up and down or left and right across the screen. Applying excessive force or forcefully scratching the touch screen. ...- Table of the Camcorder Using the Touch Screen The buttons and menu items that has been zoomed in to return to select a setting from a photo that appear on the...
... index screen. Pinch Pinch In Place two fingers on the screen and move them together. Basic Operation of Contents Menus Index Used to start playing back the clip. Using your finger up and down or left and right across the screen. Applying excessive force or forcefully scratching the touch screen. ...- Table of the Camcorder Using the Touch Screen The buttons and menu items that has been zoomed in to return to select a setting from a photo that appear on the...

User Manual
Page 27
... of month names or only the day and month), but it will still follow the order you selected. 6 Touch [24H] to use 24-hour clock or leave it unselected to use the camcorder for about 3 months, the built-in rechargeable lithium battery may discharge completely and the date and time setting may... to make your selection. • In some screens, the date will appear automatically with the [ System Setup] > [1] > [Date/Time] setting. • When you do not use 12-hour clock (AM/PM). • You can also push the joystick (Þ) to move between the fields and then press the joystick to make...
... of month names or only the day and month), but it will still follow the order you selected. 6 Touch [24H] to use 24-hour clock or leave it unselected to use the camcorder for about 3 months, the built-in rechargeable lithium battery may discharge completely and the date and time setting may... to make your selection. • In some screens, the date will appear automatically with the [ System Setup] > [1] > [Date/Time] setting. • When you do not use 12-hour clock (AM/PM). • You can also push the joystick (Þ) to move between the fields and then press the joystick to make...

User Manual
Page 28
...touch the screen. In addition, the camcorder is New York. You can navigate some of the camcorder's menus and screens using the MENU button and joystick instead of using the touch panel. If necessary, touch [$] to adjust for example, when the viewfinder unit is convenient when you travel ...destination. Changing the Time Zone Change the time zone to close the menu. Table of the language selected. Using the MENU Button and ...
...touch the screen. In addition, the camcorder is New York. You can navigate some of the camcorder's menus and screens using the MENU button and joystick instead of using the touch panel. If necessary, touch [$] to adjust for example, when the viewfinder unit is convenient when you travel ...destination. Changing the Time Zone Change the time zone to close the menu. Table of the language selected. Using the MENU Button and ...
User Manual
Page 29
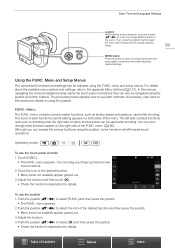
...details about the available menu options and settings, refer to select [FUNC.] and then press the joystick. • The FUNC. Operating modes: To use both sides of the desired function. • Menu items not available appear grayed out. 3 Adjust the function and then touch [X]. • ...(Ý/Þ) to the appendix Menu Options (A 131). menu contains camera-related functions, such as shutter speed and aperture, used while shooting. If necessary, refer back to use the touch panel controls 1 Touch [FUNC.]. • The FUNC. menu and setup menus. Then, press the joystick itself...
...details about the available menu options and settings, refer to select [FUNC.] and then press the joystick. • The FUNC. Operating modes: To use both sides of the desired function. • Menu items not available appear grayed out. 3 Adjust the function and then touch [X]. • ...(Ý/Þ) to the appendix Menu Options (A 131). menu contains camera-related functions, such as shutter speed and aperture, used while shooting. If necessary, refer back to use the touch panel controls 1 Touch [FUNC.]. • The FUNC. menu and setup menus. Then, press the joystick itself...
User Manual
Page 30
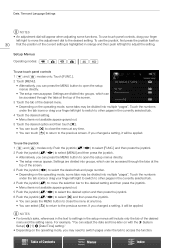
...the desired tab and page number. • Depending on the operating mode, some tabs may be applied. Settings are divided into multiple "pages". To use touch panel controls 1 and modes only: Touch [FUNC.]. 2 Touch [MENU]. • Alternatively, you can press the MENU button to open the... Push the joystick (Ý) to move the adjustment dial to the desired setting. Table of the desired menu and the setting name. To use touch panel controls, drag your finger left /right to the previous screen. Settings are divided into multiple "pages". Date, Time and Language...
...the desired tab and page number. • Depending on the operating mode, some tabs may be applied. Settings are divided into multiple "pages". To use touch panel controls 1 and modes only: Touch [FUNC.]. 2 Touch [MENU]. • Alternatively, you can press the MENU button to open the... Push the joystick (Ý) to move the adjustment dial to the desired setting. Table of the desired menu and the setting name. To use touch panel controls, drag your finger left /right to the previous screen. Settings are divided into multiple "pages". Date, Time and Language...

User Manual
Page 31
... (digital recorders, card readers, etc.), make sure that indicates the minimum guaranteed data transfer of March 2015, the recording function has been tested using SD cards rated CLASS 6 or 10. SD cards As of SD cards. To record HD clips with exFAT. For more information on recording... SDHC and 0 SDXC memory cards. Inserting a CFast Card 1 Wait until the ACCESS indicator is not exFAT-compatible, you may stop. Save your local Canon Web site. If you use them with this camcorder for the first time. 31 Compatible Recording Media For the latest information about SD cards tested for...
... (digital recorders, card readers, etc.), make sure that indicates the minimum guaranteed data transfer of March 2015, the recording function has been tested using SD cards rated CLASS 6 or 10. SD cards As of SD cards. To record HD clips with exFAT. For more information on recording... SDHC and 0 SDXC memory cards. Inserting a CFast Card 1 Wait until the ACCESS indicator is not exFAT-compatible, you may stop. Save your local Canon Web site. If you use them with this camcorder for the first time. 31 Compatible Recording Media For the latest information about SD cards tested for...


