User Manual
Page 2
...the United States and/or other countries. • Google, Android, Google Play, YouTube are trademarks of copyrighted materials may be contrary to Canon camcorders compliant with high-definition video composed of Cisco in the U.S. and other countries. • HDMI, the HDMI logo and High-... other countries. • FlashAir is a trademark or registered trademark of 1,080 vertical pixels (scanning lines). 2 in the United States and in this manual signifies Wi-Fi Protected Setup. • The Wi-Fi Protected Setup Identifier Mark is a mark of the Wi-Fi Alliance. • The N-Mark...
...the United States and/or other countries. • Google, Android, Google Play, YouTube are trademarks of copyrighted materials may be contrary to Canon camcorders compliant with high-definition video composed of Cisco in the U.S. and other countries. • HDMI, the HDMI logo and High-... other countries. • FlashAir is a trademark or registered trademark of 1,080 vertical pixels (scanning lines). 2 in the United States and in this manual signifies Wi-Fi Protected Setup. • The Wi-Fi Protected Setup Identifier Mark is a mark of the Wi-Fi Alliance. • The N-Mark...
User Manual
Page 4
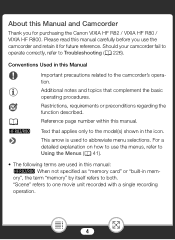
Restrictions, requirements or preconditions regarding the function described. For a detailed explanation on how to use the camcorder and retain it for purchasing the Canon VIXIA HF R82 / VIXIA HF R80 / VIXIA HF R800. Please read this manual carefully before you for future reference. Text that complement the basic operating procedures. "Scene" refers to Troubleshooting (A 226). Conventions Used in the icon...
Restrictions, requirements or preconditions regarding the function described. For a detailed explanation on how to use the camcorder and retain it for purchasing the Canon VIXIA HF R82 / VIXIA HF R80 / VIXIA HF R800. Please read this manual carefully before you for future reference. Text that complement the basic operating procedures. "Scene" refers to Troubleshooting (A 226). Conventions Used in the icon...
User Manual
Page 5
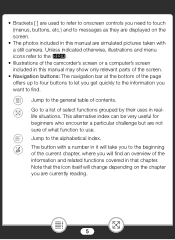
... a particular challenge but are not sure of contents. Note that chapter. Go to a list of select functions grouped by their uses in this manual may show only relevant parts of the screen. • Navigation buttons: The navigation bar at the bottom of the page offers up to four ... screen. • The photos included in that the icon itself will find . Jump to the beginning of the information and related functions covered in this manual are simulated pictures taken with a number in it will take you to the alphabetical index. • Brackets [ ] are used to refer to onscreen...
... a particular challenge but are not sure of contents. Note that chapter. Go to a list of select functions grouped by their uses in this manual may show only relevant parts of the screen. • Navigation buttons: The navigation bar at the bottom of the page offers up to four ... screen. • The photos included in that the icon itself will find . Jump to the beginning of the information and related functions covered in this manual are simulated pictures taken with a number in it will take you to the alphabetical index. • Brackets [ ] are used to refer to onscreen...
User Manual
Page 7
Table of Contents Important Usage Instructions 2 About this Manual and Camcorder 4 The Camcorder's Functions in Real-Life Situations 12 Unique functions for special cases 12 Getting the look you want 13 Challenging subjects and ...
Table of Contents Important Usage Instructions 2 About this Manual and Camcorder 4 The Camcorder's Functions in Real-Life Situations 12 Unique functions for special cases 12 Getting the look you want 13 Challenging subjects and ...
User Manual
Page 44
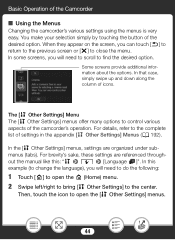
..., refer to the center. Basic Operation of settings in the appendix [1 Other Settings] Menus (A 192). In the [1 Other Settings] menus, settings are referenced throughout the manual like this example (to change the language), you will need to scroll to control various aspects of the camcorder's operation. In this : "1 > q > [Language H]". You make...
..., refer to the center. Basic Operation of settings in the appendix [1 Other Settings] Menus (A 192). In the [1 Other Settings] menus, settings are referenced throughout the manual like this example (to change the language), you will need to scroll to control various aspects of the camcorder's operation. In this : "1 > q > [Language H]". You make...
User Manual
Page 46
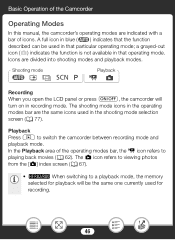
... in recording mode. A full icon in that operating mode. Playback Press ] to playing back movies (A 62). Basic Operation of the Camcorder Operating Modes In this manual, the camcorder's operating modes are divided into shooting modes and playback modes. a grayed-out icon (}) indicates the function is not available in the shooting mode...
... in recording mode. A full icon in that operating mode. Playback Press ] to playing back movies (A 62). Basic Operation of the Camcorder Operating Modes In this manual, the camcorder's operating modes are divided into shooting modes and playback modes. a grayed-out icon (}) indicates the function is not available in the shooting mode...
User Manual
Page 56
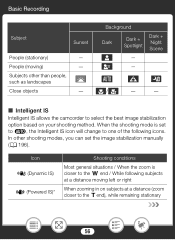
... the T end / While following icons. Icon Ä (Dynamic IS) È (Powered IS)* Shooting conditions Most general situations / When the zoom is set the image stabilization manually (A 196). Subjects other shooting modes, you can set to N, the Intelligent IS icon will change to select the best image stabilization option based on subjects...
... the T end / While following icons. Icon Ä (Dynamic IS) È (Powered IS)* Shooting conditions Most general situations / When the zoom is set the image stabilization manually (A 196). Subjects other shooting modes, you can set to N, the Intelligent IS icon will change to select the best image stabilization option based on subjects...
User Manual
Page 59
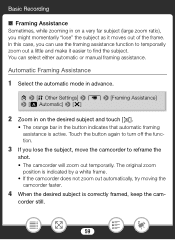
...- corder still. 59 In this case, you lose the subject, move the camcorder to turn off the function. 3 If you can select either automatic or manual framing assistance. The original zoom position is indicated by a white frame. • If the camcorder does not zoom out automatically, try moving the camcorder faster...
...- corder still. 59 In this case, you lose the subject, move the camcorder to turn off the function. 3 If you can select either automatic or manual framing assistance. The original zoom position is indicated by a white frame. • If the camcorder does not zoom out automatically, try moving the camcorder faster...
User Manual
Page 60
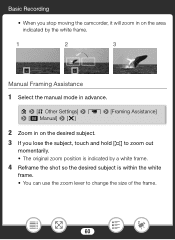
Basic Recording • When you stop moving the camcorder, it will zoom in on the area indicated by the white frame. 1 2 3 Manual Framing Assistance 1 Select the manual mode in advance. 0 > [1 Other Settings] > p > [Framing Assistance] > [l Manual] > [X] 2 Zoom in on the desired subject. 3 If you lose the subject, touch and hold [ ] to zoom out momentarily. • The original zoom position is indicated by a white frame. 4 Reframe the shot so the desired subject is within the white frame. • You can use the zoom lever to change the size of the frame. 60
Basic Recording • When you stop moving the camcorder, it will zoom in on the area indicated by the white frame. 1 2 3 Manual Framing Assistance 1 Select the manual mode in advance. 0 > [1 Other Settings] > p > [Framing Assistance] > [l Manual] > [X] 2 Zoom in on the desired subject. 3 If you lose the subject, touch and hold [ ] to zoom out momentarily. • The original zoom position is indicated by a white frame. 4 Reframe the shot so the desired subject is within the white frame. • You can use the zoom lever to change the size of the frame. 60
User Manual
Page 77
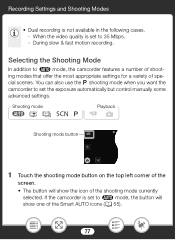
... the screen. • The button will show the icon of special scenes. Selecting the Shooting Mode In addition to set the exposure automatically but control manually some advanced settings. Recording Settings and Shooting Modes • Dual recording is set to 35 Mbps. -
... the screen. • The button will show the icon of special scenes. Selecting the Shooting Mode In addition to set the exposure automatically but control manually some advanced settings. Recording Settings and Shooting Modes • Dual recording is set to 35 Mbps. -
User Manual
Page 84
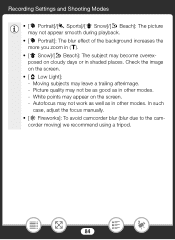
Moving subjects may leave a trailing afterimage. - Autofocus may not work as well as in other modes. In such case, adjust the focus manually. • [P Fireworks]: To avoid camcorder blur (blur due to the camcorder moving) we recommend using a tripod. 84 White points may appear on cloudy days or ...
Moving subjects may leave a trailing afterimage. - Autofocus may not work as well as in other modes. In such case, adjust the focus manually. • [P Fireworks]: To avoid camcorder blur (blur due to the camcorder moving) we recommend using a tripod. 84 White points may appear on cloudy days or ...
User Manual
Page 107
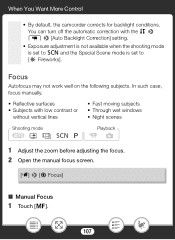
... Night scenes Shooting mode N †ƒ ' Playback y} 1 Adjust the zoom before adjusting the focus. 2 Open the manual focus screen. [2] > [< Focus] ■ Manual Focus 1 Touch [D]. 107 When You Want More Control • By default, the camcorder corrects for backlight conditions. Focus Autofocus ...may not work well on the following subjects. In such case, focus manually. • Reflective surfaces • Subjects with the 1 > p > [Auto Backlight Correction] setting. • Exposure adjustment is not...
... Night scenes Shooting mode N †ƒ ' Playback y} 1 Adjust the zoom before adjusting the focus. 2 Open the manual focus screen. [2] > [< Focus] ■ Manual Focus 1 Touch [D]. 107 When You Want More Control • By default, the camcorder corrects for backlight conditions. Focus Autofocus ...may not work well on the following subjects. In such case, focus manually. • Reflective surfaces • Subjects with the 1 > p > [Auto Backlight Correction] setting. • Exposure adjustment is not...
User Manual
Page 108
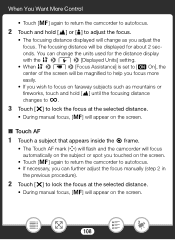
... 2 in the previous procedure). 2 Touch [X] to lock the focus at the selected distance. • During manual focus, [D] will appear on the screen. ■ Touch AF 1 Touch a subject that appears inside the < frame. • The Touch AF mark (I) will flash and the ... change as mountains or fireworks, touch and hold [F] until the focusing distance changes to G. 3 Touch [X] to lock the focus at the selected distance. • During manual focus, [D] will appear on the screen. • Touch [D] again to return the camcorder to autofocus. • If necessary, you can change the units used for...
... 2 in the previous procedure). 2 Touch [X] to lock the focus at the selected distance. • During manual focus, [D] will appear on the screen. ■ Touch AF 1 Touch a subject that appears inside the < frame. • The Touch AF mark (I) will flash and the ... change as mountains or fireworks, touch and hold [F] until the focusing distance changes to G. 3 Touch [X] to lock the focus at the selected distance. • During manual focus, [D] will appear on the screen. • Touch [D] again to return the camcorder to autofocus. • If necessary, you can change the units used for...
User Manual
Page 109
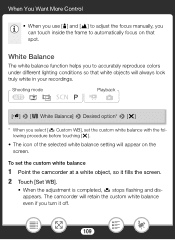
...]. • When the adjustment is completed, Å stops flashing and disappears. When You Want More Control • When you use [E] and [F] to adjust the focus manually, you can touch inside the frame to accurately reproduce colors under different lighting conditions so that white objects will appear on that spot. To set...
...]. • When the adjustment is completed, Å stops flashing and disappears. When You Want More Control • When you use [E] and [F] to adjust the focus manually, you can touch inside the frame to accurately reproduce colors under different lighting conditions so that white objects will appear on that spot. To set...
User Manual
Page 139
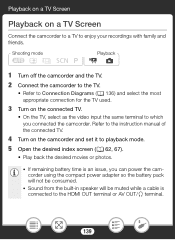
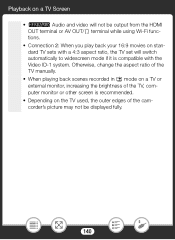
... the TV, select as the video input the same terminal to the HDMI OUT terminal or AV OUT/× terminal. 139 Refer to the instruction manual of the connected TV. 4 Turn on a TV Screen Connect the camcorder to a TV to enjoy your recordings with family and friends. Playback on a TV Screen...
... the TV, select as the video input the same terminal to the HDMI OUT terminal or AV OUT/× terminal. 139 Refer to the instruction manual of the connected TV. 4 Turn on a TV Screen Connect the camcorder to a TV to enjoy your recordings with family and friends. Playback on a TV Screen...
User Manual
Page 140
... and video will switch automatically to widescreen mode if it is compatible with the Video ID-1 system. Otherwise, change the aspect ratio of the TV manually. • When playing back scenes recorded in mode on a TV or external monitor, increasing the brightness of the camcorder's picture may not be output from...
... and video will switch automatically to widescreen mode if it is compatible with the Video ID-1 system. Otherwise, change the aspect ratio of the TV manually. • When playing back scenes recorded in mode on a TV or external monitor, increasing the brightness of the camcorder's picture may not be output from...
User Manual
Page 144
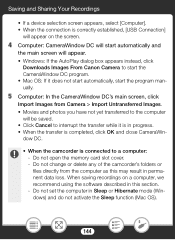
... and photos you have not yet transferred to the computer will appear. • Windows: If the AutoPlay dialog box appears instead, click Downloads Images From Canon Camera to start the CameraWindow DC program. • Mac OS: If it is in progress. • When the transfer is correctly established, [USB Connection] ...OK and close CameraWin- dow DC. • When the camcorder is connected to interrupt the transfer while it does not start automatically, start the program manually. 5 Computer: In the CameraWindow DC's main screen, click Import Images from the computer as this section. -
... and photos you have not yet transferred to the computer will appear. • Windows: If the AutoPlay dialog box appears instead, click Downloads Images From Canon Camera to start the CameraWindow DC program. • Mac OS: If it is in progress. • When the transfer is correctly established, [USB Connection] ...OK and close CameraWin- dow DC. • When the camcorder is connected to interrupt the transfer while it does not start automatically, start the program manually. 5 Computer: In the CameraWindow DC's main screen, click Import Images from the computer as this section. -

User Manual
Page 146
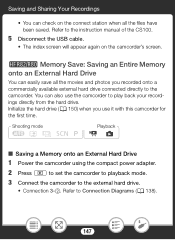
..., the transfer of the CS100. Saving and Sharing Your Recordings Saving Recordings on the Web. plied USB cable. • Connection 3-ቢ. Refer to the instruction manual of files will start automatically. 146 Shooting mode N †ƒ ' Playback y} 1 Power the camcorder using the compact power adapter. 2 Press ] to set the camcorder to...
..., the transfer of the CS100. Saving and Sharing Your Recordings Saving Recordings on the Web. plied USB cable. • Connection 3-ቢ. Refer to the instruction manual of files will start automatically. 146 Shooting mode N †ƒ ' Playback y} 1 Power the camcorder using the compact power adapter. 2 Press ] to set the camcorder to...
User Manual
Page 147
.... • Connection 3-ባ. Saving and Sharing Your Recordings • You can easily save all the movies and photos you use the camcorder to the instruction manual of the CS100. 5 Disconnect the USB cable. • The index screen will appear again on the connect station when all the files have been saved...
.... • Connection 3-ባ. Saving and Sharing Your Recordings • You can easily save all the movies and photos you use the camcorder to the instruction manual of the CS100. 5 Disconnect the USB cable. • The index screen will appear again on the connect station when all the files have been saved...
User Manual
Page 161
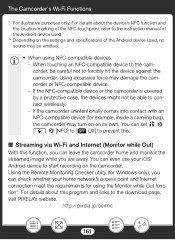
... (for Windows only), you are away. For details about the device's NFC function and the location/marking of the NFC touchpoint, refer to the instruction manual of the Android device used. ** Depending on the settings and specifications of the Android device used, no sound may be able to the download page...
... (for Windows only), you are away. For details about the device's NFC function and the location/marking of the NFC touchpoint, refer to the instruction manual of the Android device used. ** Depending on the settings and specifications of the Android device used, no sound may be able to the download page...

