Instruction Manual
Page 3
... in a residential installation. Use of FCC Rules. FCC/IC NOTICE HD Camcorder, VIXIA HF R42 / VIXIA HF R40 / VIXIA HF R400 systems This device complies with Part 15 of radio frequency energy (RF) in a particular installation. Canon U.S.A., Inc. Note: This equipment has been tested and found any interference received, ...have not found to comply with the limits for class B digital device, pursuant to comply with class B limits in the manual. If this device must not be co-located or operated in accordance with the instructions, may cause undesired operation. Low-power ...
... in a residential installation. Use of FCC Rules. FCC/IC NOTICE HD Camcorder, VIXIA HF R42 / VIXIA HF R40 / VIXIA HF R400 systems This device complies with Part 15 of radio frequency energy (RF) in a particular installation. Canon U.S.A., Inc. Note: This equipment has been tested and found any interference received, ...have not found to comply with the limits for class B digital device, pursuant to comply with class B limits in the manual. If this device must not be co-located or operated in accordance with the instructions, may cause undesired operation. Low-power ...
Instruction Manual
Page 5
REGIONS OF USE VIXIA HF R42 and VIXIA HF R40 are in compliance (as of January 2013) with the contacts listed on other regions where they can be used, make inquiries with the radio signal regulations of this instruction manual. REGIONS Canada, Hong Kong S.A.R., USA, South Korea, Taiwan Model ID0019: VIXIA HF R40 / VIXIA HF R42 5 For details on the back side of the regions listed below.
REGIONS OF USE VIXIA HF R42 and VIXIA HF R40 are in compliance (as of January 2013) with the contacts listed on other regions where they can be used, make inquiries with the radio signal regulations of this instruction manual. REGIONS Canada, Hong Kong S.A.R., USA, South Korea, Taiwan Model ID0019: VIXIA HF R40 / VIXIA HF R42 5 For details on the back side of the regions listed below.
Instruction Manual
Page 6
...Apple Inc., registered in the U.S. and other use for the MPEG-4 standard and may be used on the camcorder's settings, onscreen displays and in this manual signifies Wi-Fi Protected Setup. • The Wi-Fi Protected Setup Identifier Mark is a mark of the Wi-Fi Alliance. • Other names and..., WPA, WPA2, and the Wi-Fi Certified logo are trademarks of Twitter, Inc. • Wi-Fi is licensed under the AT&T patents to Canon camcorders compliant with high-definition video composed of Cisco in the U.S. No license is granted or implied for any other countries and is used under...
...Apple Inc., registered in the U.S. and other use for the MPEG-4 standard and may be used on the camcorder's settings, onscreen displays and in this manual signifies Wi-Fi Protected Setup. • The Wi-Fi Protected Setup Identifier Mark is a mark of the Wi-Fi Alliance. • Other names and..., WPA, WPA2, and the Wi-Fi Certified logo are trademarks of Twitter, Inc. • Wi-Fi is licensed under the AT&T patents to Canon camcorders compliant with high-definition video composed of Cisco in the U.S. No license is granted or implied for any other countries and is used under...
Instruction Manual
Page 11
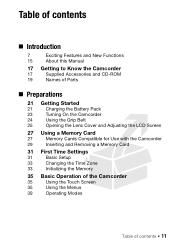
Table of contents „ Introduction 7 Exciting Features and New Functions 15 About this Manual 17 Getting to Know the Camcorder 17 Supplied Accessories and CD-ROM 19 Names of Parts „ Preparations 21 Getting Started 21 Charging the Battery ...
Table of contents „ Introduction 7 Exciting Features and New Functions 15 About this Manual 17 Getting to Know the Camcorder 17 Supplied Accessories and CD-ROM 19 Names of Parts „ Preparations 21 Getting Started 21 Charging the Battery ...
Instruction Manual
Page 15
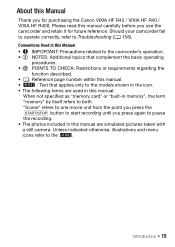
... point you press the Y button to start recording until you use the camcorder and retain it for purchasing the Canon VIXIA HF R42 / VIXIA HF R40 / VIXIA HF R400. About this Manual Thank you for future reference. Conventions Used in this Manual • IMPORTANT: Precautions related to the camcorder's operation. • NOTES: Additional topics that complement the basic operating procedures...
... point you press the Y button to start recording until you use the camcorder and retain it for purchasing the Canon VIXIA HF R42 / VIXIA HF R40 / VIXIA HF R400. About this Manual Thank you for future reference. Conventions Used in this Manual • IMPORTANT: Precautions related to the camcorder's operation. • NOTES: Additional topics that complement the basic operating procedures...
Instruction Manual
Page 18
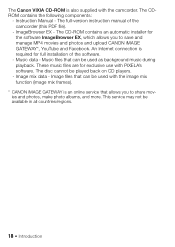
...played back on CD players. - The full-version instruction manual of the software. - The disc cannot be available in all countries/regions. 18 Š Introduction Music files that can be used with the image mix function (image mix frames). * CANON iMAGE GATEWAY is an online service that can be used as... and photos, make photo albums, and more. The CD-ROM contains an automatic installer for full installation of the camcorder (this PDF file). - The Canon VIXIA CD-ROM is also supplied with PIXELA's software. The CDROM contains the following components: - Image mix data -
...played back on CD players. - The full-version instruction manual of the software. - The disc cannot be available in all countries/regions. 18 Š Introduction Music files that can be used with the image mix function (image mix frames). * CANON iMAGE GATEWAY is an online service that can be used as... and photos, make photo albums, and more. The CD-ROM contains an automatic installer for full installation of the camcorder (this PDF file). - The Canon VIXIA CD-ROM is also supplied with PIXELA's software. The CDROM contains the following components: - Image mix data -
Instruction Manual
Page 45
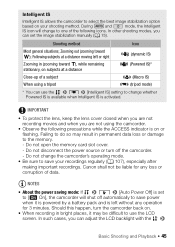
...(tripod mode) * You can adjust the LCD backlight with the > Basic Shooting and Playback Š 45 Do not open the memory card slot cover. - Canon shall not be difficult to change whether Powered IS is available when Intelligent IS is activated. In other shooting modes, you are not recording movies...: If > q > [Auto Power Off] is left or right Zooming in bright places, it is powered by a battery pack and is set the image stabilization manually (A 75). In such cases, you can use the > p > [Intelligent IS] setting to use the LCD screen. During and mode, the Intelligent IS icon...
...(tripod mode) * You can adjust the LCD backlight with the > Basic Shooting and Playback Š 45 Do not open the memory card slot cover. - Canon shall not be difficult to change whether Powered IS is available when Intelligent IS is activated. In other shooting modes, you are not recording movies...: If > q > [Auto Power Off] is left or right Zooming in bright places, it is powered by a battery pack and is set the image stabilization manually (A 75). In such cases, you can use the > p > [Intelligent IS] setting to use the LCD screen. During and mode, the Intelligent IS icon...
Instruction Manual
Page 68
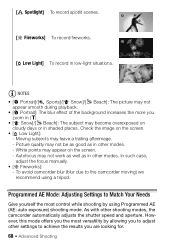
... the results you zoom in (S). • [ Snow]/[ Beach]: The subject may not be as good as in shaded places. In such case, adjust the focus manually. • [ Fireworks]: - Moving subjects may appear on the screen. - Picture quality may become overexposed on the screen. • [ Low Light]: - To avoid camcorder blur (blur...
... the results you zoom in (S). • [ Snow]/[ Beach]: The subject may not be as good as in shaded places. In such case, adjust the focus manually. • [ Fireworks]: - Moving subjects may appear on the screen. - Picture quality may become overexposed on the screen. • [ Low Light]: - To avoid camcorder blur (blur...
Instruction Manual
Page 79
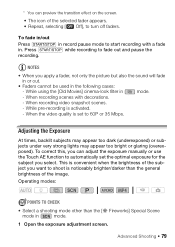
..., backlit subjects may appear too dark (underexposed) or subjects under very strong lights may appear too bright or glaring (overexposed). * You can adjust the exposure manually or use the Touch AE function to automatically set to 60P or 35 Mbps.
..., backlit subjects may appear too dark (underexposed) or subjects under very strong lights may appear too bright or glaring (overexposed). * You can adjust the exposure manually or use the Touch AE function to automatically set to 60P or 35 Mbps.

Instruction Manual
Page 80
... adjustment range may vary depending on the screen. You can touch [n] instead to adjust the exposure manually without activating the Touch AE function. • The manual adjustment dial appears and the adjustment value is changed during exposure lock, the camcorder will be grayed...a subject that the automatic backlight correction is not available in the following cases. - You have the option to further adjust the exposure manually as necessary. • You can turn off the automatic backlight correction with a strong light source behind them, the camcorder automatically corrects...
... adjustment range may vary depending on the screen. You can touch [n] instead to adjust the exposure manually without activating the Touch AE function. • The manual adjustment dial appears and the adjustment value is changed during exposure lock, the camcorder will be grayed...a subject that the automatic backlight correction is not available in the following cases. - You have the option to further adjust the exposure manually as necessary. • You can turn off the automatic backlight correction with a strong light source behind them, the camcorder automatically corrects...
Instruction Manual
Page 81
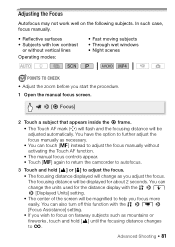
... as necessary. • You can also turn off this function with low contrast or without activating the Touch AF function. • The manual focus controls appear. • Touch [D] again to return the camcorder to autofocus. 3 Touch and hold [F] until the focusing distance changes ... > [Displayed Units] setting. • The center of the screen will be adjusted automatically. You can touch [D] instead to adjust the focus manually without vertical lines Operating modes: • Fast moving subjects • Through wet windows • Night scenes SCN POINTS TO CHECK • Adjust ...
... as necessary. • You can also turn off this function with low contrast or without activating the Touch AF function. • The manual focus controls appear. • Touch [D] again to return the camcorder to autofocus. 3 Touch and hold [F] until the focusing distance changes ... > [Displayed Units] setting. • The center of the screen will be adjusted automatically. You can touch [D] instead to adjust the focus manually without vertical lines Operating modes: • Fast moving subjects • Through wet windows • Night scenes SCN POINTS TO CHECK • Adjust ...
Instruction Manual
Page 82
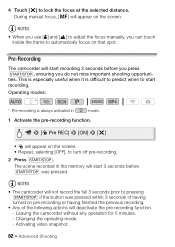
... on pre-recording or having finished the previous recording. • Any of the following actions will appear on that spot. 4 Touch [X] to adjust the focus manually, you do not miss important shooting opportunities. Operating modes: * SCN * Pre-recording is difficult to predict when to turn off pre-recording. 2 Press Y. During...
... on pre-recording or having finished the previous recording. • Any of the following actions will appear on that spot. 4 Touch [X] to adjust the focus manually, you do not miss important shooting opportunities. Operating modes: * SCN * Pre-recording is difficult to predict when to turn off pre-recording. 2 Press Y. During...
Instruction Manual
Page 87
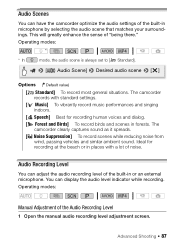
... microphone by selecting the audio scene that matches your surroundings. Audio Recording Level You can display the audio level indicator while recording. Operating modes: SCN Manual Adjustment of the built-in forests. Advanced Shooting Š 87 Audio Scenes You can have the camcorder optimize the audio settings of the Audio Recording...
... microphone by selecting the audio scene that matches your surroundings. Audio Recording Level You can display the audio level indicator while recording. Operating modes: SCN Manual Adjustment of the built-in forests. Advanced Shooting Š 87 Audio Scenes You can have the camcorder optimize the audio settings of the Audio Recording...
Instruction Manual
Page 88
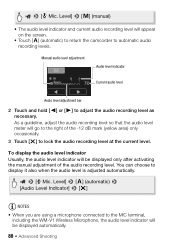
... the audio recording level. To display the audio level indicator Usually, the audio level indicator will be displayed only after activating the manual adjustment of the -12 dB mark (yellow area) only occasionally. 3 Touch [X] to lock the audio recording level at the ... Level] > [m] (automatic) > [Audio Level Indicator] > [X] NOTES • When you are using a microphone connected to automatic audio recording levels. Manual audio level adjustment Audio level indicator Current audio level Audio level adjustment bar 2 Touch and hold [Ï] or [Ð] to display it also when the...
... the audio recording level. To display the audio level indicator Usually, the audio level indicator will be displayed only after activating the manual adjustment of the -12 dB mark (yellow area) only occasionally. 3 Touch [X] to lock the audio recording level at the ... Level] > [m] (automatic) > [Audio Level Indicator] > [X] NOTES • When you are using a microphone connected to automatic audio recording levels. Manual audio level adjustment Audio level indicator Current audio level Audio level adjustment bar 2 Touch and hold [Ï] or [Ð] to display it also when the...
Instruction Manual
Page 91
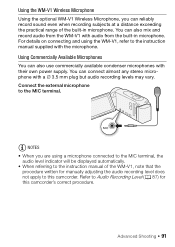
...practical range of the WM-V1, note that the procedure written for this camcorder. Refer to Audio Recording Level (A 87) for manually adjusting the audio recording level does not apply to this camcorder's correct procedure. Using the WM-V1 Wireless Microphone Using the optional WM...the WM-V1 with a ∅ 3.5 mm plug but audio recording levels may vary. Connect the external microphone to the instruction manual of the built-in microphone. You can also use commercially available condenser microphones with the microphone. Using Commercially Available Microphones You can also...
...practical range of the WM-V1, note that the procedure written for this camcorder. Refer to Audio Recording Level (A 87) for manually adjusting the audio recording level does not apply to this camcorder's correct procedure. Using the WM-V1 Wireless Microphone Using the optional WM...the WM-V1 with a ∅ 3.5 mm plug but audio recording levels may vary. Connect the external microphone to the instruction manual of the built-in microphone. You can also use commercially available condenser microphones with the microphone. Using Commercially Available Microphones You can also...

Instruction Manual
Page 105
...family and friends. Playback on the camcorder and set it to the computer using the HDMI OUT terminal will not be output from the supplied VIXIA CD-ROM to the TV. For details, refer to the Software Guide (PDF file) of the connected TV. 4 Turn on an ...; 105 For details, refer to which you connected the camcorder. To save your recordings on a TV Screen Connect the camcorder to a TV to the instruction manual of PIXELA's software. - On the TV, select as background music. Playback on a computer. - Operating modes: SCN 1 Turn off the camcorder and the TV...
...family and friends. Playback on the camcorder and set it to the computer using the HDMI OUT terminal will not be output from the supplied VIXIA CD-ROM to the TV. For details, refer to the Software Guide (PDF file) of the connected TV. 4 Turn on an ...; 105 For details, refer to which you connected the camcorder. To save your recordings on a TV Screen Connect the camcorder to a TV to the instruction manual of PIXELA's software. - On the TV, select as background music. Playback on a computer. - Operating modes: SCN 1 Turn off the camcorder and the TV...

Instruction Manual
Page 106
Otherwise, change the aspect ratio of the TV manually. * Refer to widescreen mode if it is compatible with the type of the device. Depending on the memory card using the compact power adapter. • ...-compatible. In such case, play back your memory card on standard TV sets with a 4:3 aspect ratio, the TV set will switch automatically to the instruction manual of memory card used*. • We recommend powering the camcorder using the camcorder. 106 Š External Connections NOTES • You can also play video directly...
Otherwise, change the aspect ratio of the TV manually. * Refer to widescreen mode if it is compatible with the type of the device. Depending on the memory card using the compact power adapter. • ...-compatible. In such case, play back your memory card on standard TV sets with a 4:3 aspect ratio, the TV set will switch automatically to the instruction manual of memory card used*. • We recommend powering the camcorder using the camcorder. 106 Š External Connections NOTES • You can also play video directly...
Instruction Manual
Page 112
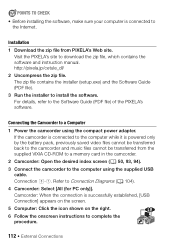
... Guide (PDF file). 3 Run the installer to download the zip file, which contains the software and instruction manual. Visit the PIXELA's site to install the software. Installation 1 Download the zip file from the supplied VIXIA CD-ROM to a memory card in the camcorder. 2 Camcorder: Open the desired index screen (A 50, 93, 94...
... Guide (PDF file). 3 Run the installer to download the zip file, which contains the software and instruction manual. Visit the PIXELA's site to install the software. Installation 1 Download the zip file from the supplied VIXIA CD-ROM to a memory card in the camcorder. 2 Camcorder: Open the desired index screen (A 50, 93, 94...
Instruction Manual
Page 115
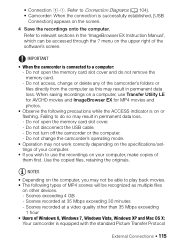
... for MP4 movies and photos. • Observe the following types of MP4 scenes will be recognized as this may result in the 'ImageBrowser EX Instruction Manual', which can be able to use the recordings on or flashing. Do not turn off the camcorder or the computer. - Use the copied files, retaining...
... for MP4 movies and photos. • Observe the following types of MP4 scenes will be recognized as this may result in the 'ImageBrowser EX Instruction Manual', which can be able to use the recordings on or flashing. Do not turn off the camcorder or the computer. - Use the copied files, retaining...
Instruction Manual
Page 120
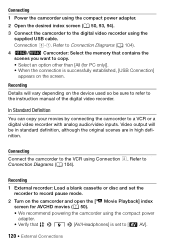
Connection #-1. Recording Details will be sure to refer to the instruction manual of the digital video recorder. Refer to a VCR or a digital video recorder with analog audio/video inputs. Refer to Connection Diagrams (A 104). 4 6/4 Camcorder: Select the ...
Connection #-1. Recording Details will be sure to refer to the instruction manual of the digital video recorder. Refer to a VCR or a digital video recorder with analog audio/video inputs. Refer to Connection Diagrams (A 104). 4 6/4 Camcorder: Select the ...


