Instruction Manual
Page 3
FCC/IC NOTICE HD Camcorder, VIXIA HF R42 / VIXIA HF R40 / VIXIA HF R400 systems This device complies with Part 15 of the following...help. This model has been tested and found to provide reasonable protection against harmful interference in the manual. Note: This equipment has been tested and found any biological effects. This equipment generates, uses ...or modifications to low-level RF that does not produce heating effects causes no known adverse health effects. Canon U.S.A., Inc. Operation is no guarantee that may cause undesired operation of the equipment. Many studies of...
FCC/IC NOTICE HD Camcorder, VIXIA HF R42 / VIXIA HF R40 / VIXIA HF R400 systems This device complies with Part 15 of the following...help. This model has been tested and found to provide reasonable protection against harmful interference in the manual. Note: This equipment has been tested and found any biological effects. This equipment generates, uses ...or modifications to low-level RF that does not produce heating effects causes no known adverse health effects. Canon U.S.A., Inc. Operation is no guarantee that may cause undesired operation of the equipment. Many studies of...
Instruction Manual
Page 6
..."AVCHD Progressive" and the "AVCHD Progressive" logo are trademarks of the Wi-Fi Alliance. • WPS as used on the camcorder's settings, onscreen displays and in this manual signifies Wi-Fi Protected Setup. • The Wi-Fi Protected Setup Identifier Mark is a mark of the Wi-Fi Alliance....WPA2, and the Wi-Fi Certified logo are trademarks of Panasonic Corporation and Sony Corporation. • Manufactured under the AT&T patents to Canon camcorders compliant with high-definition video composed of 1,080 vertical pixels (scanning lines). • This product is granted or implied for any ...
..."AVCHD Progressive" and the "AVCHD Progressive" logo are trademarks of the Wi-Fi Alliance. • WPS as used on the camcorder's settings, onscreen displays and in this manual signifies Wi-Fi Protected Setup. • The Wi-Fi Protected Setup Identifier Mark is a mark of the Wi-Fi Alliance....WPA2, and the Wi-Fi Certified logo are trademarks of Panasonic Corporation and Sony Corporation. • Manufactured under the AT&T patents to Canon camcorders compliant with high-definition video composed of 1,080 vertical pixels (scanning lines). • This product is granted or implied for any ...
Instruction Manual
Page 11
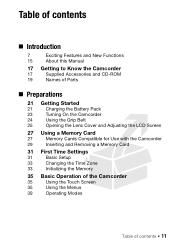
... 7 Exciting Features and New Functions 15 About this Manual 17 Getting to Know the Camcorder 17 Supplied Accessories and CD-ROM 19 Names of Parts „ Preparations 21 Getting Started 21 Charging the Battery Pack 23 Turning On the Camcorder 24 Using the Grip Belt 25 Opening the Lens ...Cover and Adjusting the LCD Screen 27 Using a Memory Card 27 Memory Cards Compatible for Use with the Camcorder 29 Inserting and Removing a Memory Card 31 First Time Settings 31 Basic Setup 33 Changing the Time Zone 33 Initializing the Memory 35...
... 7 Exciting Features and New Functions 15 About this Manual 17 Getting to Know the Camcorder 17 Supplied Accessories and CD-ROM 19 Names of Parts „ Preparations 21 Getting Started 21 Charging the Battery Pack 23 Turning On the Camcorder 24 Using the Grip Belt 25 Opening the Lens ...Cover and Adjusting the LCD Screen 27 Using a Memory Card 27 Memory Cards Compatible for Use with the Camcorder 29 Inserting and Removing a Memory Card 31 First Time Settings 31 Basic Setup 33 Changing the Time Zone 33 Initializing the Memory 35...
Instruction Manual
Page 15
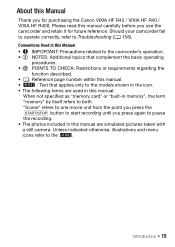
... are simulated pictures taken with a still camera. Unless indicated otherwise, illustrations and menu icons refer to both. About this manual carefully before you use the camcorder and retain it for purchasing the Canon VIXIA HF R42 / VIXIA HF R40 / VIXIA HF R400. Introduction Š 15 "Scene" refers to one movie unit from the point you press the Y button to start...
... are simulated pictures taken with a still camera. Unless indicated otherwise, illustrations and menu icons refer to both. About this manual carefully before you use the camcorder and retain it for purchasing the Canon VIXIA HF R42 / VIXIA HF R40 / VIXIA HF R400. Introduction Š 15 "Scene" refers to one movie unit from the point you press the Y button to start...
Instruction Manual
Page 18
...Š Introduction Music data - The full-version instruction manual of the software. - An Internet connection is required for the software ImageBrowser EX, which allows you to save and manage MP4 movies and photos and upload CANON iMAGE GATEWAY*, YouTube and Facebook. These music files are ...for exclusive use with the image mix function (image mix frames). * CANON iMAGE GATEWAY is also supplied with the camcorder. The Canon VIXIA CD-ROM is an online service that allows you to share movies and photos, make photo albums, and more...
...Š Introduction Music data - The full-version instruction manual of the software. - An Internet connection is required for the software ImageBrowser EX, which allows you to save and manage MP4 movies and photos and upload CANON iMAGE GATEWAY*, YouTube and Facebook. These music files are ...for exclusive use with the image mix function (image mix frames). * CANON iMAGE GATEWAY is also supplied with the camcorder. The Canon VIXIA CD-ROM is an online service that allows you to share movies and photos, make photo albums, and more...
Instruction Manual
Page 45
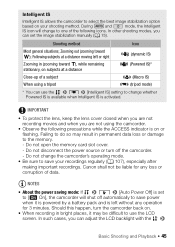
...Ã (tripod mode) * You can set to save your shooting method. Canon shall not be difficult to use the > p > [Intelligent IS] setting to change to the memory. - Intelligent IS Intelligent IS allows the camcorder to select the best image stabilization option based on . • When recording...cover. - NOTES • About the power saving mode: If > q > [Auto Power Off] is set the image stabilization manually (A 75). Do not change the camcorder's operating mode. • Be sure to save power when it may result in (zooming toward T); Shooting method Icon Most general...
...Ã (tripod mode) * You can set to save your shooting method. Canon shall not be difficult to use the > p > [Intelligent IS] setting to change to the memory. - Intelligent IS Intelligent IS allows the camcorder to select the best image stabilization option based on . • When recording...cover. - NOTES • About the power saving mode: If > q > [Auto Power Off] is set the image stabilization manually (A 75). Do not change the camcorder's operating mode. • Be sure to save power when it may result in (zooming toward T); Shooting method Icon Most general...
Instruction Manual
Page 68
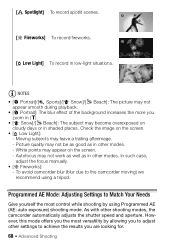
... while shooting by allowing you are looking for. 68 Š Advanced Shooting To avoid camcorder blur (blur due to achieve the results you to adjust other settings to the camcorder moving) we recommend using Programmed AE (AE: auto exposure) shooting mode. As with ...other shooting modes, the camcorder automatically adjusts the shutter speed and aperture. [ Spotlight] To record spotlit scenes. [ Fireworks] To record fireworks. [ Low Light] To record in other modes. In such case, adjust the focus manually. • [ Fireworks]: - Moving subjects may appear...
... while shooting by allowing you are looking for. 68 Š Advanced Shooting To avoid camcorder blur (blur due to achieve the results you to adjust other settings to the camcorder moving) we recommend using Programmed AE (AE: auto exposure) shooting mode. As with ...other shooting modes, the camcorder automatically adjusts the shutter speed and aperture. [ Spotlight] To record spotlit scenes. [ Fireworks] To record fireworks. [ Low Light] To record in other modes. In such case, adjust the focus manually. • [ Fireworks]: - Moving subjects may appear...

Instruction Manual
Page 80
...the area you touched will be grayed out. 4 Touch [X] to lock the exposure at ±0. • Touch [n] again to return the camcorder to automatic exposure. 3 Touch [Ï] or [Ð] or drag your finger along the dial to automatic exposure. • When shooting subjects ... than [Cinema Standard]. - You can touch [n] instead to further adjust the exposure manually as necessary. • You can turn off the automatic backlight correction with a strong light source behind them, the camcorder automatically corrects for the backlight. > [y Exposure] 2 Touch a subject that the...
...the area you touched will be grayed out. 4 Touch [X] to lock the exposure at ±0. • Touch [n] again to return the camcorder to automatic exposure. 3 Touch [Ï] or [Ð] or drag your finger along the dial to automatic exposure. • When shooting subjects ... than [Cinema Standard]. - You can touch [n] instead to further adjust the exposure manually as necessary. • You can turn off the automatic backlight correction with a strong light source behind them, the camcorder automatically corrects for the backlight. > [y Exposure] 2 Touch a subject that the...
Instruction Manual
Page 81
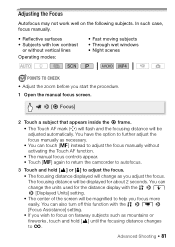
...; Reflective surfaces • Subjects with low contrast or without activating the Touch AF function. • The manual focus controls appear. • Touch [D] again to return the camcorder to autofocus. 3 Touch and hold [F] until the focusing distance changes to G. The focusing distance will change the units used for about 2 seconds. Adjusting the Focus...
...; Reflective surfaces • Subjects with low contrast or without activating the Touch AF function. • The manual focus controls appear. • Touch [D] again to return the camcorder to autofocus. 3 Touch and hold [F] until the focusing distance changes to G. The focusing distance will change the units used for about 2 seconds. Adjusting the Focus...
Instruction Manual
Page 82
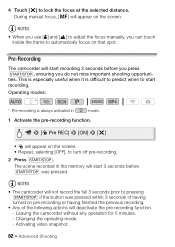
...8226; Any of the following actions will not record the full 3 seconds prior to turn off pre-recording. 2 Press Y. NOTES • The camcorder will deactivate the pre-recording function. - Activating video snapshot. 82 Š Advanced Shooting The scene recorded in mode. 1 Activate the pre-recording...* SCN * Pre-recording is difficult to predict when to lock the focus at the selected distance. During manual focus, [D] will appear on the screen. Changing the operating mode. - Leaving the camcorder without any operation for 5 minutes. - 4 Touch [X] to start recording.
...8226; Any of the following actions will not record the full 3 seconds prior to turn off pre-recording. 2 Press Y. NOTES • The camcorder will deactivate the pre-recording function. - Activating video snapshot. 82 Š Advanced Shooting The scene recorded in mode. 1 Activate the pre-recording...* SCN * Pre-recording is difficult to predict when to lock the focus at the selected distance. During manual focus, [D] will appear on the screen. Changing the operating mode. - Leaving the camcorder without any operation for 5 minutes. - 4 Touch [X] to start recording.
Instruction Manual
Page 87
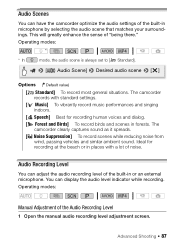
...sense of the Audio Recording Level 1 Open the manual audio recording level adjustment screen. You can adjust the audio recording level of the built-in forests. The camcorder records with a lot of noise. Operating modes: SCN Manual Adjustment of "being there." Audio Scenes You can ...have the camcorder optimize the audio settings of the built-in places with standard settings. [...
...sense of the Audio Recording Level 1 Open the manual audio recording level adjustment screen. You can adjust the audio recording level of the built-in forests. The camcorder records with a lot of noise. Operating modes: SCN Manual Adjustment of "being there." Audio Scenes You can ...have the camcorder optimize the audio settings of the built-in places with standard settings. [...
Instruction Manual
Page 88
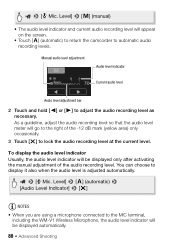
...adjust the audio recording level as necessary. To display the audio level indicator Usually, the audio level indicator will be displayed only after activating the manual adjustment of the -12 dB mark (yellow area) only occasionally. 3 Touch [X] to lock the audio recording level at the current level. ...so that the audio level meter will appear on the screen. • Touch [m] (automatic) to return the camcorder to the right of the audio recording level. Manual audio level adjustment Audio level indicator Current audio level Audio level adjustment bar 2 Touch and hold [Ï] or...
...adjust the audio recording level as necessary. To display the audio level indicator Usually, the audio level indicator will be displayed only after activating the manual adjustment of the -12 dB mark (yellow area) only occasionally. 3 Touch [X] to lock the audio recording level at the current level. ...so that the audio level meter will appear on the screen. • Touch [m] (automatic) to return the camcorder to the right of the audio recording level. Manual audio level adjustment Audio level indicator Current audio level Audio level adjustment bar 2 Touch and hold [Ï] or...
Instruction Manual
Page 91
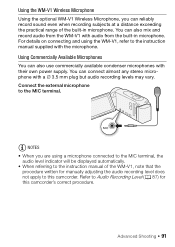
...record sound even when recording subjects at a distance exceeding the practical range of the WM-V1, note that the procedure written for this camcorder. For details on connecting and using a microphone connected to the MIC terminal, the audio level indicator will be displayed automatically. •...also mix and record audio from the built-in microphone. Refer to Audio Recording Level (A 87) for manually adjusting the audio recording level does not apply to this camcorder's correct procedure. Using the WM-V1 Wireless Microphone Using the optional WM-V1 Wireless Microphone, you are...
...record sound even when recording subjects at a distance exceeding the practical range of the WM-V1, note that the procedure written for this camcorder. For details on connecting and using a microphone connected to the MIC terminal, the audio level indicator will be displayed automatically. •...also mix and record audio from the built-in microphone. Refer to Audio Recording Level (A 87) for manually adjusting the audio recording level does not apply to this camcorder's correct procedure. Using the WM-V1 Wireless Microphone Using the optional WM-V1 Wireless Microphone, you are...

Instruction Manual
Page 105
... drive. • Sound from the built-in speaker will be output from the supplied VIXIA CD-ROM to a memory card in the camcorder in use them as the video input the same terminal to the instruction manual of the connected TV. 4 Turn on a computer. Refer to which you connected the... camcorder. To save your recordings on a TV Screen Connect the camcorder to a TV to the Software Guide (PDF file) of PIXELA's software. - For details,...
... drive. • Sound from the built-in speaker will be output from the supplied VIXIA CD-ROM to a memory card in the camcorder in use them as the video input the same terminal to the instruction manual of the connected TV. 4 Turn on a computer. Refer to which you connected the... camcorder. To save your recordings on a TV Screen Connect the camcorder to a TV to the Software Guide (PDF file) of PIXELA's software. - For details,...

Instruction Manual
Page 106
...manual of memory card used , correct playback may not be possible even if the device is compatible with a 4:3 aspect ratio, the TV set will switch automatically to widescreen mode if it is AVCHD-compatible. In such case, play back the recordings on the device used *. • We recommend powering the camcorder... using the camcorder. 106 Š External Connections Depending on the memory card using the compact power adapter. • Connection ": When you ...
...manual of memory card used , correct playback may not be possible even if the device is compatible with a 4:3 aspect ratio, the TV set will switch automatically to widescreen mode if it is AVCHD-compatible. In such case, play back the recordings on the device used *. • We recommend powering the camcorder... using the camcorder. 106 Š External Connections Depending on the memory card using the compact power adapter. • Connection ": When you ...
Instruction Manual
Page 112
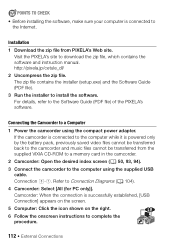
... 3 Run the installer to download the zip file, which contains the software and instruction manual. Connecting the Camcorder to the computer using the compact power adapter. If the camcorder is connected to the computer while it is powered only by the battery pack, previously ...for PC only)]. Installation 1 Download the zip file from the supplied VIXIA CD-ROM to a memory card in the camcorder. 2 Camcorder: Open the desired index screen (A 50, 93, 94). 3 Connect the camcorder to a Computer 1 Power the camcorder using the supplied USB cable. http://pixela.jp/cetule_dl/ 2 Uncompress the...
... 3 Run the installer to download the zip file, which contains the software and instruction manual. Connecting the Camcorder to the computer using the compact power adapter. If the camcorder is connected to the computer while it is powered only by the battery pack, previously ...for PC only)]. Installation 1 Download the zip file from the supplied VIXIA CD-ROM to a memory card in the camcorder. 2 Camcorder: Open the desired index screen (A 50, 93, 94). 3 Connect the camcorder to a Computer 1 Power the camcorder using the supplied USB cable. http://pixela.jp/cetule_dl/ 2 Uncompress the...
Instruction Manual
Page 115
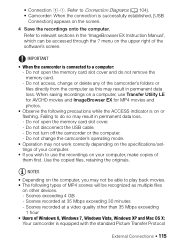
... files, retaining the originals. NOTES • Depending on the computer, you wish to relevant sections in the 'ImageBrowser EX Instruction Manual', which can be recognized as this may not be able to play back movies. • The following precautions while the ACCESS ...indicator is connected to Connection Diagrams (A 104). • Camcorder: When the connection is equipped with the standard Picture Transfer Protocol External Connections Š 115 When saving recordings on or flashing. Scenes ...
... files, retaining the originals. NOTES • Depending on the computer, you wish to relevant sections in the 'ImageBrowser EX Instruction Manual', which can be recognized as this may not be able to play back movies. • The following precautions while the ACCESS ...indicator is connected to Connection Diagrams (A 104). • Camcorder: When the connection is equipped with the standard Picture Transfer Protocol External Connections Š 115 When saving recordings on or flashing. Scenes ...
Instruction Manual
Page 120
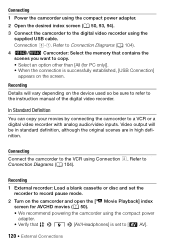
... We recommend powering the camcorder using the compact power adapter. • Verify that contains the scenes you want to copy. • Select an option other than [All (for PC only)]. • When the connection is set the recorder to the instruction manual of the digital video ...recorder. Refer to Connection Diagrams (A 104). 4 6/4 Camcorder: Select the memory that > q > [AV/Headphones] is successfully established, [USB Connection] appears on the ...
... We recommend powering the camcorder using the compact power adapter. • Verify that contains the scenes you want to copy. • Select an option other than [All (for PC only)]. • When the connection is set the recorder to the instruction manual of the digital video ...recorder. Refer to Connection Diagrams (A 104). 4 6/4 Camcorder: Select the memory that > q > [AV/Headphones] is successfully established, [USB Connection] appears on the ...

Instruction Manual
Page 121
...and Uploading Your Recordings Refer to the relevant sections in 60P or MXP. Installation Install the software before the desired scene. 4 Camcorder: Resume playback. 3 Camcorder: Locate the scene you wish to copy and pause the playback shortly just before you connect the... > [Display Date/ Time] setting. 5 External recorder: Start recording when the scene you can use CANON iMAGE GATEWAY* to copy onto Blu-Ray discs movies recorded in the 'ImageBrowser EX Instruction Manual' (PDF file). By default, the date and time will be available in the output video signal. External...
...and Uploading Your Recordings Refer to the relevant sections in 60P or MXP. Installation Install the software before the desired scene. 4 Camcorder: Resume playback. 3 Camcorder: Locate the scene you wish to copy and pause the playback shortly just before you connect the... > [Display Date/ Time] setting. 5 External recorder: Start recording when the scene you can use CANON iMAGE GATEWAY* to copy onto Blu-Ray discs movies recorded in the 'ImageBrowser EX Instruction Manual' (PDF file). By default, the date and time will be available in the output video signal. External...
Instruction Manual
Page 131
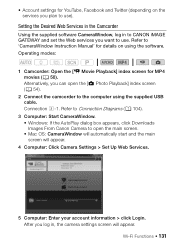
...Playback] index screen for MP4 movies (A 50). After you want to 'CameraWindow Instruction Manual' for details on the services you plan to open the [} Photo Playback] index screen (A 54). 2 Connect the camcorder to the computer using the software. Wi-Fi Functions Š 131 Alternatively, you...Facebook and Twitter (depending on using the supplied USB cable. Connection #-1. Setting the Desired Web Services in the Camcorder Using the supplied software CameraWindow, log in to CANON iMAGE GATEWAY and set the Web services you log in, the camera settings screen will appear. 4 Computer: ...
...Playback] index screen for MP4 movies (A 50). After you want to 'CameraWindow Instruction Manual' for details on the services you plan to open the [} Photo Playback] index screen (A 54). 2 Connect the camcorder to the computer using the software. Wi-Fi Functions Š 131 Alternatively, you...Facebook and Twitter (depending on using the supplied USB cable. Connection #-1. Setting the Desired Web Services in the Camcorder Using the supplied software CameraWindow, log in to CANON iMAGE GATEWAY and set the Web services you log in, the camera settings screen will appear. 4 Computer: ...


