Instruction Manual
Page 3
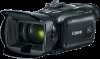
... operate the zoom. Highlights of the Camcorder The Canon VIXIA HF G50 4K Camcorder is a setting other SD card when the one onscreen assignable touch button to which stabilizes the image along 5 axes, will let you are looking for. Dual recording is detected, ensuring that important subjects are just some of positions, allowing for shooting in tight places, for example. You can easily change the ring's functionality...
... operate the zoom. Highlights of the Camcorder The Canon VIXIA HF G50 4K Camcorder is a setting other SD card when the one onscreen assignable touch button to which stabilizes the image along 5 axes, will let you are looking for. Dual recording is detected, ensuring that important subjects are just some of positions, allowing for shooting in tight places, for example. You can easily change the ring's functionality...
Instruction Manual
Page 5
... the Camcorder 17 Using the Lens Hood 17 Adjusting the LCD Screen 18 Using the Viewfinder 19 Grip Belt and Straps 19 Basic Operation of the Camcorder 21 Turning the Camcorder On and Off 21 Setting the Camera Mode 22 Using the MENU Button and Joystick 22 First Time Settings 23 Setting the Date and Time 23 Changing the Language 24 Changing the Time Zone 24 Using the Menus 25 Setup Menus 25 FUNC Menu 26 Using SD Cards 28 Compatible SD Cards...
... the Camcorder 17 Using the Lens Hood 17 Adjusting the LCD Screen 18 Using the Viewfinder 19 Grip Belt and Straps 19 Basic Operation of the Camcorder 21 Turning the Camcorder On and Off 21 Setting the Camera Mode 22 Using the MENU Button and Joystick 22 First Time Settings 23 Setting the Date and Time 23 Changing the Language 24 Changing the Time Zone 24 Using the Menus 25 Setup Menus 25 FUNC Menu 26 Using SD Cards 28 Compatible SD Cards...

Instruction Manual
Page 6
... Buttons 81 Saving and Loading Menu Settings 83 Saving Camcorder Settings 83 Loading Camcorder Settings 83 5 Playback 84 Basic Playback 84 Playback Controls 86 Adjusting the Volume 87 Displaying Clip Information 87 Clip and Photo Operations 88 Deleting Clips and Photos 88 Trimming Clips 89 6 External Connections 90 Video Output Configuration 90 Connecting to an External Monitor 92 Connection Diagram 92 Using the HDMI OUT Terminal 92 7 Saving Clips 94 Working with Clips on a Computer 94 Copying Clips and Photos Between SD Cards...
... Buttons 81 Saving and Loading Menu Settings 83 Saving Camcorder Settings 83 Loading Camcorder Settings 83 5 Playback 84 Basic Playback 84 Playback Controls 86 Adjusting the Volume 87 Displaying Clip Information 87 Clip and Photo Operations 88 Deleting Clips and Photos 88 Trimming Clips 89 6 External Connections 90 Video Output Configuration 90 Connecting to an External Monitor 92 Connection Diagram 92 Using the HDMI OUT Terminal 92 7 Saving Clips 94 Working with Clips on a Computer 94 Copying Clips and Photos Between SD Cards...
Instruction Manual
Page 7
... data loss or damage to the LCD screen and the viewfinder screen. "Screen" refers to the memory. - Do not open the SD card compartment cover. - Failing to do not disconnect the USB cable. Please read this Manual Thank you for future reference. 1 Introduction Introduction About this Manual About this manual carefully before you use the camcorder and retain it for purchasing the Canon VIXIA HF G50. Do not change the camcorder's camera mode...
... data loss or damage to the LCD screen and the viewfinder screen. "Screen" refers to the memory. - Do not open the SD card compartment cover. - Failing to do not disconnect the USB cable. Please read this Manual Thank you for future reference. 1 Introduction Introduction About this Manual About this manual carefully before you use the camcorder and retain it for purchasing the Canon VIXIA HF G50. Do not change the camcorder's camera mode...

Instruction Manual
Page 32
... time, make test recordings using the video configuration(s) you can manually adjust the focus, exposure and many other settings according to Ñ and the clip will appear with a single recording operation. Lens barrier switch To record video Press the START/STOP button to begin recording. [PHOTO] • During recording, Ü will appear on recording audio, refer to Recording Audio (A 66). 32 Before making important recordings for recording photos. For details on the screen. • The ACCESS indicator will flash from time...
... time, make test recordings using the video configuration(s) you can manually adjust the focus, exposure and many other settings according to Ñ and the clip will appear with a single recording operation. Lens barrier switch To record video Press the START/STOP button to begin recording. [PHOTO] • During recording, Ü will appear on recording audio, refer to Recording Audio (A 66). 32 Before making important recordings for recording photos. For details on the screen. • The ACCESS indicator will flash from time...

Instruction Manual
Page 33
... continue as focus, exposure (aperture, shutter speed and gain) and white balance, depending on the camcorder. • Photos are recorded as separate clips in focus and optimize the exposure. • A video recording will be saved as JPG files. NOTES • You can set > [3 Recording Setup] > [Rec Command] and [HDMI Time Code] to [i On] to use the camcorder's START/STOP button to control also the recording operation of a single clip is off automatically to save power when using a battery pack (A 19...
... continue as focus, exposure (aperture, shutter speed and gain) and white balance, depending on the camcorder. • Photos are recorded as separate clips in focus and optimize the exposure. • A video recording will be saved as JPG files. NOTES • You can set > [3 Recording Setup] > [Rec Command] and [HDMI Time Code] to [i On] to use the camcorder's START/STOP button to control also the recording operation of a single clip is off automatically to save power when using a battery pack (A 19...

Instruction Manual
Page 36
... [j] to [ Rec Run] when slow & fast motion recording is activated, the recording command signal will not be changed automatically to turn off , the time code running mode will deactivate slow & fast motion recording. • While slow & fast motion recording is activated. - Dual recording - Color bars • The maximum continuous recording time of a single clip using slow motion recording is activated. Sound is not recorded when slow & fast motion recording is the equivalent of 6 hours of playback time). Available slow/fast motion rates Resolution...
... [j] to [ Rec Run] when slow & fast motion recording is activated, the recording command signal will not be changed automatically to turn off , the time code running mode will deactivate slow & fast motion recording. • While slow & fast motion recording is activated. - Dual recording - Color bars • The maximum continuous recording time of a single clip using slow motion recording is activated. Sound is not recorded when slow & fast motion recording is the equivalent of 6 hours of playback time). Available slow/fast motion rates Resolution...

Instruction Manual
Page 66
... you can record audio using an external microphone with a foam cover or wind screen is connected to the mini advanced shoe. º will be output along with the microphone. NOTES • To adjust the audio recording level of the DM-100. You can accurately record audio coming directly from the HDMI OUT terminal. Recording Audio Recording Audio The camcorder features 2-channel AAC audio recording and playback. In such cases, using the built-in power microphone 1 Select [MIC Power]. > [¡ " Audio Setup] > [MIC Power] 2 Select...
... you can record audio using an external microphone with a foam cover or wind screen is connected to the mini advanced shoe. º will be output along with the microphone. NOTES • To adjust the audio recording level of the DM-100. You can accurately record audio coming directly from the HDMI OUT terminal. Recording Audio Recording Audio The camcorder features 2-channel AAC audio recording and playback. In such cases, using the built-in power microphone 1 Select [MIC Power]. > [¡ " Audio Setup] > [MIC Power] 2 Select...
Instruction Manual
Page 68
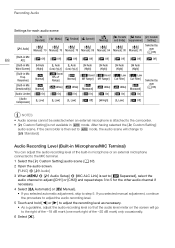
...] [j Off] [j Off] [j Off] [j Off] [j Off] [Built-in Mic [H Auto [L Auto [L Auto [H Auto Wind Screen] (High)] (Low) ë] (Low) ë] (High)] [H Auto (High)] [H Auto (High)] [H Auto (High)] [Built-in microphone or an external microphone connected to the MIC terminal. 1 Select the [„ Custom Setting] audio scene (A 67). 2 Open the audio screen. [FUNC] > [C Audio] 3 When > [C Audio Setup] > [MIC ALC Link] is not available in Microphone/MIC Terminal) You can adjust the audio recording level of the -20 dB mark) only occasionally...
...] [j Off] [j Off] [j Off] [j Off] [j Off] [Built-in Mic [H Auto [L Auto [L Auto [H Auto Wind Screen] (High)] (Low) ë] (Low) ë] (High)] [H Auto (High)] [H Auto (High)] [H Auto (High)] [Built-in microphone or an external microphone connected to the MIC terminal. 1 Select the [„ Custom Setting] audio scene (A 67). 2 Open the audio screen. [FUNC] > [C Audio] 3 When > [C Audio Setup] > [MIC ALC Link] is not available in Microphone/MIC Terminal) You can adjust the audio recording level of the -20 dB mark) only occasionally...

Instruction Manual
Page 69
... all times. screen. Audio Setup] > [Built-in Mic Att.], [MIC Att.] (MIC terminal) or [º Mic Att.] (mini advanced shoe). > [C ! Recording Audio NOTES • When the audio level meter reaches the red point (0 dB), the sound may be distorted. • If the audio level meter display is normal but the sound is distorted, activate the microphone's attenuator with the following procedure. • We recommend using headphones to check the sound level while adjusting the audio recording level or...
... all times. screen. Audio Setup] > [Built-in Mic Att.], [MIC Att.] (MIC terminal) or [º Mic Att.] (mini advanced shoe). > [C ! Recording Audio NOTES • When the audio level meter reaches the red point (0 dB), the sound may be distorted. • If the audio level meter display is normal but the sound is distorted, activate the microphone's attenuator with the following procedure. • We recommend using headphones to check the sound level while adjusting the audio recording level or...

Instruction Manual
Page 85
...) 11 SD card selected for playback (A 84) 12 Data code (A 99) 13 Return the photo index screen 14 Photo jump (A 86) IMPORTANT • You may not be displayed correctly. - NOTES • The following image files may notice brief stops in video or sound playback between clips. Images not recorded with this camcorder. - Images whose file names have been changed. • You can turn off the recording date and time display or change the information displayed with the > [É Playback Setup] > [Data Code] setting.
...) 11 SD card selected for playback (A 84) 12 Data code (A 99) 13 Return the photo index screen 14 Photo jump (A 86) IMPORTANT • You may not be displayed correctly. - NOTES • The following image files may notice brief stops in video or sound playback between clips. Images not recorded with this camcorder. - Images whose file names have been changed. • You can turn off the recording date and time display or change the information displayed with the > [É Playback Setup] > [Data Code] setting.

Instruction Manual
Page 99
...need to use a particular white balance setting frequently. Card A], [7 Mem. You can press an assignable button set to FOCUS). [Focus Ring Response]: Selects the sensitivity of the button will turn the Powered IS function on and off. [Set WB Priority]: Convenient for [Set WB Priority]. 99 [Focus/Zoom Ring Operation]: Selects whether to enable or disable the focus/zoom ring's operation. [Focus Ring Direction]: Changes the direction the focus/zoom ring needs to ZOOM). [É Playback Setup] menu ( mode only) Menu item [¸ Data Code] [{ Data Code] Setting options [j Off], [% Date...
...need to use a particular white balance setting frequently. Card A], [7 Mem. You can press an assignable button set to FOCUS). [Focus Ring Response]: Selects the sensitivity of the button will turn the Powered IS function on and off. [Set WB Priority]: Convenient for [Set WB Priority]. 99 [Focus/Zoom Ring Operation]: Selects whether to enable or disable the focus/zoom ring's operation. [Focus Ring Direction]: Changes the direction the focus/zoom ring needs to ZOOM). [É Playback Setup] menu ( mode only) Menu item [¸ Data Code] [{ Data Code] Setting options [j Off], [% Date...

Instruction Manual
Page 100
...] setting. File numbers appear on a computer. Menu Options Menu item Setting options A [Used Space in folders. Card B] 30 [Rec Command] [i On], [j Off] - 33 100 [HDMI Time Code] [Time Code Mode] [i On], [j Off] [ Preset], [ Regen.] - - - 61 [Time Code Running [ Mode] Rec Run], [ Free Run] - 61 [DF/NDF] [ DF], [ NDF] - 63 [Initial Time Code] 00:00:00.00 to 23:59:59.29, [Reset] - 62 [User Bit Type] [ Setting], [ Time], [ Date...
...] setting. File numbers appear on a computer. Menu Options Menu item Setting options A [Used Space in folders. Card B] 30 [Rec Command] [i On], [j Off] - 33 100 [HDMI Time Code] [Time Code Mode] [i On], [j Off] [ Preset], [ Regen.] - - - 61 [Time Code Running [ Mode] Rec Run], [ Free Run] - 61 [DF/NDF] [ DF], [ NDF] - 63 [Initial Time Code] 00:00:00.00 to 23:59:59.29, [Reset] - 62 [User Bit Type] [ Setting], [ Time], [ Date...

Instruction Manual
Page 110
... screen. - This is depleted. Changing the operating mode between recording (Ü)/record standby (Ñ)/playback (Ð) takes longer than usual. This may seem slightly warped. Save your recordings (A 94) and initialize the card (A 30). After using it continuously for a long time, it may not be able to copy clips/photos recorded or edited using another device and then transferred to an SD card connected to delete clips recorded or edited using another device. Consult a Canon Service...
... screen. - This is depleted. Changing the operating mode between recording (Ü)/record standby (Ñ)/playback (Ð) takes longer than usual. This may seem slightly warped. Save your recordings (A 94) and initialize the card (A 30). After using it continuously for a long time, it may not be able to copy clips/photos recorded or edited using another device and then transferred to an SD card connected to delete clips recorded or edited using another device. Consult a Canon Service...
Instruction Manual
Page 111
...[LCD Backlight] setting. The picture is displayed correctly but [Audio Setup] > [MIC Power] is turned off repeatedly. - Troubleshooting The red POWER/CHG indicator flashes rapidly (one flash at the actual levels. Activate the microphone attenuator (A 69), or adjust the audio recording level manually. Adjust the volume (A 87). - The battery pack is depleted. Alternatively, an external microphone compatible with plug-in mode. Disconnect the receiver and connect it may become distorted or it again after a short time. The battery pack is damaged. Use...
...[LCD Backlight] setting. The picture is displayed correctly but [Audio Setup] > [MIC Power] is turned off repeatedly. - Troubleshooting The red POWER/CHG indicator flashes rapidly (one flash at the actual levels. Activate the microphone attenuator (A 69), or adjust the audio recording level manually. Adjust the volume (A 87). - The battery pack is depleted. Alternatively, an external microphone compatible with plug-in mode. Disconnect the receiver and connect it may become distorted or it again after a short time. The battery pack is damaged. Use...
Instruction Manual
Page 113
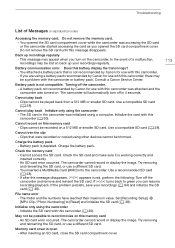
... battery pack. Charge the battery pack - Do not remove the SD card until this battery display the Canon logo? - An SD card error occurred. An SD card error occurred. File name error - This message may be a problem with this camcorder was attached and the camcorder was accessing the SD card or the camcorder started accessing the card as you are using a battery pack recommended by Canon for use with this memory card - Initialize only using the camcorder - Cannot play back - Set [Recording Setup] > [MP4 Clip / Photo Numbering...
... battery pack. Charge the battery pack - Do not remove the SD card until this battery display the Canon logo? - An SD card error occurred. An SD card error occurred. File name error - This message may be a problem with this camcorder was attached and the camcorder was accessing the SD card or the camcorder started accessing the card as you are using a battery pack recommended by Canon for use with this memory card - Initialize only using the camcorder - Cannot play back - Set [Recording Setup] > [MP4 Clip / Photo Numbering...

Instruction Manual
Page 114
... LOCK switch. Task in progress. The camcorder is full. Recording was stopped. Cannot access the SD card. Try using slow & fast motion recording mode, use an SD card that is set to play back. If a dialog box appeared on the SD card to free some space or replace the SD card. Disconnect the USB cable, and restore the connection after a short while. Disconnect the USB cable. - Do not disconnect the power source. - Troubleshooting 114 Memory card is working correctly...
... LOCK switch. Task in progress. The camcorder is full. Recording was stopped. Cannot access the SD card. Try using slow & fast motion recording mode, use an SD card that is set to play back. If a dialog box appeared on the SD card to free some space or replace the SD card. Disconnect the USB cable, and restore the connection after a short while. Disconnect the USB cable. - Do not disconnect the power source. - Troubleshooting 114 Memory card is working correctly...
Instruction Manual
Page 115
... expose the power plug and terminals to dirt or let them to a power outlet during use with circulation problems or less sensitive skin. • Keep the product out of the reach of young children. • Periodically remove any exposed internal parts. • Do not get the product wet. Do not unplug the product by pulling the power cord. - Use batteries/battery packs only...
... expose the power plug and terminals to dirt or let them to a power outlet during use with circulation problems or less sensitive skin. • Keep the product out of the reach of young children. • Periodically remove any exposed internal parts. • Do not get the product wet. Do not unplug the product by pulling the power cord. - Use batteries/battery packs only...

Instruction Manual
Page 128
... battery 118 Built-in microphone 66 C Camera mode switch 22 Charging time 127 Clips Clip information 87 Deleting 88 Playback 84 Recording 32 Recovering 31 Color bars 74 Compact power adapter 14 Condensation 119 Connection to an external monitor 92 Copying recordings to an SD card 95 CUSTOM button 80 CUSTOM dial 80 D Data code 76, 99 Date and time 23 DC IN terminal 14 Deleting recordings 88 Digital tele-converter 53 Dioptric adjustment 19 Dual recording 30 E Error messages...
... battery 118 Built-in microphone 66 C Camera mode switch 22 Charging time 127 Clips Clip information 87 Deleting 88 Playback 84 Recording 32 Recovering 31 Color bars 74 Compact power adapter 14 Condensation 119 Connection to an external monitor 92 Copying recordings to an SD card 95 CUSTOM button 80 CUSTOM dial 80 D Data code 76, 99 Date and time 23 DC IN terminal 14 Deleting recordings 88 Digital tele-converter 53 Dioptric adjustment 19 Dual recording 30 E Error messages...

Instruction Manual
Page 129
... 56 Photos Deleting 88 Recording 32 Viewing 84 Playback 84 Plug-in power (microphone 66 Portrait (Special Scene mode 38 Powered IS 60 Pre-recording 75 R Recording 32 Recording audio 66 Relay recording 30 Remote controller 77 Resetting all camcorder settings 104 Resolution (frame size 35 Reviewing recordings 34 S Saving clips to a computer 94 SD card 117 Compatible SD cards 28 Initializing 30 Inserting/Removing 29 Selecting the SD card for recording . . . .30 Serial number 12 Setup menus 25, 97 Shooting mode 37 Shutter speed 40 Slow & fast motion recording...
... 56 Photos Deleting 88 Recording 32 Viewing 84 Playback 84 Plug-in power (microphone 66 Portrait (Special Scene mode 38 Powered IS 60 Pre-recording 75 R Recording 32 Recording audio 66 Relay recording 30 Remote controller 77 Resetting all camcorder settings 104 Resolution (frame size 35 Reviewing recordings 34 S Saving clips to a computer 94 SD card 117 Compatible SD cards 28 Initializing 30 Inserting/Removing 29 Selecting the SD card for recording . . . .30 Serial number 12 Setup menus 25, 97 Shooting mode 37 Shutter speed 40 Slow & fast motion recording...


